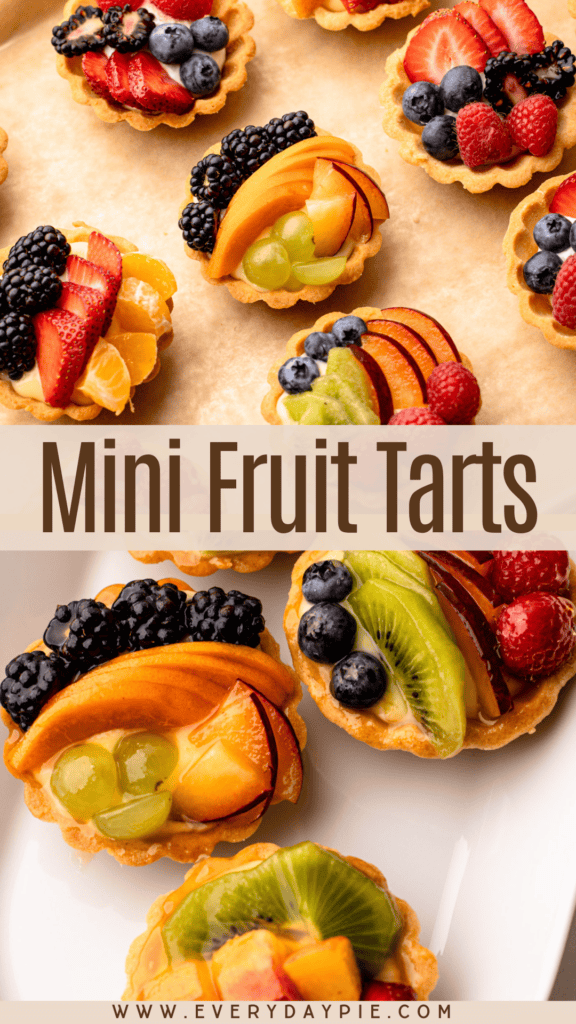
These Mini Fruit Tartlets are the perfect two-bite desserts, featuring mini tart crusts filled with a simple mascarpone cream, topped with fresh fruit, and finished with an optional but beautiful glaze.
Want to save this recipe?
Enter your email & I'll send it to your inbox. Plus, get weekly updates from me!
There is something so adorable about a mini dessert, especially when it's a classic like these Mini Fruit Tarts. It's a two-bite, portable dessert that features all of the tastes and textures you could want: crunchy (thanks to that crisp pastry shell), creamy (thanks to that silky mascarpone whipped cream), and fresh from the juicy fruit on top, perfectly counterbalancing it all.
They look impressive and are surprisingly easy to make, though mini tarts, like mini pies, require a bit more up front work to prepare. However, that extra effort pays off when you can set them out to serve without the need to slice!
Similar to this Classic Fruit Tart recipe, these mini fruit tarts can be made with a variety of berries or a mix of seasonal fruit.
So, let's get to making them, shall we? The article below details all the information you need to know to make these tarts successfully, concluding with the recipe at the end. You can jump around using the menu below or skip to the end of the article for the full recipe.
Jump to:
The Mise en Place
This recipe is basically an assembly of a few delicious components. These mini fruit tarts will need:
- The pastry: This recipe uses a sweet tart dough known as Pâte Sablée. It is sturdy enough to hold up to the heavy tart filling, but delicate enough to have a light, buttery crispness to it. It’s made in a food processor and comes together quickly. It does have nuts in it, though, so if allergies are a concern, it can be swapped with this similar nut-free Pâte Sucrée recipe.
- The mascarpone whipped cream: This is essentially an enriched whipped cream, made with mascarpone cheese. While a traditional Fruit Tart uses pastry cream, I opted for this mascarpone whipped cream to simplify the filling process, especially since these fruit tartlets require a bit more effort to assemble. This whipped cream filling not only saves time but it also has a slightly longer shelf life compared to pastry cream.
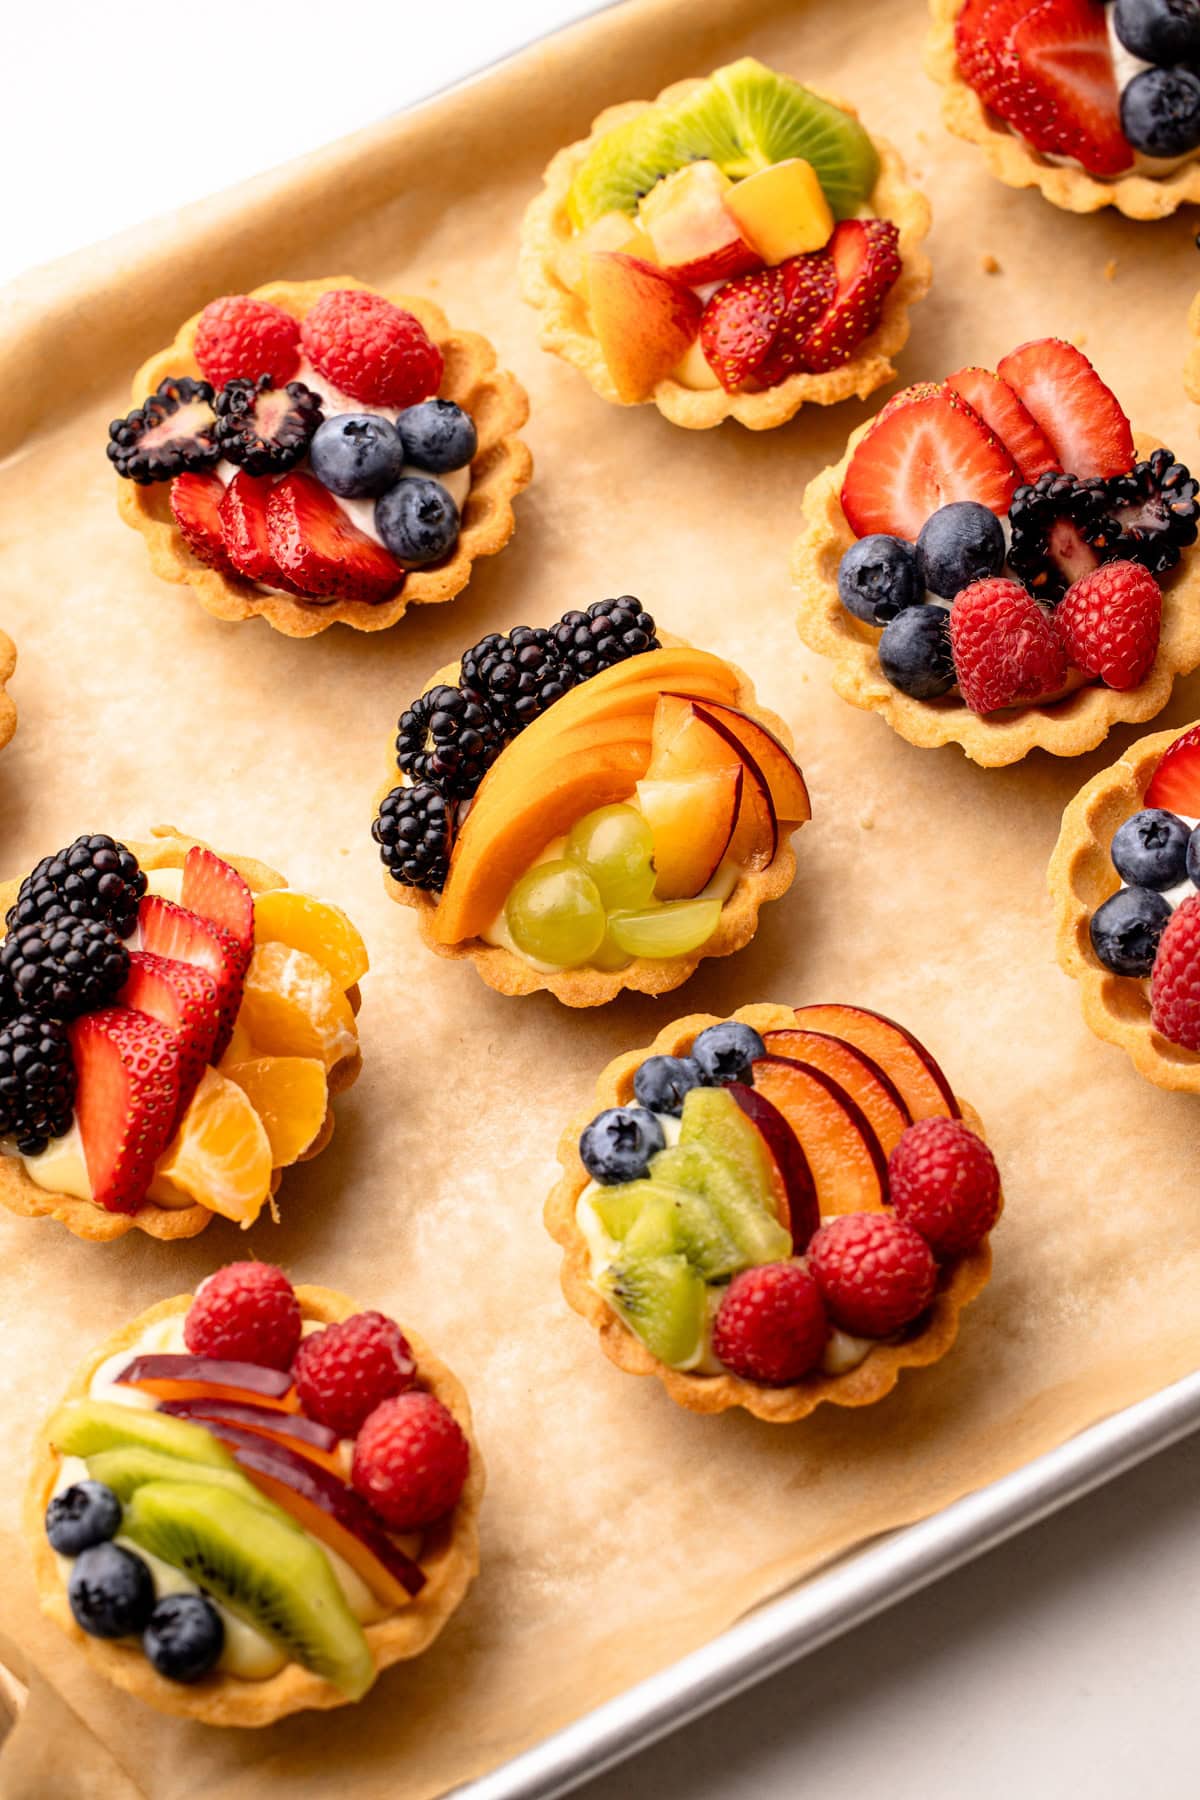
- The fruit: The fruit is the the star of the show here, and you can get as creative or as classic as you like. Berries are a simple choice requiring minimal prep, but the options are endless. Beyond berries, popular choices include kiwi, pineapple, cherries, mango, peaches, and other stone fruits.
- The fruit glaze: This adds a nice shine and helps keep the fruit fresher, but it’s not essential.
Preparing the Mini Tart Shells
These mini tart shells are super delicious, with a rich, sweet flavor and and light, crumbly texture. The recipe is based on this Pâte Sablée; if you are looking for a step-by-step tutorial on how to make it, you can check out that article and recipe.
For these fruit tartlets, you'll need mini tart pans, which can vary drastically in size and shape. For this recipe, I used "Egg Tart Molds” that have a fluted edge, a 3-inch diameter at the top, and about half that on the bottom. With this size, I was able to make 12 tartlets. Your tart mold will likely vary from this size, as the most common size for mini tart pans is a 4-inch diameter. If you don’t have mini tart pans, this recipe can also be baked in a muffin tin!
Here is a visual overview of how to prep the mini tart shells:
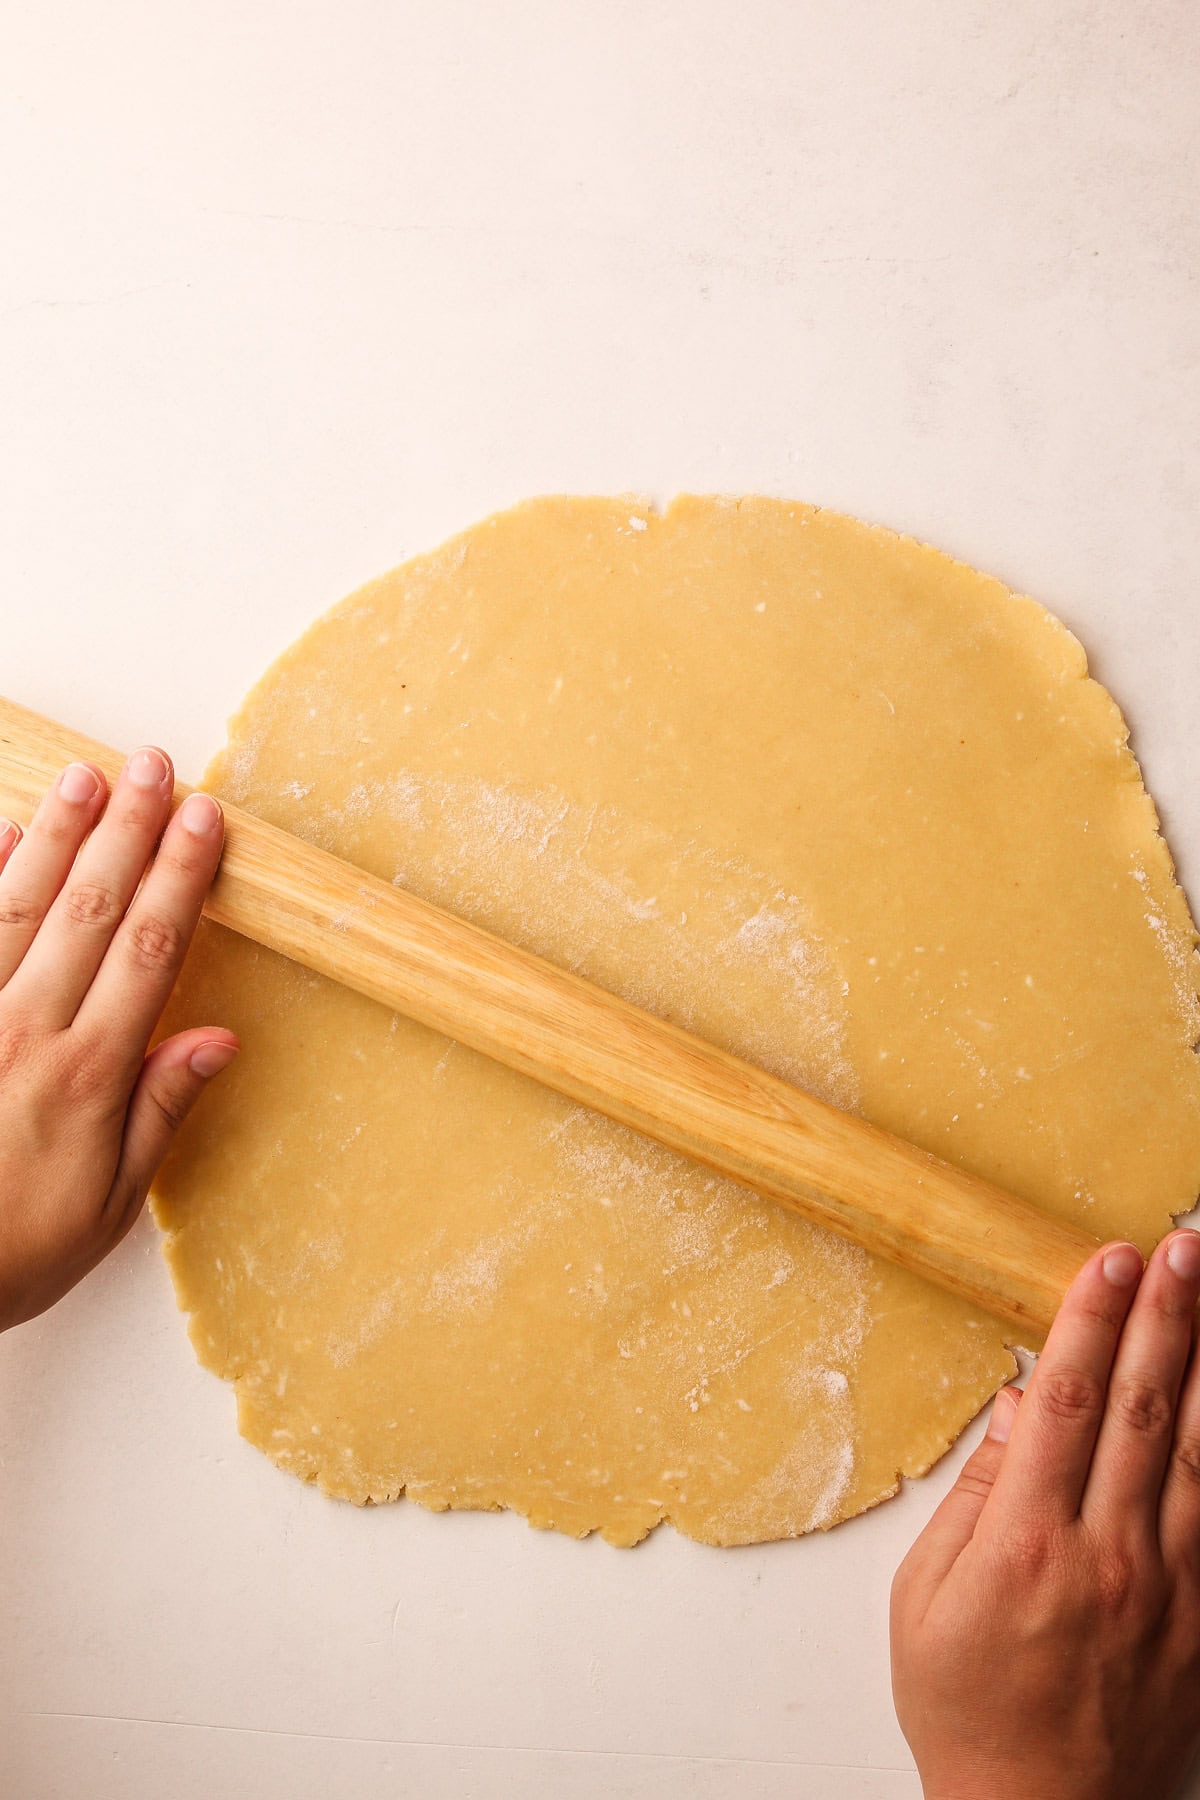
Step 1: Roll out the chilled pastry.
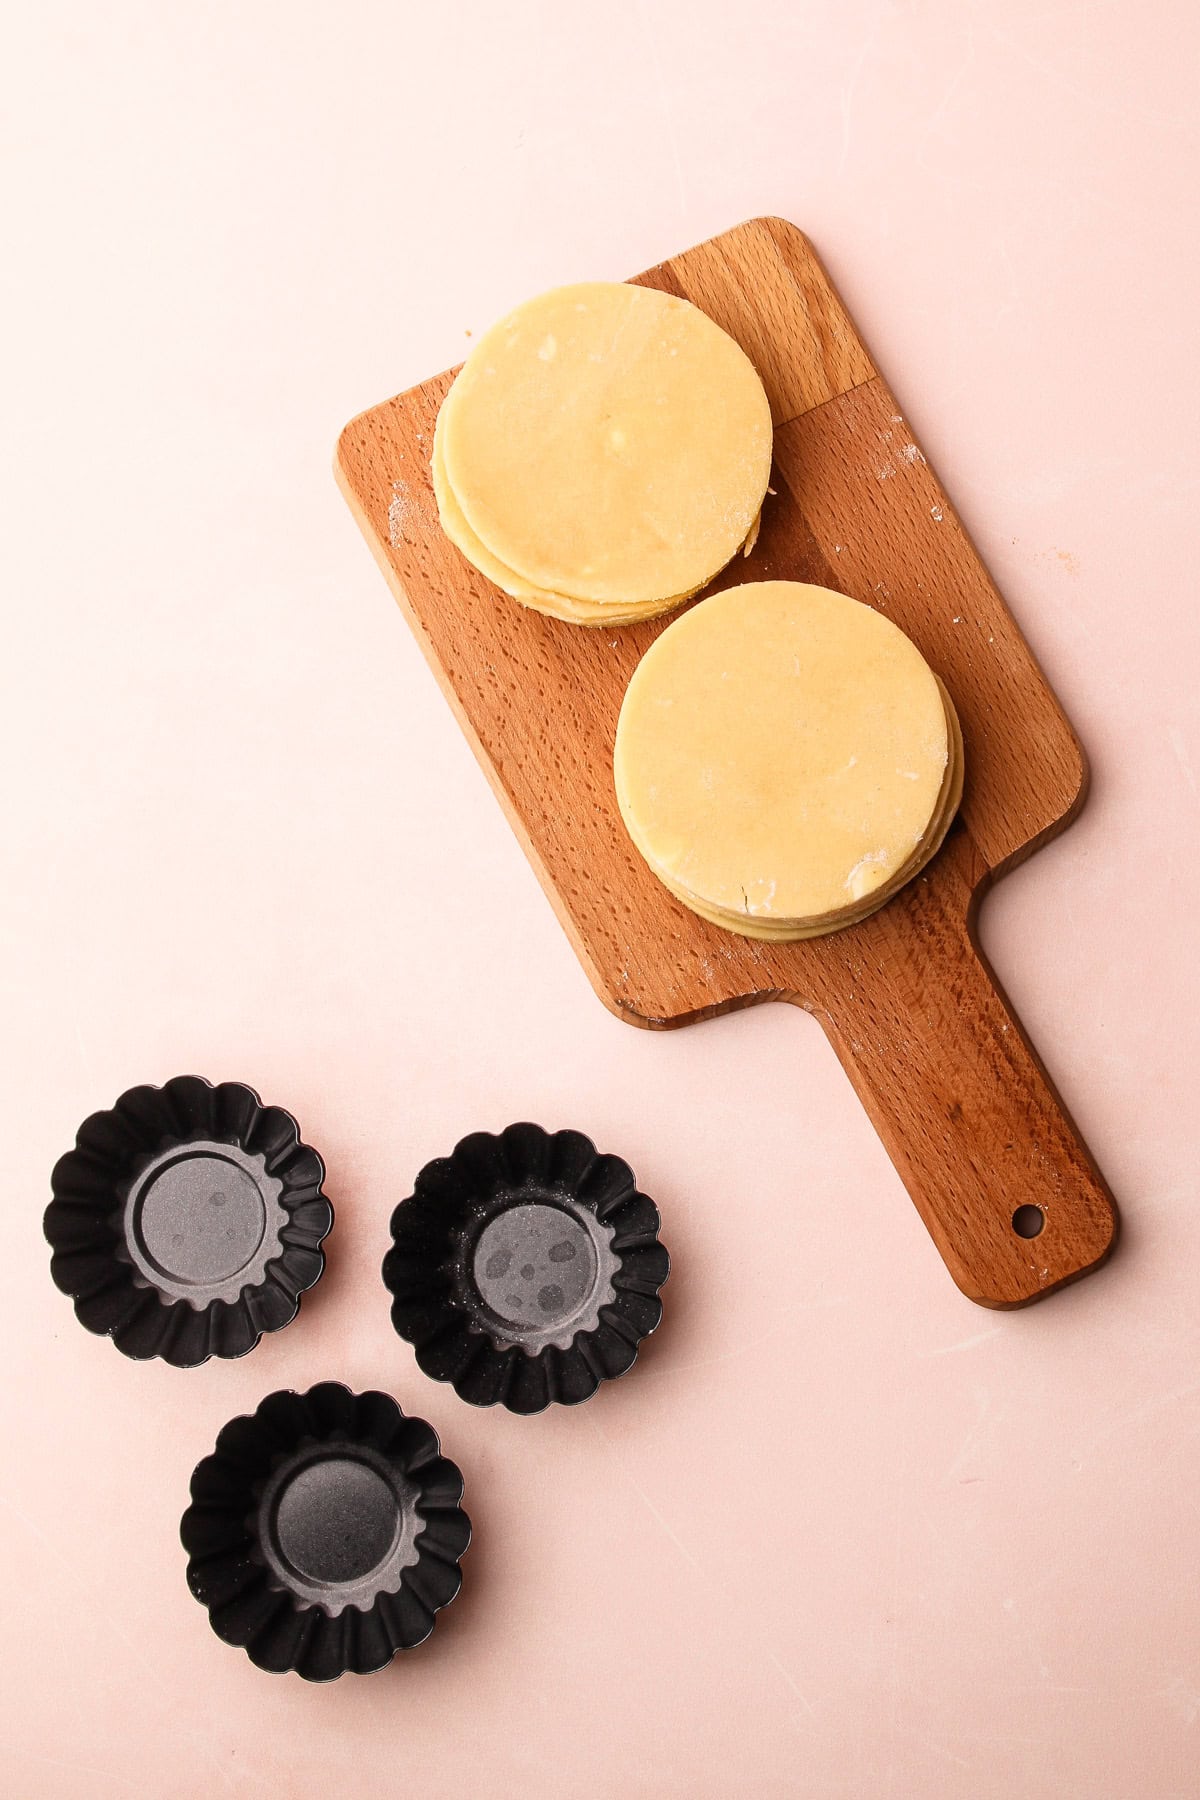
Step 2: Cut out as many rounds as possible using a circle cutter that's 1-½ inches larger than the diameter of your mini tartlet pans.
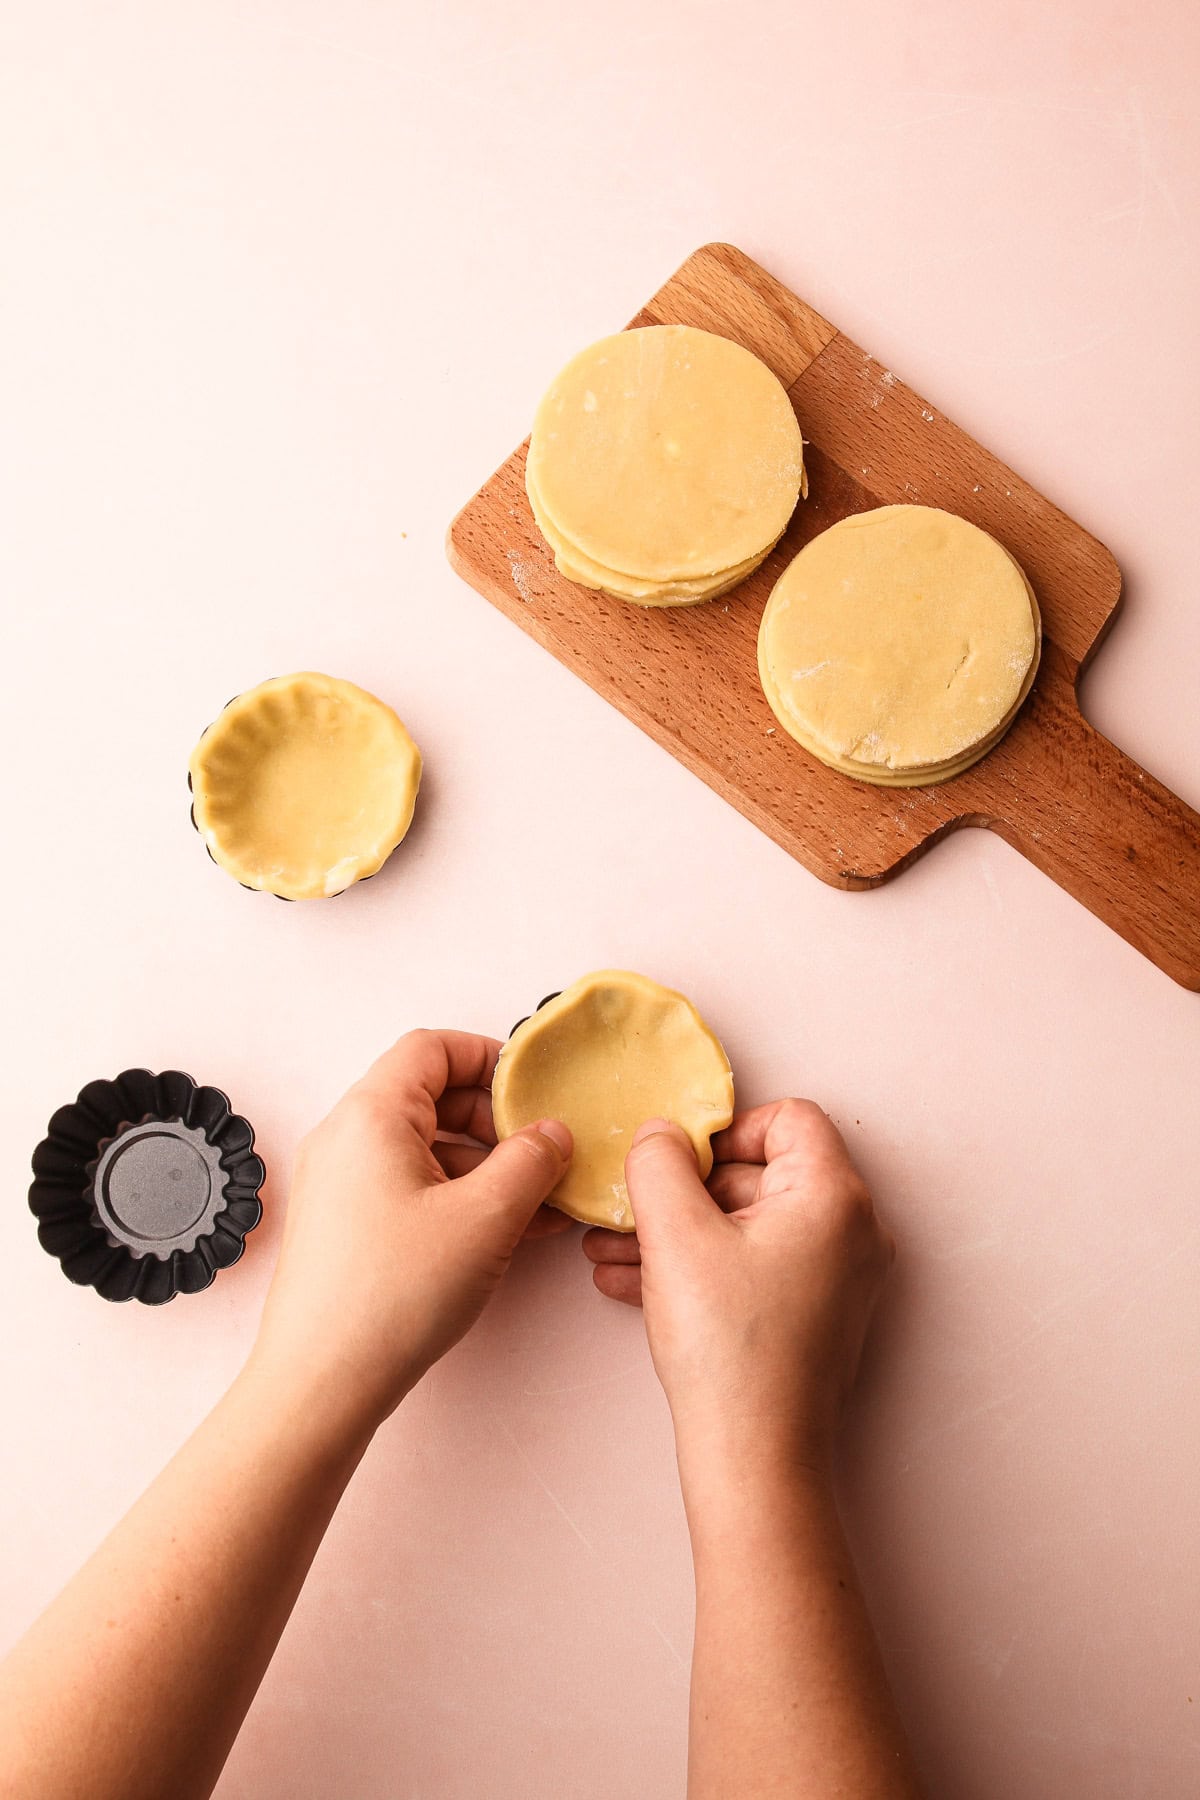
Step 3: Line the tins with the pastry circles, then chill in the refrigerator for 15 minutes.
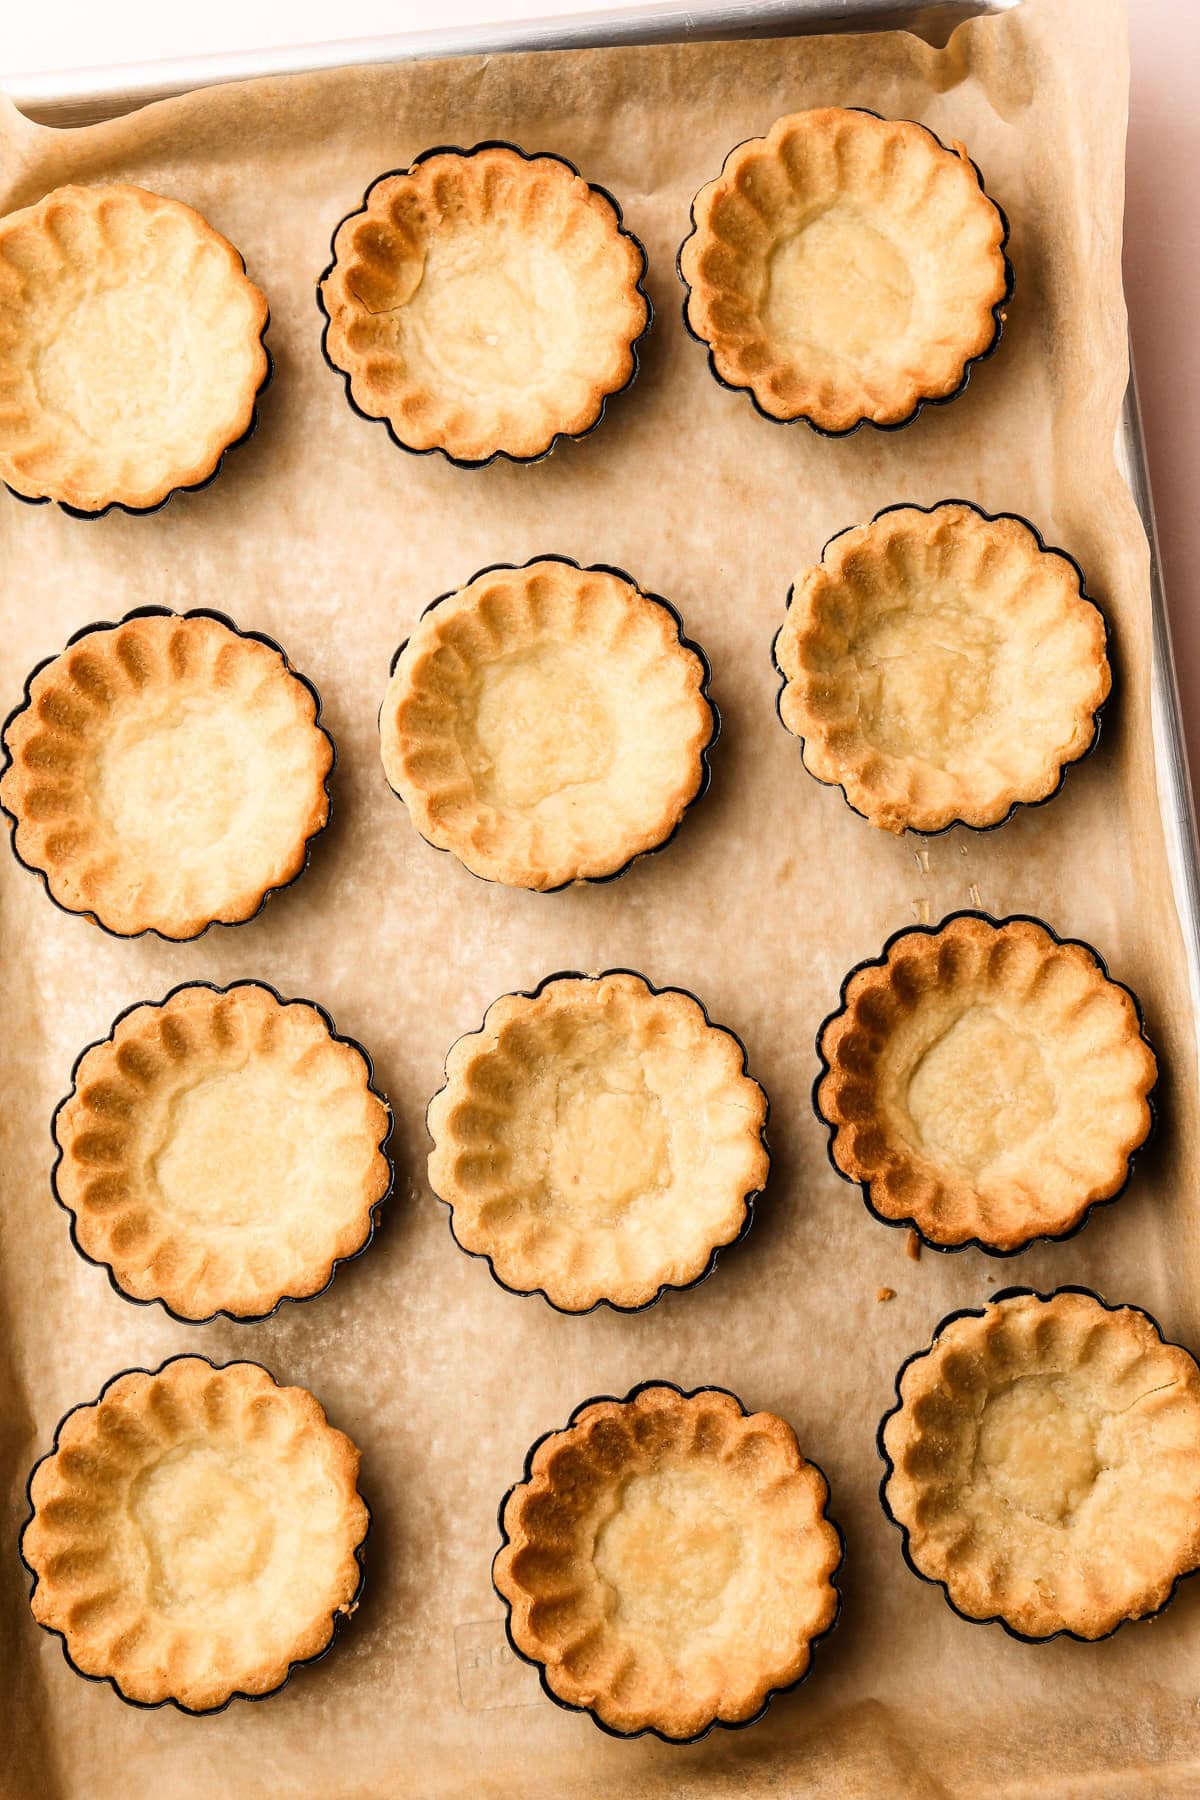
Step 4: Blind bake the tart shells.
New to blind-baking?
Even though these are mini tartlets, the same rules apply for blind-baking as with any pastry. Check out this Guide to Blind Baking for extensive tips and advice on successfully blind-baking pastry.
Assembling
Here is a quick visual guide for assembling the mini fruit tarts!
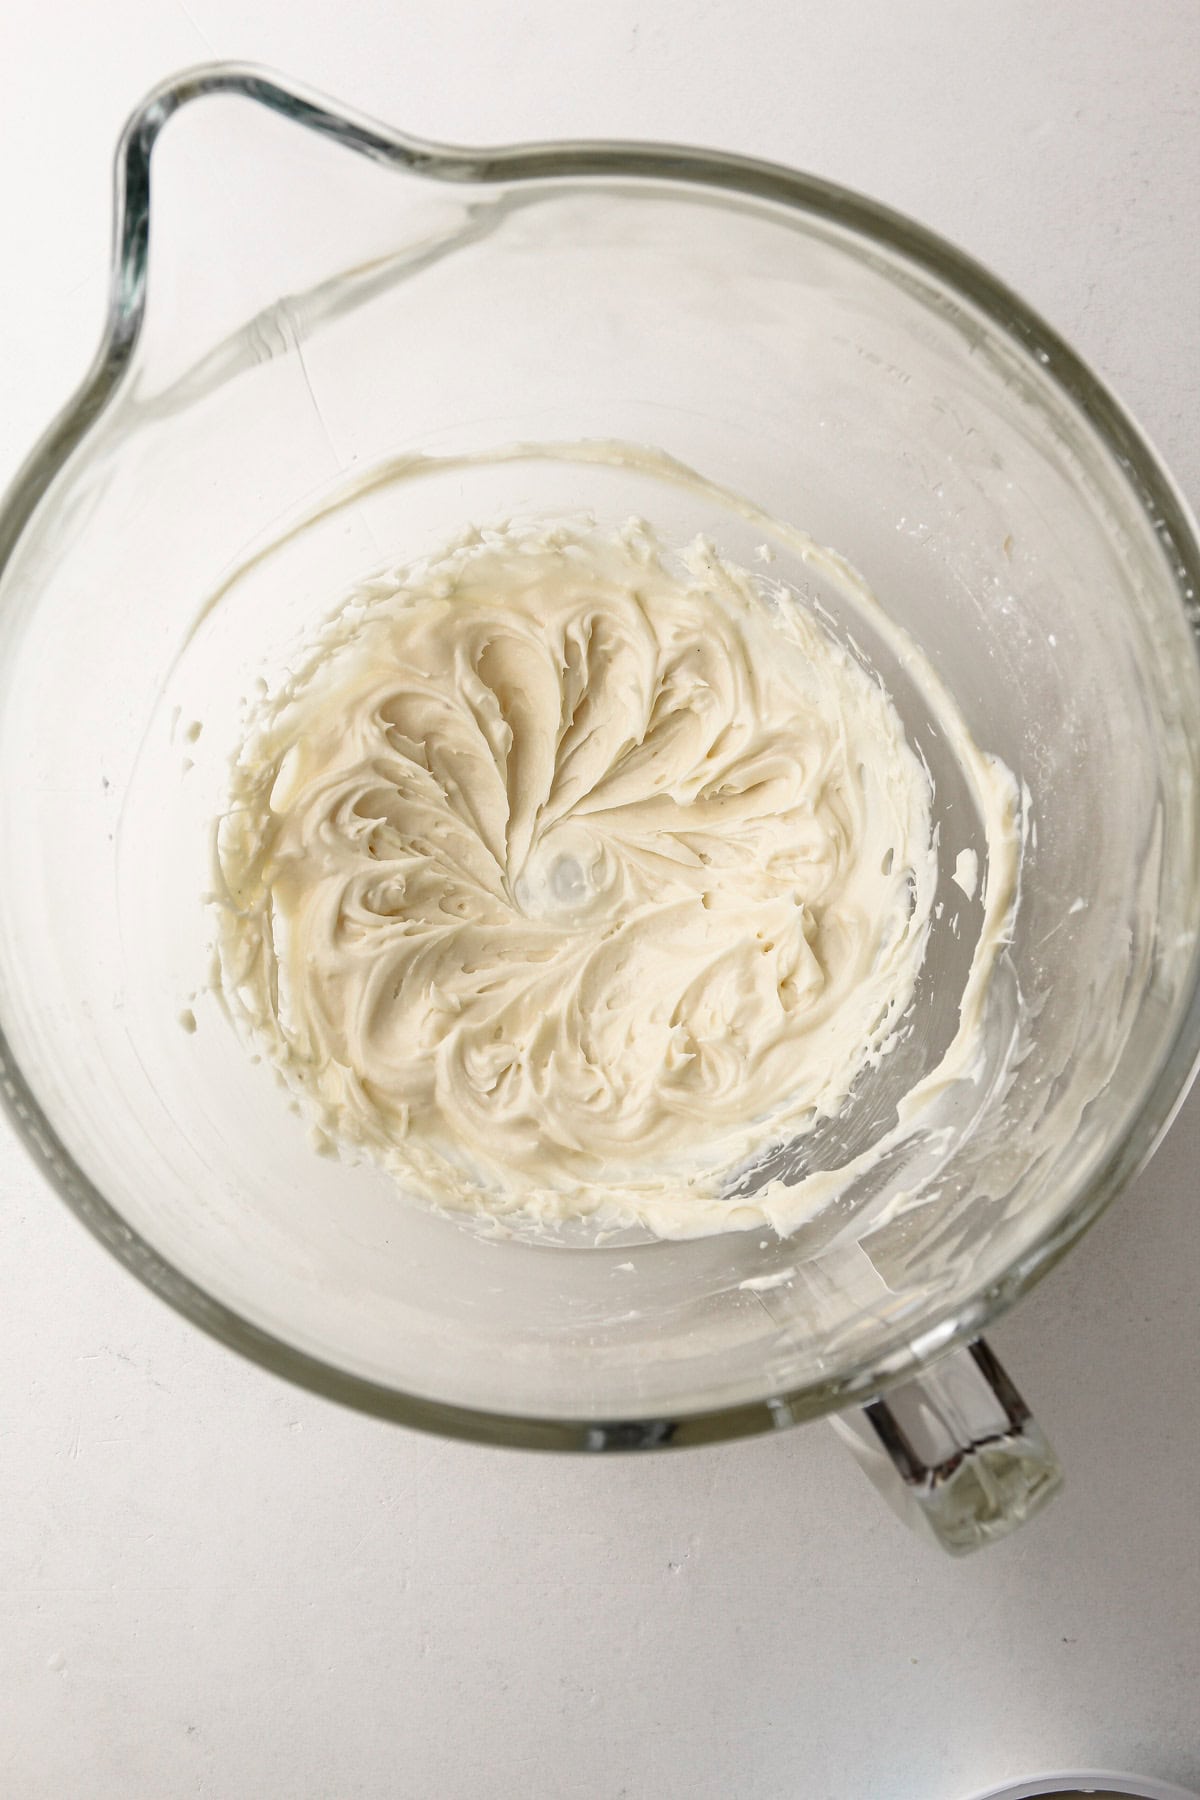
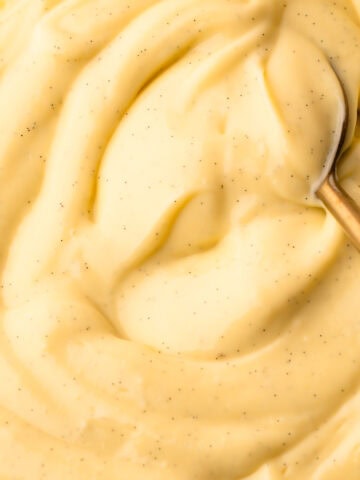
Step 1: Whip the mascarpone, sugar, and vanilla until completely smooth.
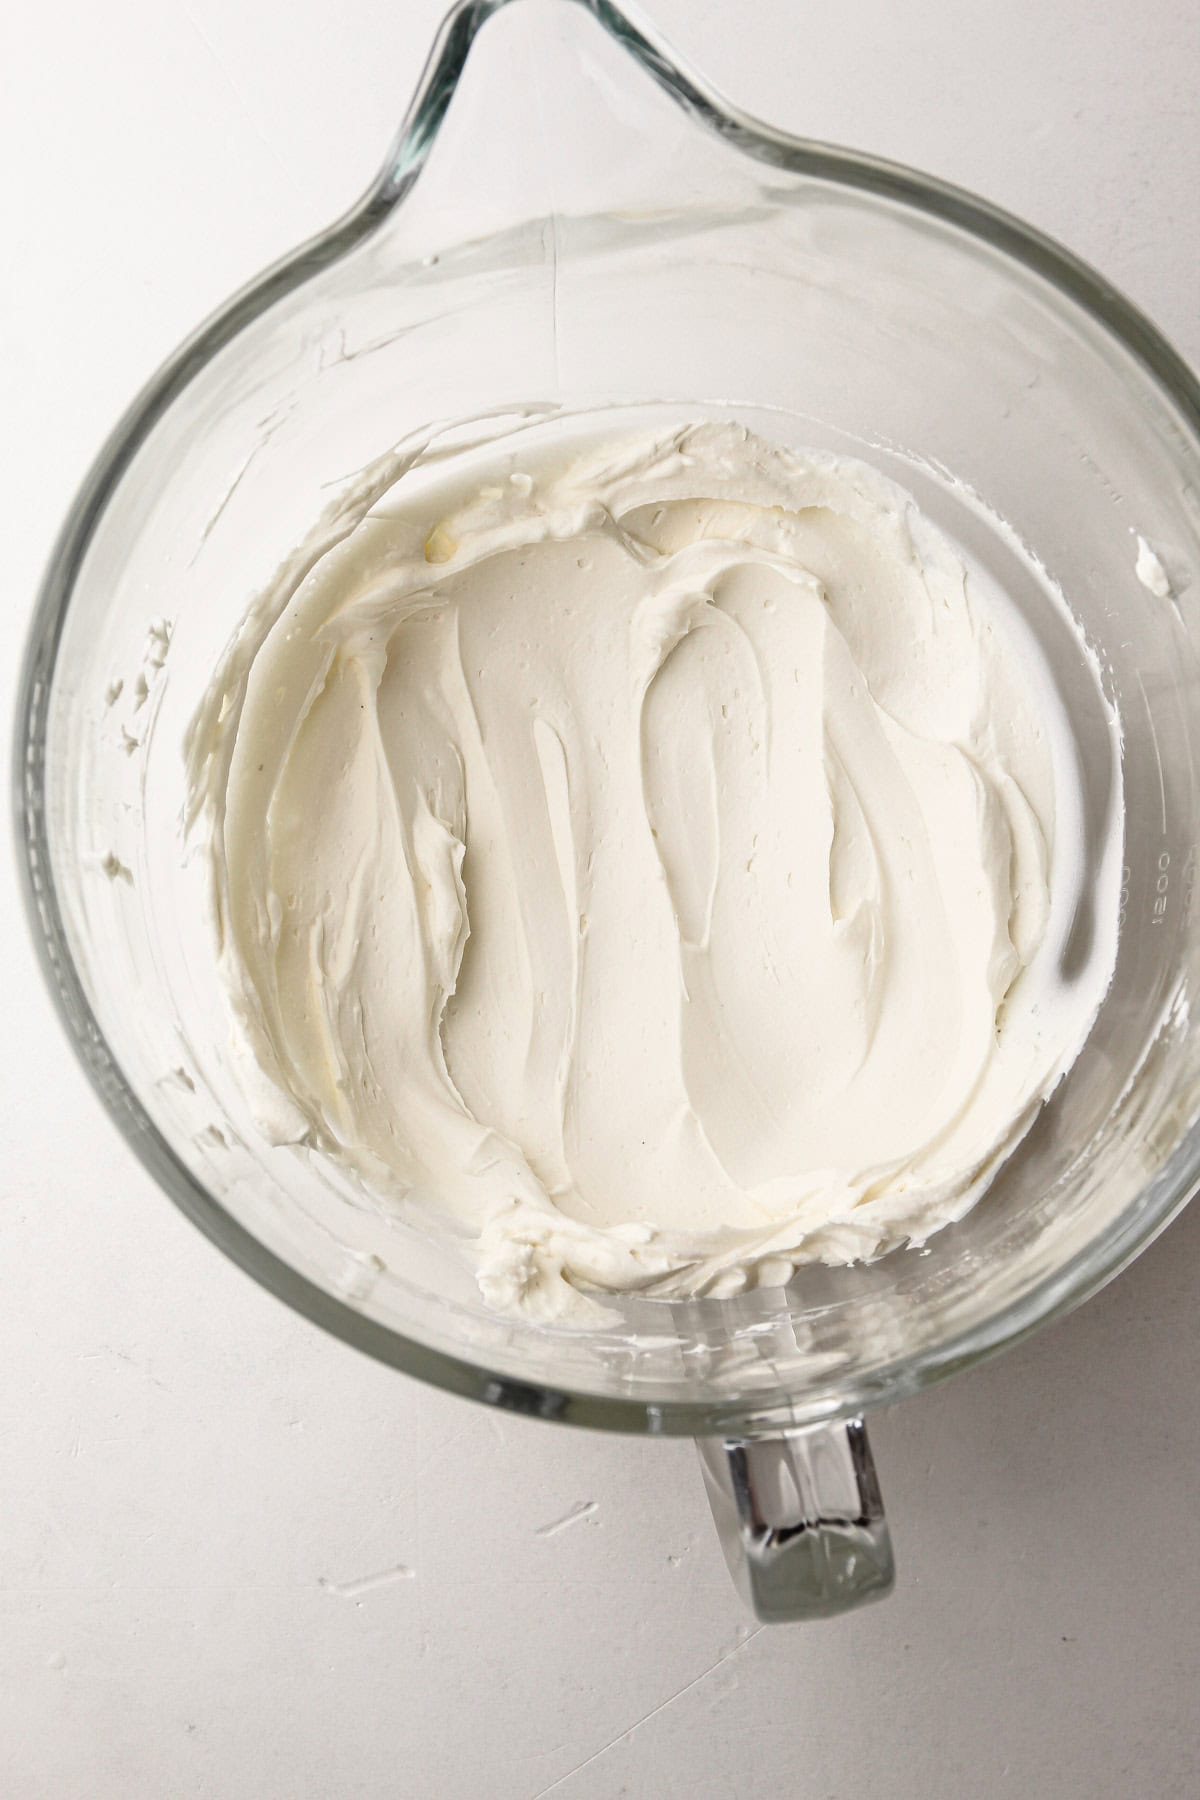
Step 2: Slowly add in the heavy cream, and whip until thickened.
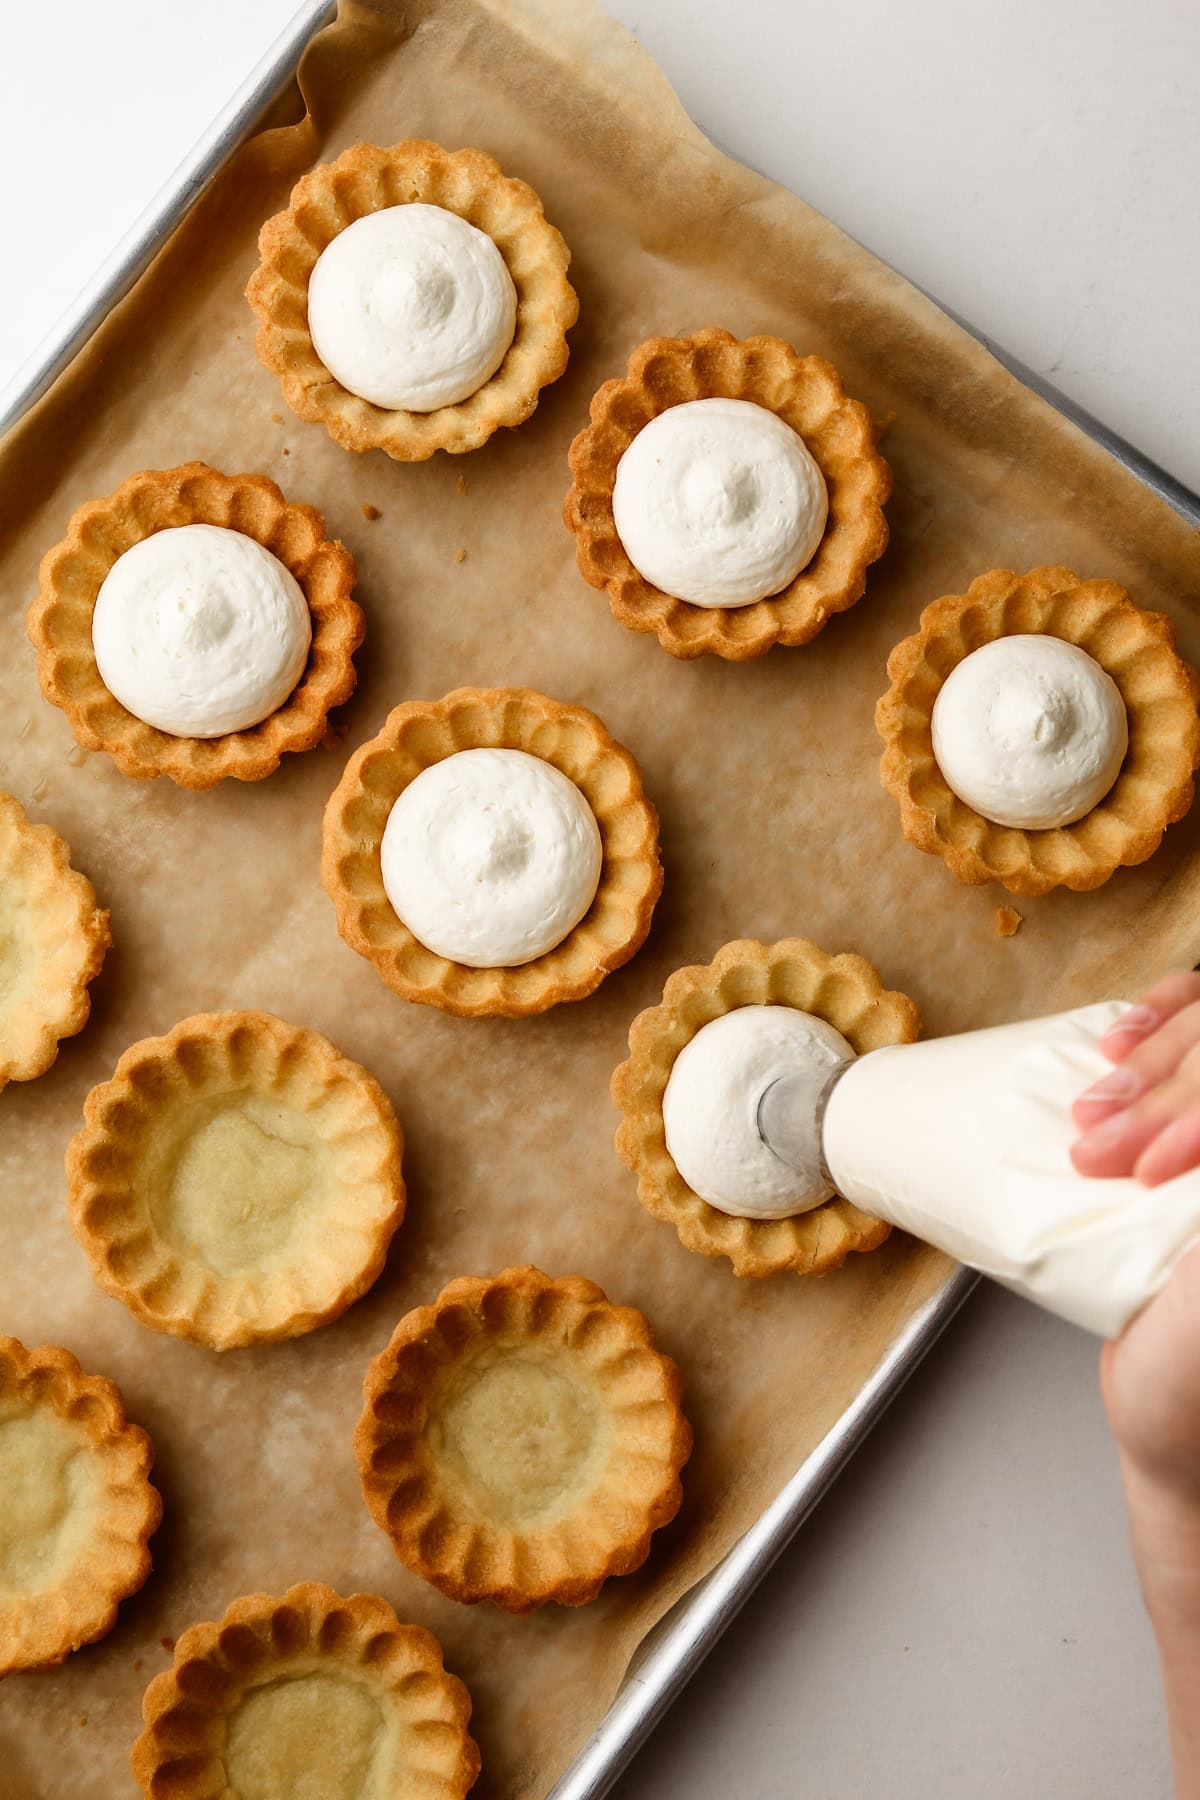
Step 3: Pipe the cream filling into the baked tartlet shells.
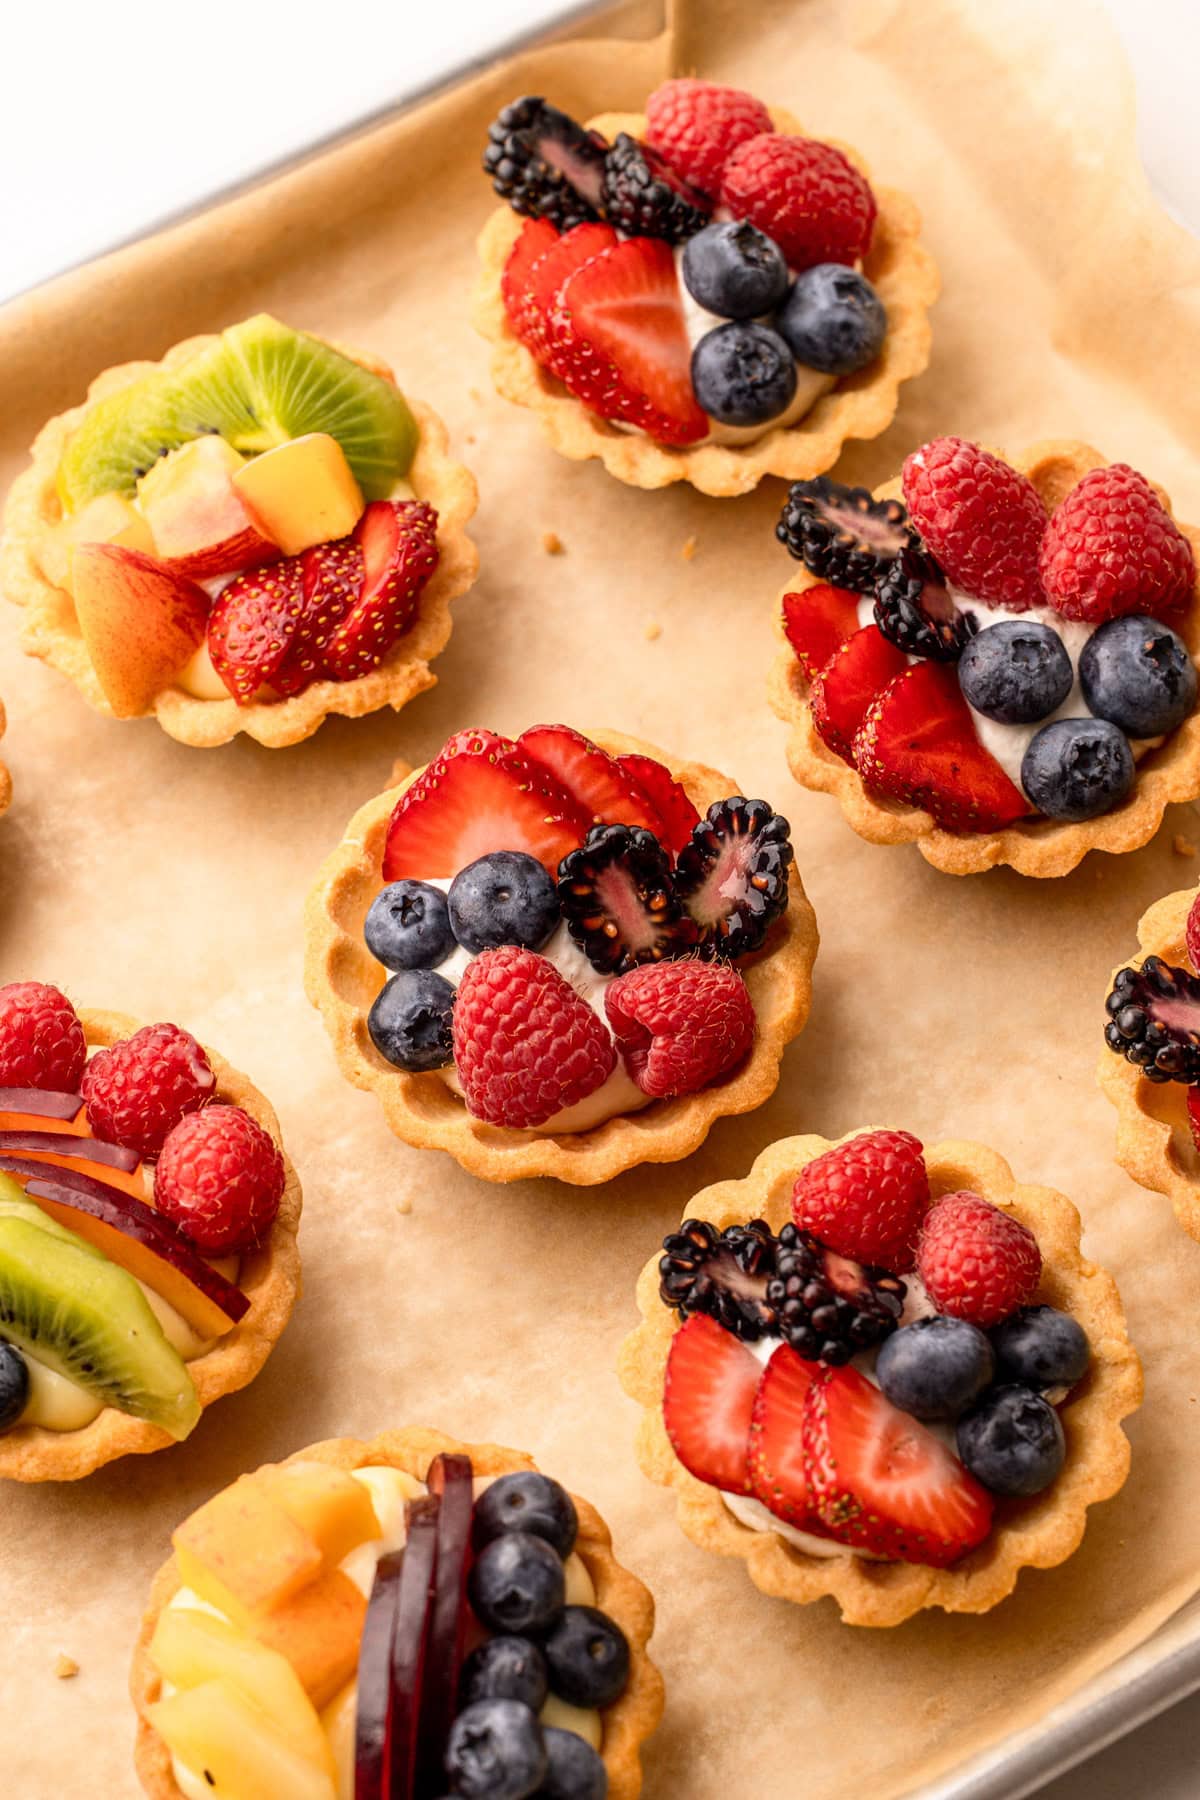
Step 4: Prepare the fruit, making sure it is clean and as dry as possible, then arrange on top of the cream as desired.
To Glaze or Not to Glaze
Glazing the fruit is optional. The glaze helps keep the fruit fresher longer and gives it a nice clean finish and professional appearance. It's made from heated and strained apricot preserves with a bit of water added to make it possible to brush it onto the fruit.
However, perfect in-season fruit needs no garnish to make it beautiful, so if your fruit looks great, go ahead and leave it bare.
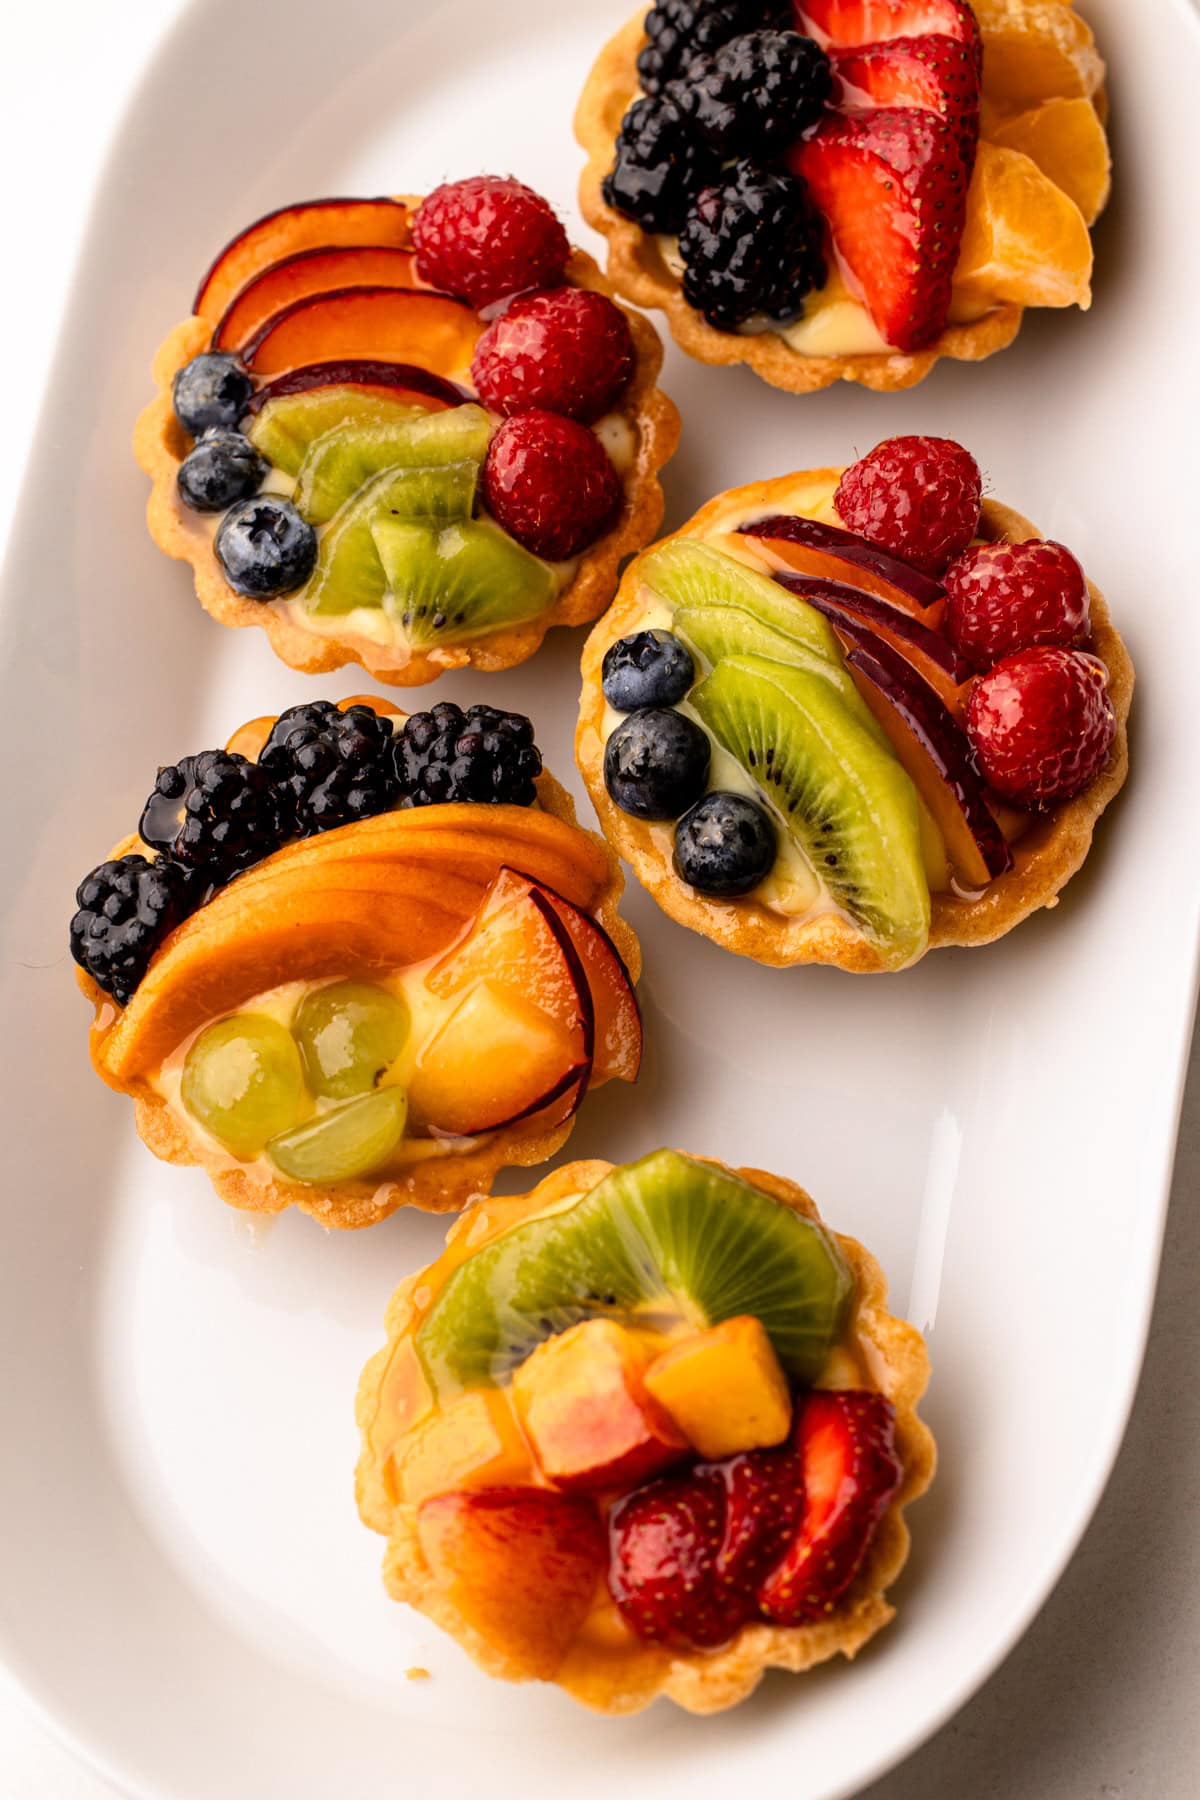
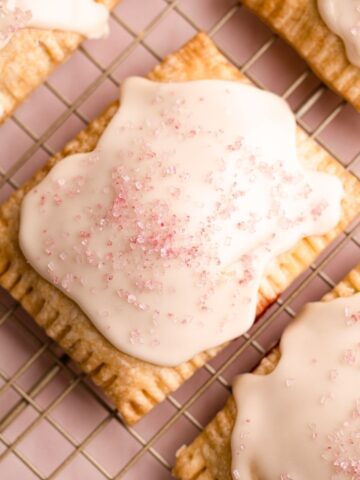
Mini fruit tarts made with an assortment of fruit with an apricot glaze.
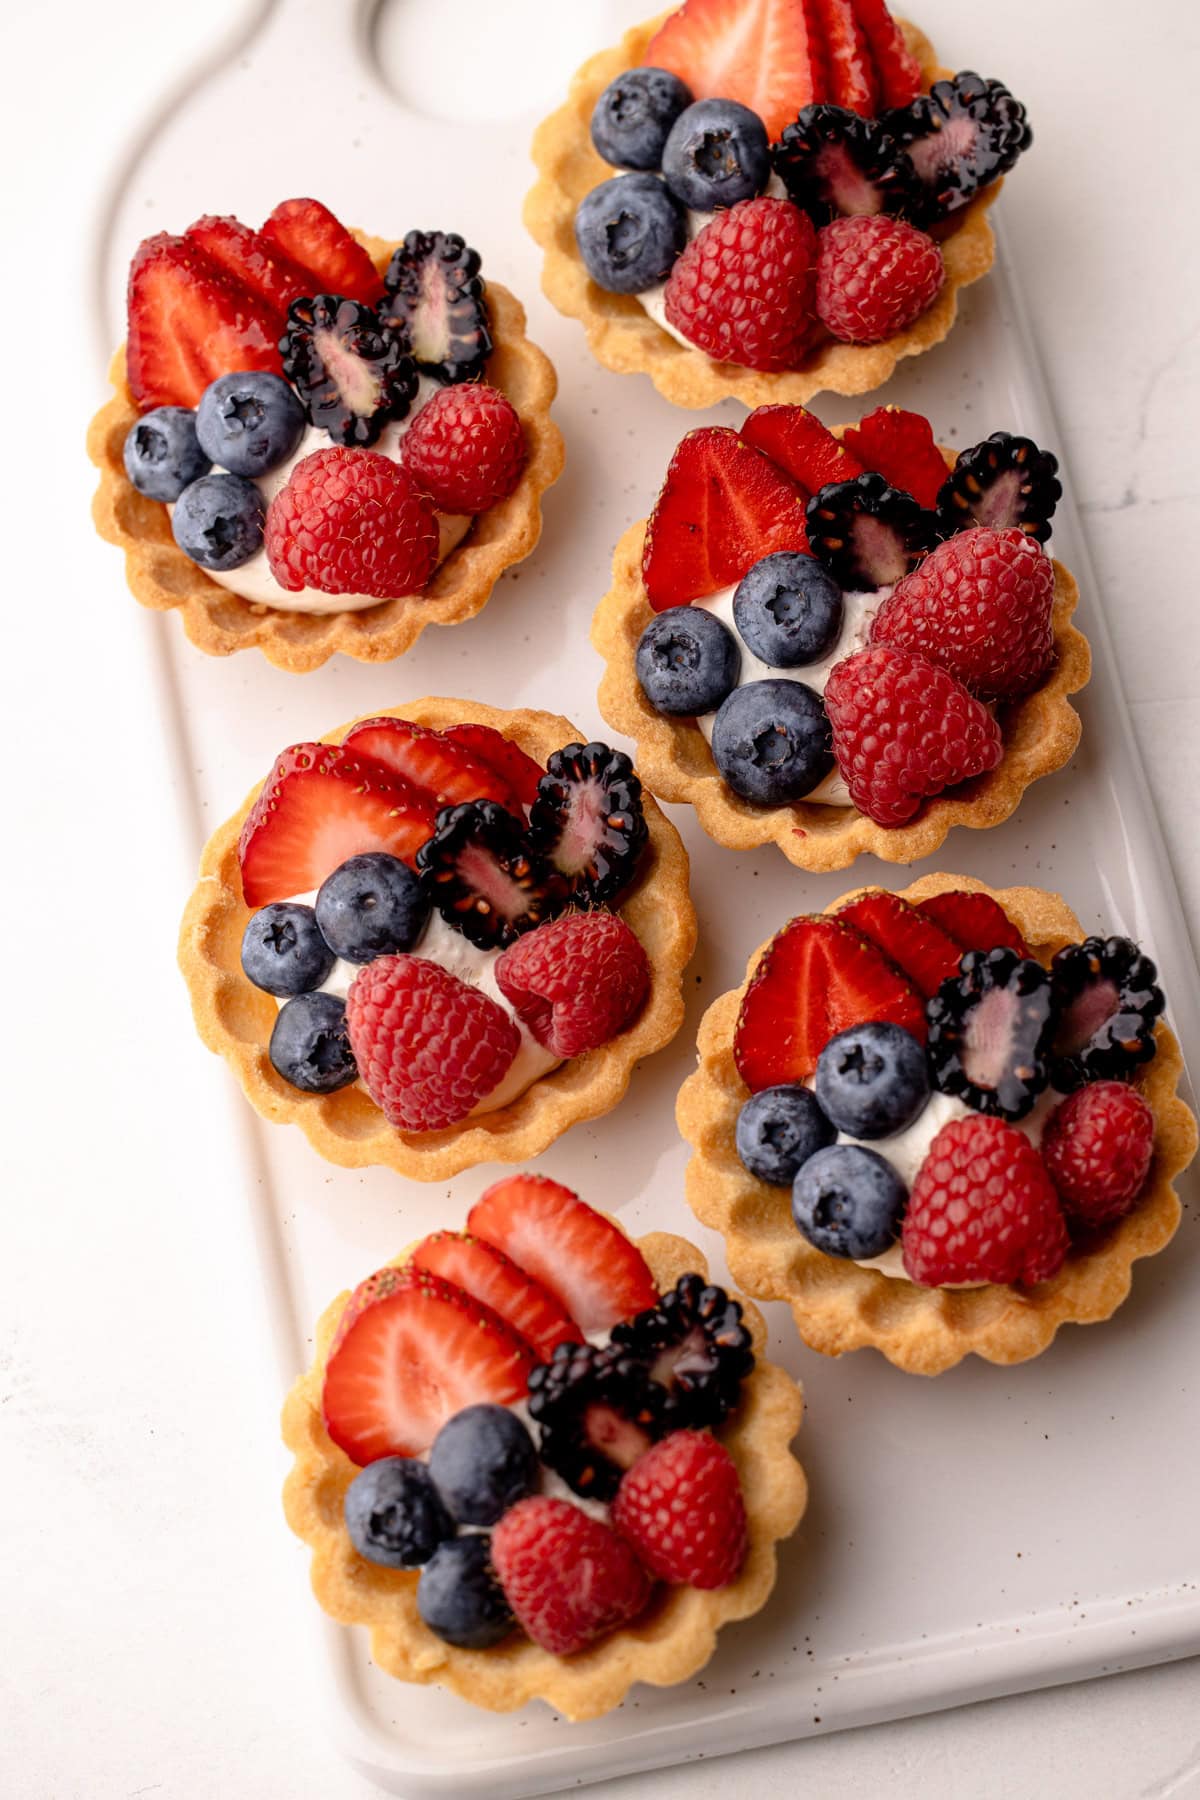
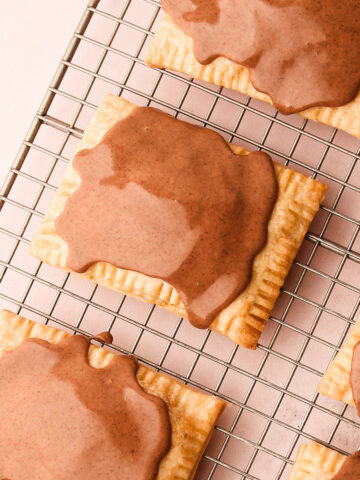
Mini fruit tarts made with berries without a glaze.
Serving + Storing
Once the fruit tarts are assembled, they can be served immediately or chilled for up to 1 day. Although they’re best when enjoyed right away, if the fruit is in great shape, particularly if it is left whole rather than sliced, the tarts should hold for about a day.
The pastry dough can be made up to 2 days in advance, and the mascarpone whipped cream filling can be made a day ahead.
More Fruit Recipes
- Best Fruit Pie Recipes
- Cherry and Strawberry Slab Pie
- Strawberry Rhubarb Crisp
- Blueberry Icebox Cake
- Very Cherry Ice Cream
More Pastry Recipes

I am so honored when you make a recipe from my site! If you make this Mini Fruit Tarts recipe, please leave a star ⭐️⭐️⭐️⭐️⭐️ rating with your experience! If you have any questions about this recipe, feel free to comment here, and tag me on Instagram!
Full Recipe
Mini Fruit Tartlets

These Mini Fruit Tartlets are the perfect two-bite desserts, featuring mini tart crusts filled with a simple mascarpone cream, topped with fresh fruit, and finished with an optional but beautiful glaze.
- Prep Time: 00:35
- Cook Time: 00:20
- Total Time: 55 minutes
- Yield: About 12 Tarts
- Category: Dessert
Ingredients
For Pastry:
- 1 cup (120 grams) all-purpose flour, more for work surface
- ½ cup (50 grams) almond flour
- ⅓ cup (40 grams) powdered sugar
- ½ teaspoon coarse kosher salt
- 8 tablespoons (110 grams) unsalted butter, softened
- 1 large egg, beaten
For Mascarpone Cream:
- 4 tablespoons (4 ounces) mascarpone cheese
- ½ cup (60 grams) powdered sugar
- 2 teaspoons vanilla extract
- 1 cup (226 grams) heavy cream
To Assemble:
- ¼ cup apricot preserves
- 1-2 tablespoons water
- Assorted fresh fruit, washed, completely dried, and sliced if desired
Instructions
Make and Bake the Mini Tart Shells:
- Add the flour, almond flour, powdered sugar, and salt to the bowl of a food processor and pulse until combined. Add in the softened butter and pulse 5 to 7 times, or until the butter is broken down into tiny pebbles.
- With the motor running, add in the egg and let the dough process until it forms a cohesive ball around the blade, about 1 minute.
- Remove the tart pastry from the processor, wrap it in plastic wrap, then chill for a minimum of 30 minutes or up to two days.
- Roll out the chilled pastry on a lightly floured work surface to ⅛ to ¼-inch thickness. Using a circle cutter 1-½ inches larger than the diameter of your mini tartlet pans, cut out rounds of dough. (See note about mini tart pans.)
- Line the mini tartlet pans with the circles of pastry, taking care to press the pastry into the sides and the bottoms of each tin. Chill the mini tart shells in the refrigerator for 15 minutes.
- Meanwhile, preheat the oven to 375ºF and place an oven rack in the lower-middle part of the oven.
- Once chilled, line each tart shell with a small, round piece of parchment paper or a muffin liner. Fill each tart shell with pie weights (I recommend dry rice or beans or lentils), making sure to push the pie weights to the edges.
- Bake the tart shells for 12 minutes, then remove from the oven and carefully remove the parchment and pie weights. Return the shells to the oven and bake for an additional 5-8 minutes, or until the pastry is fully cooked through. Transfer to a wire rack to cool completely until ready to use. This can be done up to one day ahead of time.
Make the Mascarpone Cream:
- Using an electric mixer fitted with the whisk attachment, whip the mascarpone, powdered sugar, and vanilla extract on medium speed until completely smooth, about 2 minutes, scraping down the sides of the bowl with a rubber spatula halfway through.
- With the mixer running, slowly add in the cream. Once added, stop and scrape down the sides of the bowl to ensure no mascarpone is stuck to the bottom of the bowl. Whip on medium speed until the cream is thickened to stiff peaks.
- For easy assembly, transfer the cream to a piping bag (this is optional).
Assemble:
- Pipe the cream into the baked tart shells (or use a scoop).
- Place the fresh fruit on top of the cream, arranging as desired.
- In a small pot, combine the apricot preserves and 1 tablespoon of water. Cook over low heat until melted, 2 to 3 minutes. Strain the mixture through a fine-mesh strainer into a small bowl. Set aside any preserves left in the strainer for another use. If the mixture is very thick, add additional water, 1 tablespoon at a time, until it’s the viscosity of heavy cream.
- Using a pastry brush, brush a light coating of the apricot glaze onto the fruit.
- Refrigerate the tarts until ready to serve. Serve within 1 day.
Notes
This recipe was tested using Diamond Crystal coarse kosher salt. If you use Morton's kosher salt or fine salt, decrease the volume by half. Check out this Salt Guide for further information on this subject.
Mini tart pans vary greatly in size and shape. For this recipe, I used 3-inch fluted “Egg Tart Molds,” which yielded 12 tarts. A common alternative are 4-inch tart pans, which would result in fewer tarts overall. If you don't have mini tart pans, you can bake the tarts in a muffin tin or make a full-sized tart using this linked recipe. If you have more than 12 mini tart pans, you can use them for blind baking by placing one inside each pastry shell and filling them with pie weights instead of using parchment or muffin liners.
Use only best-quality berries that are NOT overly ripe for these tarts. Overly ripe fruit is never a good idea on pastry desserts.
Make sure your fruit is as dry as possible! It's important to wash fruit, of course. But make sure to drain and then dry the fruit on paper towels to absorb any excess liquid. Introducing excess liquid will compromise the structure of the tarts.
The glaze should be slightly warm when you are glazing your fruit, so if it cools down, gently heat it up again. If it gets too thick, add in more water.
Some of the links on this page may be affiliate links. Everyday Pie is a participant in the Amazon Associates Program. As an Amazon Associate I earn from qualifying purchases, at no extra cost to you.
Emily willcut
Kelly!! This is the absolute best tart I’ve ever made or eaten!! The crust is perfect and has a great bite to it! The filling is out of this world. I had two without the fruit because I couldn’t wait to get it in my mouth. Once I garnished the rest with the fruit that were so beautiful. 10 out of 10! Now I gotta go have another for breakfast. 🙂🙂🙂🙂 highly recommend this recipe