

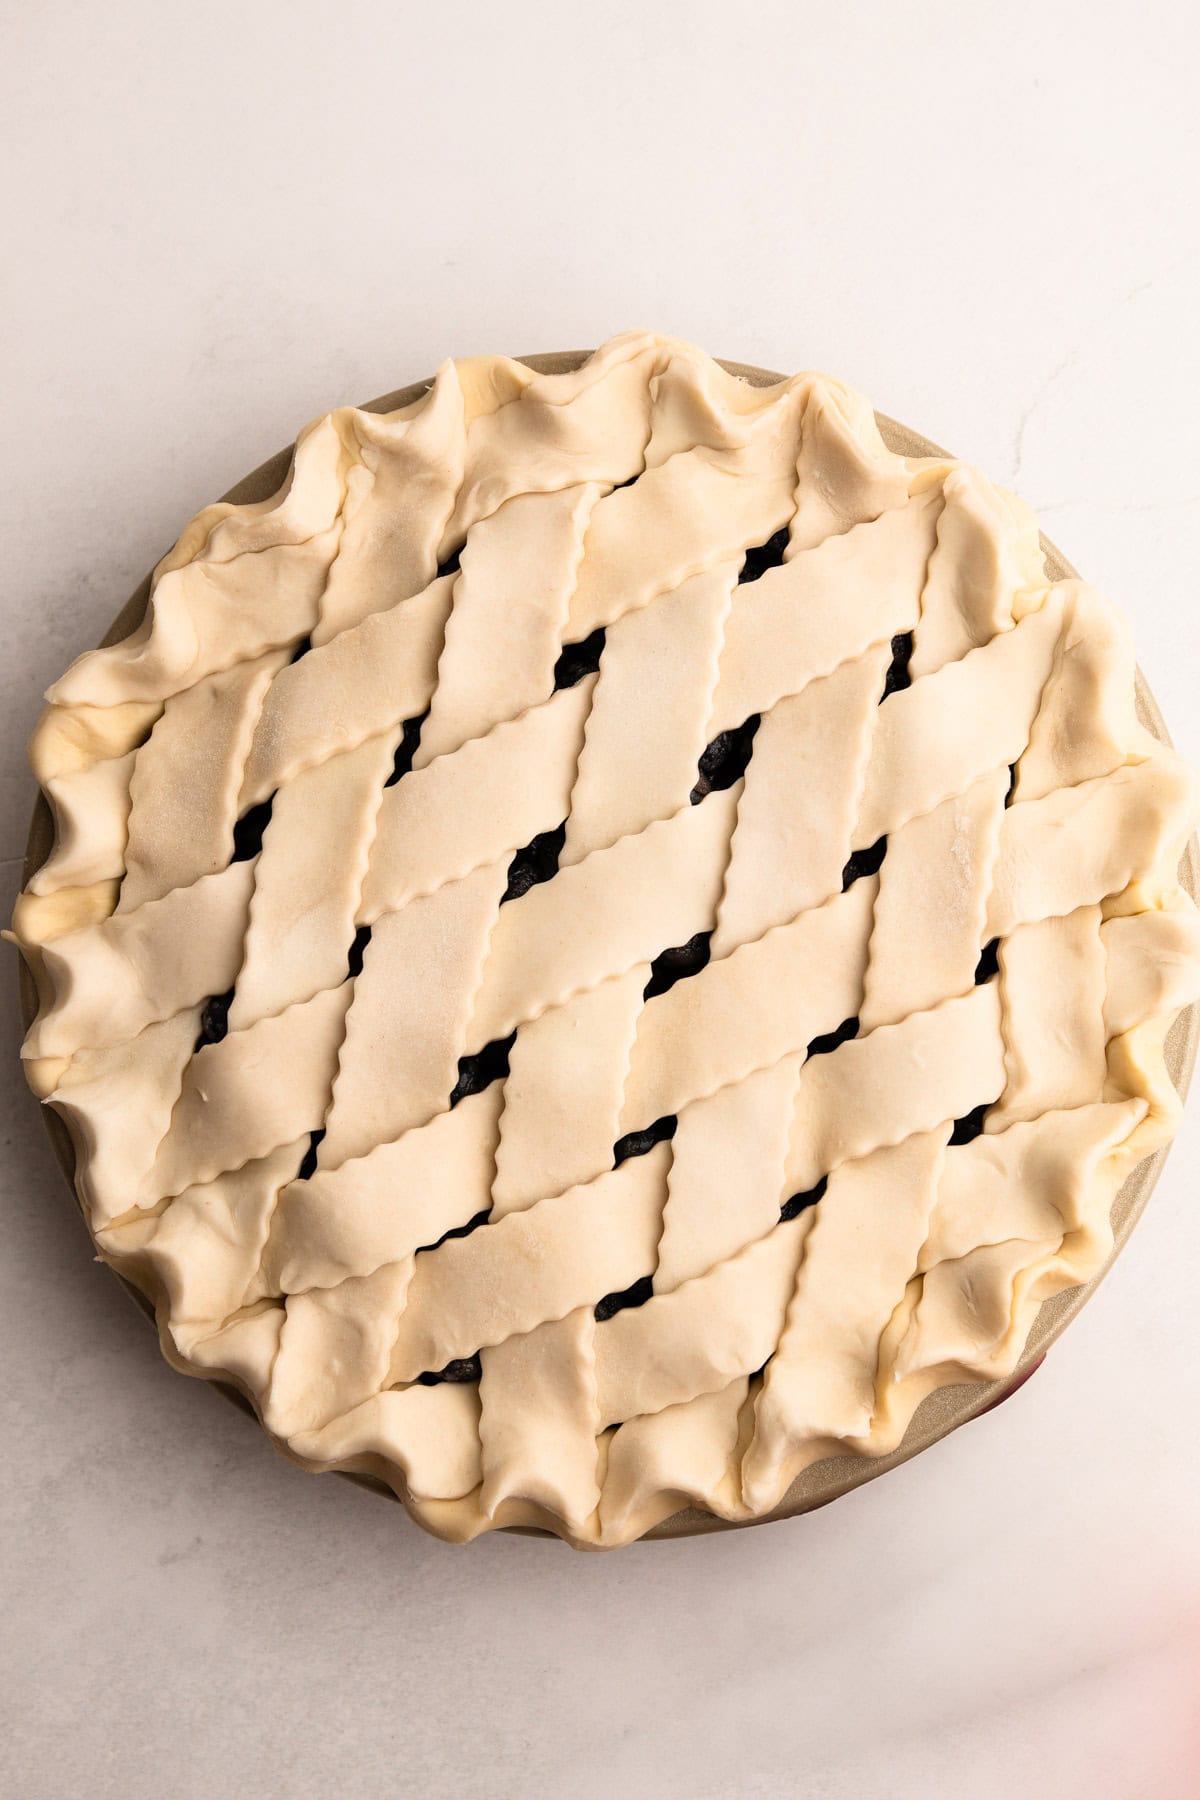
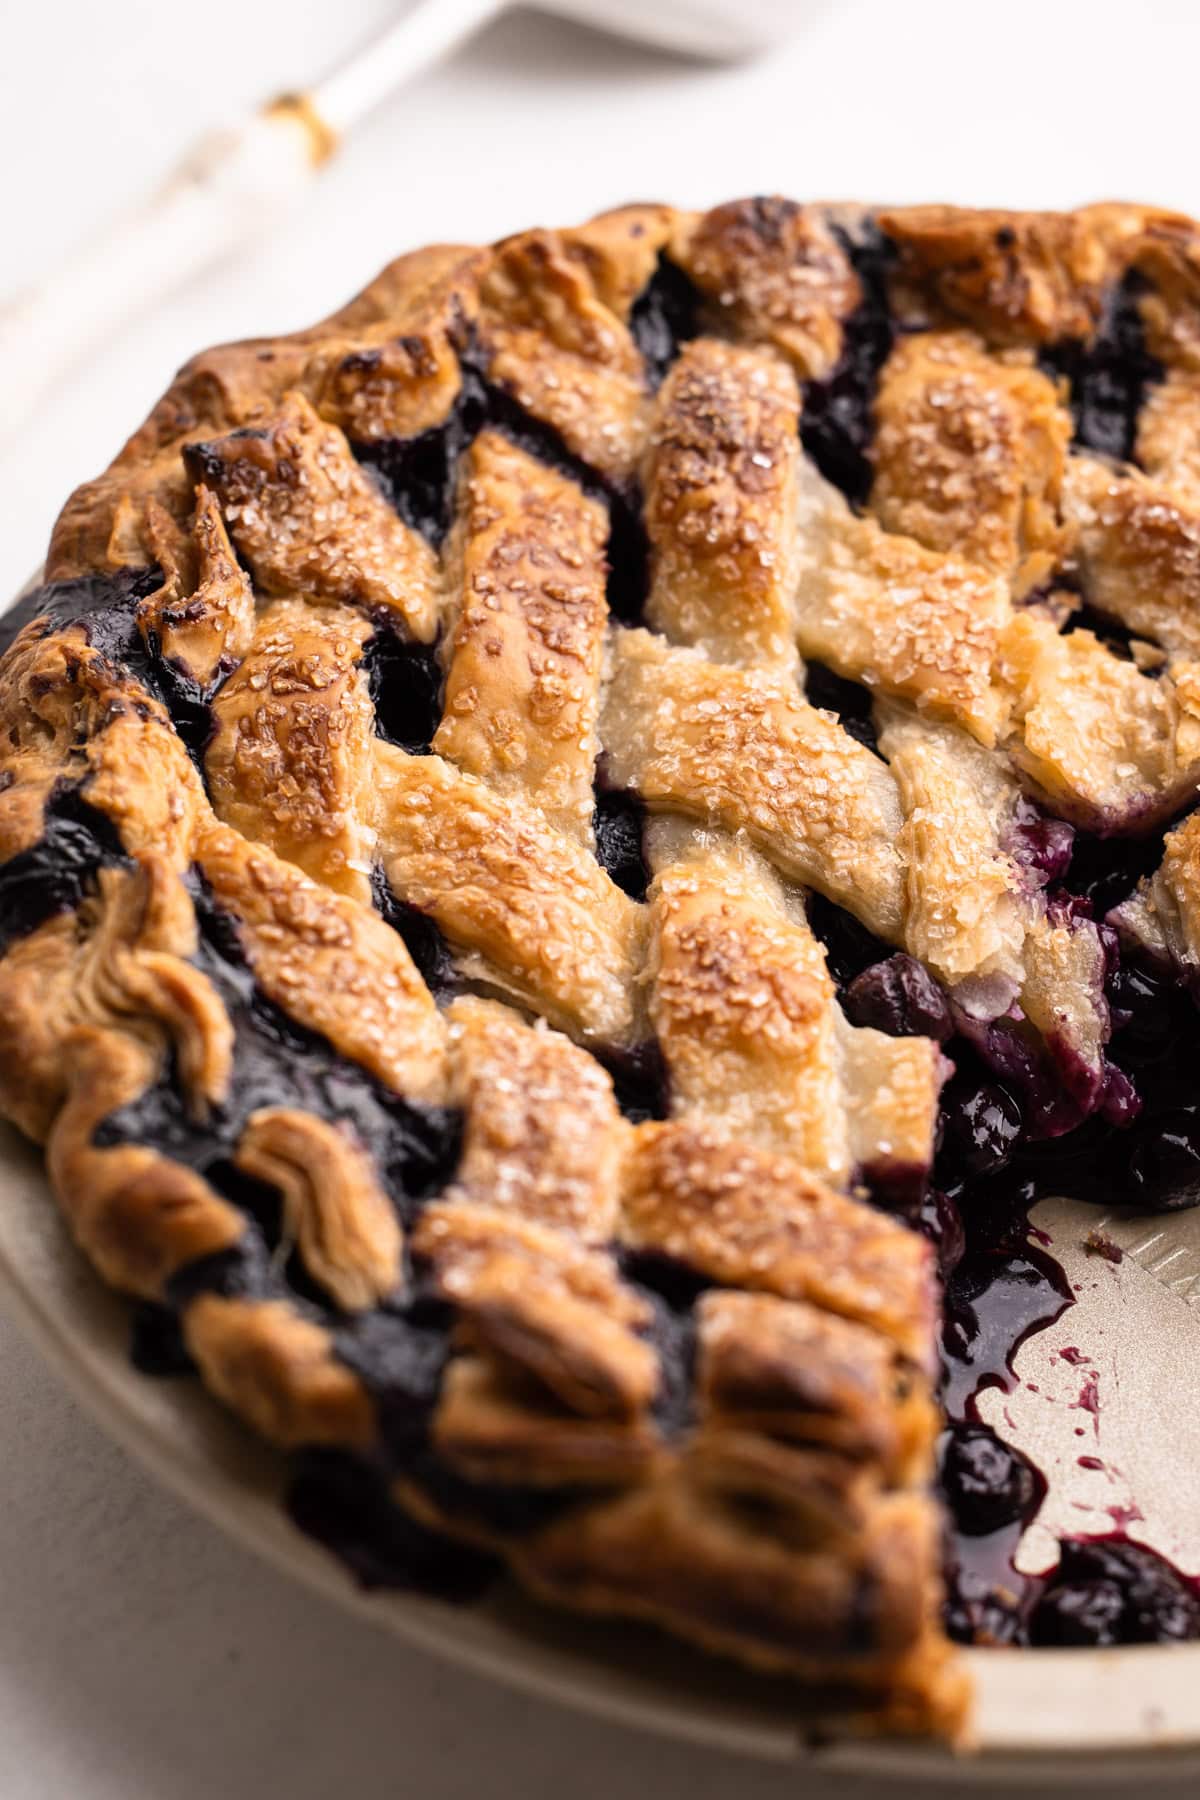
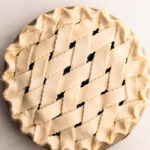
This All Butter Pie Crust recipe is simple to make and creates a perfectly flaky, delicious crust suitable for both sweet and savory pies.
Want to save this recipe?
Enter your email & I'll send it to your inbox. Plus, get weekly updates from me!
Half the reason homemade pies are so delicious is the buttery, flaky crust. A well-made butter pie crust is a true work of art—crispy enough to shatter with a bite, yet delicate enough to melt in your mouth. And this recipe is my best take on classic American-style tender and flaky pie pastry. It's simple to make in a food processor (though I also offer alternative methods to making pie crust, such as by hand, in a stand mixer or with a pastry blender) and comes together in 10 minutes or less from start to finish.
Over the years, I've heard how much bakers stress about making all-butter pie crust. Here's the good news: It's easier than you think! My motto is always practice makes progress (not perfection). Making pastry requires various skills that you will improve over time with practice. But truth be told, any homemade pie crust you make is worlds better than anything you can buy at the store, so don't be worried if you are a beginner. You're going to do great! And if you want to read a bit more about the science behind good pie crust, check out this How to Make Pie Crust Guide!
Now, let's get to making it, shall we? You can jump around using the menu below, or skip to the end of the article for the full recipe.
Ingredients Needed
At its heart, a good pie crust is a balance of three key ingredients: flour, butter, and water. This all-butter pie crust recipe also contains a few extra ingredients that make it the best it can be.
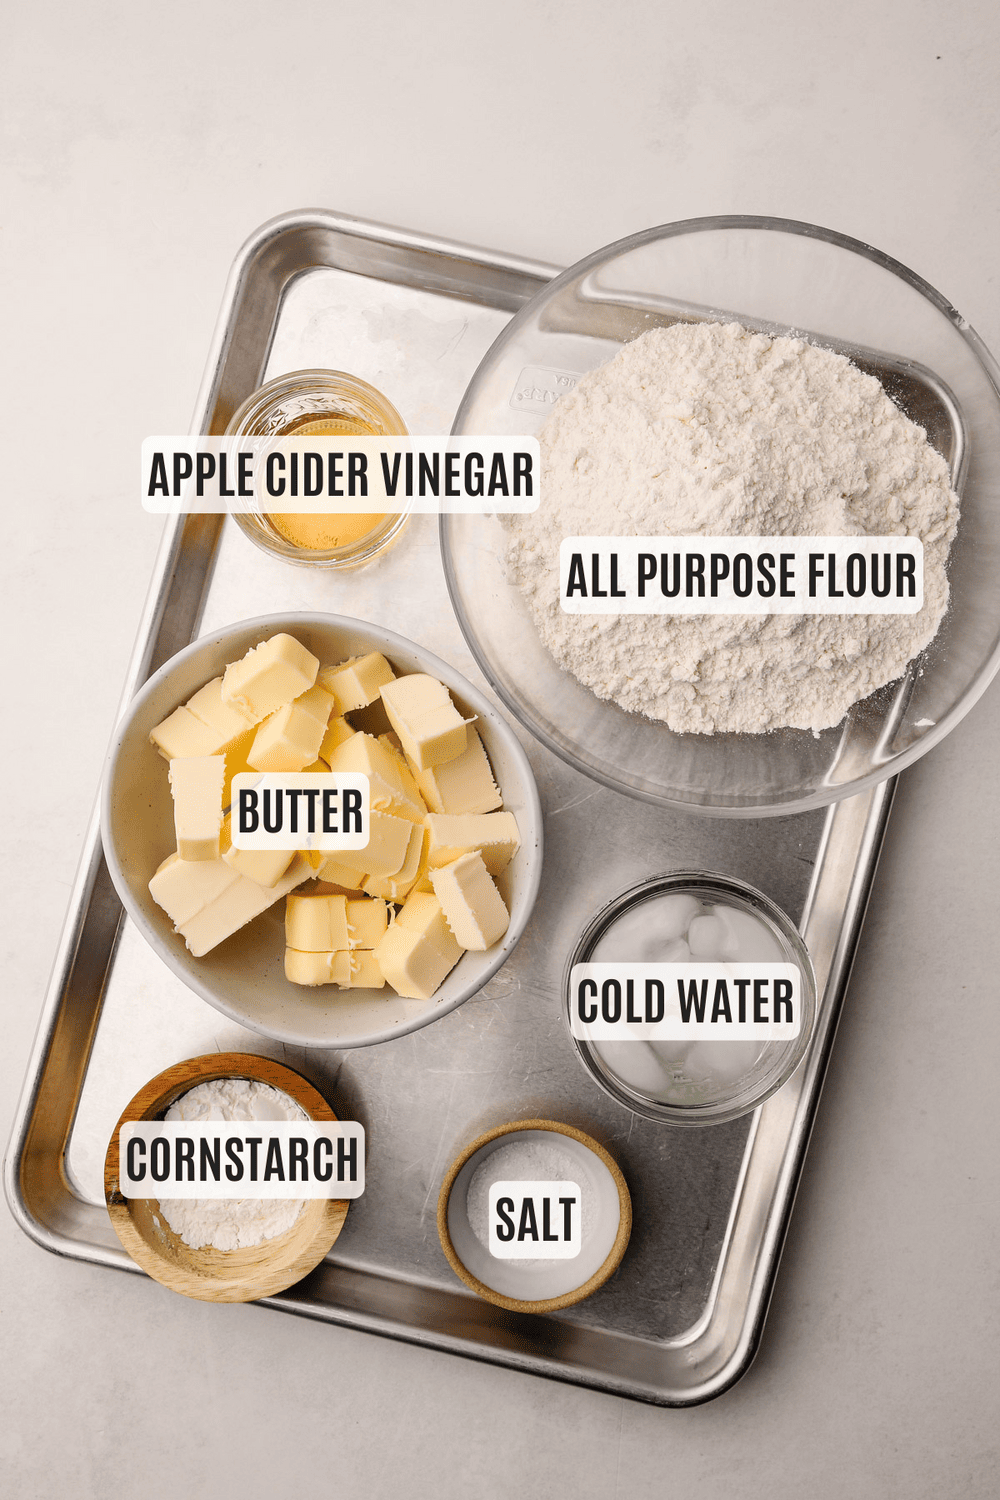
- all purpose flour: Generally speaking, pastry flour is the best flour for making pastry because it has a lower protein content. But most people don't keep it in their kitchen, so this recipe calls for all-purpose flour.
- cornstarch: The addition of cornstarch makes the all-purpose flour mimic pastry flour. You can totally skip this and add in an equal amount of flour if you wish, but cornstarch helps to make this pie dough delicate.
- salt: This recipe was tested using Diamond Crystal coarse kosher salt. If you use Morton's kosher salt or fine salt decrease by about half for volume, or use the same amount by weight.
- unsalted butter: For this recipe, use standard American butter (not a high-fat European-style butter).
- apple cider vinegar: This helps make the dough tender by inhibiting gluten formation. It also brings a subtle hint of tang to the crust that keeps it nicely balanced.
- cold water: Water brings the pastry together, but it needs to be cold to help keep the temperature of the dough as chilled as possible. In a pinch, when I don't have ice available, I'll just let the tap run for 30 seconds to get the water very cold and use that.
How to Make It
Butter pie crust made in the food processor offers the best of both worlds: it is mildly flaky and ultra tender. And it's the simplest way to make pie dough. That is why this is my preferred method of making all-butter pie dough.
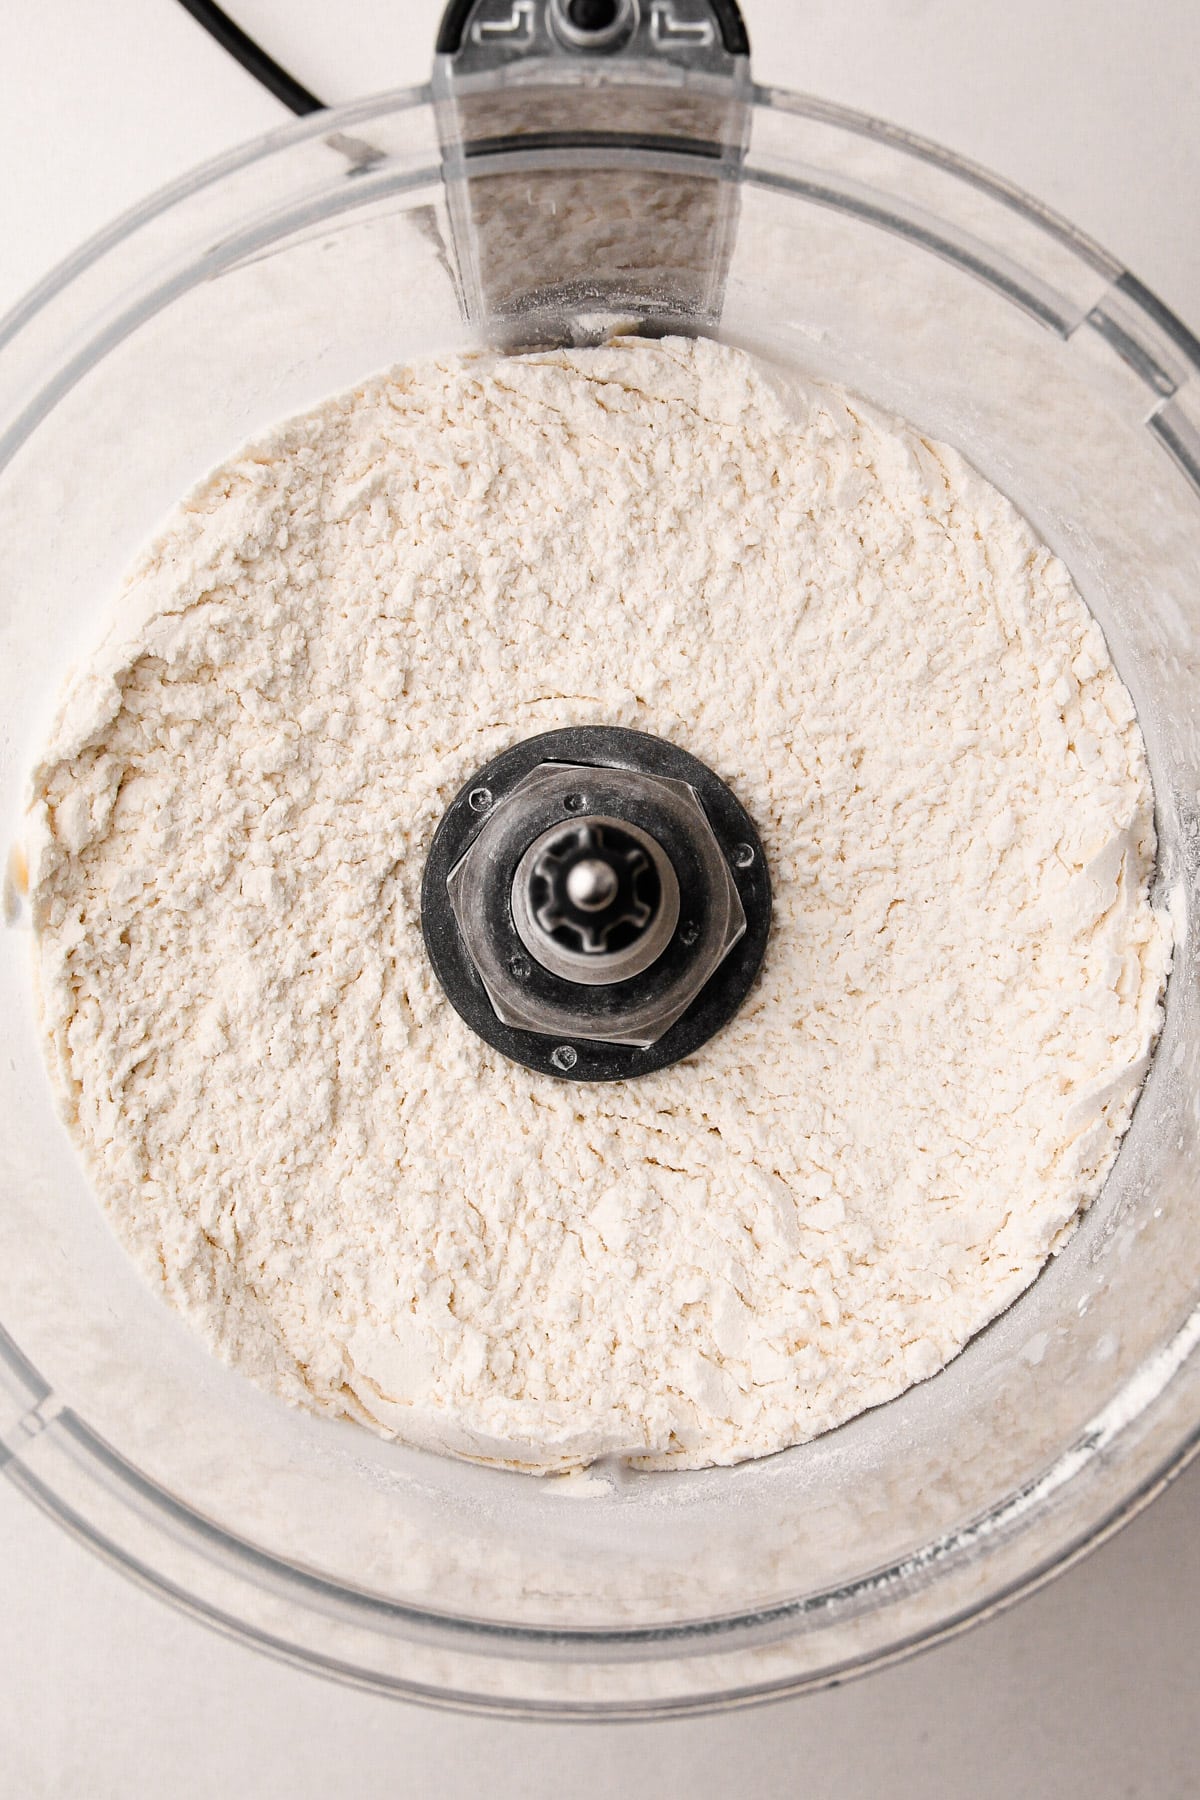
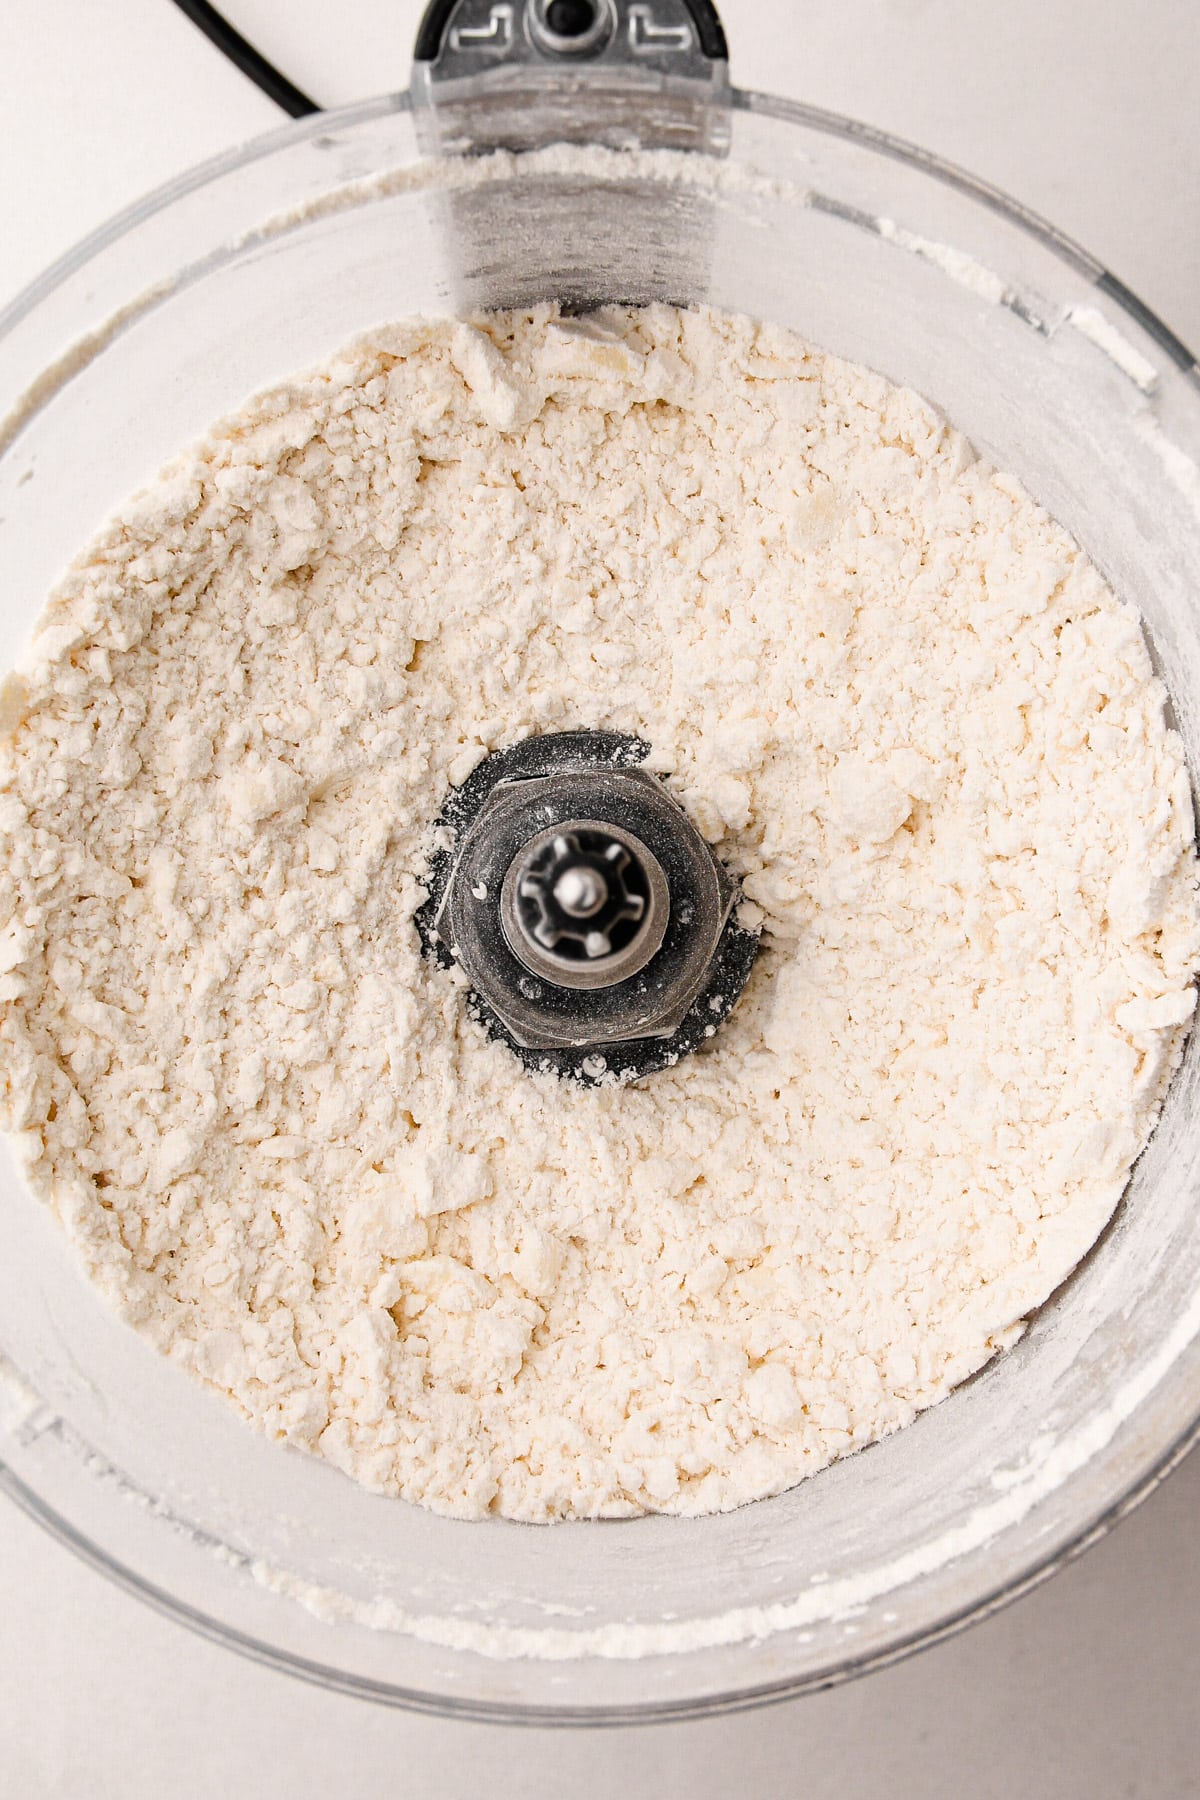
Step 1: Pulse the dry ingredients.
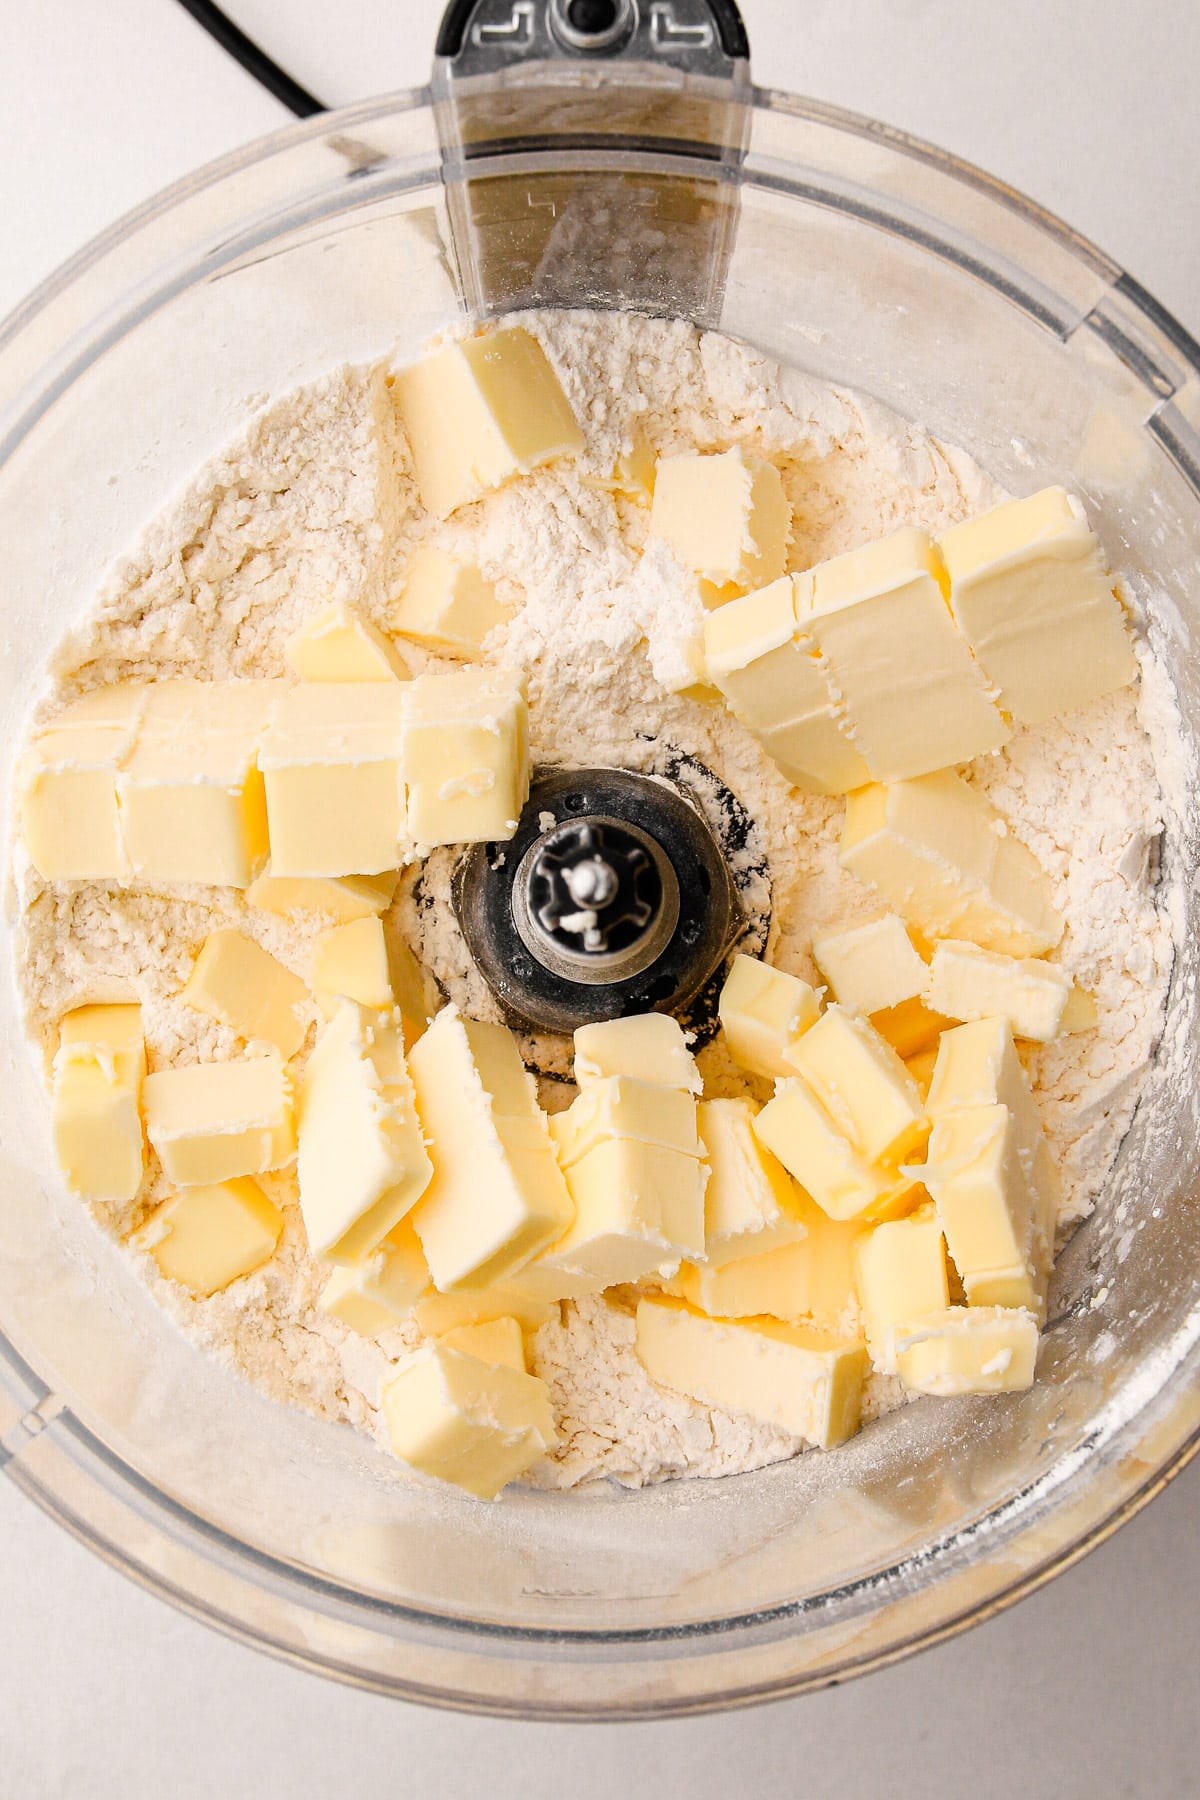
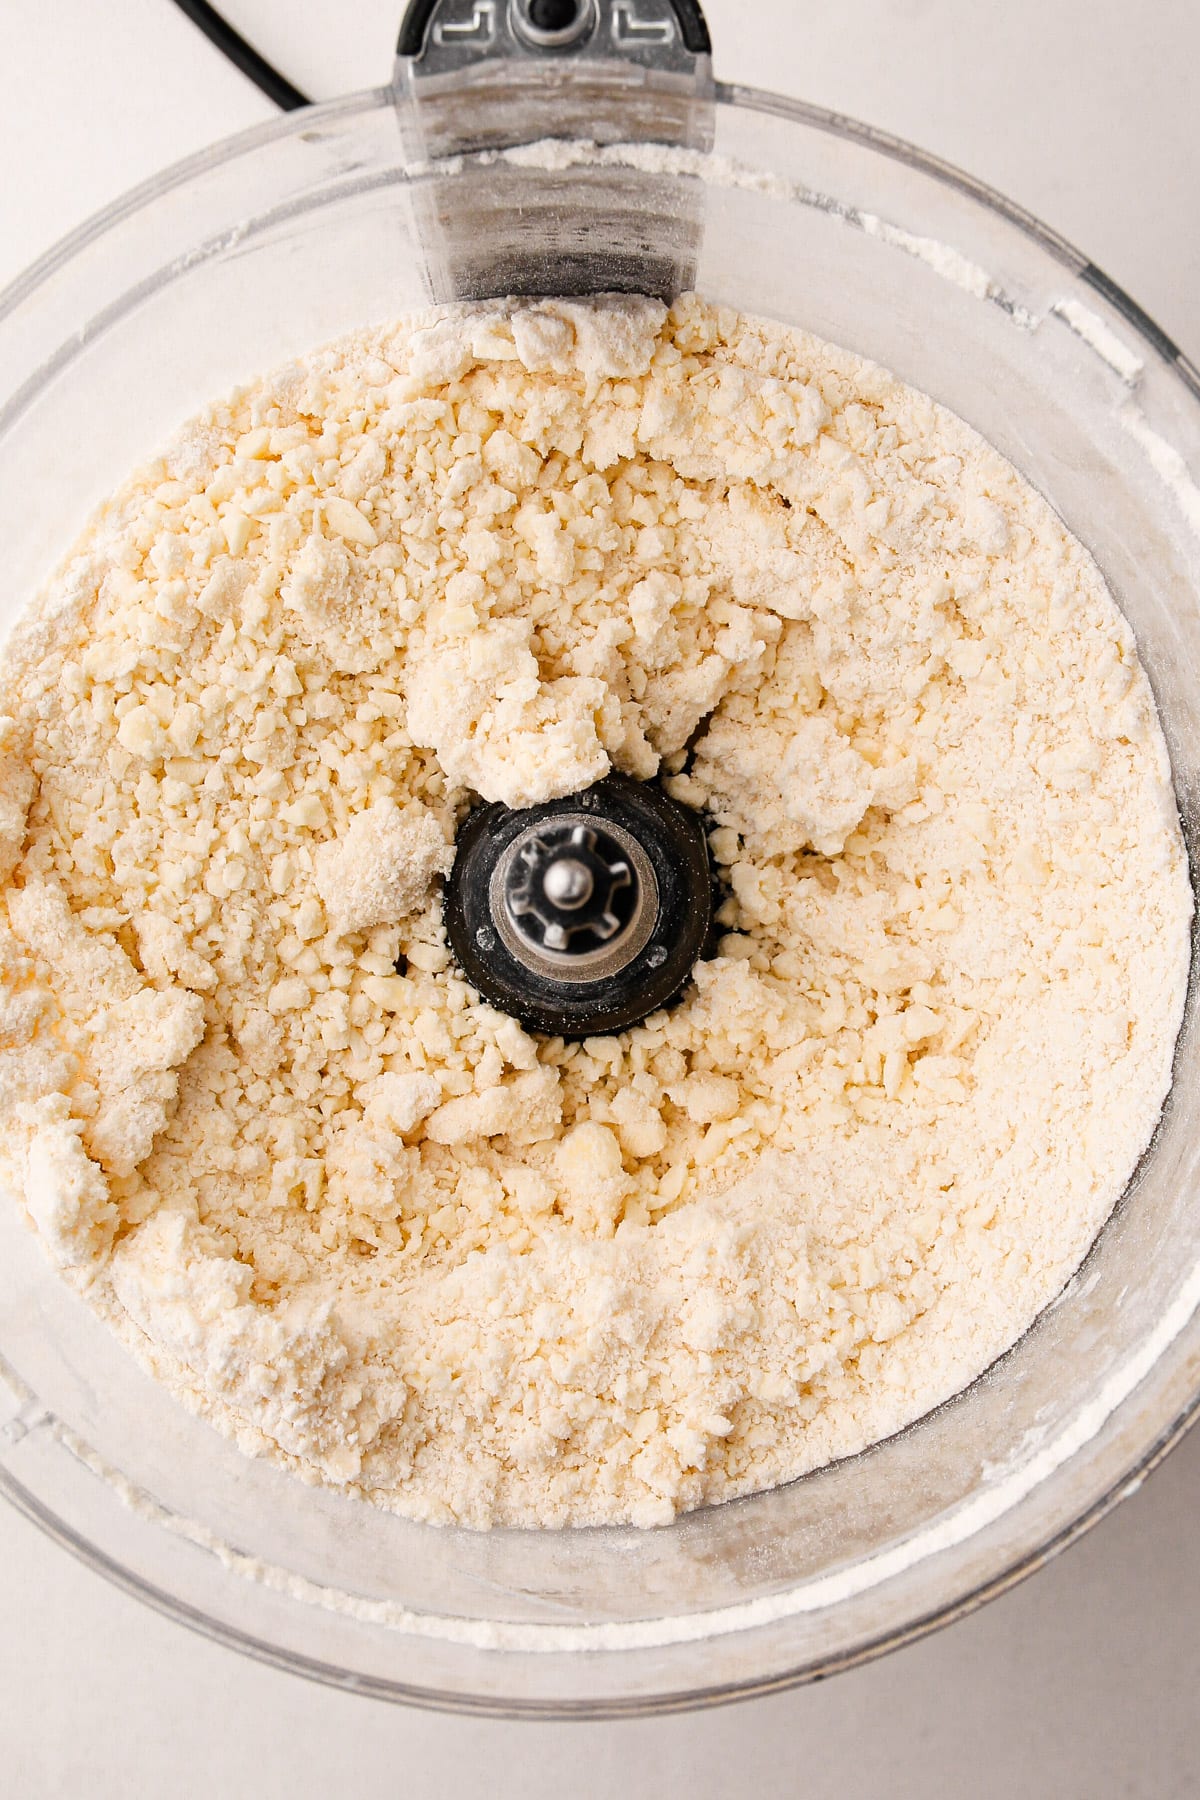
Step 2: Add in the cold butter.
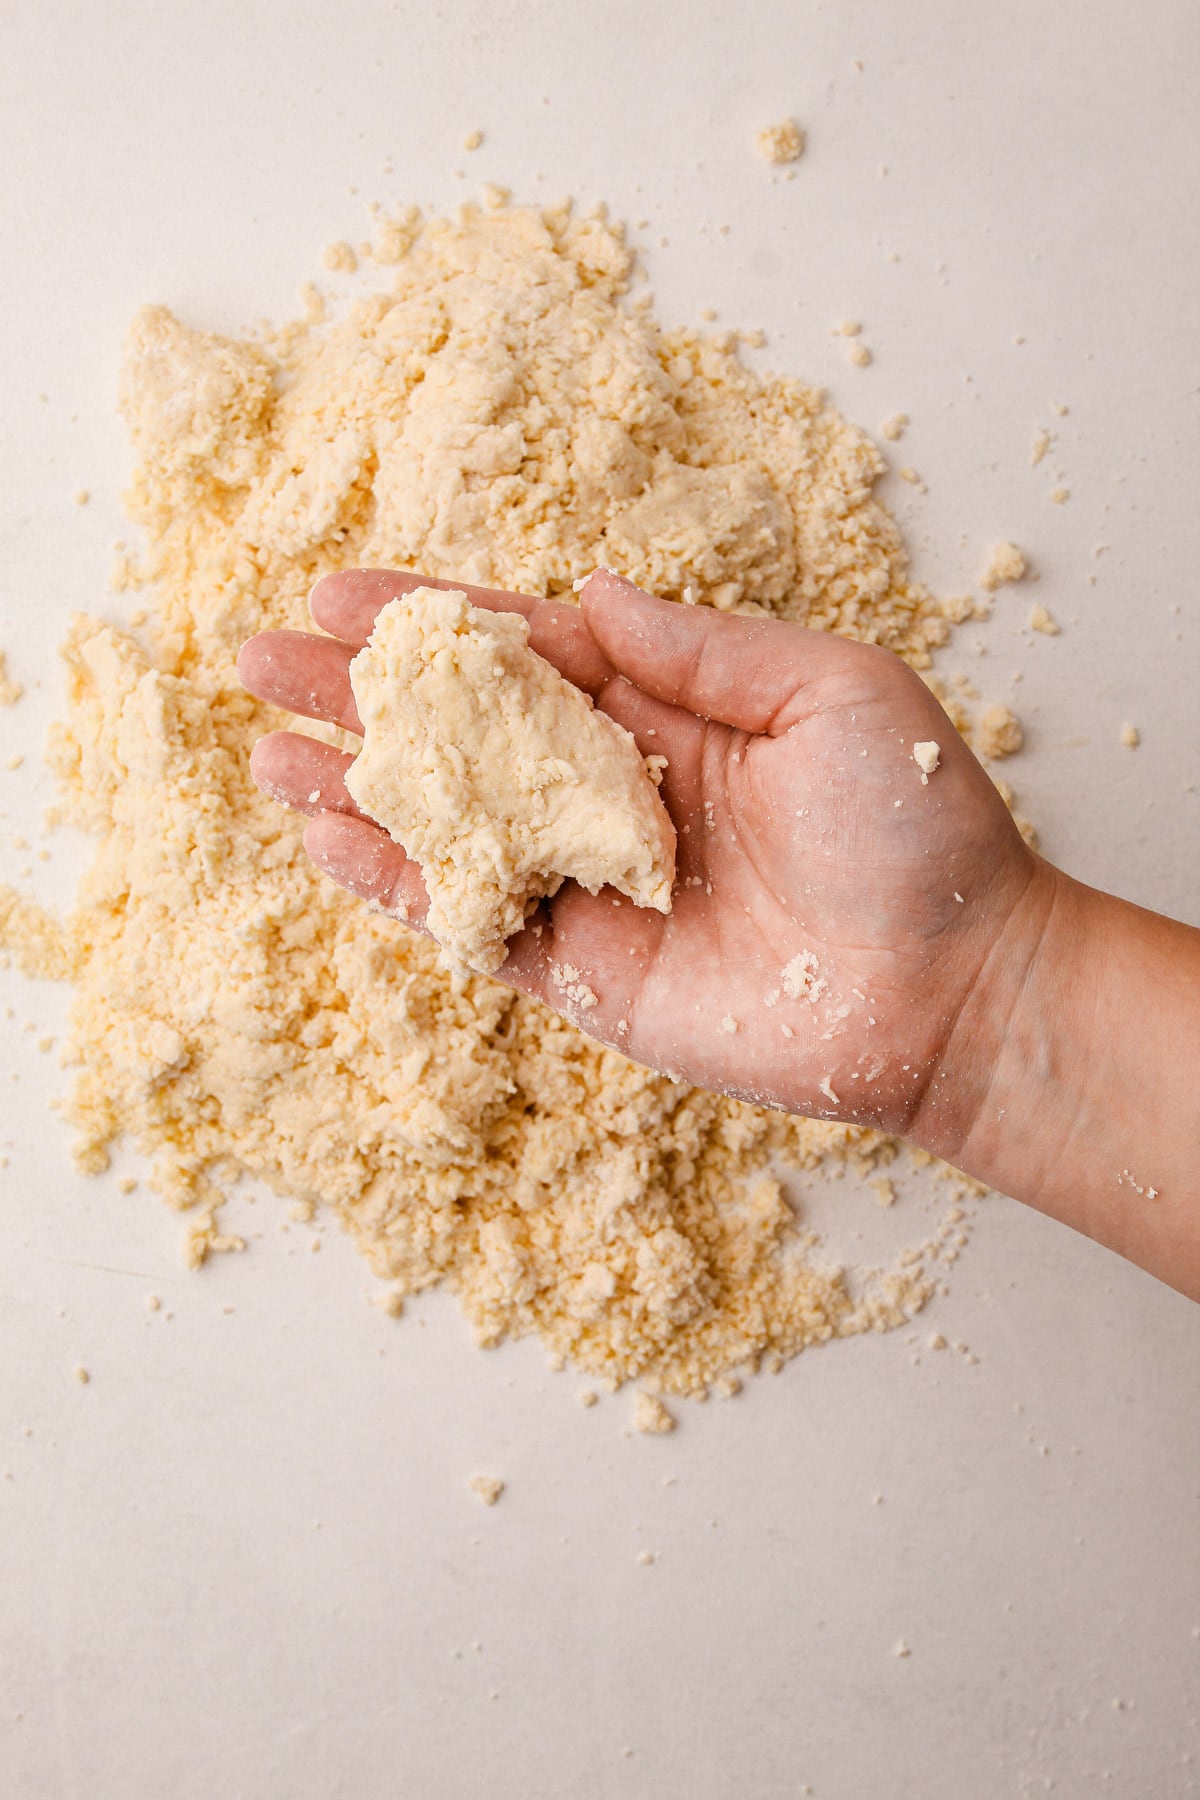
Step 3: Pulse roughly 5-7 times until the butter is in small pieces, about the size of a pea.
Step 4: Drizzle in the water and vinegar, then stop. Do not process until it comes together in a ball.
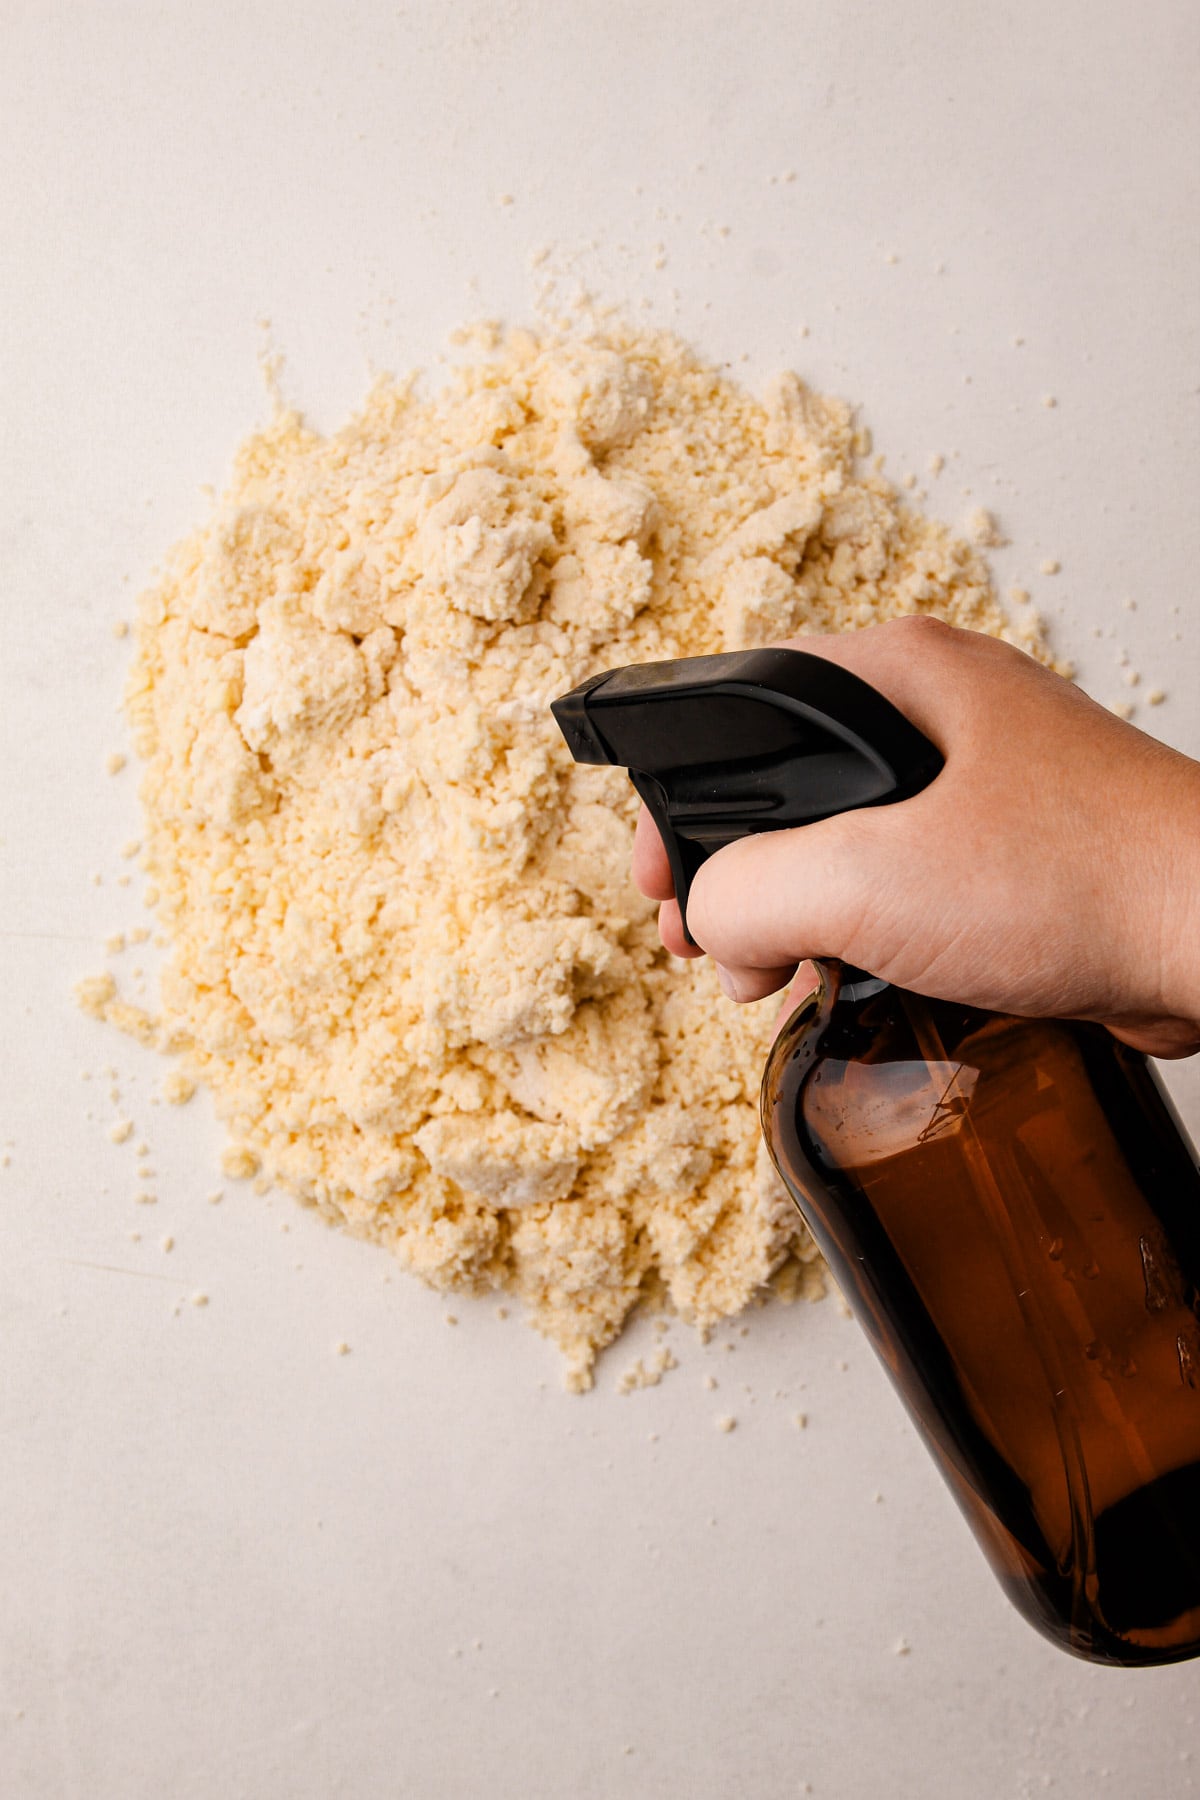
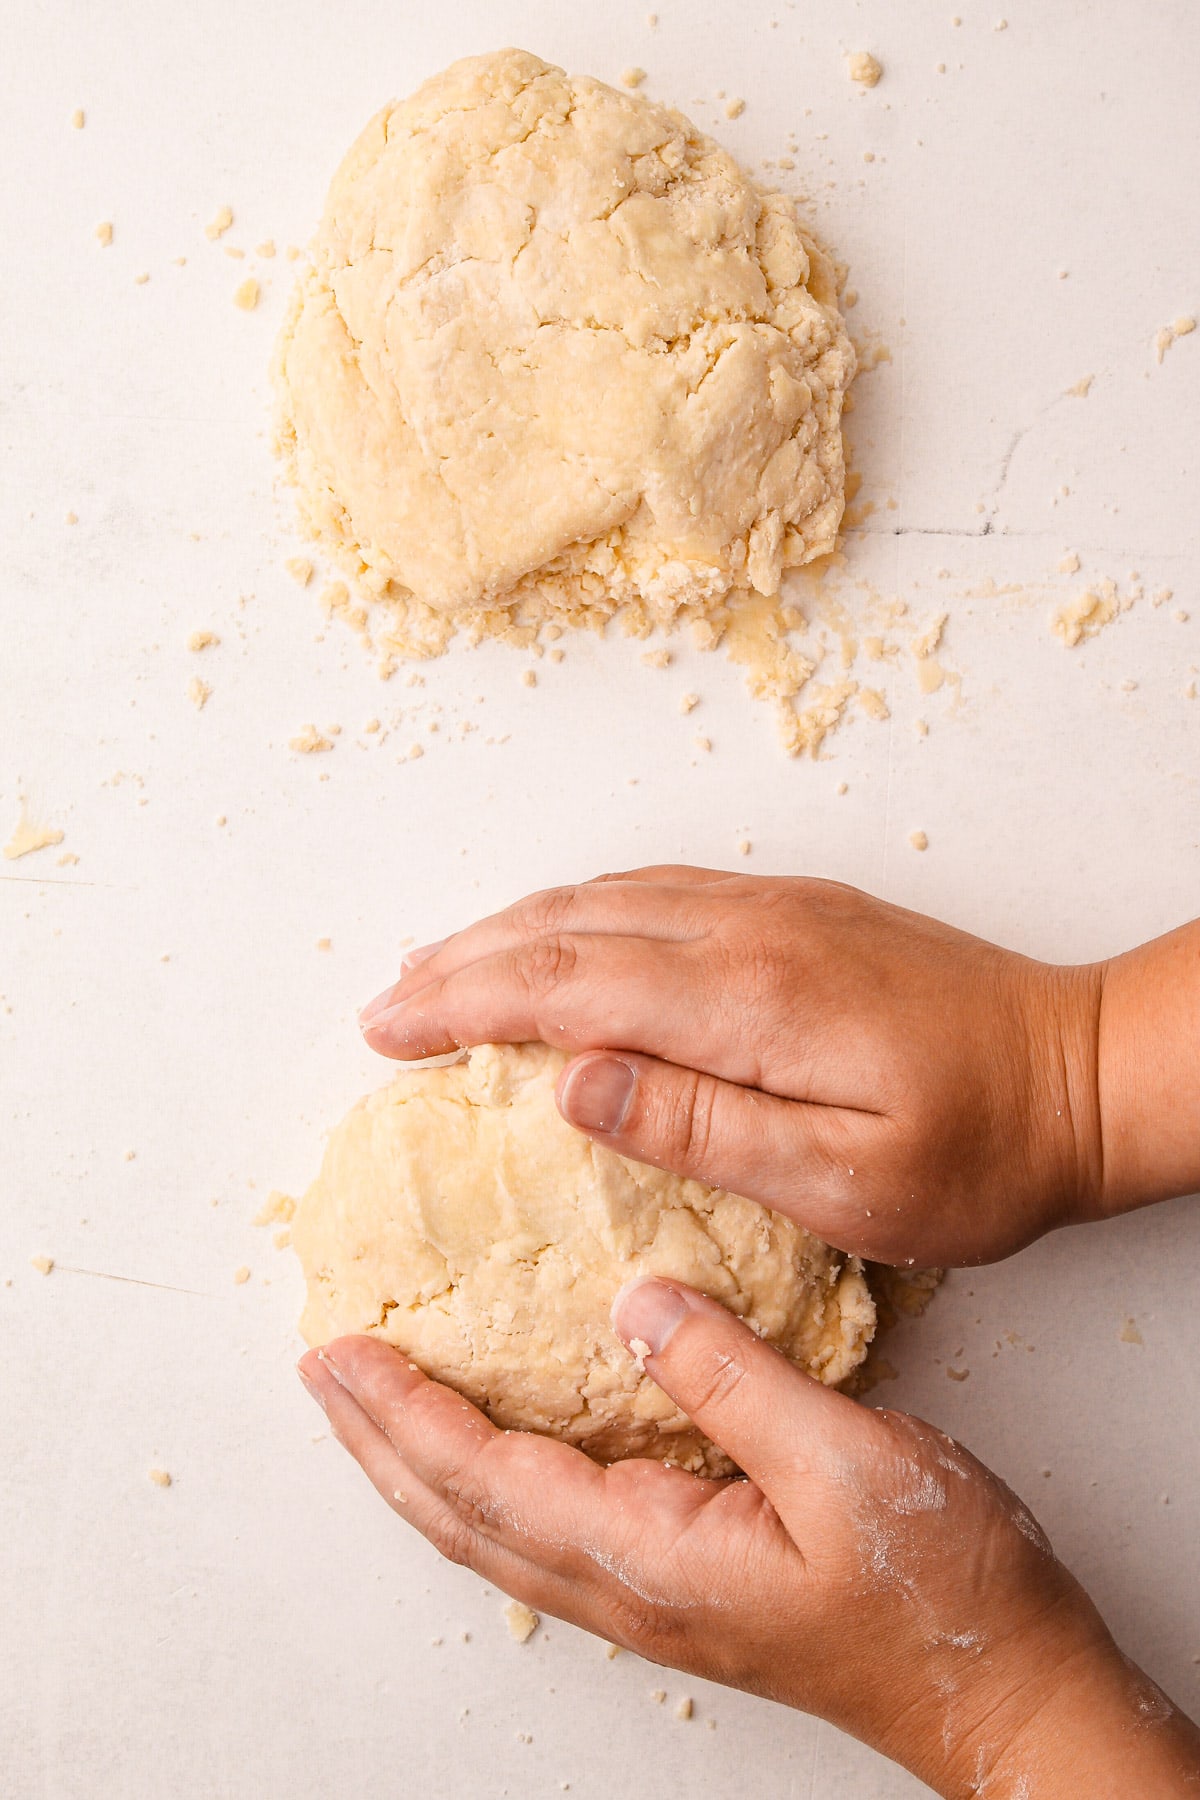
Step 5: Dump the dough onto a work surface and spritz or drizzle any dry spots with additional water if needed.
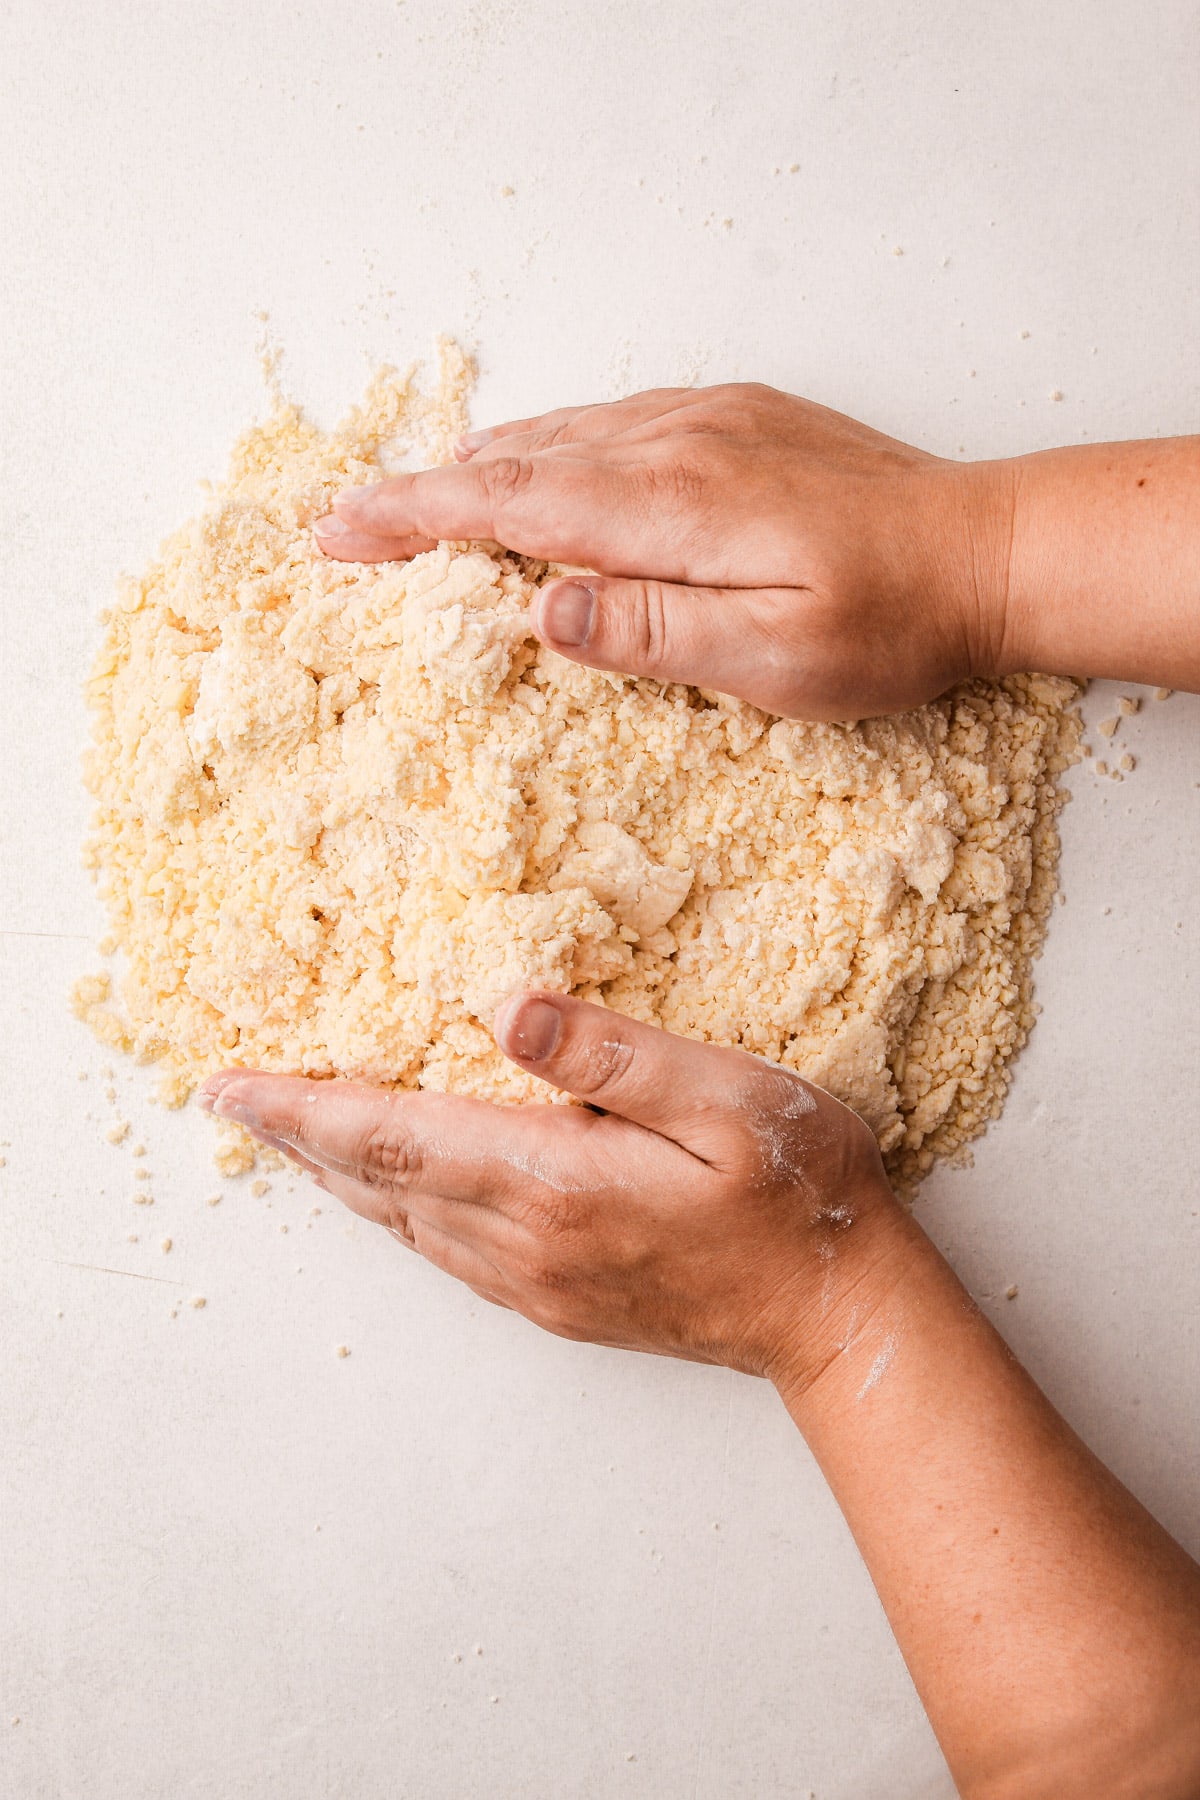
Step 6: Bring the dough together.
Many bakers tend to be overly cautious with water, resulting in under-hydrated dough. Given the choice, I prefer slightly over-hydrated pie dough to under-hydrated. In fact, I often add more water than most recipes recommend to ease rolling out the dough. Make sure there are no dry spots; they won't disappear even while the dough rests. The dough should hold together easily when squeezed, and any dry areas can be moistened with a few drops of water or my favorite tool: a kitchen-safe spray bottle of water.
Storing Butter Pie Crust
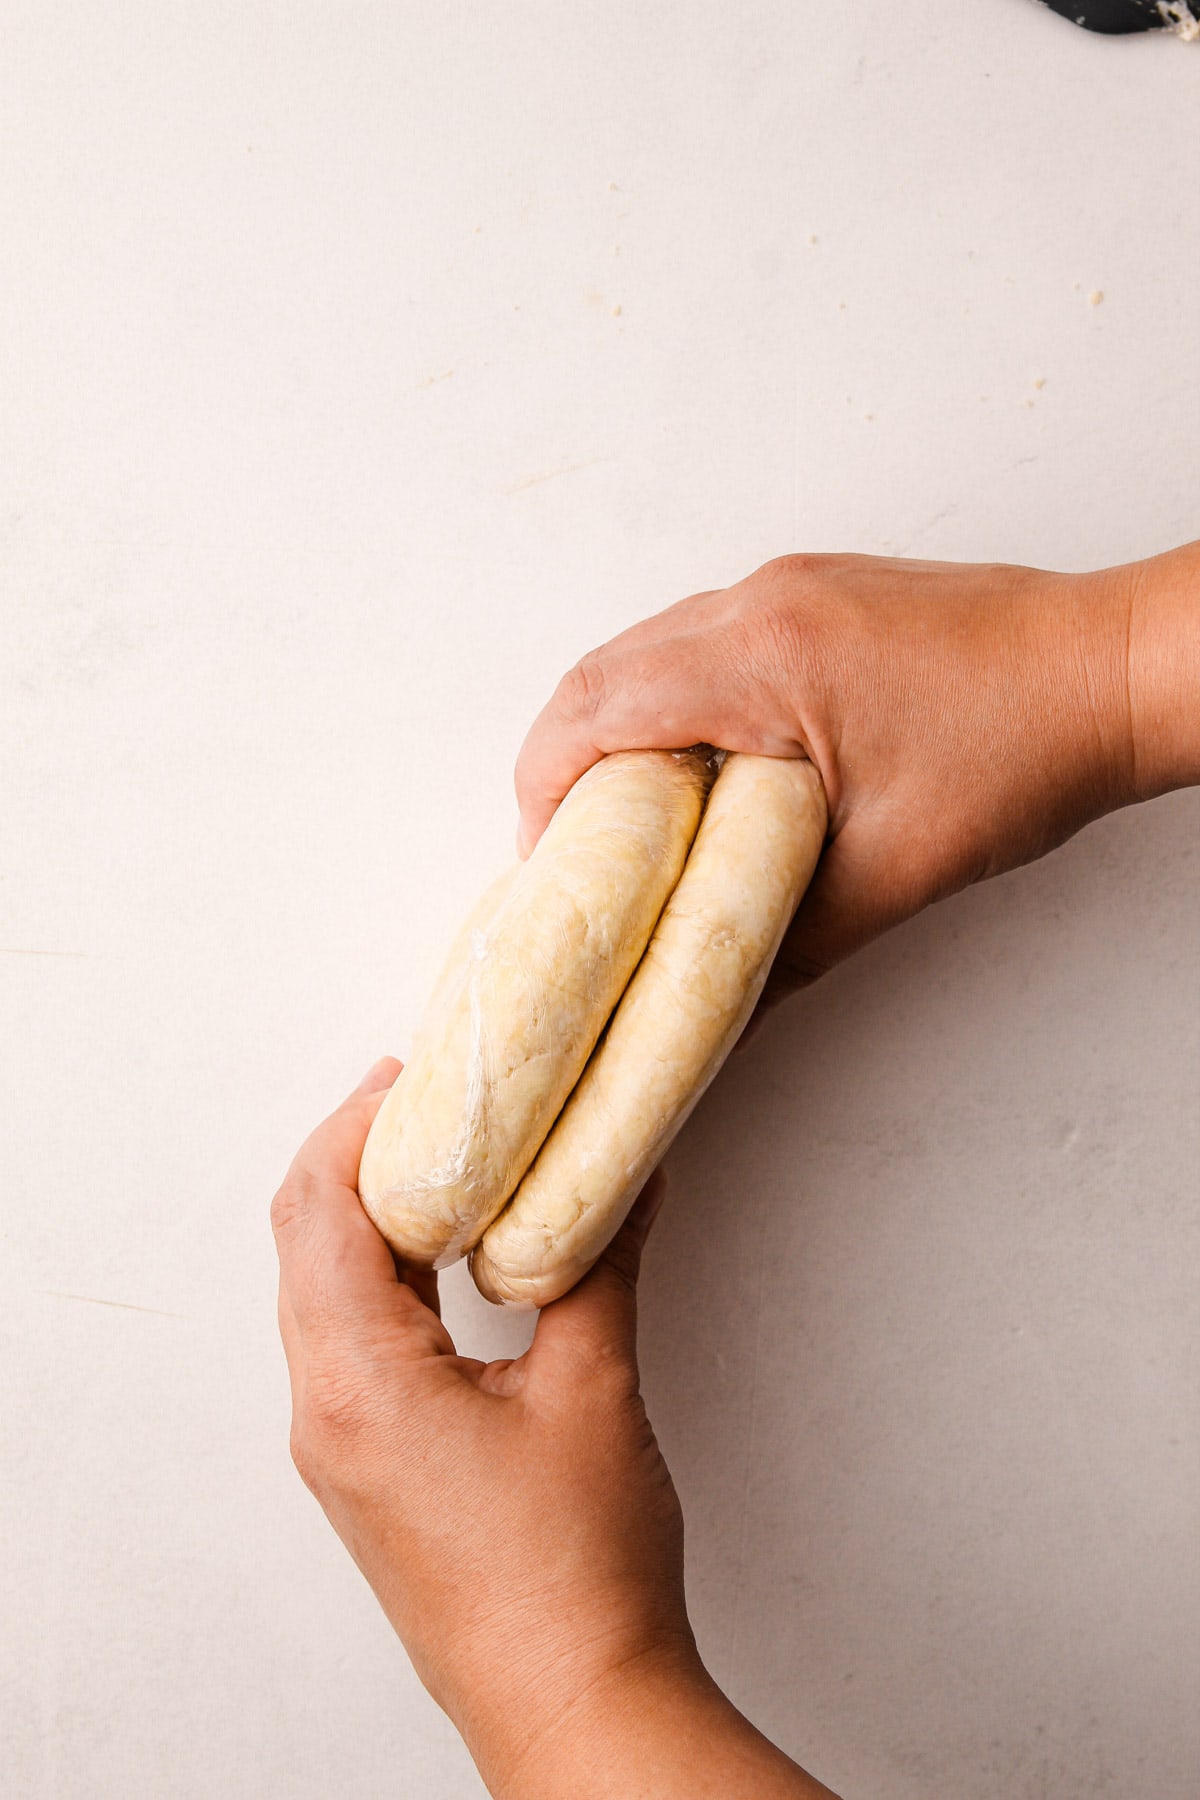
Making all-butter pie crust the same day it needs to be rolled out or baked is not recommended! If possible, plan to make the pastry at least one day ahead of time. Pie dough keeps really well in the refrigerator or the freezer. But first, you need to wrap it well!
Wrap the pie dough in plastic wrap as tightly as you can, then use a rolling pin to roll out the wrapped pie dough disk and flatten it so it fills any gaps and essentially makes an airtight seal with the plastic wrap. This helps to prevent it from oxidizing (or turning a muddled gray color).
You can store the wrapped pie dough in the refrigerator for 2-4 days or the freezer for up to 3 months. If you plan to store it for an extended period of time, wrap it in a double layer of plastic wrap.
Video
More Resources
For more reading and resources, check out these recipes and tutorials:
I am so honored when you make a recipe from my site! If you make this All Butter Pie Crust recipe, please leave a star ⭐️⭐️⭐️⭐️⭐️ rating with your experience! If you have any questions about this recipe, feel free to comment here, and tag me on Instagram!
Full Recipe
All Butter Pie Crust
This All Butter Pie Crust recipe is simple to make and creates a perfectly flaky, delicious crust suitable for both sweet and savory pies.
- Prep Time: 00:10
- Cook Time: 00:00
- Total Time: 10 minutes
- Yield: 2 Pie Crusts
- Category: Pie Dough
Ingredients
- 2-¾ cups (330 grams) all-purpose flour
- 2 tablespoons (14 grams) cornstarch
- ½ teaspoon (2 grams) coarse kosher salt (see note)
- 18 tablespoons (250 grams) unsalted butter, chilled and cut into 1" pieces
- 1 tablespoon (15 grams) apple cider vinegar
- ½ cup (120 grams) ice water, more as needed
Instructions
- Add the flour, cornstarch and salt to the bowl of a food processor.
- Pulse 2-3 times until combined.
- Add in the butter and pulse 5 times.
- Add the vinegar to the water. With the motor running, slowly pour the water into the flour. The dough should be crumbly and it should hold together when squeezed. Drip in more water and toss together if needed.
- Empty the flour mixture onto a work surface and divide it into two piles.
- Quickly form each dough pile together. If there are any dry spots, drip a bit more water on them and knead together if you have to. Each dough should weigh about 12 ounces.
- Place each in a piece of plastic wrap and wrap tightly.
- Using a rolling pin, roll the dough out until it stretches to the corner of the plastic wrap.
- Refrigerate for at least 2 hours, but preferably overnight.
Notes
Weighing your flour is the most accurate way to measure. If you aren't going to weigh it, make sure to spoon it into the cup, and then level it off. If you scoop the flour out with the measuring cup and then level, it could change the outcome of the final product.
This recipe was tested using Diamond Crystal coarse kosher salt. If you use Morton's kosher salt or fine salt decrease by about half for volume, or use the same amount by weight.
You can store it in the refrigerator for 2-4 days or the freezer for up to 3 months. If you plan to store it for an extended period of time than wrap it up twice!
How you bake a butter pie crust is just as important as preparing it. The key rule: very cold dough should go into a very hot oven, ideally at 425ºF. However, it's best to reference the filling recipe for any specific key details about baking the crust.
This butter pie crust recipe was originally published in 2018 and was the very first recipe ever published on this food blog. It is the same butter pie crust recipe I've been personally using to make pies for over 15 years. It was adapted from the pie crust in Rose Levy Berenbaum's Pie and Pastry Bible. Since then I've often updated the accompanying article and step-by-step tutorials to offer the best possible guidance on how to make it.
Want additional ways to make pie crust? Check out this post on How to Make Pie Dough by Hand or How to Make Pie Crust in a Stand Mixer for a more in-depth look at alternative methods.
Some of the links on this page may be affiliate links. Everyday Pie is a participant in the Amazon Associates Program. As an Amazon Associate I earn from qualifying purchases, at no extra cost to you.
Jeffrey
This is my go-to pie crust. I love the way it tastes and it is so flaky and holds up well with fruit pies. Thank you for sharing.
Lola
I've always been used to making French and British fine pastries and the American ones always baffled me - none ever worked out. This one was so easy to follow and turned out perfectly. Despite not baking the pie long enough (it was a fruit filling from another recipe) and the filling leaking out, even after three days the pie crust itself has remained solid. This will now be my go-to recipe for American-style pies.
Julie
Even though I failed to read 😬 the part about making this crust the day before using ahead of time, IT WAS DELICIOUS! I was able to refrigerate the crust for a few hours before rolling and I have to say it was the best pie crust I’ve made. Thank you!
Brandy J
Recipe is very easy to follow! If I had realized how easy pie crust could be I would have been making my own all along. I made a couple of apple hand pies using recipe here to test the crust and it’s yummy! Looking forward to making a whole pie for thanksgiving.
Lindsay
I made this pie dough today to use for an apple pie tomorrow...so I don't know the outcome YET. But, my dough was very wet after mixing in the food processor. I did the spoon and level method and thought perhaps I really messed that up, so I measured the two dough balls halves and both were a little over 13oz. Lol, I have no clue. I figured if I under measured the flour it'd be less than the mentioned 12oz. If I'd put too much flour, it would not have been as wet. Idk! I'm super interested to see how it bakes! Next time I'm weighing everything! How much does butter brand/quality matter? I used Kerry Gold.
Braden
This always comes out perfect and is delicious. It is now my go to pie crust. I previously used a recipe on another site that was much more difficult, and it made me think pie crust was much harder than it had to be. Follow the steps here and you are in good hands.
Victoria DeHart
Made this several times. It comes out best when you make it a day ahead and rest it in the fridge overnight.
I also made it by hand, "squishing" the butter and flour like Julia Child!
It came out beautifully, and it is my go to recipe now!
Sarah
This is the best pie crust I’ve ever made! My family kept commenting on how flaky it was. Love this recipe.
Tony Childs
This was easily the best pie crust I've ever made: shatteringly crisp, yet flaky and melt-in-your-mouth tender. M made a batch of apple hand pies and used Janie's Mill "Silky Smooth" pastry flour in lieu of AP + cornstarch, which took it to the next level. If you haven't tried Janie's Mill flours I can't recommend them enough.
Quick question. I want a beautifully-flaky crust like this for a French Silk pie. You said this pastry wasn't for cold pies. Is there a way to get the same crisp, tender, flakiness of this crust with either your Pâte Sucrée or Pâte Sablée pastries, or are they more dense?
Wonderful recipe. Thank you for sharing!
Haley
This recipe is amazing!
I have attempted pie crusts in the past and they were nearly inedible and I honestly thought I was just not a good enough baker to make my own pie crust. After reading through this blog I wanted to give it another shot so I made this recipe and I’m blown away by how good it turned out. This is my new go-to pie crust recipe, never going back!
Kelli Avila
Hi Haley! I'm so glad! YAY! Thanks for sharing! -Kelli
Michael
Never has my pie crust come out so beautiful! And without frustration. Thank you for the step by step instructions. This pie crust has what all the others are lacking!!
Deb B
The pie crust is awesome fabulous. It would help to remove ads. There are so so so many ads you can’t print the recipe without ads and the ads cover part of the recipe. Very frustrating!!!
Kelli Avila
Hi Deb---the income from the ads enables me to create these free-to-you recipes. However, they shouldn't cover part of the recipe at all...so I will look into that. Appreciate the feedback.
Jacqueline
How much butter? I can't find the measurement anywhere so I must be missing something!
Kelli Avila
Jacqueline, the recipe is located below the article. Keep scrolling til you see it.
Lynne
I made these hand pies for a potluck luncheon and they were a big hit. Easy to make and very delicious. This is definitely a keeper recipe.
Anne
Hi Kelli--You mention chilling a pie 30 minutes to 1 hour before baking. Does this mean chilling a fully assembled pie, as in a double crusted fruit pie for instance? Won't the bottom crust absorb moisture and get mushy?
Thanks!
Kelli Avila
Yes, chill the fully assembled pie. The pastry doesn't absorb moisture as you describe until it's baking. Making sure to put the pie in a properly preheated oven and baking it for long enough is how you prevent a mushy bottom.
Unni
I bake quite a lot, but have never understood pies...until I tried this wonderful recipe and got an absolutely beautiful pie! I planned to make the brownie pecan pie, but burned the nuts!! But I used walnuts and it was a success. Just to make sure, this recipe is for TWO crusts, right? I still have the other half of the dough in the fridge and can't wait to use it 🙂 Thank you so much!
Kelli Avila
I am so glad you gave it a try! I love messages like this! Yes--this is for two pie crusts. Enjoy the other 🙂
Susan
I was excited to find your site and recipe and tips. Have a question about using liquor in a pie crust. Have tried vodka and the results were good but was thinking about using bourbon for not only my bourbon pecan pumpkin custard pie crust but for the pie crust for my apple pie. Do you think it would work or should I forget about it?
Kelli Avila
How much did you plan to put in?
Sally Ijams
Watched your demo last night and made the crust this morning. Thanks for making it so approachable, I’ll never be afraid of making it again! Can’t wait to use it for a apple pie tomorrow. Yum!
Ashley
If I use pastry flour, do I still need to add the cornstarch? Thanks so much for such a detailed recipe!
Kelli Avila
Hi! Great question. If you are using pastry flour, omit the cornstarch but add an extra 15 grams of pastry flour!
Jennifer
This is my new staple pie crust recipe! I used it for a homemade chicken pot pie and it was AMAZING! I skipped the ACV just because I didn’t have it on hand but I’m excited to see the difference the next time I make this. First pie crust I’ve ever made that didn’t collapse when cut into and didn’t fall apart when I was rolling it out. Perfectly flaky and buttery… 10/10!!
Kelli Avila
Thank you so much for stopping by and sharing! So happy it worked out for you! -Kelli
Brielle
I made this with the spiced blackberry pie (which was amazing) this is the only pie crust recipe I ever want to use. I used this recipe and did a faux lamination and the bottom crust reminded me of a croissant. It was incredible.
Kelli Avila
Brielle, sounds so delicious! And yes to the lamination! Love it! -Kelli
Patrice
So thorough with instructions. Great for beginners just learning pie crust and anyone that can use the tips provided.
Kelli Avila
Thank you Patrice! Appreciate you sharing! -Kelli
Alyssa
Best All purpose pie crust recipe! Ive tried many others, but this is the only pie crust recipe ive liked. DELICIOUS and an easy to follow recipe. 10 out of 10!
Kelli Avila
Thanks Alyssa! -Kelli
Andrea
Hi! I did an apple pie with this crust and it was absolutely delicious! So easy and the ingredients are so incredibly common! Thank you so so much and I really appreciate all the tips and facts. Definitely a new fan and follower 🙂
Kelli Avila
Yay! Thanks Andrea! -Kelli
Erica
The easiest and most flaky, delicious crust!
Kelli Avila
Thanks for sharing, Erica! -Kelli
Sally
Wonderful instructions, this is by far my favorite recipe for pie crust!
Kelli Avila
So happy it worked well for you! Thank you, Sally! -Kelli
Sarah
This is my go-to pie crust recipe and has been for years! I so appreciate the specific instructions for the recipe with different appliances. I love using this for quiche, classic thanksgiving pies like apple and pumpkin and for my chicken pot pie! It’s a keeper.
Kelli Avila
Thanks for sharing, Sarah! -Kelli
Susy
So easy to make and so delicious
Kelli Avila
So happy you enjoyed, Susy! -Kelli
Cheyana
I used this recipe in combination with your apple pie filling recipe and it turned out beautifully! I had a glass pie plate and was nervous about putting it in the oven straight out of the fridge so I chilled both the top and bottom crusts for a while after I rolled them out and then just assembled as quickly as possible. The pie crust was flaky and tender, and didn't totally dry out in the oven. My oven only has heating elements on the top, rather than the top and bottom of the oven, but I placed the pie plate on a cookie sheet that I preheated in the oven, and used the convection setting to prevent the top from browning too quickly. I'm not usually a pie person, but I think this pie crust with your apple pie filling may have convinced me!
Kelli Avila
Cheyana! What an amazing compliment. I'm so glad you enjoyed and proud that you used some tricks to make sure it baked properly given your oven set up! Great thinking! Thank you for taking the time to share your experience. Cheers, Kelli
Janel C.
My pie crusts usually turn out a bit tough and I’m always disappointed. I decided to give this recipe a try and followed it exactly. I used it to make some savory hand pies and the crust turned out amazing!! Even the scraps I had leftover and re-rolled turned into perfectly flaky crust. This crust makes me so very happy!
Kelli Avila
Janel! I'm so happy this recipe worked for you!
Heather
Making pie crust used to be my kryptonite UNTIL I followed this recipe and all of your helpful tips. I am so thrilled that I was successful with this recipe. I weighed everything, used the food processor method, and let the dough rest overnight in the fridge. This pie dough rolled easily the next day and blind baked to the perfect golden brown. Will be my go-to recipe for pie crust from now on. Thank you!
Kelli Avila
Heather, thanks for coming by and sharing! So glad you found this helpful! Hope you had a great holiday! -Kelli
Lynne cox
Hi Kelli
Happy thanksgiving to you!
Can I use whole wheat pastry flour instead of AP for this pie dough recipe? 😁
Kelli Avila
Hi Lynne. I recommend you use this recipe to use whole wheat pastry flour instead: https://everydaypie.com/whole-wheat-pie-crust/
Lesa
Can I use this recipe for an apple pie crust?
Kelli Avila
Absolutely!
Nevada
This crust is delicious and turns out super flaky once baked. My sister in law and I got together earlier this summer to make a bunch of fruit pies (one of them Kelli's Ginger Strawberry Rhubarb) for the freezer and we've been enjoying them ever since. Thanks for all the tips to make these a success!!
Alyssa
I use this pie crust for all kinds of things it’s delicious and flaky. I love the apple cider vinegar in it. It adds a nice subtle flavor. I will usually make two batches and freeze the second one so I have it in hand.
Kelli Avila
Such a good tip to double it and have it on hand!
Sue
Hi Kelli. I’m making your brownie pecan pie. Can I freeze 1/2 the pie dough for another day?
Kelli Avila
Yes! It will last 3-6 months (or more) in the freezer well wrapped. Hope you enjoy!
Donna Walden
Hi Kelli, This pie crust turned out to be the best I've ever made. It was flaky and delicious ! Even though it was a wetter dough than I am used to, after resting it for a day, it rolled out beautifully. I am a believer. I used the crust to make your Butternut Squash, Carmelized Onion and Feta Pie. All I can say about that recipe is WOW!
Kelli Avila
I'm glad it worked out, Donna!
Donna Walden
I'm questioning the 1/2 cup of ice water in this recipe. I added most of the 1/2 cup and my beautiful dough turned to mush. Most pie dough recipes I've used in the past only call for 1-2 Tbsp. I added more flour to get it to come together. Now I'm wondering if I should re-make the crust, as I've read too much water can make it tough?
Kelli Avila
Hi Donna. I say this in the kindest way possible but I've used this recipe professionally for 12 years to make pie crust 🙂 It's not the recipe---but I am questioning if you made an error while making it--such as a mismeasurement of flour or some other ingredient? It shouldn't be mush, that's for sure! It might still be useable, depending on the error that occurred. I'd check back on it in an hour or two and see how it feels. All the photos referenced in this post are all of this pie crust--so take a look at those and see if you might be able to see where the error is. Hope it works out!
Hema
Thanks For Sharing this Amazing Recipe. My Family Loved It. I will be sharing this Recipe with my Friends. Hope They will like it.
Stephanie
I have made this pie crust many times with all the methods and it always turns out phenomenally. Easy to make with clear directions!
Bethen Haddon
Thanks for the great recipe, my pie crust come out lovely and flaky.
Is it normal for there to be melted butter at the bottom of the baking dish once the pie is out of the oven? My pastry was well chilled as I rolled out the night before baking.
I find it hard sometimes to get the cooled pie out of the dish because it gets stuck when the butter solidifies.
Kelli Avila
Hi Bethen! I love that you rolled out the night before! There isn't supposed to be melted butter at the bottom of the dish. Was it a lot? My thinking is that maybe there was too big of a chunk of butter? Another possibility is that there was a slight measuring discrepancy with the flour, which would mean there wasn't enough flour to and the butter didn't quite have anywhere to go? Or possibly your oven wasn't hot enough? Did any of the filling leak out and under the crust? That can also make the pie stick to the pie dish.
L
My dough is sitting in the fridge. I just realized this recipe was for a 9" plate but mine is 12". I am making latticed blueberry pie. Would it be alright if merge the two halves of the dough after they come out of the fridge?
Kelli Avila
This pie crust actually makes a little extra, compared to the typical amount. If you roll it thinner, it probably can work. But you also could merge it together after it's rolled out.
L
Just to update you that I made the blueberry pie with this crust recipe and it was a huge hit!! Thanks a lot!
Jillie
Can you use just regular white vinegar as a substitute for apple cider vinegar?
Kelli Avila
Hi Jillie. If you don't have the apple cider vinegar, I'd suggest just leaving it out instead of trying to substitute it! The primary reason it's added is for a subtle flavor component (along with lending a bit more tenderness to it) and any other vinegar won't cut it. You won't affect the integrity of the recipe by leaving it out though!
Tara
Very deatail information.. thank you Kelli!
????????????