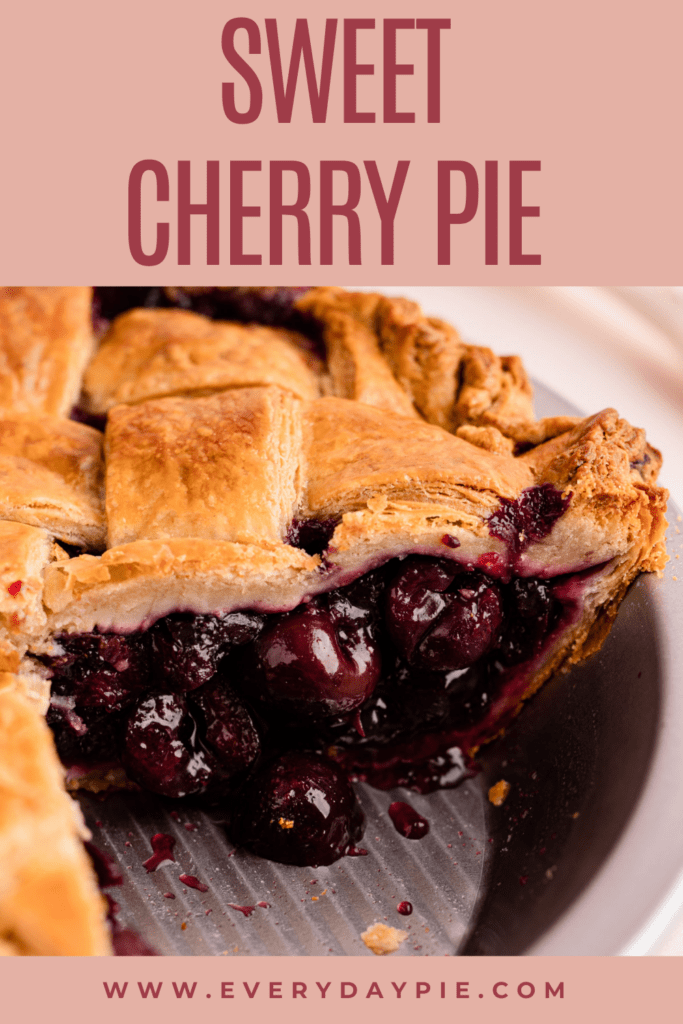
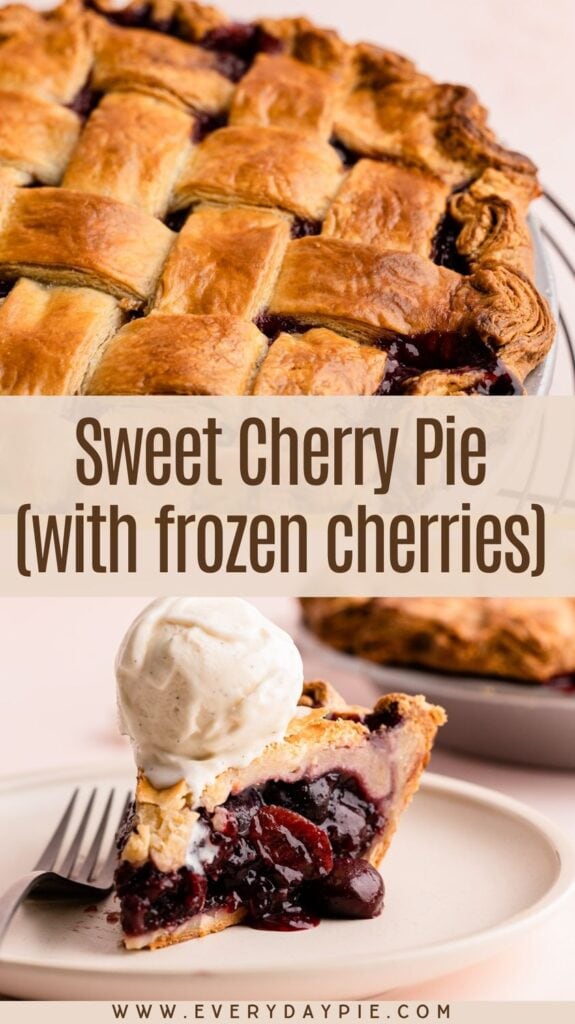
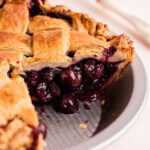
This Cherry Pie made with frozen sweet cherries is the perfect pie to make any time of year. Frozen sweet dark cherries are paired with lemon and tart cherry juice and accented with almond extract to boost the cherry pie flavor, then baked to perfection inside a flaky lattice crust.
Want to save this recipe?
Enter your email & I'll send it to your inbox. Plus, get weekly updates from me!
Cherry pie conjures quintessential Americana (okay, that and Apple Pie...and Chocolate Cream Pie...and I could keep going but I won't). Sour Cherry Pie often gets all the accolades, but I'm here to argue that Sweet Cherry Pie is just as delicious, nuanced, and lovely. My version harnesses the convenience of frozen cherries for their year-round availability and because they're already pitted. Truly, I hate pitting fruit.
Because frozen dark cherries are naturally sweet, this pie uses less added sugar than its sour counterpart (similar to these Cherry Turnovers, which use sweet cherries, compared to these Sour Cherry Hand Pies). Tart cherry juice and a fresh squeeze of lemon are added to balance out the sweetness, and a splash of almond extract amps up the cherry-ness of the pie.
Can we also talk about the consistency of the filling? I feel like many people struggle with getting cherry filling to thicken properly, but this recipe uses my favorite pie thickener to achieve the perfect texture. And finally, that perfectly-balanced filling is baked up in an amazing butter flaky pie crust. This pie is simply perfection, destined to win blue ribbons.
So, let's get to making it, shall we? The article below is jam-packed full of useful information. You can jump around using the menu below, or skip to the end of the article for the full recipe.
Jump to:
Ingredients Needed and Substitutions
Here is a brief overview of the ingredients needed for this recipe. The full recipe with quantities is listed below this text in the recipe card.
- frozen sweet dark cherries (This recipe was developed using frozen cherries that are available year-round in the grocery store. They're typically flash-frozen and of good quality, and they're already pitted. A win-win in my book!)
- tart cherry juice (Because this recipe uses readily-available sweet cherries, it needs some tartness to even out the flavor. Using store-bought tart cherry juice not only brings that balance, but it also enhances the cherry flavor. If you don't want to purchase the cherry juice, you can go ahead and use and equal amount of orange juice. It will slightly change the flavor, but not negatively.)
- almond extract (You won't necessarily be able to pick out this flavor in the pie, but it helps make the cherry flavor shine through.)
- quick-cooking tapioca (This is my preferred thickening agent, especially given that this a juicy pie from the frozen cherries and added cherry juice. I'll talk about this more below.)
- granulated sugar
- lemon juice (Adds another layer of flavor balance to the pie.)
- butter (Dotting the pie with butter before baking makes the filling luxurious, but this is very optional.)
What Type of Thickener to Use
The best type of thickener for this pie is quick-cooking tapioca, which is also known as instant tapioca or Minute tapioca. Quick-cooking tapioca is made from the cassava plant, as are tapioca pearls and starch, but it is processed into small granules that cook quickly.
Quick-cooking tapioca thickens this pie by absorbing the juicy cherry filling into the granules, creating a thick, clear gel. If you look closely in the filling, you may see very tiny beads of tapioca, but it's not something you will taste or notice unless you are looking for it.
Unlike other thickeners such as cornstarch or flour, quick-cooking tapioca creates a perfectly thickened consistency without making the filling cloudy or gummy. It allows the clean and bright cherry flavor to shine through.
You can find quick-cooking tapioca in all major grocery stores, usually in the baking aisle near the cornstarch.
Tips for Working with Quick-Cooking Tapioca
- Make sure to let the tapioca granules sit with the cherry juice to allow them to hydrate. Stir up your filling a few times while it is sitting to ensure that all the granules are evenly hydrated.
- Exposed tapioca granules can harden in the heat of the oven, so make sure you aren't leaving too much fruit filling exposed if you are doing a lattice or other decorative design for the top crust.
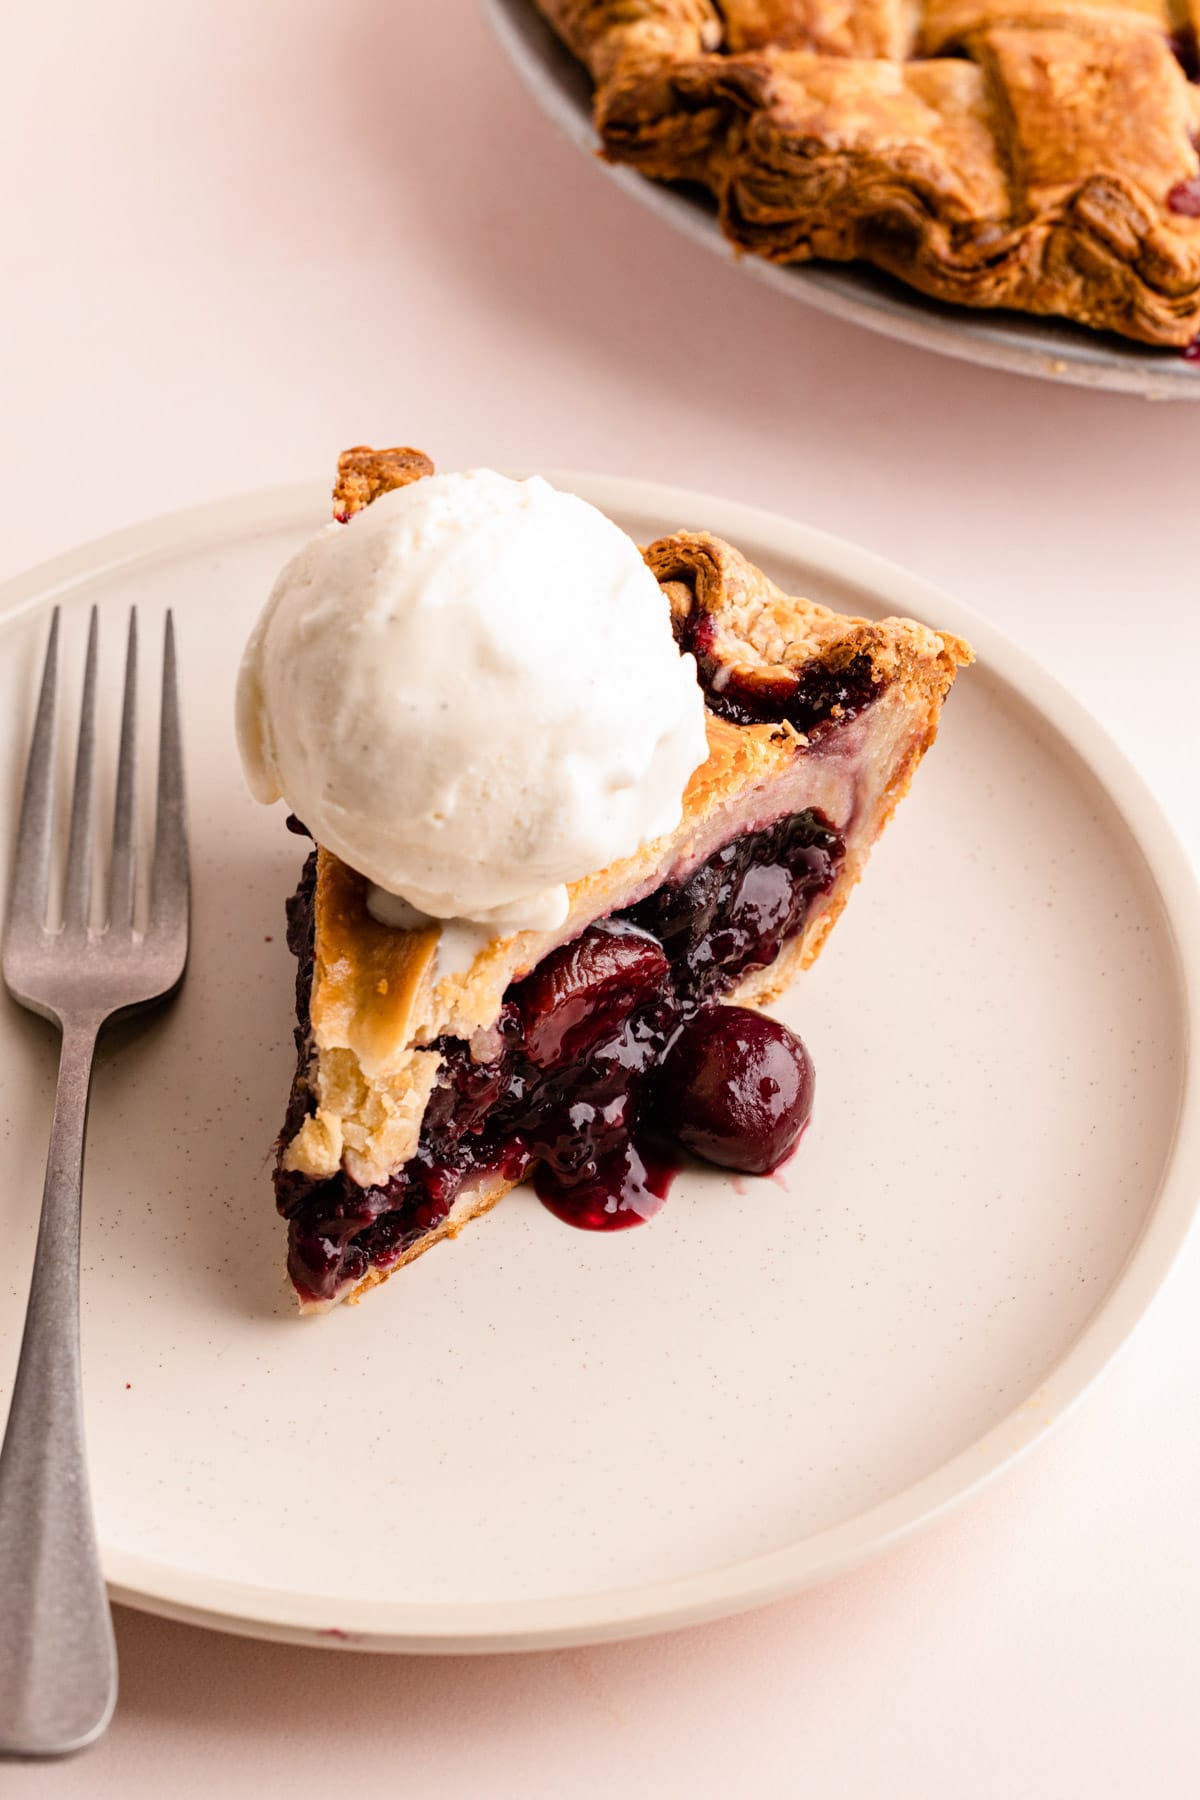
- For the tapioca granules in the pie filling to activate fully, the pie must be nearly completely cooled. This doesn't mean you can’t dive right into this pie warm--you can--it just might be a bit runny. The filling will thicken up more once it cools.
- Do not use tapioca pearls instead of the quick-cooking tapioca.
Pie Crust Options
This pie tastes best with a homemade buttery pie crust, and I recommend my Flaky Pie Crust recipe, which is linked in the recipe card. Be sure to check out the article above the recipe as it is a super useful guide to making the crust.
If you don't want to make that Super Flaky Pie Crust, there are several other options on this website that would work well:
Whatever pie crust you use, you'll need a top crust and a bottom crust.
Double Crust Vs. Lattice
What type of top crust you choose is a personal preference!
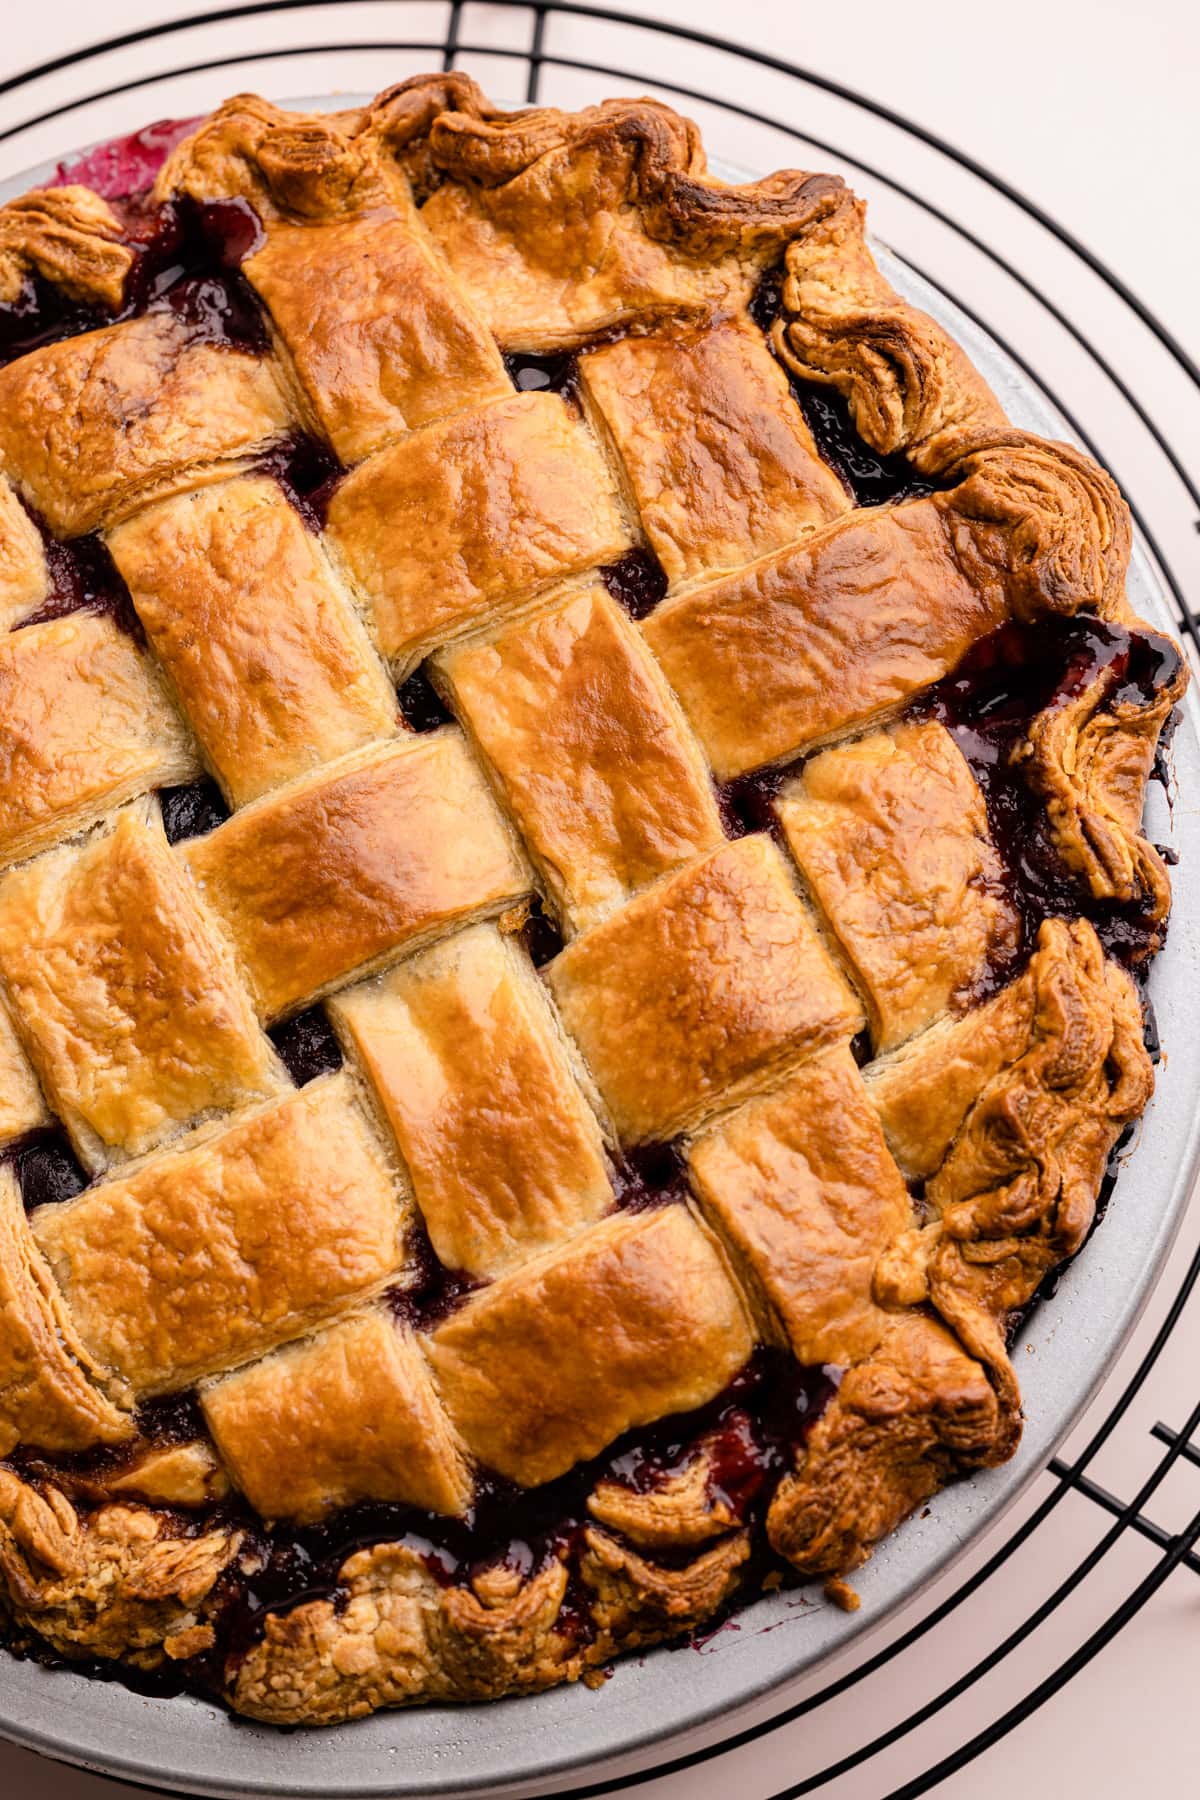
If you want that classic Americana look to your cherry pie, a lattice top will undoubtedly do the trick. Many people are intimidated by making a lattice pie crust, but it’s pretty simple to do if you follow a few easy tips and tricks. Here is a complete Guide to Making a Lattice Pie Crust if you are unfamiliar with the technique.
Aside from being beautiful, a lattice does also serve a purpose! Some pies (especially fruit pies) need to have a way for the built-up steam from the evaporating filling to escape. A lattice pie is essentially built-in ventilation.
However, a full top crust is much easier to put on a pie. All you have to do is roll out pie dough to a 10- or 11-inch circle and place it on top of the pie. Tuck the edges underneath the crust and crimp as desired. Make sure to poke steam holes! Do this after you egg wash, so the steam holes don't get sealed over.
Step-By-Step Recipe Overview
As with most pies, there are a few steps you need to complete to get to the finished product. A lot of these components can be broken down into steps and done days (or weeks) in advance.
Here is a quick visual overview of the steps needed to make this recipe. This is not the actual recipe, which is located at the end of this article and has much greater detail to ensure success.
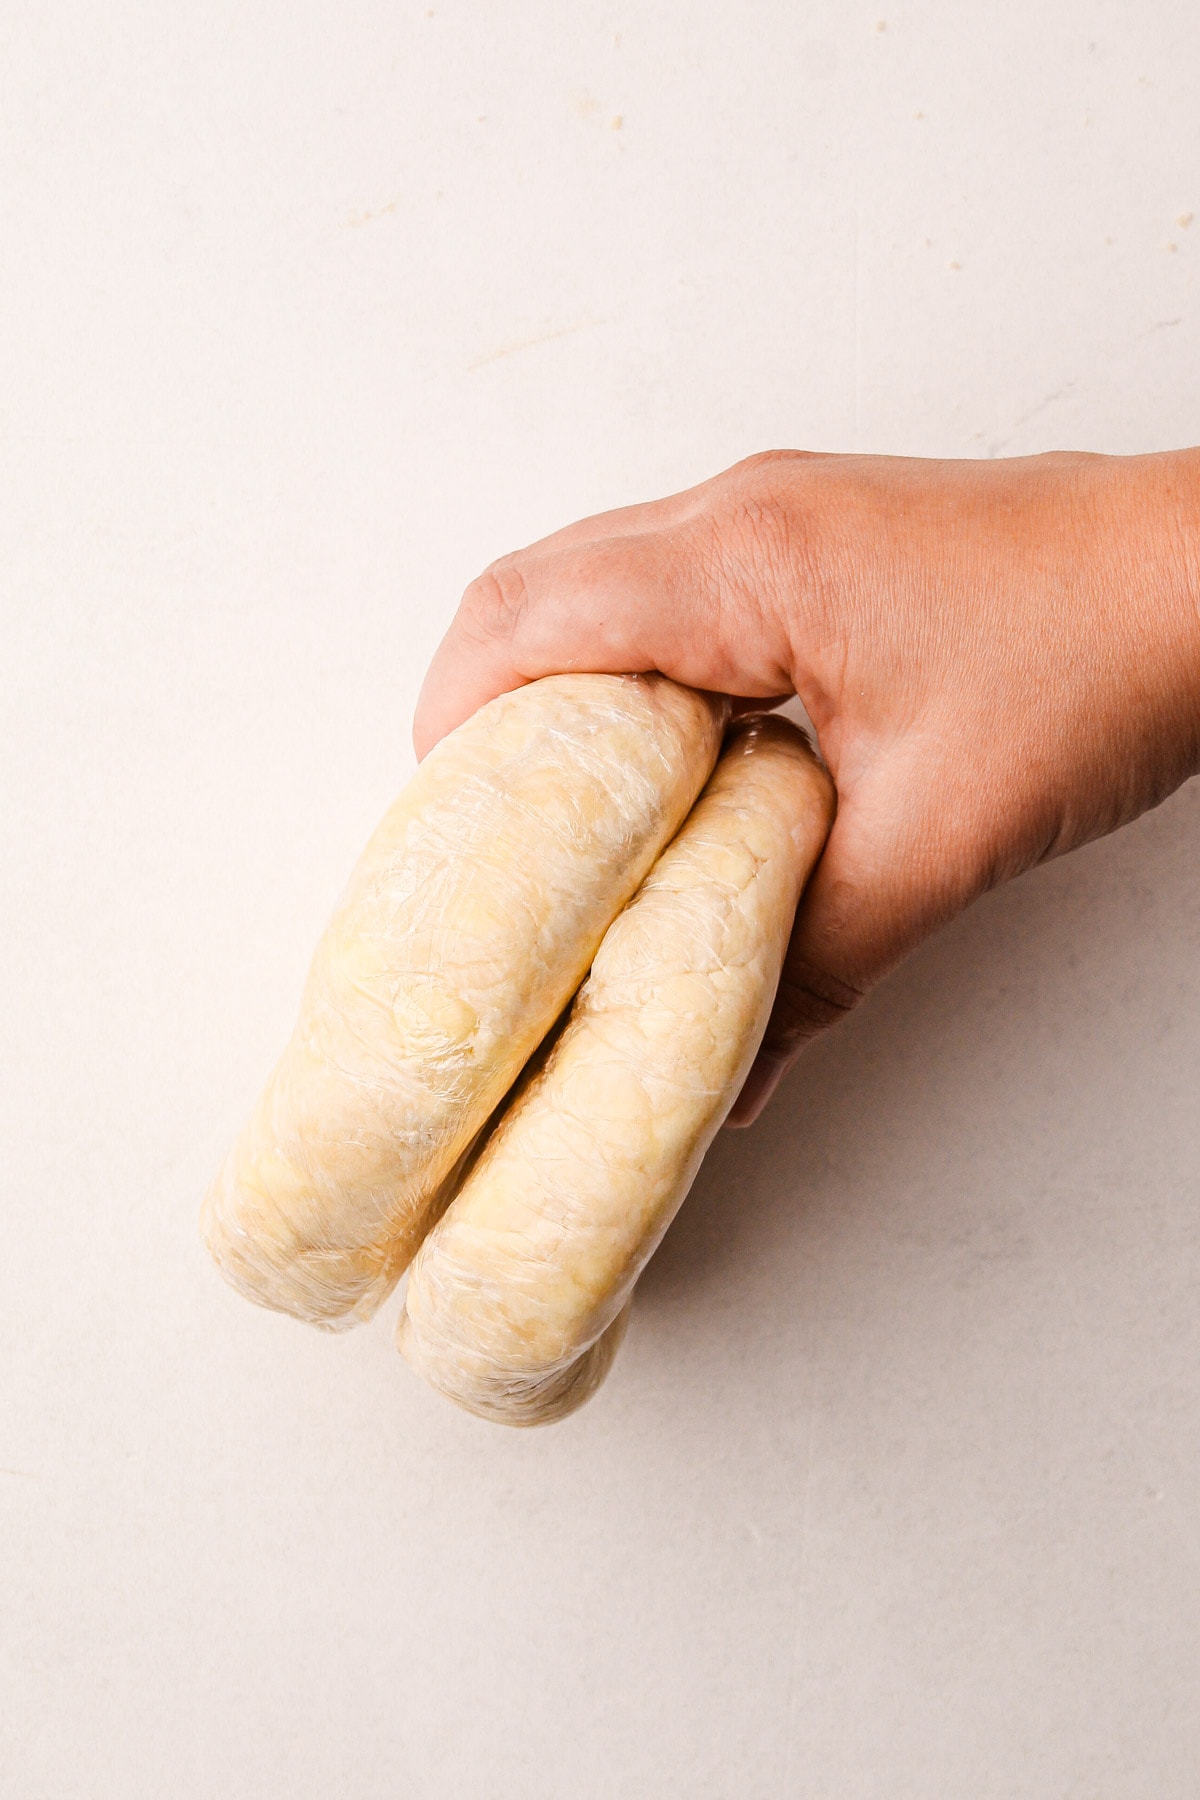
Step 1: Prepare the pie crust. It's best to do this at least one day ahead of time.
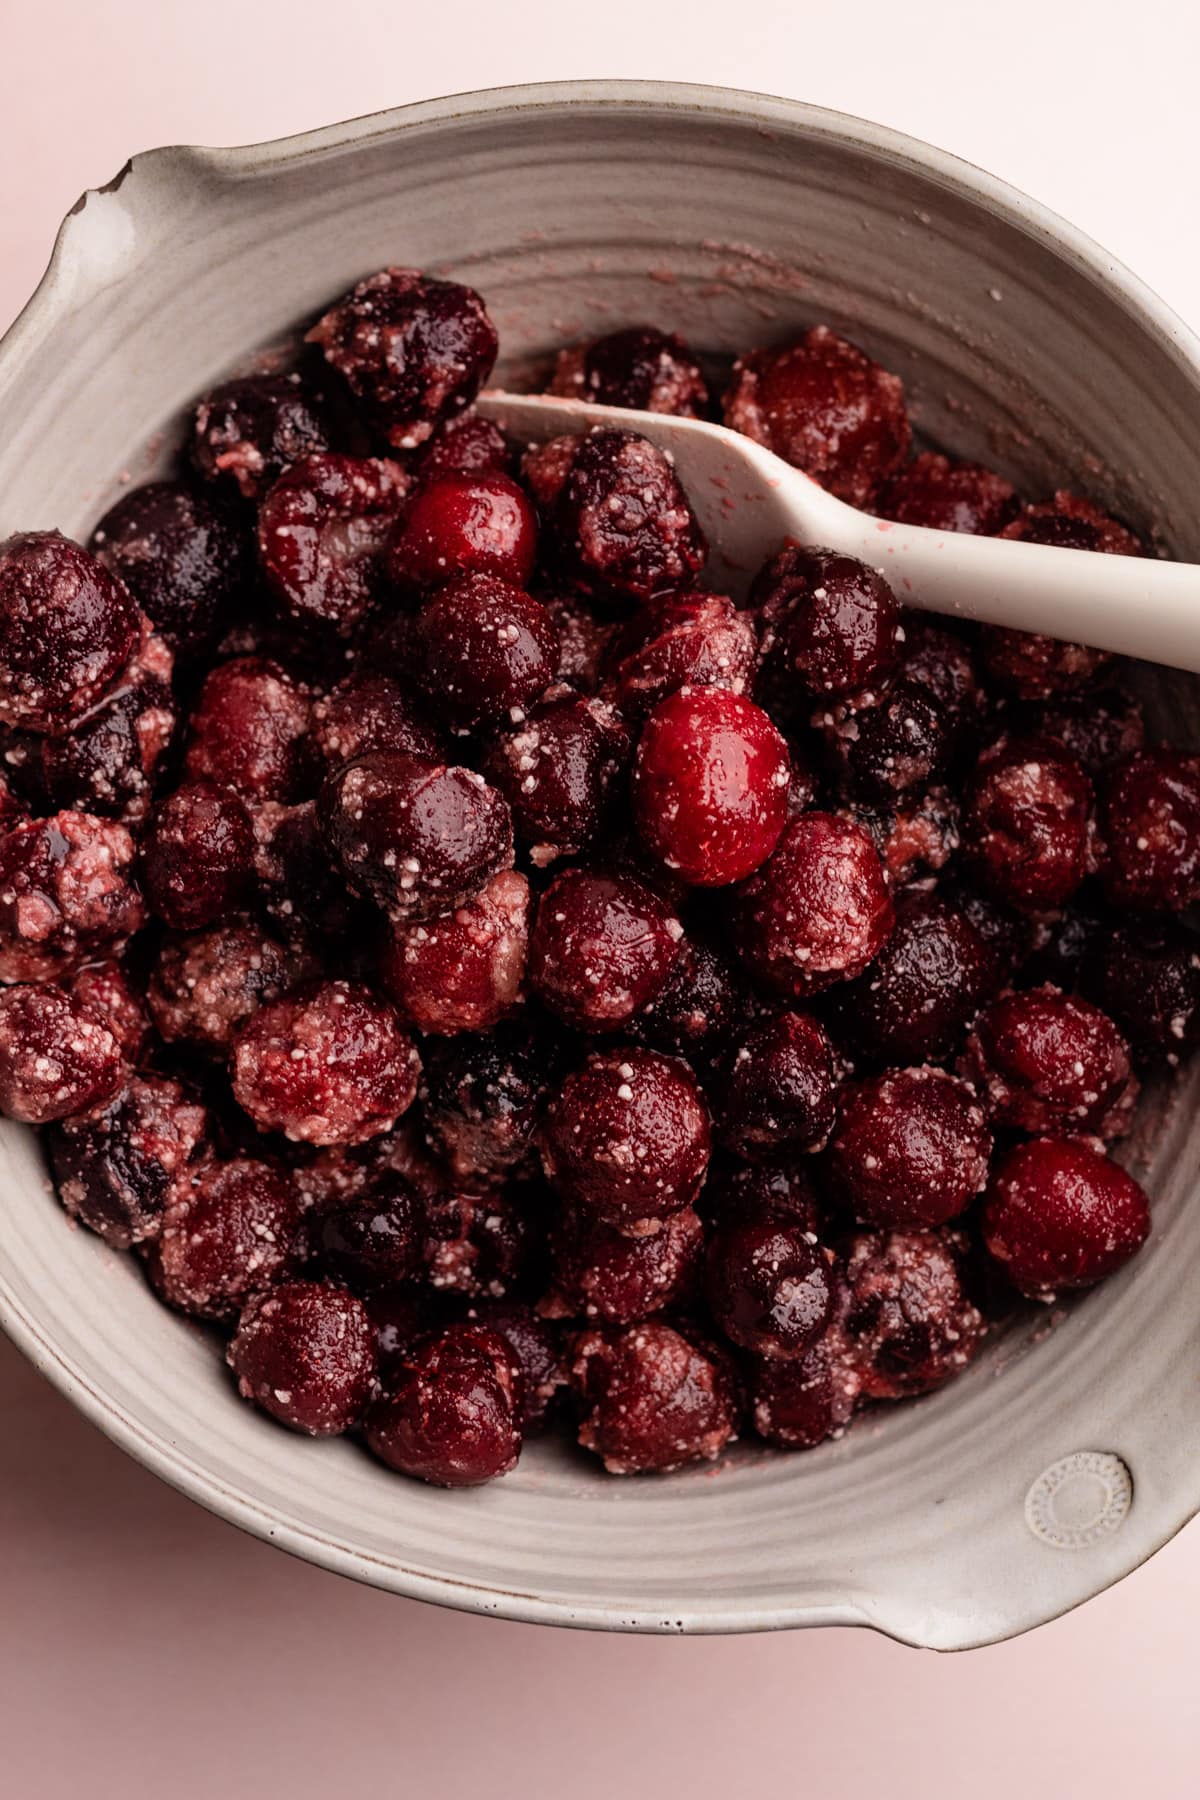
Step 2: Mix together the cherry pie filling. Let the frozen cherry mixture sit for a few minutes so the tapioca can hydrate.
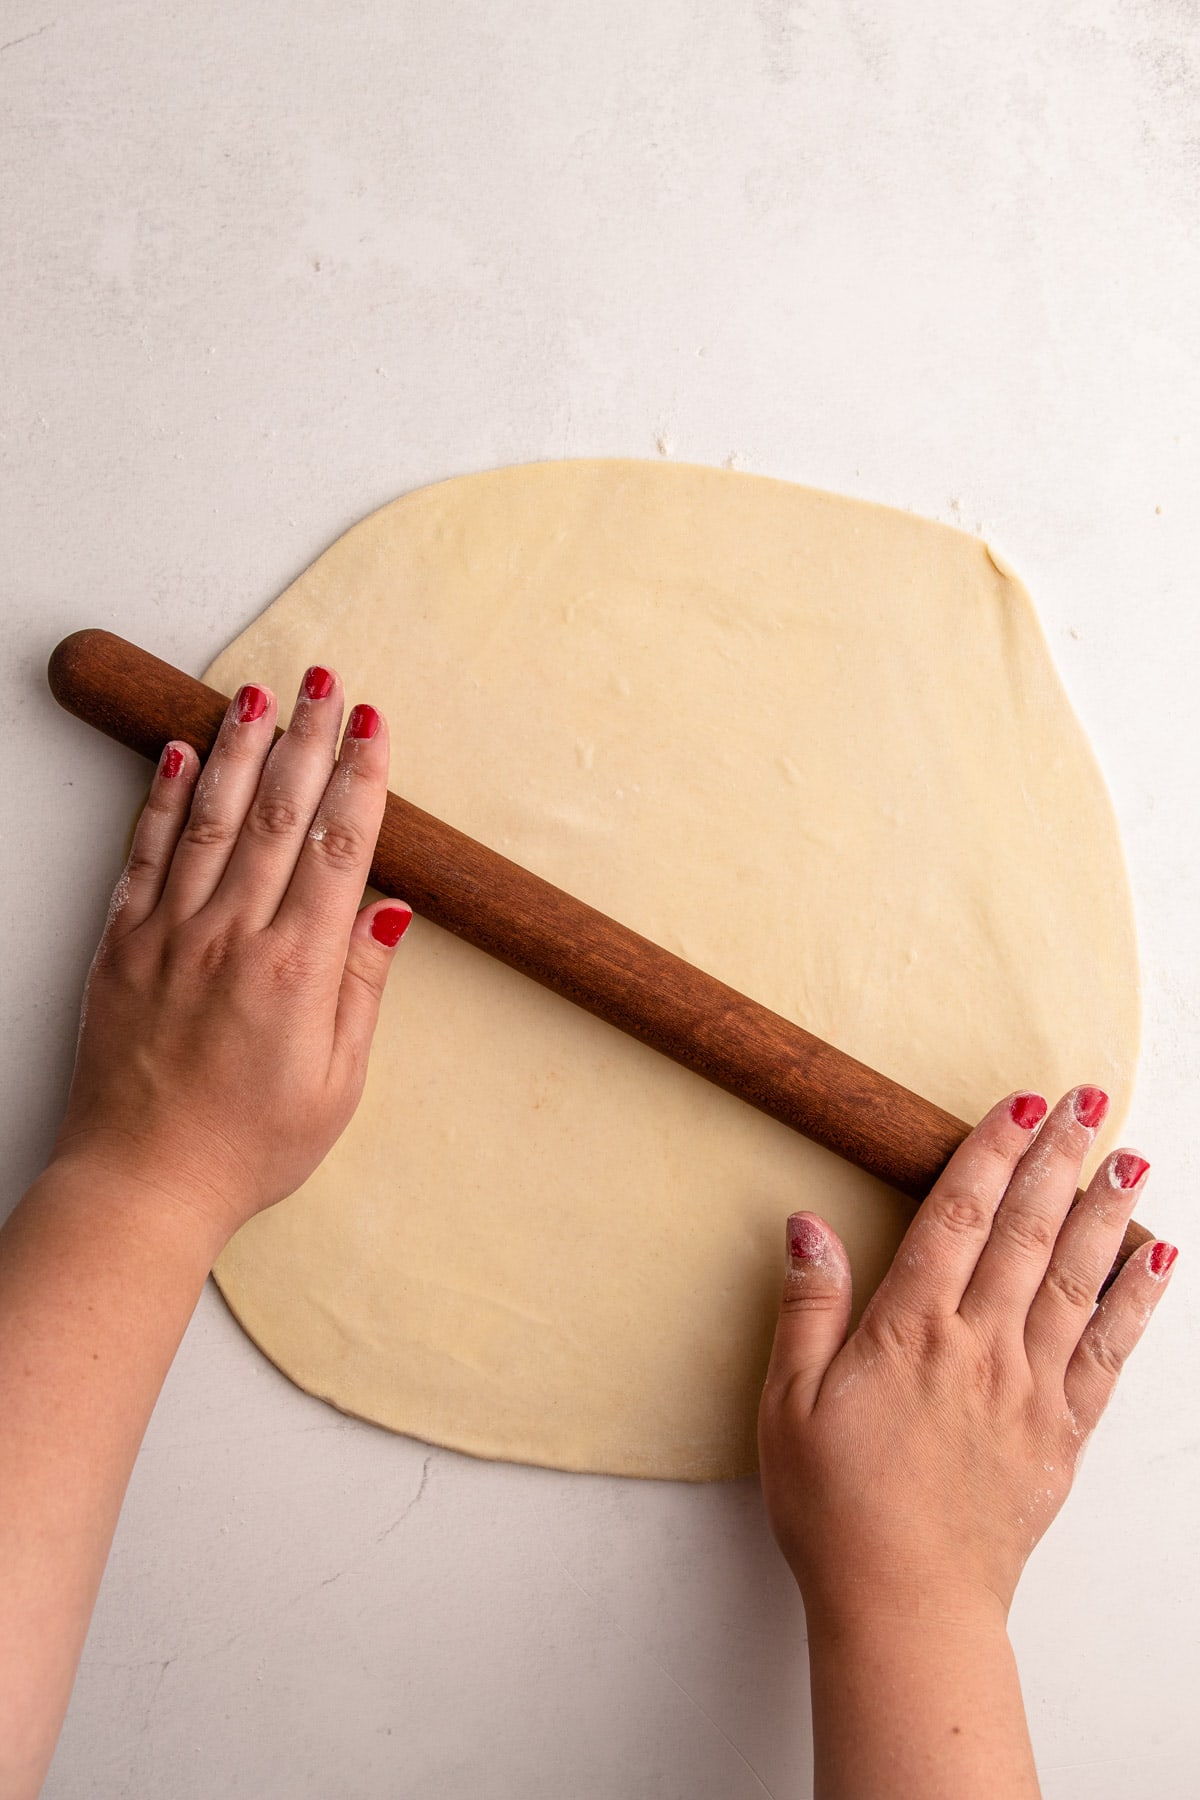
Step 3: Roll out the bottom pie crust and fit it into a 9-inch pie plate.
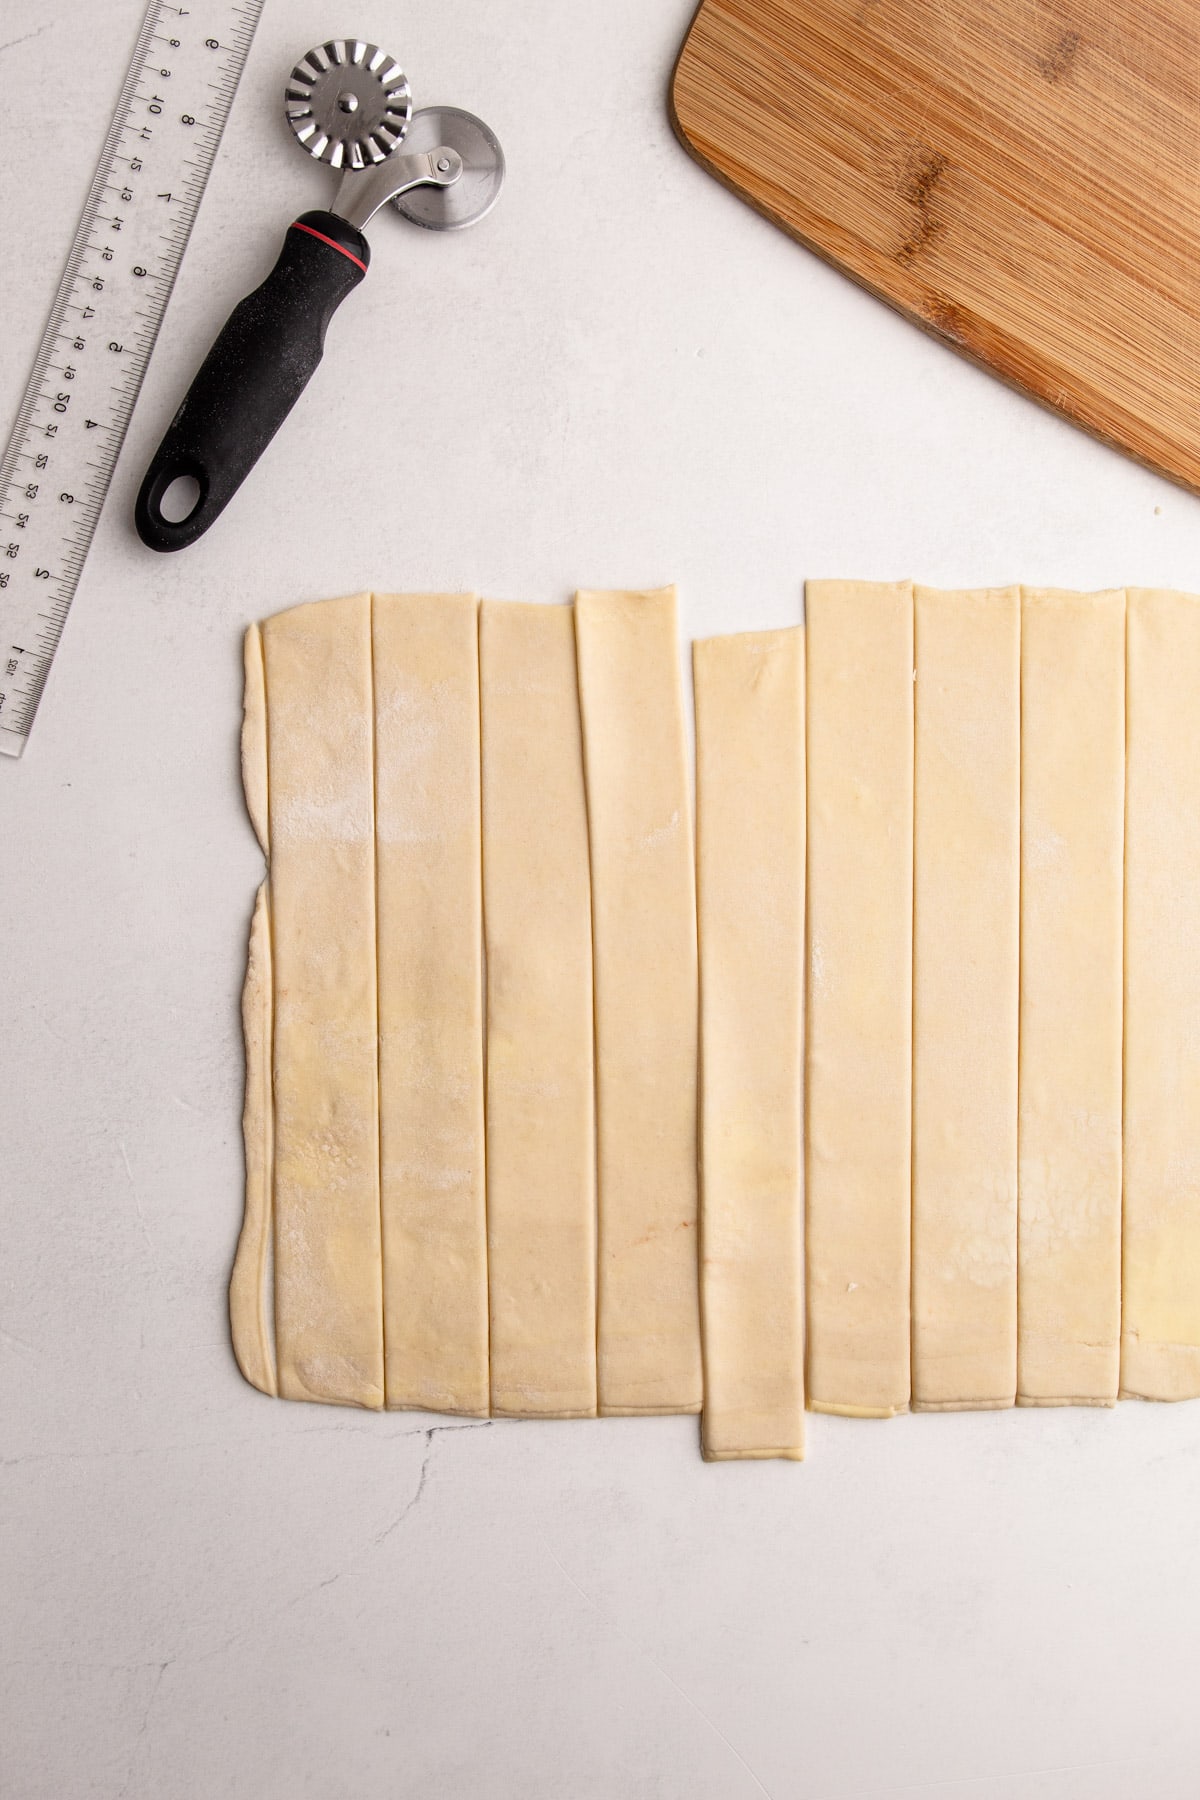
Step 4: Roll out the top crust, and cut strips to make a lattice, if you're making one (it's optional).
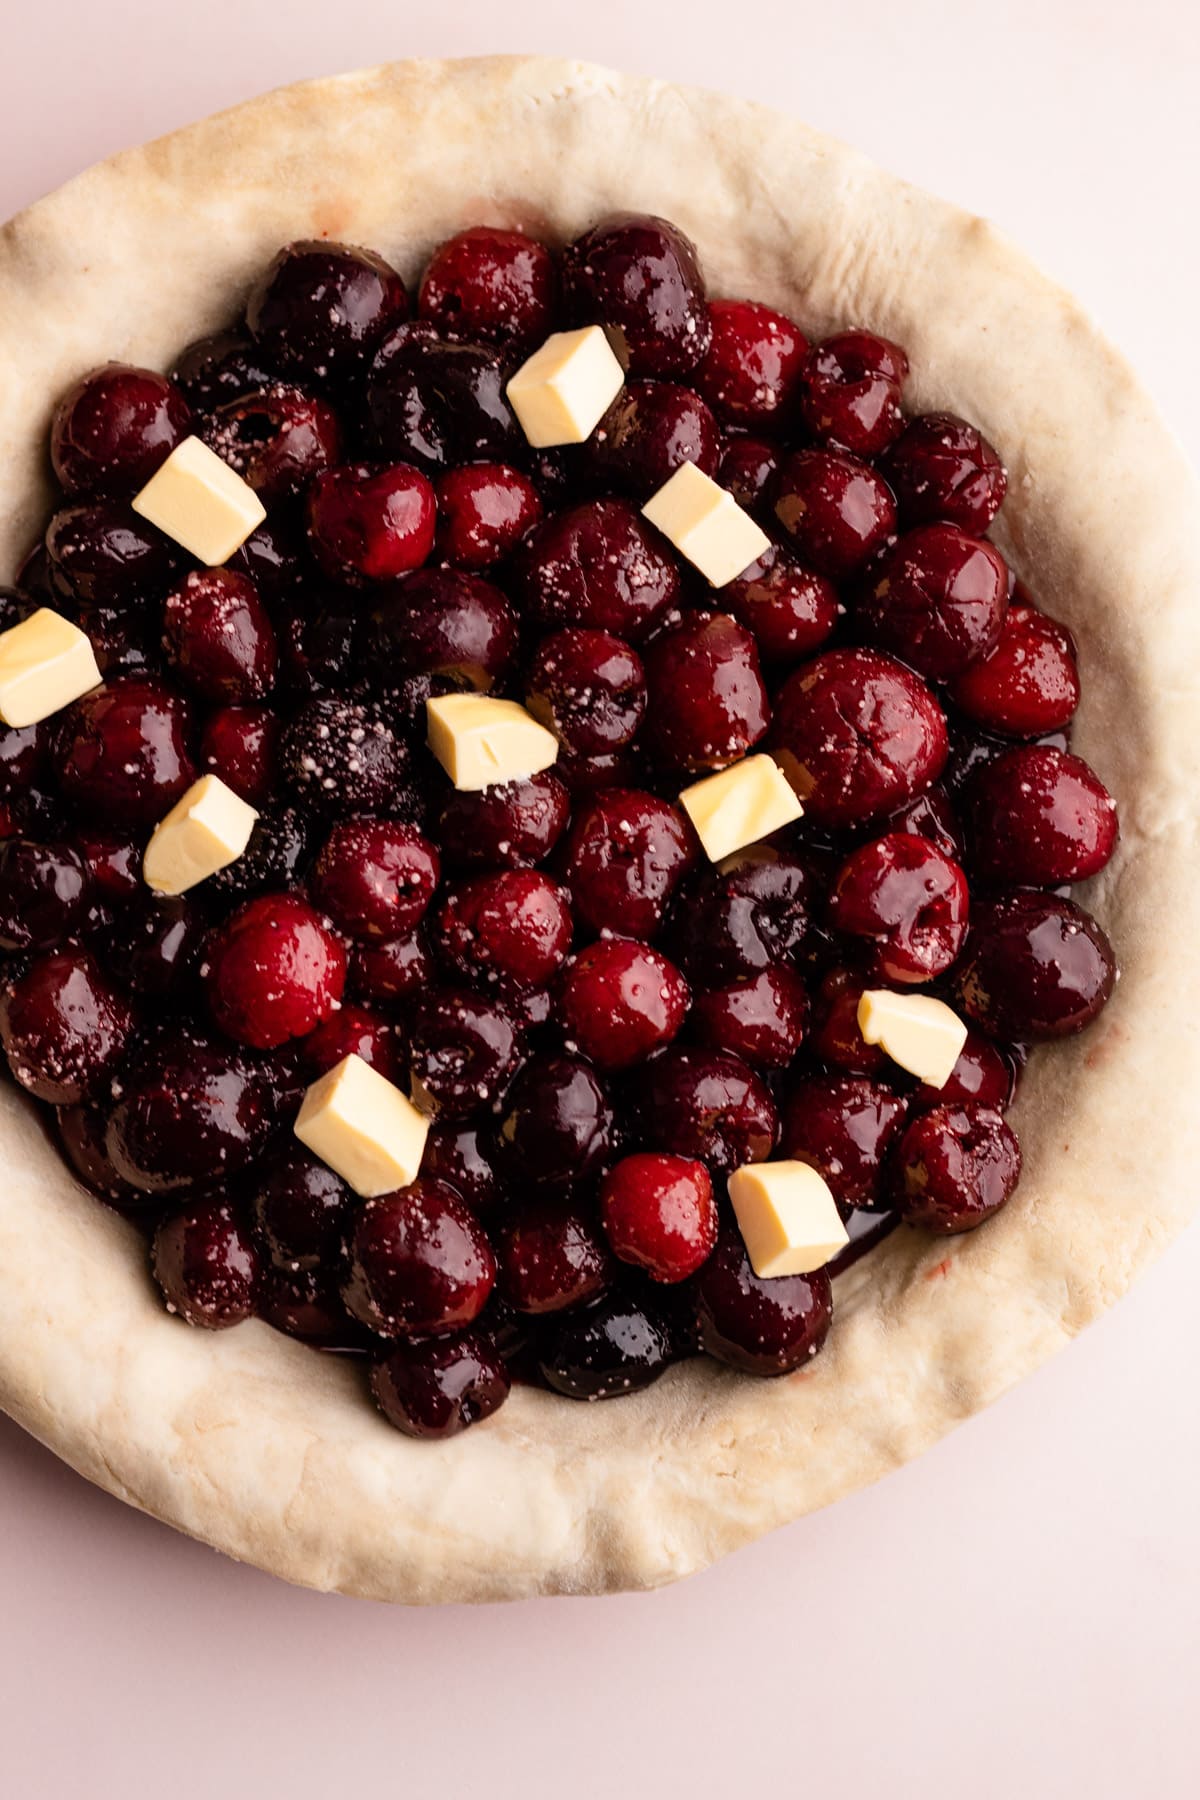
Step 5: Add the filling to the pie crust, and optionally dot with butter.
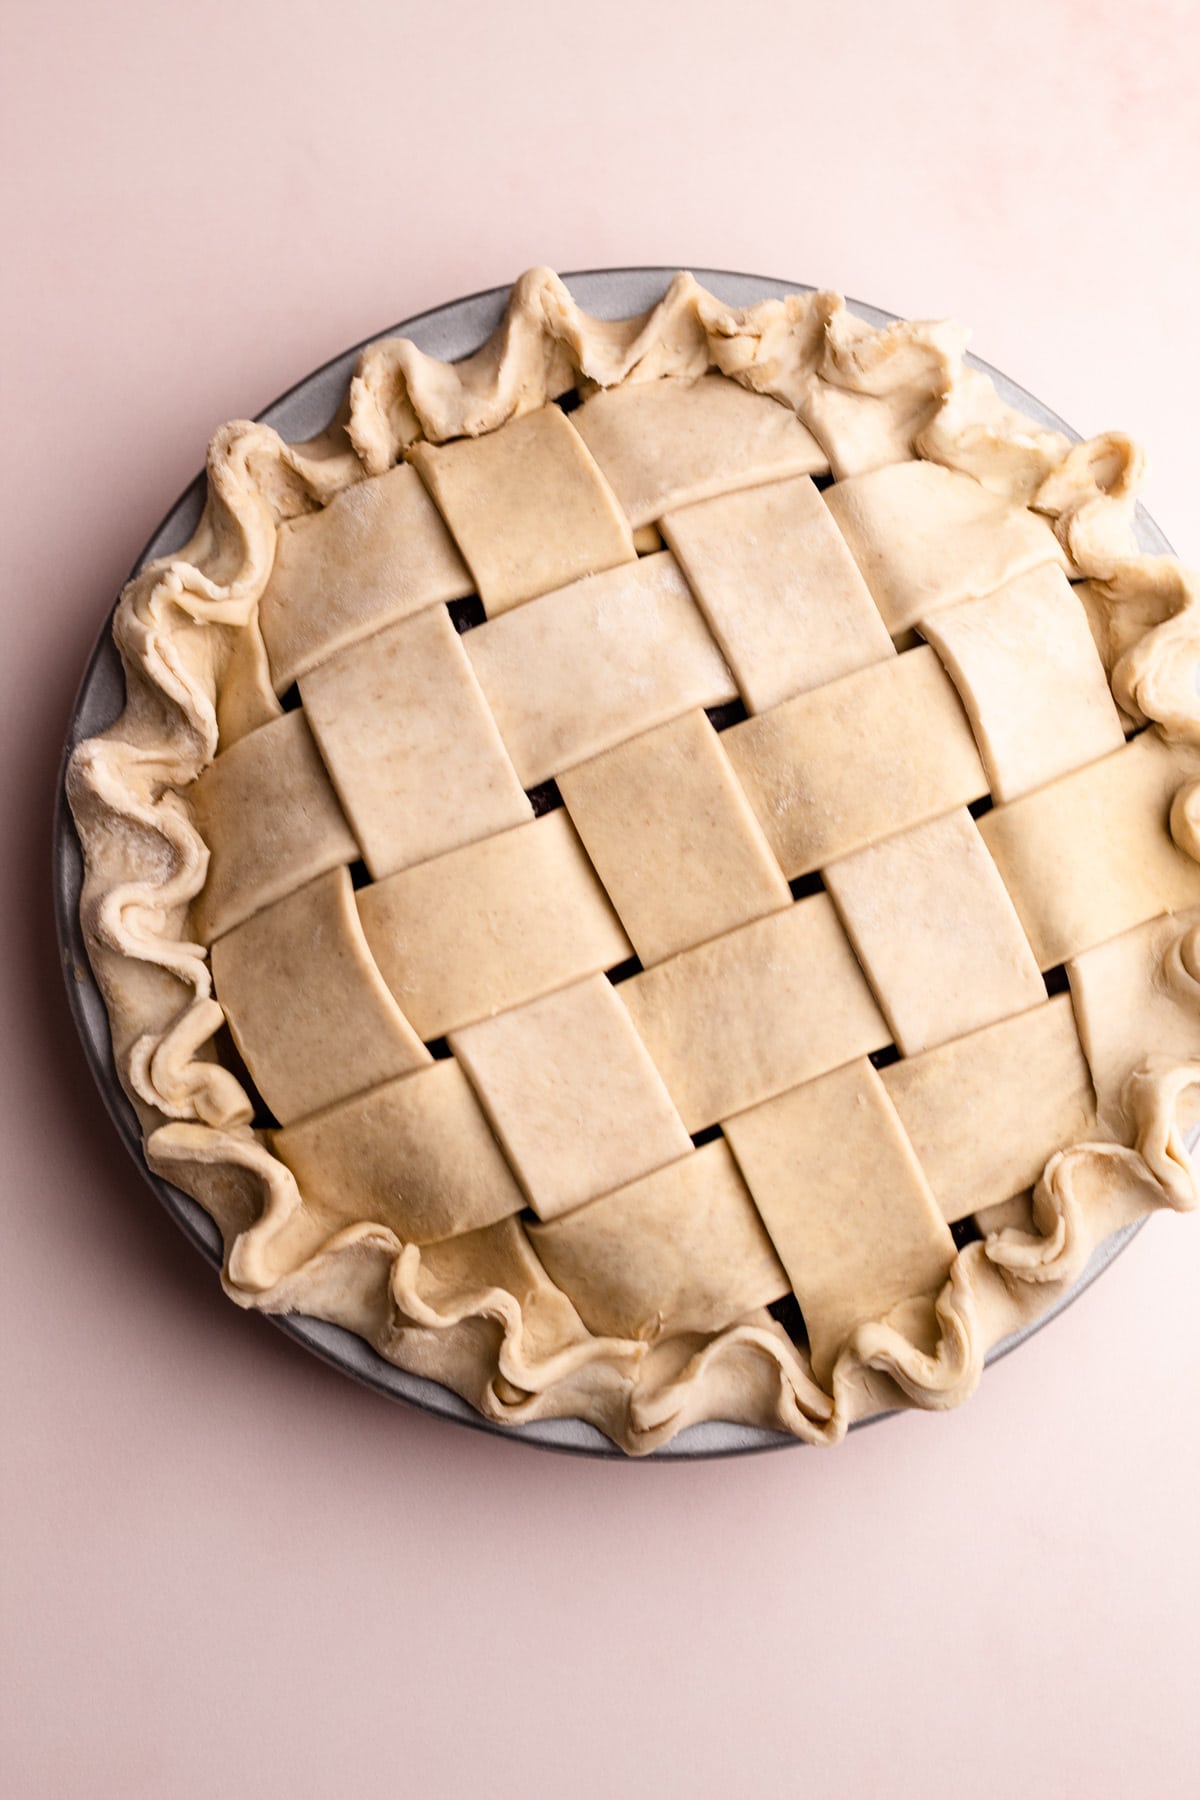
Step 6: Add the top crust of your choice and crimp the top and bottom crusts together.
Baking Tips
There is one main rule to remember when baking a double butter pie crust: the very cold dough should be put in a very hot oven. All-butter pie pastry should be thoroughly chilled before baking and then baked at a high temperature, ideally around 425ºF. See this post about baking a Double Crust Pie for more extensive information.
But here are a few additional helpful tips for this cherry pie:
- Make sure your oven is running at an accurate temperature (a cheap oven thermometer is useful for this)
- To ensure your pie is baked properly, use an instant-read thermometer. For fruit pies, check the internal temperature is above 200ºF. Visually check for golden pastry and a puffed up pie. Look for at least one bubble to check if the filling is ready.
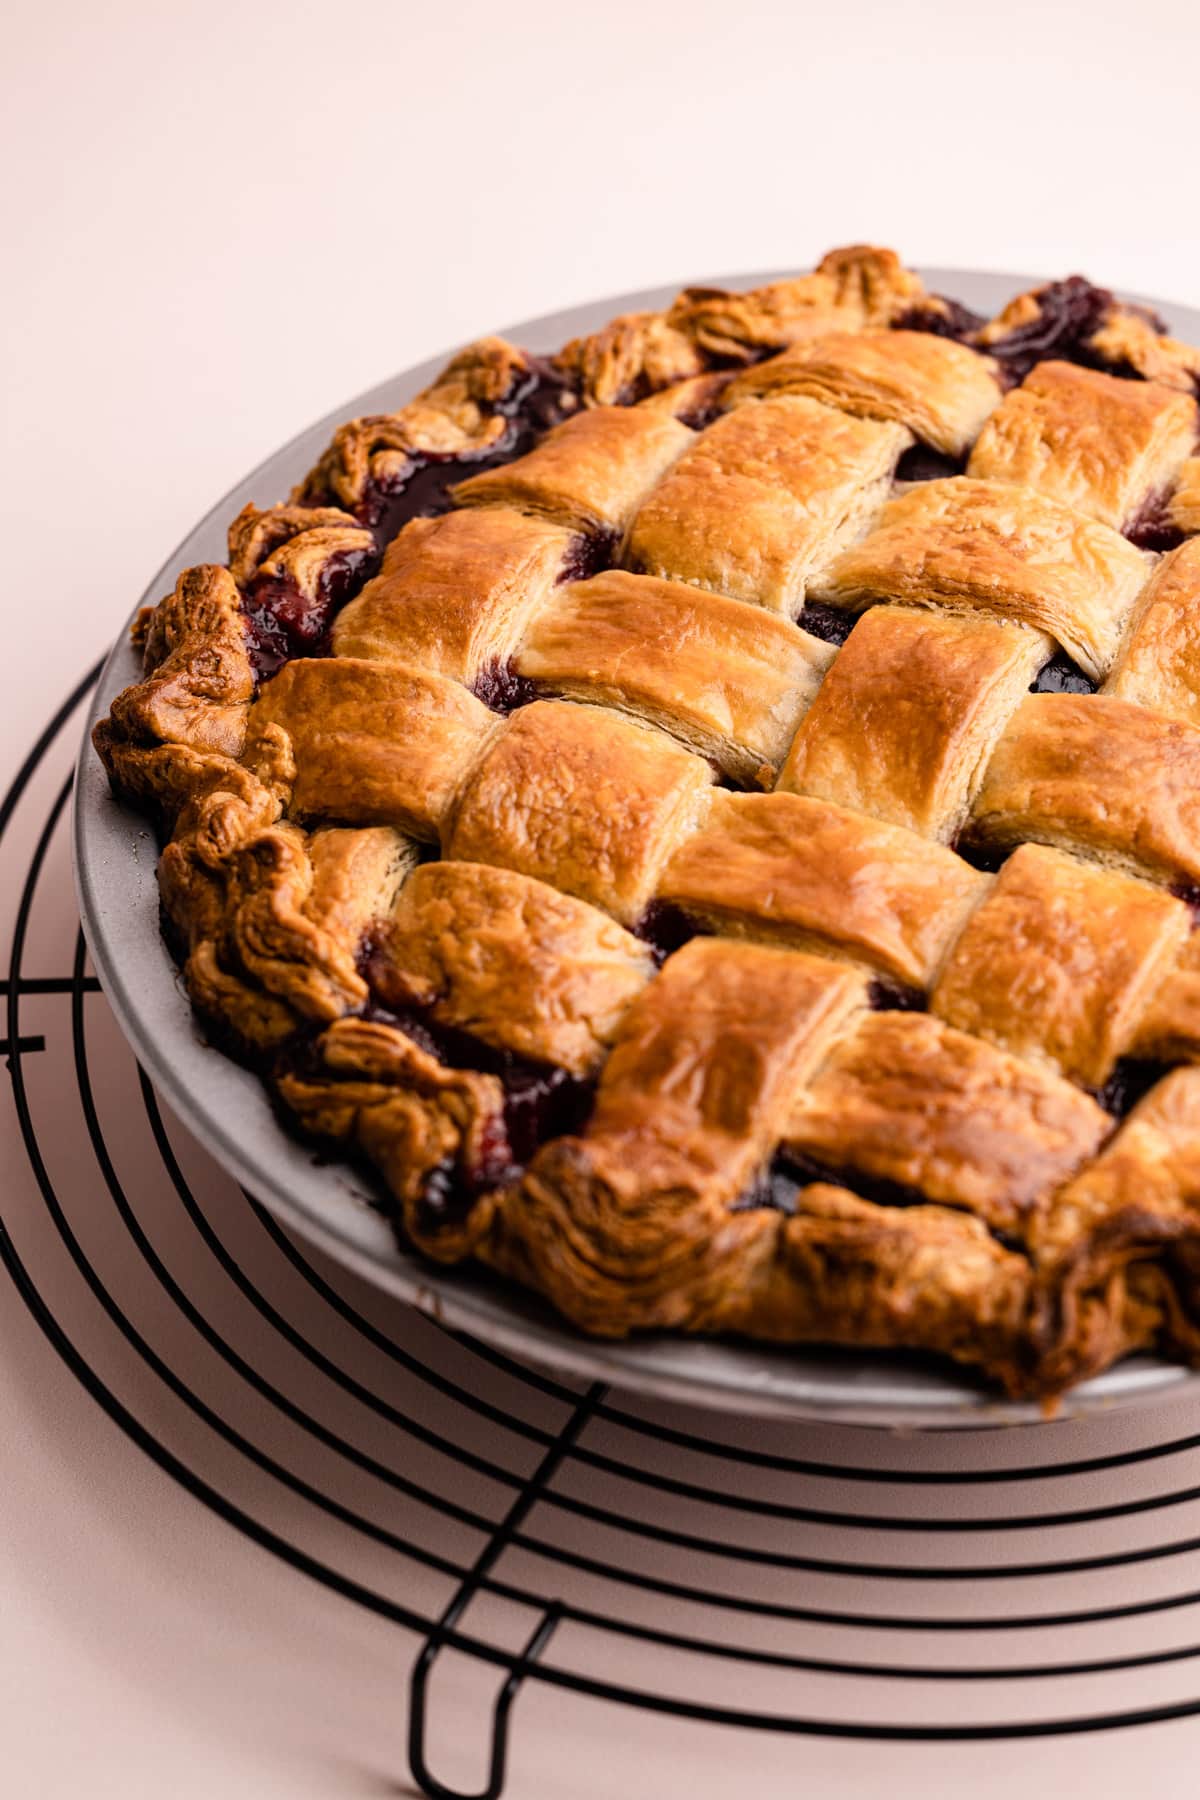
- If you find that your pie is done but the top crust isn't as golden brown as you'd like, move the pie up to the middle rack to cook for about 10 minutes, or until baked to your liking.
Make Ahead Tips
- The pie crust can and should be made a day ahead of time. You can make it up to 2 days ahead, stored in the refrigerator, or up to 3 months stored in the freezer.
- You can roll out the pastry 1 day ahead of time.
- The entire pie can be assembled and frozen before being baked. You can bake it straight from frozen, following this guide: How to Bake a Frozen Pie.

Serving / Storing
The pie must be nearly completely cooled in order for the filling to set up. This does not mean you can’t dive right into this pie warm–you can. It just might be slightly runny. The filling will thicken up more once it cools.
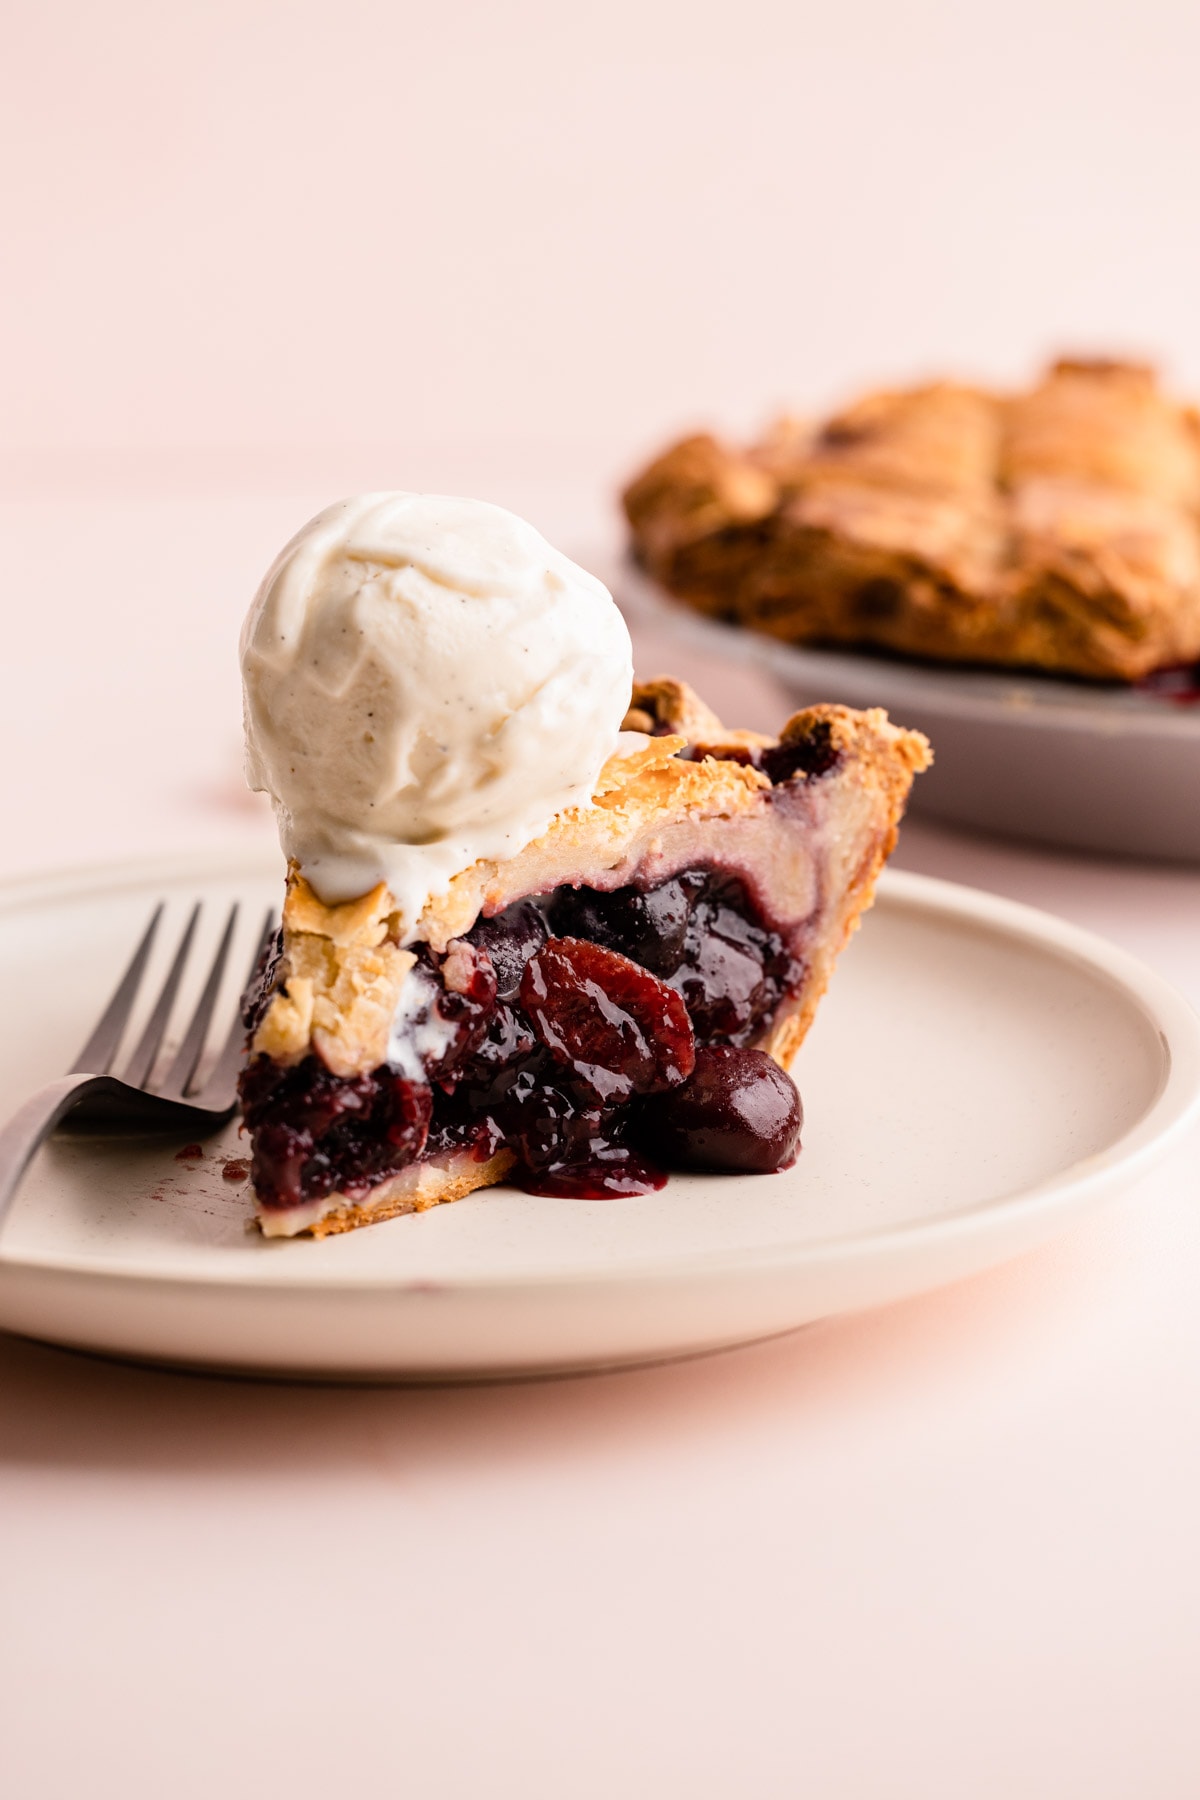
Serve the baked cherry pie at room temperature. It can be served as-is or with a scoop of ice cream.
The pie can be stored fully-baked at room temperature, covered, for 1 day. If you are storing it longer, cover it and place it in a refrigerator.
Video
More Cherry Recipes
More Fruit Pies
I am so honored when you make a recipe from my site! If you make this Cherry Pie Recipe, please leave a star ⭐️⭐️⭐️⭐️⭐️ rating with your experience! If you have any questions about this recipe, feel free to comment here, and tag me on Instagram!
PrintFull Recipe
Sweet Cherry Pie
This Sweet Cherry Pie, made using frozen cherries, is the best dessert to make regardless of what season it is! Sweet cherries are paired with lemon and tart cherry juice to balance it out, accented with almond extract, and tucked inside a flaky lattice crust. The best type of thickener for this pie is quick-cooking tapioca. Quick-cooking tapioca is great because it works by absorbing the juicy cherries within the granules to create a thick filling. See the notes for an alternative.
- Prep Time: 00:30
- Cook Time: 01:00
- Total Time: 1 hour 30 minutes
- Yield: serves 8-10
- Category: Fruit Pie
- Method: Bake
- Cuisine: American
Ingredients
- 1 batch Flaky Pie Crust (see notes for alternatives)
- 7 cups (32 ounces) frozen sweet pitted cherries
- ½ cup (100 grams) granulated sugar
- ⅓ cup tart cherry juice
- 2 tablespoons fresh squeezed lemon juice
- 2 tablespoons quick-cooking tapioca (see notes for substitute)
- ½ teaspoon almond extract
- Pinch of coarse kosher salt
- 2 tablespoons unsalted butter, diced (optional)
- Egg wash (1 egg whisked together with 1 tablespoon water)
- Coarse sugar (optional)
Instructions
- Prepare the pie pastry and let rest overnight, if possible.
- Preheat the oven to 425ºF and place an oven rack in the lower and middle part of the oven.
- Make the filling: In a large bowl, mix the cherries, granulated sugar, cherry juice, lemon juice, tapioca, almond extract, and salt until combined. Let stand at room temperature, stirring occasionally, to hydrate the tapioca, about 10-15 minutes. The cherries will slightly defrost in this timeframe.
- Roll out the pastry: Roll out 1 pie pastry disk to an 11-inch circle. Fit the pastry into a 9-inch pie plate, making sure to press the pastry into the sides and the bottom. Roll out the second disk of pastry and cut strips to make a lattice, if desired, or just roll out as a full top crust. Place the lattice strips or top crust in the refrigerator until ready to use.
- Transfer the cherry pie filling and all of its juices into the pastry-lined pie plate. Gently press down on the filling to eliminate any gaps between the fruit. Dot the pie with the pieces of butter, if using.
- You can top the pie with a lattice or top it with the rolled-out pie dough with a few slits or small shapes stamped out of it to let steam escape. Trim the edges and crimp the bottom and top crusts together.
- Brush the top crust with an egg wash and sprinkle with coarse sugar, if desired.
- Bake on the lowest rack for 25 minutes.
- Lower the oven temperature to 400ºF. If the crust is browning, cover the outer edges with aluminum foil or a pie shield, leaving the middle of the crust exposed. Bake for another 35-40 minutes, or until the juices are bubbling and the temperature of the middle of the pie reaches above 200ºF.
- Let the pie cool at room temperature for 3-6 hours to let the juices set up.
- Serve at room temperature.
Notes
If you don't want to purchase tart cherry juice, you could substitute orange juice. It results in a slightly different flavor but it is still lovely!
The tapioca can be swapped for 3 tablespoons of cornstarch.
The added butter to the pie filling is completely optional. It adds a bit of "luxury" to the filling, but is not essential.
This pie tastes best with a homemade buttery pie crust. There are a few options on this website:
If you find that your pie is done but the top crust isn't as golden brown as you'd like, move the pie up to the middle rack to cook for about 10 minutes, or until baked to your liking.
Baking tip: If you find that your pie is done but the top crust isn't as golden brown as you'd like, move the pie up to the middle rack to cook for about 10 minutes, or until baked to your liking.
Some of the links on this page may be affiliate links. Everyday Pie is a participant in the Amazon Associates Program. As an Amazon Associate I earn from qualifying purchases, at no extra cost to you.
Chiara
Very well written recipe, fantastic pie, super american style.
J. Babcock
this pie turned orrut great. I did not thaw the cherries and I used a pie bird, which took care of the juiice problem. J Bab
Alison
This cherry pie filled every expectation I have, and I even cheated and bought crust. The ratio of tart to sweet was perfection! The filling is so easy— just measure a few ingredients into one bowl and stir a couple times.
I was surprised to find a couple stray pits in the frozen cherries so be careful. Will definitely be my go-to cherry pie recipe from here out! Thank you Kelli!
Kelli Avila
Oh wow! I've always seen the notes on packages that stray pits may be in them, but I've never actually experienced it. So happy you enjoyed the recipe!!
Monique C
Can't wait to try this recipe! If I've defrosted the cherries already, do I need to alter the liquid in the recipe at all?
Kelli Avila
I've not tried it with defrosted cherries. And I don't recommend it. But I don't think you'll need to change anything.
Priscilla
Hi Kelli!
I tried this recipe today because it looks sooo appealing! About the filling: I used cornstarch instead of the tapioca and my filling was just runny juice and cherries. Help! What am I doing wrong? I used frozen cherries as suggested and all the juices in the recipe and baked it on the lower rack for 25mins.
Priscilla
Just read the recipe again and realized that the cooking time is much longer! Just ignore thefirat comment then. Sorry!!! Love your content!
Kelli Avila
Hi Priscilla! Yes---that is not enough time for the cornstarch to reach 200ºF which is the minimum it needs to thicken. Can you put it in back in the oven to bake up?
Debbie
Mary, I found the sour cherry juice in the organic section at Loblaw's here in Ottawa
C. Motz
Can you add instructions on at what point in the process the pie can be frozen for later? TIA
Kelli Avila
Hi there! It can either be frozen once assembled, but not baked or once it is fully baked. Check out this post for more info about freezing pies: How to Bake a Frozen Pie or this one How to Bake a Double Crust Pie
Larry Unger
Anyone tried tried ClearJel in lieu of the quick cooking tapioca pearls?
Ron Chapman
Hello Kelli
Thank you for the info on quick cooking tapioca. I have made your apple pie filling, apple pie, triple coconut cream pie and they were all very tasty. I did something wrong when making the banana cream pie as it never really set up, I will try it again another day. I really love the apple pie and will make it often. I will try many more of your recipies as I have really liked all the ones I have made so far, including the tricks and tips you include.
Kelli Avila
Ron, what a kind message. It's nice to meet another pie enthusiast! For the banana cream pie, did the pudding come up to a boil? Good luck on your next bake! -Kelli
Ron Chapman
Hello Kelli
I am pretty new to baking and have a question about tapioca. From what I have been reading, I should use 2 tablespoons of tapioca for every tablespoon of corn starch. Is quick cooking tapioca different or am I mistaken. I am confused on the usage.
Kelli Avila
Hi Ron! Quick cooking tapioca is very different from tapioca starch, if that is what you are referring to. Quick cooking tapioca is granulated tapioca pearls, vs. tapioca starch/flour is ground up. Personally I don't like tapioca starch in pies, so I never put it in my recipes. But I do like quick cooking tapioca for its ability to thicken pies with a lot of juice without making them gummy. You could use cornstarch for this recipe if you'd like. I would recommend 3-4 tablespoons. Reach out if you have any other questions! -Kelli
Sharon Geis
Can I use corn starch instead of tapioca.
Kelli Avila
Yes, use 3 tablespoons cornstarch for a semi set filling, or 4 tablespoons for a set filling.
Alison Johnston
Kelli...should I thaw my frozen sweet cherries before using? Also, since I have pomegranate juice and cranberry juice (both 100% juice) can either of those be substituted for the tart cherry juice? Thanks!
Alison
Kelli Avila
Hi Alison! No need to defrost the cherries, you'll be macerating them anyways, and they will defrost then! Just be sure to stir it a few times during the defrosting period. Also, either of those juices will work great in this recipe! Happy baking!
Mary porter
Can you tell me where might find tart cherry juice? I live in Ontario Canada. I also normally use tapioca starch as a thickener, so not sure how much I should use in this recipe.
I can’t wait to try this cherry pie.
Regards,
Mary
Kelli Avila
Hi Mary. I find cherry juice in the regular grocery store. Look for juice that doesn't have any added sugar. I would suggest sticking with the thickener called for in the recipe. I can't advice on how to swap it out for the tapioca starch since I haven't tested it.
Bri
I’ve been following Everyday Pie for some time and have made her basic butter pie crust recipe my go to
for pie crust. I just attempted her sweet cherry pie for Thanksgiving and it was delicious! Overall, the family very much enjoyed it and the only bit of constructive feedback I received was that the filling could have been a tad sweeter. But that’s nothing a little big of whip cream of ice cream can’t fix 😉 Personally, i appreciated that this recipe stayed away from the syrupy canned cherry pie filling and made me feel better about the quality of ingredients.
Thanks for continuing to share such delicious and inspiring content!
Kelli Avila
Thanks for stopping by and sharing, Bri!