
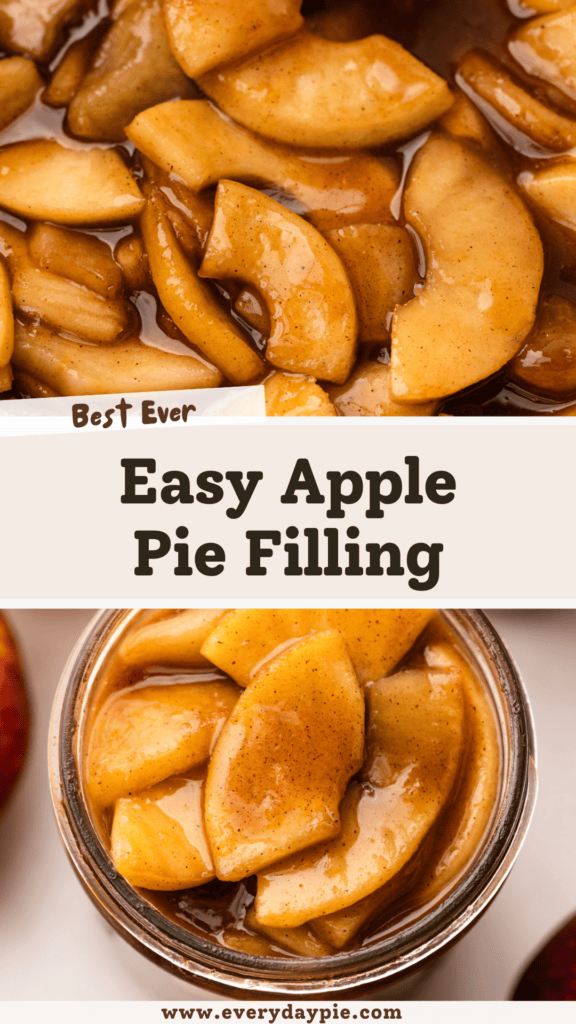
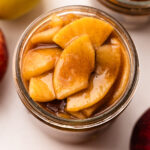
Homemade Apple Pie Filling is super easy to make at home, and perfect to have on hand or stored away in the freezer for whenever you need it. This recipe has a few hidden tricks to get the best apple flavor!
Want to save this recipe?
Enter your email & I'll send it to your inbox. Plus, get weekly updates from me!
This homemade apple pie filling, made with apple cider, brown sugar, and warm spices, is rich and delicious—perfect for any dessert that calls for canned apple pie filling. Every fall, this filling earns a permanent spot in my refrigerator (and freezer). It's super easy to make and stores well, too. Making apple pie filling is one of the best ways to use up any large quantities of apples you might have from apple picking.
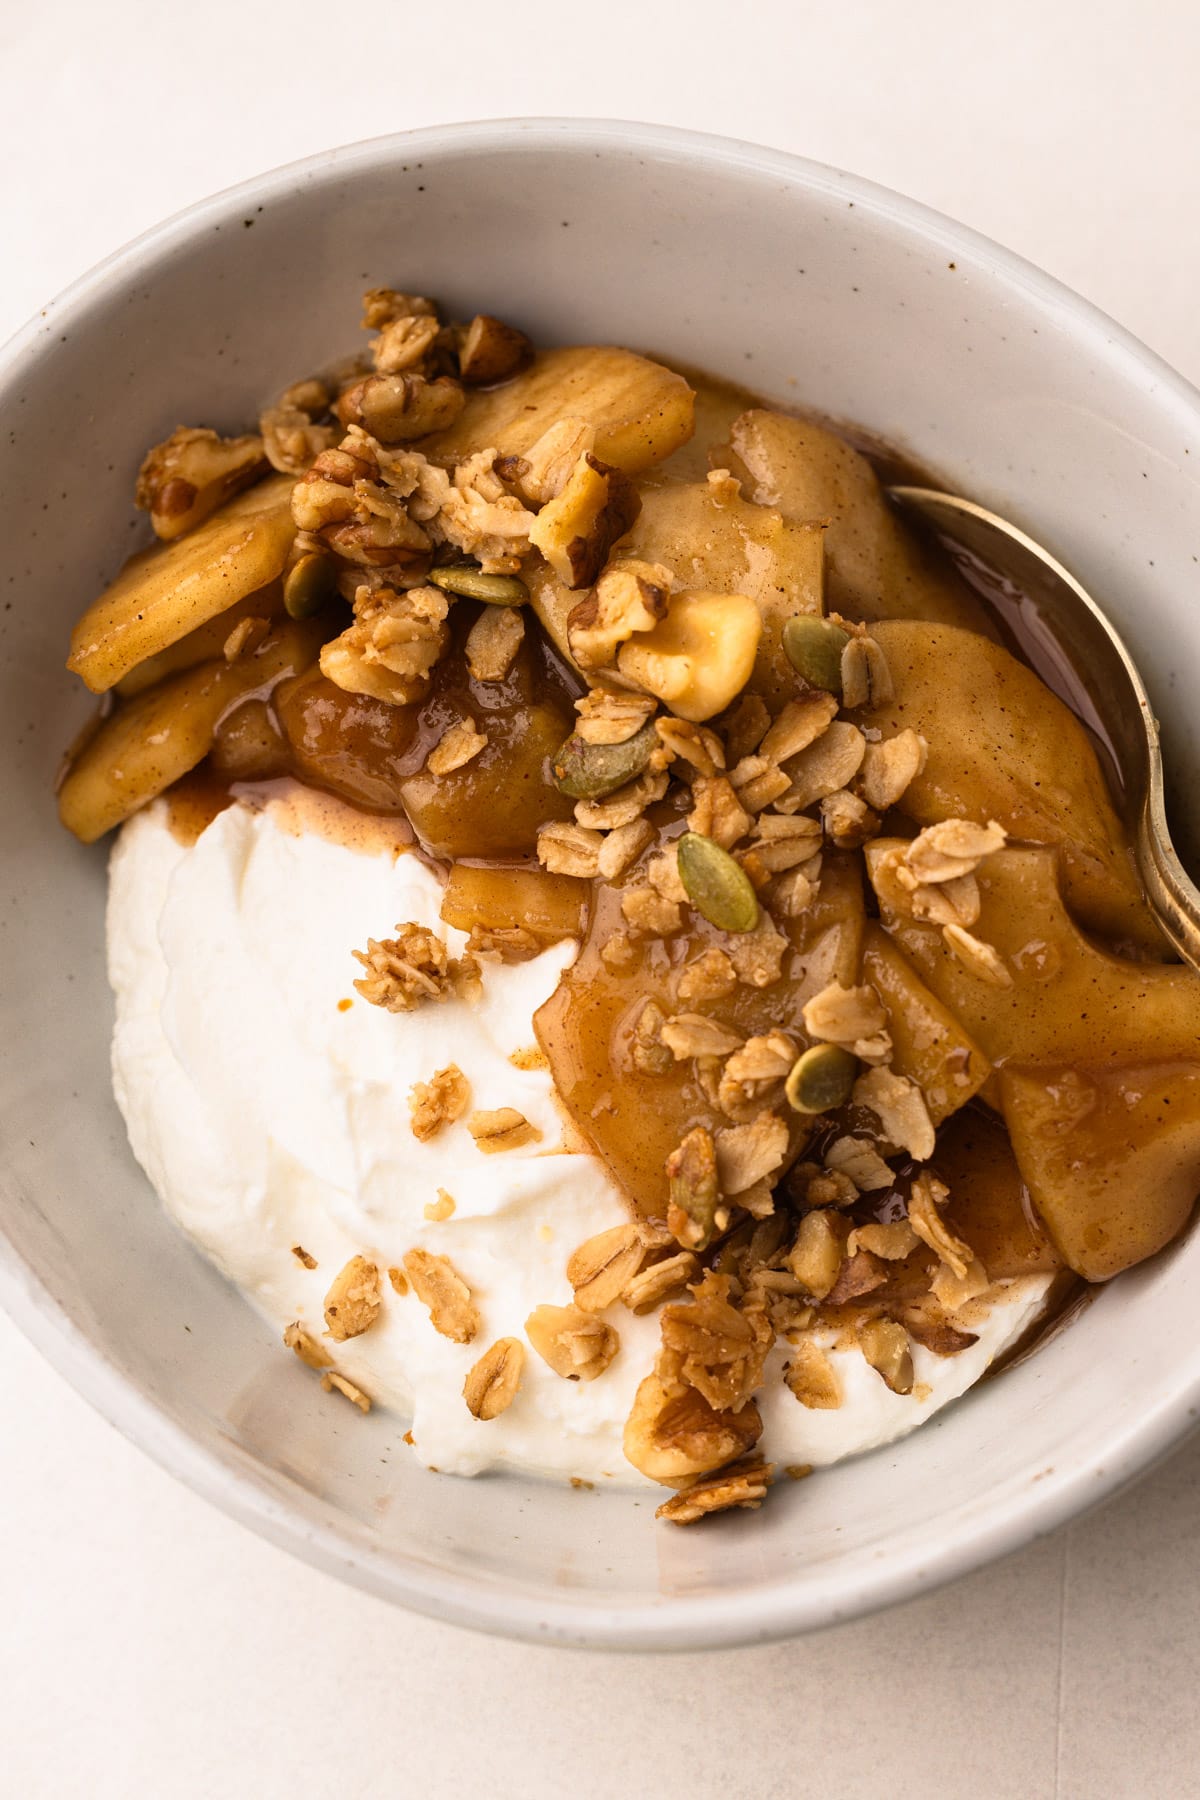
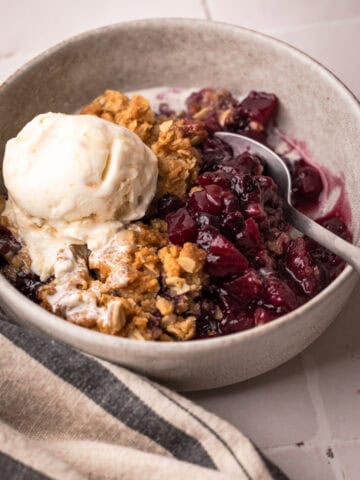
This recipe has all kinds of uses, such as apple crisp, apple pastries, apple hand pies, an apple galette, or, even as a cake filling. It's also delicious all by itself, or with your morning yogurt or even a scoop of ice cream.
And as far as pie goes, there is a case to be made for using this cooked apple pie filling. Using pre-cooked filling decreases the amount of time needed to bake an apple pie and it also prevents the crust from separating from the filling because the apples have already been cooked! However, I do have a recipe dedicated just for apple pie if that is what you are looking for: Ultimate Apple Pie.
Ingredient Overview
Here is an overview of the ingredients needed for this recipe. The full recipe is listed below in greater detail.

- baking apples (see my top choices below)
- sugar (brown sugar and granulated sugar)
- fresh apple cider (not apple cider vinegar, not alcoholic cider, not apple juice, ok? see this explanation for more)
- spices (fresh nutmeg and cinnamon)
- salt (just a pinch)
- cornstarch
- fresh lemon juice
- unsalted butter
- vanilla extract
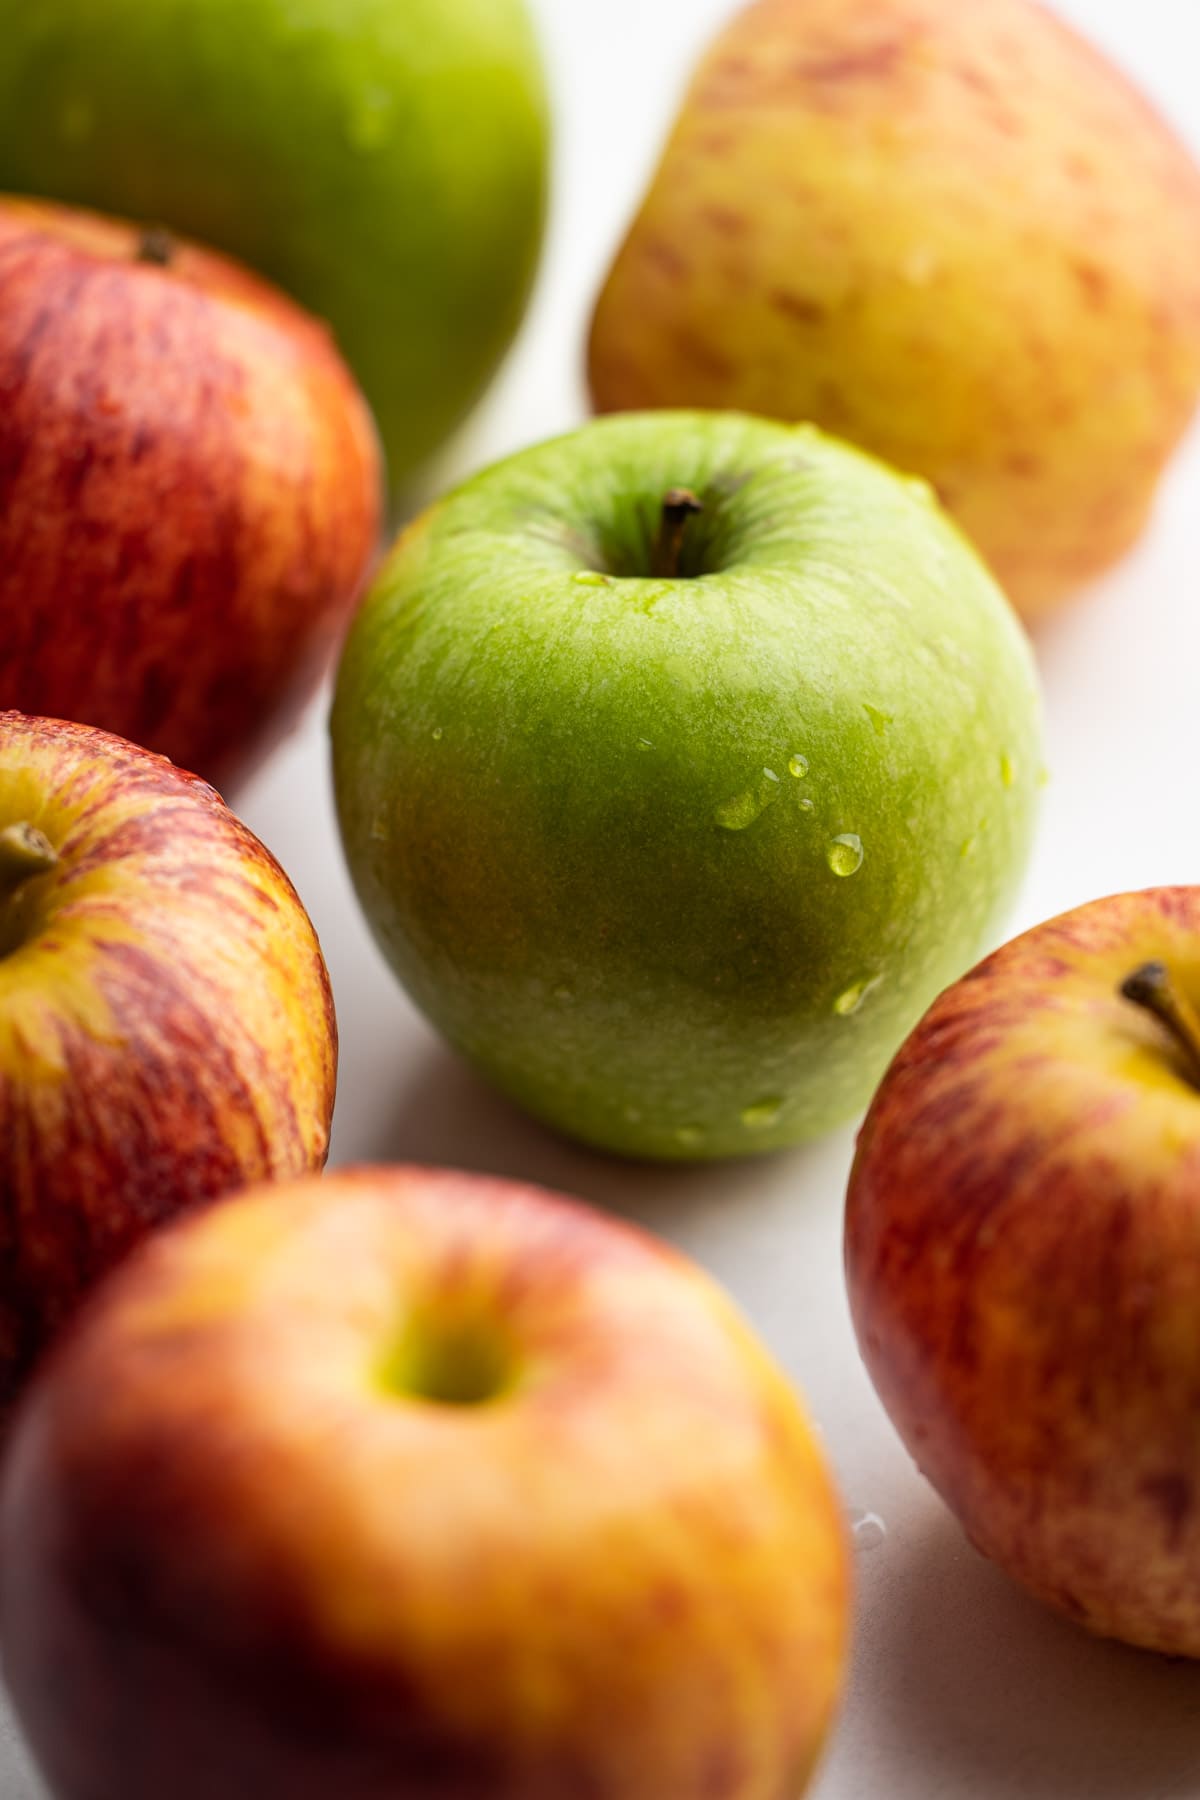
Best Apples to Use
For just about any apple dessert, you want to have an apple that can hold it’s shape, has a nuanced flavor and a slight tartness to break up the sweetness of the sugar. Using a combination of apples is helpful because it introduces a few different types of flavors and textures to the pie.
Gala and Granny Smith apples are my overall recommendation because they hold their texture well, they have a sweet and tart flavor to them and they are readily available.
Here are some other options:
- Cortland
- Yellow Delicious
- Braeburn
- Pink Lady
- Ginger Gold
- Jonagold
How to Make It
This isn't a very complicated task. Essentially, apples are peeled and sliced, then mixed together with a few ingredients on the stove. They're cooked until softened, and then a cornstarch slurry is added to thicken them up! Here is a step-by-step overview of how to make it.

Step 1: Add the apples, sugar, and spices to a large pot.

Step 2: Mix together and let it macerate for about 10 minutes. Pour in ¾ of the cider.

Step 3: Cook for about 10 minutes until the apples have softened.

Step 4: Stir together a cornstarch slurry with remaining apple cider, and add it to the pot. Cook until boiling for 2 minutes.
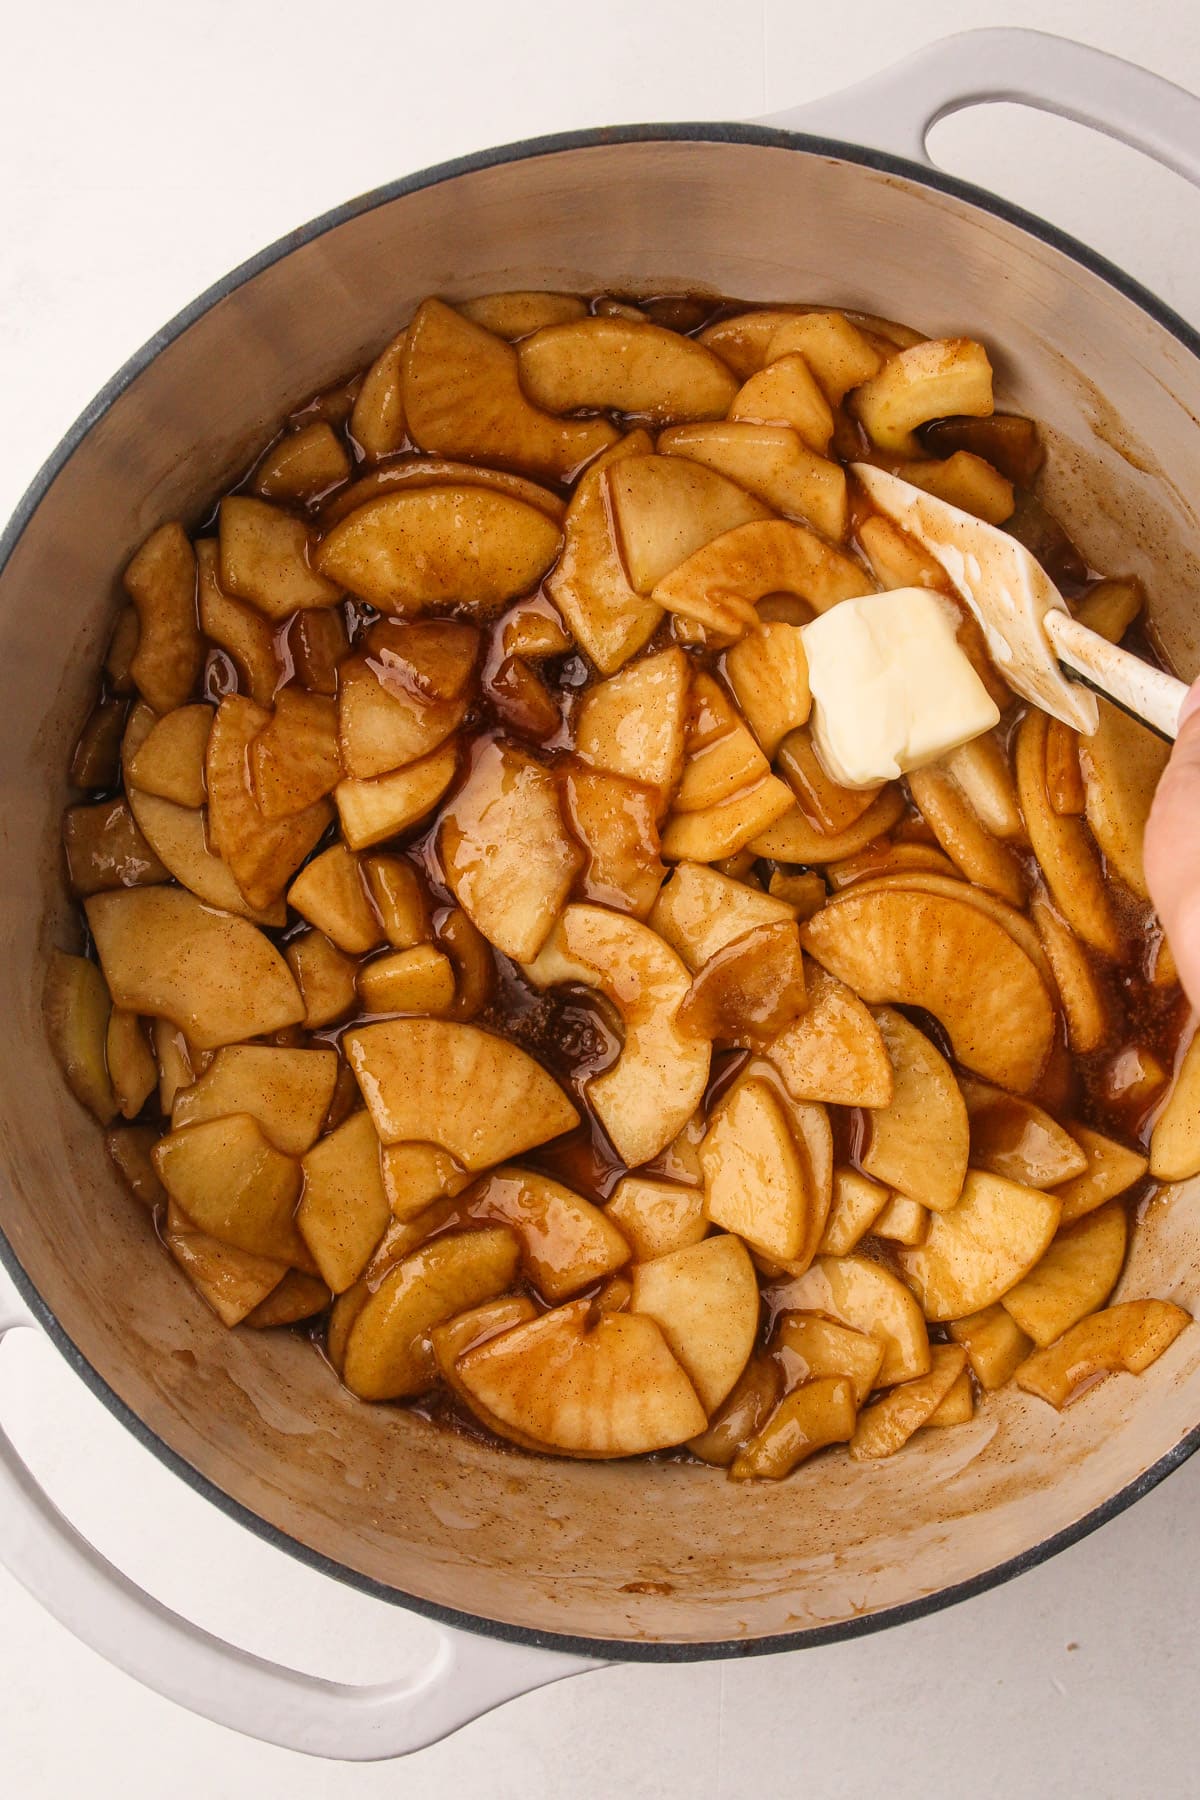
Step 5: Stir in the butter and vanilla extract.
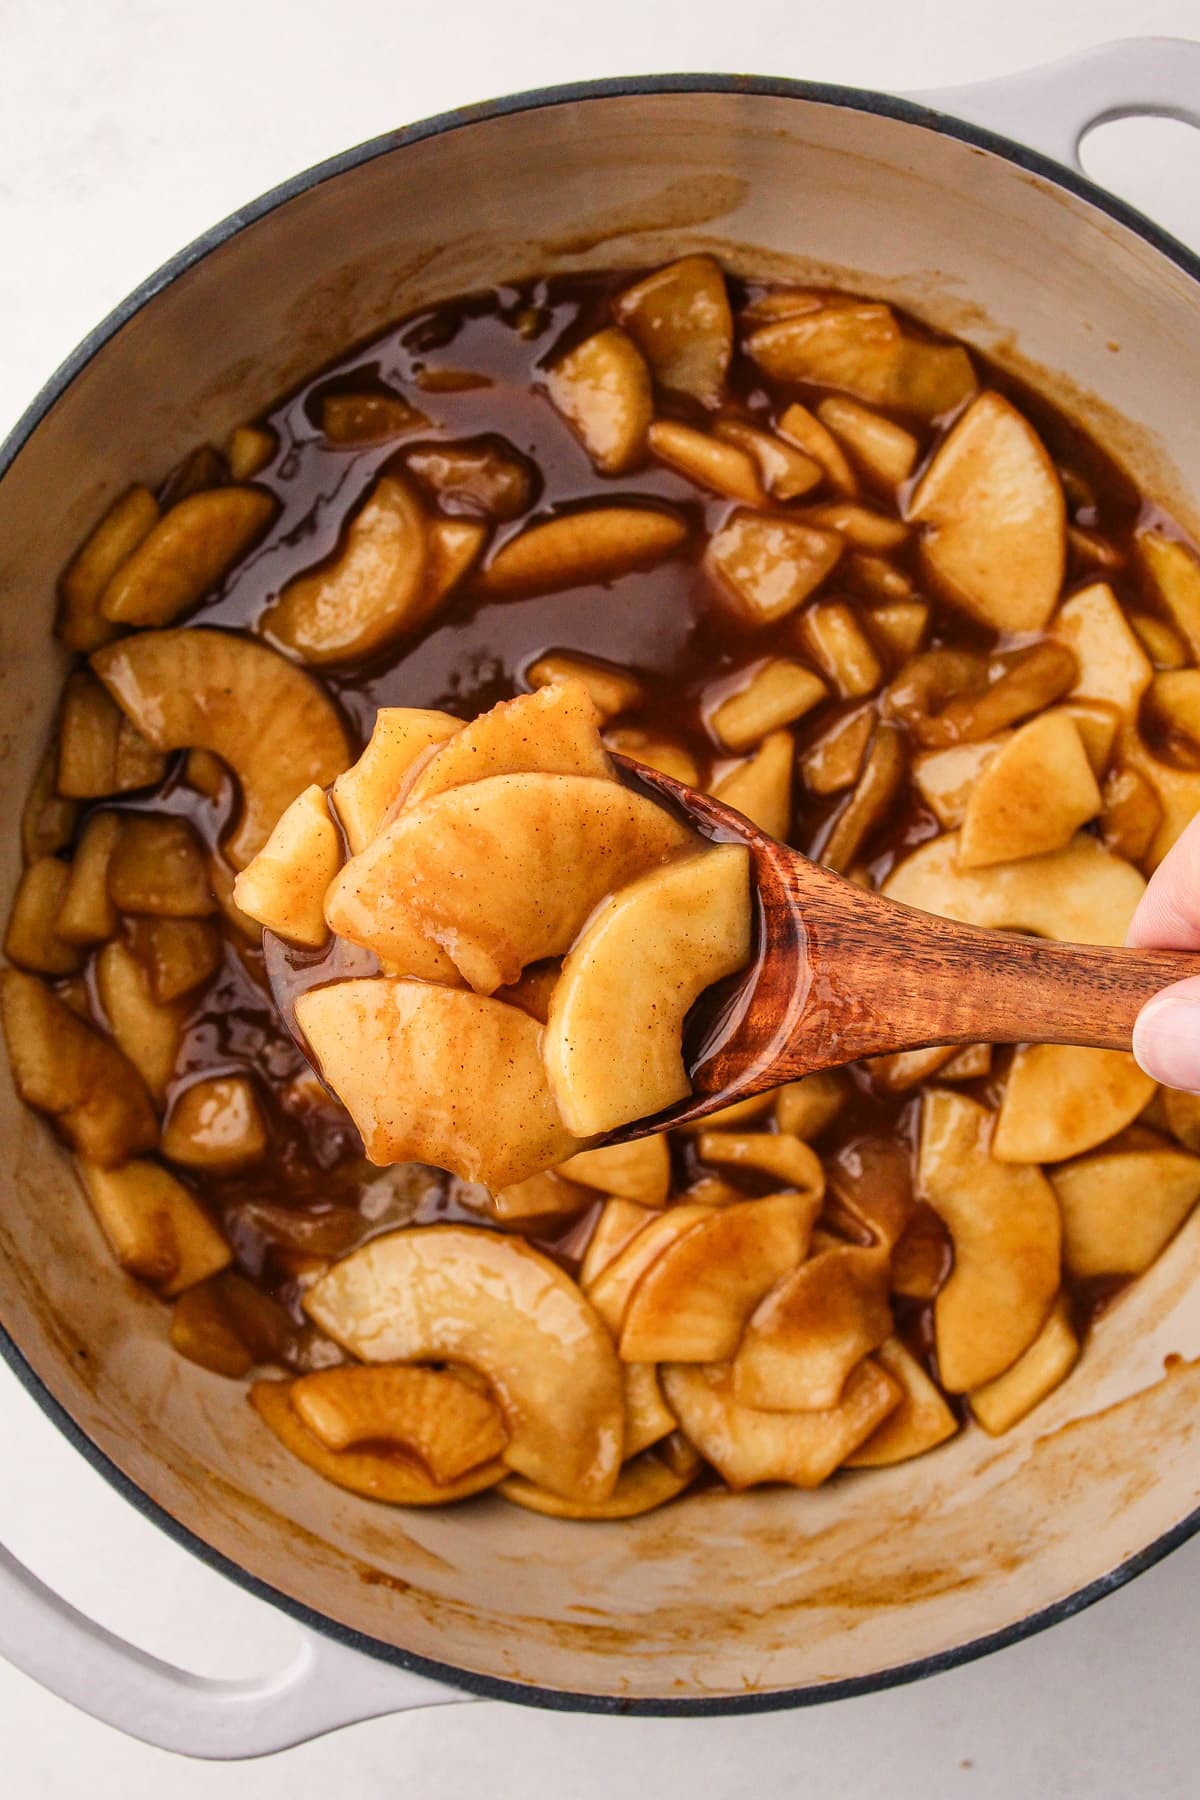
Step 6: Cool down and use immediately or store away for later.
Kelli's Best Tips
Overall you'll find this recipe very simple, but there are a few tricks you should follow to ensure you get the best flavor in your filling.
- Cut the apples into various sizes for an appealing texture. Usually recipes suggest making sure the fruit is similar size so it cooks at the same time, but I find different the various textures to add an interesting element to this recipe. My favorite tool for this is a Johnny Apple Peeler.
- Use actually fresh apple cider, not something else. I understand it isn't always easy to find depending on where you live, but if you can buy it, please do. It adds another element of apple flavor and adds in extra sauce around the apples. I just love that apple sauce that surrounds the apple slices, and this ensures it's plentiful.
- Be sure to follow the instructions for the cornstarch slurry. I prefer to cook the apples to the correct consistency first, and then add the cornstarch to thicken it up. If the cornstarch is added in at the beginning, it can become a little thick or gloopy and possibly even burn, so I like to add it in right at the end, once the apples have fully cooked.
- At the very end of the cooking process, some butter and vanilla are folded into the hot mixture. The butter adds a delicious richness, and the vanilla adds a depth of flavor that complements the apples very nicely. If you wanted to keep your filling more about the pure apple flavor, you can omit the vanilla and tone down the spices entirely.

How to Use Apple Pie Filling
Okay, now you've got apple pie filling. What should you use it for?
You can also make an apple crisp with it, (use this crisp recipe or this crumble recipe for topping it), as a filling for pastry, in hand pies (use this dough), over waffles or pancakes, with oatmeal, with yogurt and granola (my actual favorite fall breakfast), or served with ice cream
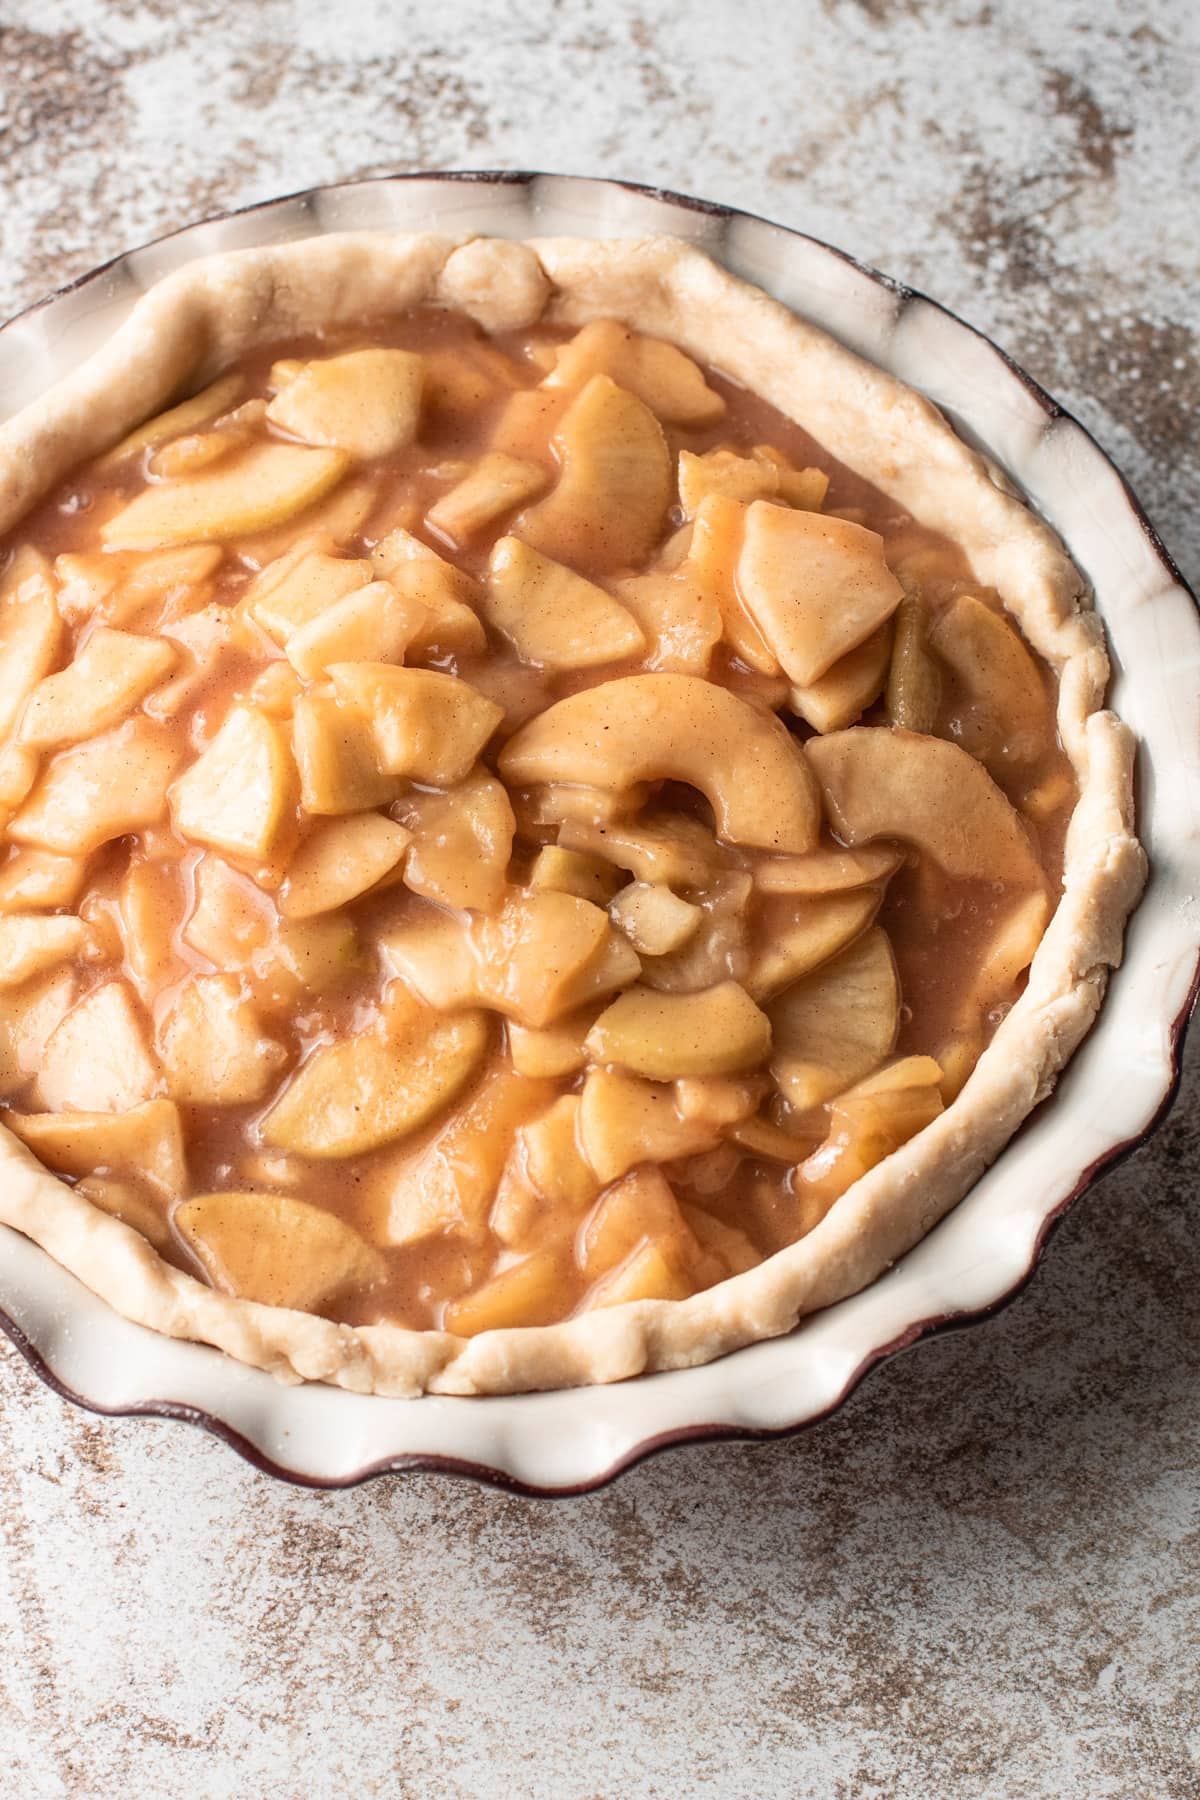
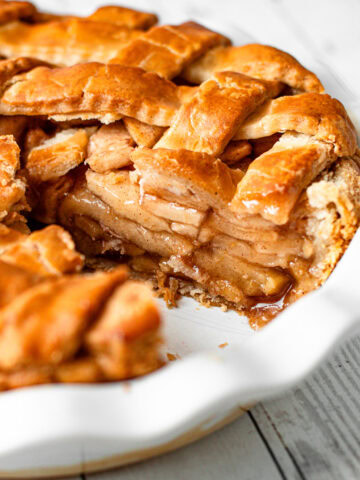
How to Turn It Into a Pie
This recipe makes about 6 cups of apple filling, which is the exact amount you need to make a standard 9" apple pie. To be fair, I do have an Apple Pie recipe and an Apple Crumb Pie recipe, so be sure to check those out if that is what you are after.
Otherwise here are some guidelines:
To turn this into a pie, you'll need either one batch of All Butter Pie Crust (which makes enough for a double-crust pie) or a single pie crust and a crumble topping, to make a dutch apple pie.
The pie filling needs to be completely chilled before you can add it to the pie crust. So make your pie filling one day ahead of time. Then roll out the pie dough, assemble the pie, and bake! You can bake the pie at 425ºF for 25 minutes on the lower shelf, and then reduce the oven temp to 400ºF and move the pie up to the middle shelf for an additional 20-30 minutes. Bake just until the top crust is nice and golden brown. No need for the pie filling to bubble since it has been precooked.

Be sure to check out this article about best tips for baking a Double Crust Fruit Pie.
Storing and Freezing Apple Pie Filling
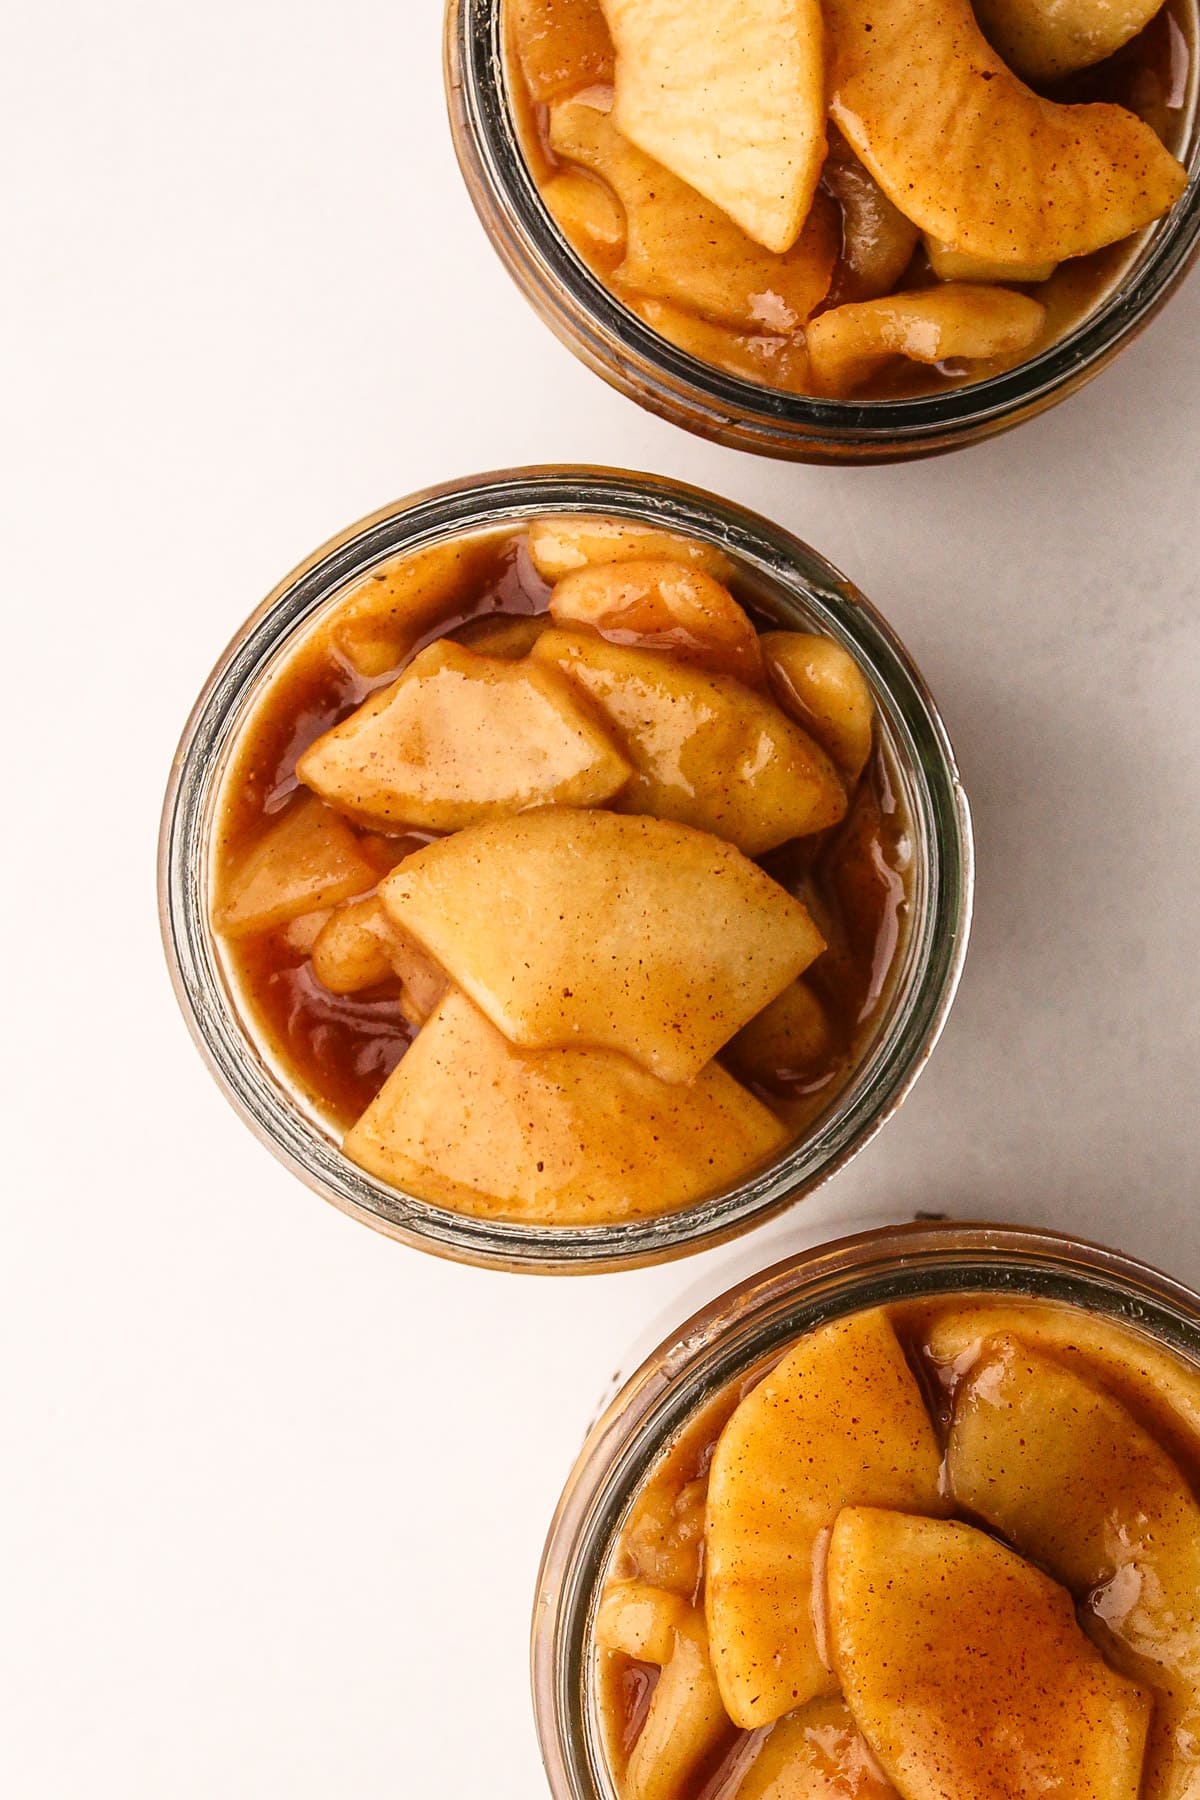
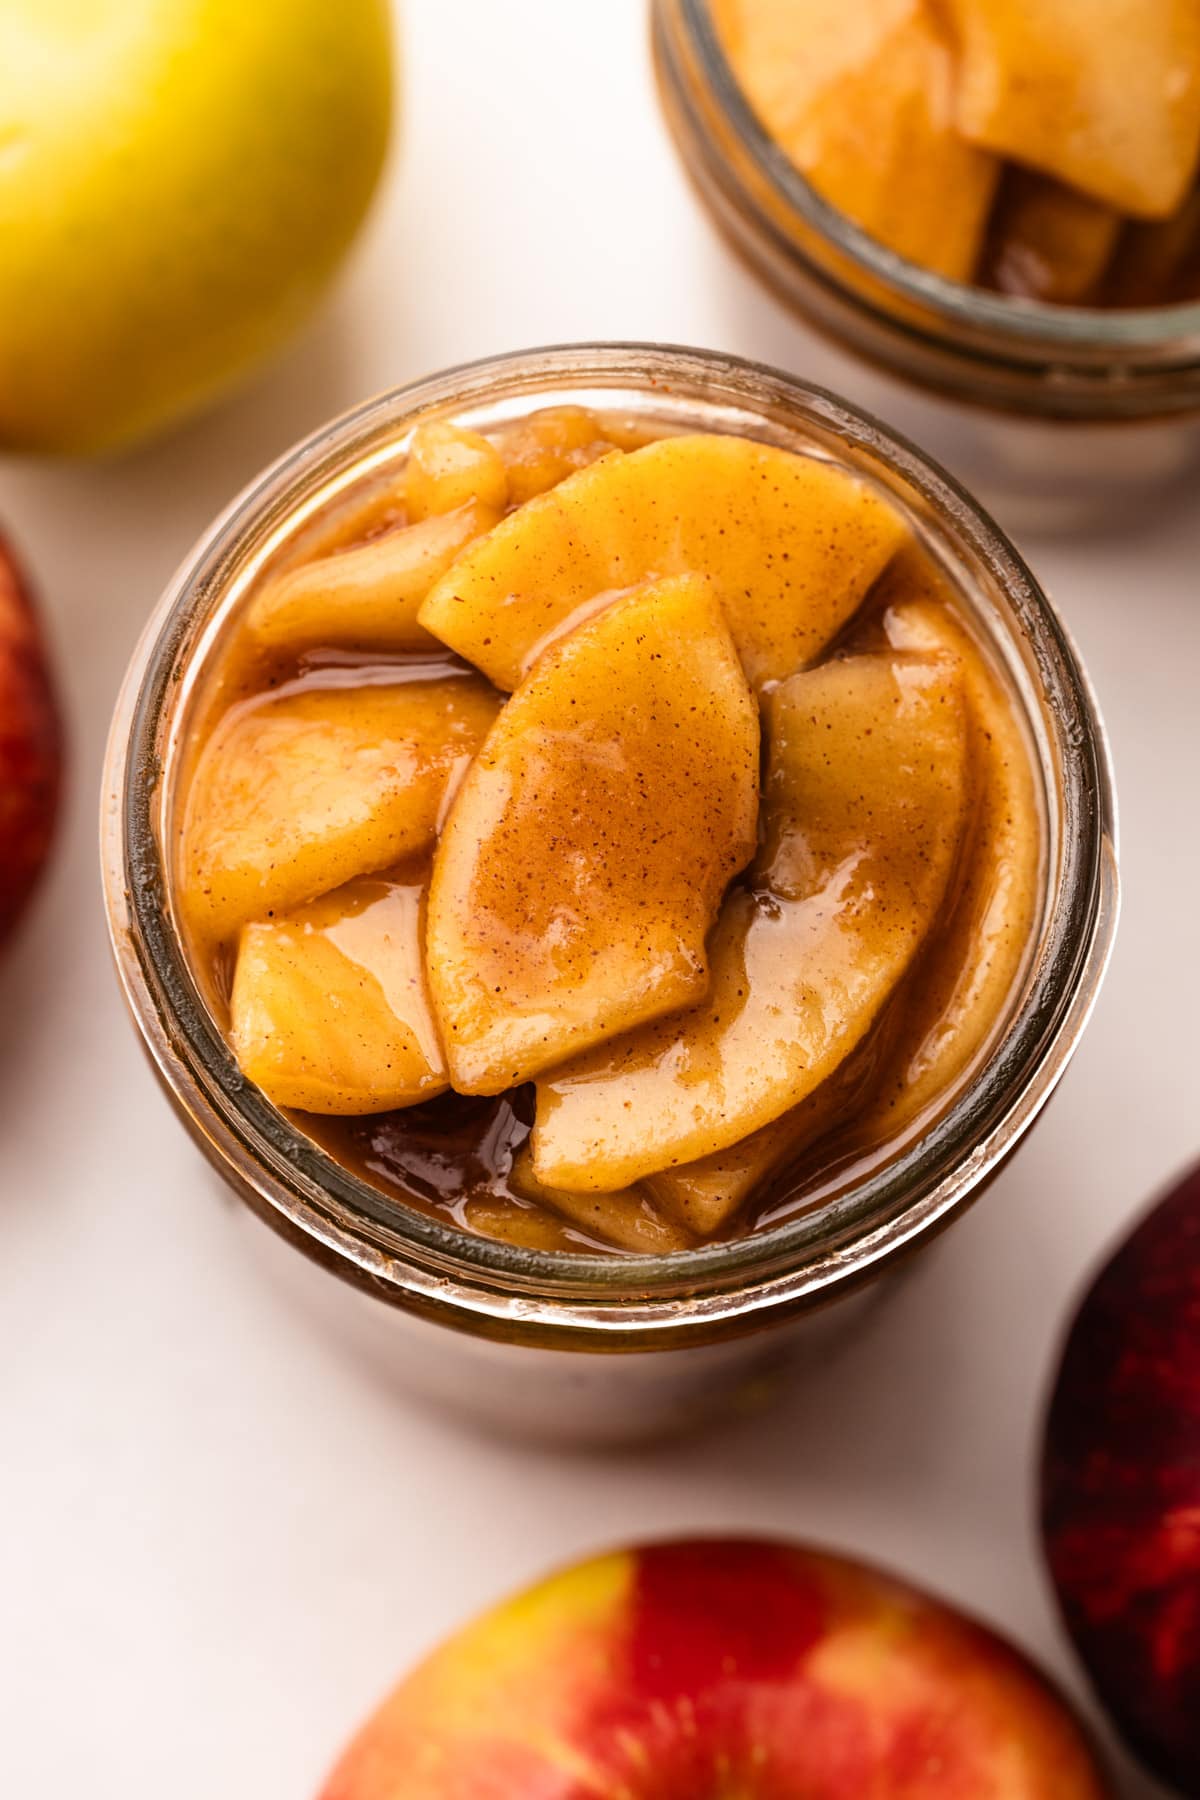
Because it has a high sugar content, it will keep for quite a while in the fridge. I've never kept it for more than 7 days, as I've always used it up, but it likely could last a little bit longer than even that. Store in glass storage containers.
It will last for a minimum of 3 months in the freezer. After three months it will start to lose some of its potent flavor, but it's still safe to eat for up to 12 months, though it's not ideal.
I don't recommend canning this. Canning is so specific and I have not tested this to make sure it passes the amount of sugar and acidity needed to make it safe for canning. I'd recommend freezing it instead for long-term storage.
Watch the Video
More Apple Recipes
I am so honored when you make a recipe from my site! If you make this Easy Apple Pie Filling, please leave a star ⭐️⭐️⭐️⭐️⭐️ rating with your experience! If you have any questions about this recipe, feel free to comment here, and tag me on instagram!
Full Recipe
Apple Pie Filling
Apple pie filling is super easy to make at home, and perfect to have on hand or stored away in the freezer for whenever you need it. This apple pie filling recipe has a few hidden tricks to get the best apple flavor! This recipe is perfect for pies, desserts, or any other sweet treat that calls for apple pie filling. Many readers have mistakenly mixed up fresh apple cider with apple cider vinegar. Do not make this mistake. This recipe requires fresh apple cider, which is unfiltered apple juice, and is typically found in the produce or fresh juice section. Looking for a full apple pie recipe? Check out The Apple Pie Recipe.
- Prep Time: 00:25
- Cook Time: 00:10
- Total Time: 35 minutes
- Yield: 6 cups
- Category: Sweet Pies
- Method: Stovetop
- Cuisine: American
Ingredients
- 3 pounds (about 7-9 apples) baking apples, peeled, cored, and sliced thinly
- 1 tablespoon lemon juice
- ½ cup (100 grams) packed light brown sugar
- ¼ cup (50 grams) granulated sugar
- 1–½ teaspoon ground cinnamon
- ¼ teaspoon grated nutmeg
- Pinch salt
- 2 tablespoons (14 grams) cornstarch
- ¾ cup + 2 tablespoon fresh apple cider, divided (see note)
- 2 teaspoon vanilla extract
- 2 tablespoons unsalted butter
Instructions
- Add apples, lemon juice, brown sugar, granulated sugar, cinnamon, nutmeg and salt to a heavy bottom pot. Stir together and let macerate at room temperature for about 10 minutes. Add ¾ cup of apple cider to the pot, and stir the apples one more time.
- Turn the heat to medium and begin to cook the apples, stirring occasionally to make sure the apples cook evenly. Cook until the apples have softened, about 10 minutes, making sure not to cook off all of the liquid. If the liquid does cook off quickly, add ⅓ cup more apple cider to the pot.
- Create a slurry by whisking together the cornstarch and remaining 2 tablespoons apple cider together in a small bowl.
- Pour the cornstarch slurry into apples and stir together until dissolved. Continue cooking until the mixture is thickened, about 2-3 minutes.
- Remove from heat and stir in the vanilla and butter.
- Let apple mixture cool completely, and then transfer apples to a glass storage container.
- Looking to turn this into a pie? Check out this guide How to Bake a Double Crust Pie for some baking tips.
Notes
Do not, I repeat: do not use apple cider vinegar in this recipe. This recipe calls for fresh apple cider, as in the juice you find often in the fresh produce section. If you can't find apple cider, you can use apple juice. If you can't find apple juice, use water. But please, oh please, don't use apple cider vinegar.
Cooked apple pie filling will keep for up to 7 days in the refrigerator or up to 3 months in the freezer.
Looking for an actual from scratch apple pie recipe? Check out The Apple Pie Recipe. It's the ultimate apple pie recipe using a few different techniques and ingredients.
Want help turning this into a pie? Check out this guide on How to Bake a Double Crust Pie to give you time and temperature for doing so.
Some of the links on this page may be affiliate links. Everyday Pie is a participant in the Amazon Associates Program. As an Amazon Associate I earn from qualifying purchases, at no extra cost to you.
Rehana Fazli
What can I replace apple cider with?
Kelli Avila
There are notes on this in the recipe 🙂 Apple juice or water.
Jas R
I absolutely love this recipe, so much so that this is my first comment ever on a recipe! I'll sometimes have issues lessening a recipe (ex. using 1 pound of apples instead of 3), and I have literally never had that issue with this recipe in all the years I've used it. I've used it constantly to make apple filling for apple bites, apple pie, and even just to have as a topping. The only "changes" I've made is always using apple juice, which is recommended in the Notes, and using a sweet cream butter. The sweet cream butter is really the reason I'm here! I've used different kinds of butter as that's the only way I felt comfortable "playing" with the recipe, and boy oh boy! The apple pie filling really takes on an amazing, creamy flavor with the sweet cream butter. So please make this recipe if you ever need apple pie filling, and try substituting sweet cream butter in! And thank you to Kelli for changing my apple filling game!!
Kelli Avila
Thank you so much for taking the time to comment your experience. And I'm thrilled that you enjoy the recipe!
Lou Ann Ehret
I added a small can of hatch chopped green chilies to the mixture for a Southwest flare.
Then before you put the filling into the pie crust, sprinkle in about 1/2 cup Freshly grated cheddar cheese.
(Don’t use pre-shredded cheese).
Monica
Hi Kelli. What an awesome website! I'm so pleased to find it. Thanks for the clear instructions and tips on making the apple pie filling. It was so easy to follow, and I now have two bags of apple pie filling in the freezer ready for pies.
Tammy Mcelmurry
Can I can this? Water bath or pressure canner and for how long
Kelli Avila
I don't have that information as I'm not an expert in canning.
Dianne Cassata
I need to thank you for this recipe! When I made this my family & friends said it “ IS THE BEST APPLE PIE THEY HAVE EVER EATEN”. Now more of my friends & family want me to make it. Your idea of putting apple cidar is GENIUS! I cant thank you enough! I have bought expensive Apple Pies from premier bakeries and made other recipes, but this one is THE BEST EVER!
Gillian H OCallaghan
The BEST apple pie filling ever! After trying this I am never going in search of another apple pie recipe. The instructions were so clear and it was easy to make ahead of time. We used it all for our Thanksgiving pie, but I'm going to make another batch soon to have on hand for ice cream or topping with some whipped cream and enjoying "as is."
Sharron Jensen
Thankyou foru
Lorissa
Hands down the best Apple pie filling recipe! I was looking for something with brown sugar. Little did I know that I’d be also using apple cider. The ratios are perfect. The consistency is perfect.
I did have to cook the apples for more than 10 minutes, but that’s normal when you don’t use the same stove top, pot or apple type.
Great recipe! Thank you!
Barb.
I knew this recipe had to exist and I was going to make one up-and then I found yours and it is way better than my imagined one--thank you so much! Enjoy your own holiday meals-you deserve them for joining us all at ours! barb.
Heather
This is such a delicious recipe! Last year, I had a pie disaster when freezing a deep dish pie with a fresh apple filling. There was way too much moisture, and cooking the whole thing through was impossible without burning the pastry (even with a foil cover!). Anyways, I learned my lesson and choose to cook my fruit fillings first. This recipe is a real winner and a great solution to my pie difficulties!
AB
Can you use this to make a pie and freeze before baking
Mona
Easy peezy!
Judith Duboff
Can you use canned apple pie filling? Thank You, Judith Duboff
Windi Perrow
Love this and every recipe Kelly shares with us! She makes them so easy to follow! She is a gem.
Julie G
This recipe is not only easy but delicious. I used it for Chicago-style apple slices and it was perfect. It sets up beautifully and I wouldn’t even consider using another recipe.
Instinctually, apple cider makes sense to give it an extra boost of apple flavor.
For those using vinegar instead of cider, please don’t blame Kelli for your mistake. She points this out multiple times throughout the description and recipe. Anytime you make a new recipe, it’s important to read through everything, twice.
Thanks for all the great recipes, Kelli.
Dina Levitt
Best. Recipe. Ever!!
You could just sit with a jar of this apple pie filling and eat the whole thing with a spoon. Without sharing! But then you wouldn’t have apple pie so do both! Make two jars of it.
Just putting this out there: definitely listen to Kelli when she says to use APPLE CIDER and *not* apple cider vinegar. That would be icky and not following her very clear instructions!
Enjoy!
Kelli Avila
Thanks for commenting, Dina! -Kelli
KM
Excellent apple filling recipe, I use for pies, apple crisp, on top of vanilla ice cream.
Faith
argh!!!! I used apple cider vinegar, you should add this comment right in the ingredients In brackets beside the 3/4 apple cider PLEASE so that noone else does this. I didn't read down to the bottom till after the pie was in the oven. Oh well $20 bucks down the drain in ingredients.
Anne
Please don't blame her because you didn't read the recipe. She states multiple times to NOT use apple cider vinegar.
Sheila M M Scanlon
Two questions:
- can I add walnuts, and if so, when in the cooking process?
- for pie, should I prebake the crust?
Many thanks.
Kelli Avila
Hi Sheila--you can add walnuts if you'd like! When you add them depends on if you want them to keep their texture? You can always add them after the apple pie filling is baked. For making a pie with this, please read the information in the article, it will give you lots of tips. Generally speaking, you should be able to bake this properly without blind baking, so long as your oven temperature is high enough.
Amanda
Thank you for all the attention and care when writing the recipes. They are so easy to follow and sooo delicious!! Best pie filling eveer!!
Andrea
What a perfect recipe. But i was wondering, can use the Filling for the super Flacky crust pie?
Kelli Avila
Yes you can! Hope you enjoy!
Kate
Easier than I thought. Everyone loved the filling in the homemade pie crust!
Barbara
Tastes great, but there is a lot of liquid. I measured very carefully. When using it for a pie, do I leave some of it out?
Kelli Avila
How much is a lot? Does it look different than the photos? Is it properly thickened?
Barbara
There are almost two cups of liquid and not very thick. I lifted the apples out of the liquid and placed them in a separate container. There is some liquid with the apples. Yes, it looks different than the picture with the apples in the bottom crust. That doesn't look as if there is a lot of liquid.
Kelli Avila
Hi Barbara. If the liquid isn't thick then there must have been some issue along the way. I'd recommend either setting aside some of the liquid, or adding additional cornstarch to it to thicken it correctly.
Barbara
Thank you!
Andrea
What an excellent recipe, but i was wondering, can i use this filling with the super flacky pie crust?
Kim Neppl
I know how to make a pie but this had great flavor and well written recipe. Delish!
Michael
Compliments all around on this filling! Delish! And bonus points- I made it a few weeks before I wanted to serve it. Thawed beautifully! Next time I need to make my apple slices larger- my mistake. Still tasted wonderful thought
Jessica
Can you this filling for an apple crumb pie ?
Kelli Avila
YES! Enjoy!
Gail
I'm so thankful I didn't use Apple cider vinegar , what an easy mistake to make ..
Shannon Rollins
I love this recipe! It made my house smell so good while making! I added a mix of dried raisins, cherries, and cranberries on top before putting top crust for my pie! Wow! Amazing!
MaryRose
Oh my goodness! I made this today and now that it has cooled down, I believe I could eat the whole thing, it’s THAT good. I used Granny Smith apples, it’s what I had, the bit of tartness with the perfect amount of sweet is pretty perfect. Took longer than 10 minutes for apples to soften, kept checking them until they were to my liking. A real winner Kelli! Thank you!
Sav Trujillo
Omg???? Literally the most delicious thing, specifically made this to try with yogurt and I am not disappointed. Thank you for this recipe💗
Dina Levitt
This apple pie filling recipe is outrageously delicious! Such a crowd pleaser. Honestly, you could just sit with a fork and eat it the whole thing straight out of the pot! Well done Kelli.
Sue
Easy to make and delicious! I love the added flavor from the cider!
Nicole
This is a fantastic recipe and would highly recommend it!
Pamela Otte
Excellent and easy to follow steps. Love using her recipes!!!! Thank you!!!
Sally Ijams
This is soooo good, it’s a family favorite! Easy to make and it turns out delicious every single time. Highly recommended!
Judy
I made your apple pie filling a couple of weeks ago and I love it! I used allspice instead of nutmeg and also added a bit of cardamom. Thank you for sharing your recipe with us.
Brooklyn
I loved this recipe!! The perfect apple pie.
Jill
I made this fully intending to use it for pie. But I ended up just eating it with ice cream. Looking forward to trying one of your ice cream recipes with the apple pie filling as a topping!
Very easy to make and great instructions!
Melissa Tortorice
Eleanor Rousseau
We picked sooo many apples this year that I didn’t know what to do with them all. Then I saw Kelli’s recipe for apple pie filling. It is delicious! We put it on toast, waffles, mixed with yogurt, and eaten by the spoonful. I haven’t made a pie yet but soon, because I made so many batches my freezer is half full. ❤️
Juli Woods
Excellent recipe to keep FOREVER to use for any apple dessert you’ll ever want to make!
Noreen
PeaceBang
So delicious!!!
Rosanne McMahon
I have baked pies my whole life but never with such detailed recipes that leave me proud to show off my work and offer to my favorite guests. The instructions if you take the time to read them offer a no-fail recipe because this chef has taken the time for you so you make no mistakes. I know this because I skipped the instructions the first time I made the apple pie and filling it was too full and boiled over. The flavor was so good though I had to try again. I followed instructions to the letter and it was perfect, delicious, and made a beautiful pie. I am hooked on everydaypie recipes. Especially the apple pie filling!
Amy
I've made this apple pie filling and it was the best one I've ever eaten! Being in the U.K. I was a bit confused as to what apple cider was at first (I didn't think Kelli wanted us to use alcohol in the recipe 😂) but I just googled apple cider and was shown a bottle of what we call cloudy apple juice. I also like that this recipe is easily made vegan by omitting or subbing the butter at the end, although it doesn't taste as good of course. I've used this as a topping on pancakes, and in different apple based recipes.
Eddie Stlouis
Great recipe, I enjoyed it. I was intimated at first, but the instructions were pretty easy to follow and I think I nailed it 😎
Dana
I made this and also used the suggested apple peeler. The results were great and directions were complete and easy to follow.
Lexi simons
SO good - just like my Swedish Nan makes! Drool worthy.
Ben
I really enjoyed
Christina Ryan
Simply amazing!!
Kristen Coleman
I’m a huge stickler for apple pie filling because I’m picky and it has to blend well with my ice cream. I tried this recipe and it shocked my taste buds to the heavens. I will continue to not only make this recipe for holidays but also my random Tuesdays.
Amy H
So easy and so delicious!! Took me back to my childhood as it tasted just like my grandfather's homemade apple pie!!
katelin jenkins
Best apple pie filling around!
John
I love it ❤️❤️❤️
Nelson
😋😋😋😋love it 😋😋😋😋
Lenore Litwin
Finally, an apple pie filling that lets the apples…rather than all the spices…be the star. I had to add some extra cornstarch due to juicy apples, but otherwise as directed. Phenomenal flavor. Thanks.
Teresa
Awesome recipe, I have made this recipe twice now an just to let you know I have use Swerve brown sugar an Erythritol for my sugar substitute as I can not have real sugar. Your recipe turned out great in a apple pie. Am making apple crisp now. Thank you Teresa
Catherine M.
Hands down best apple pie recipe I’ve made! Looking forward to making this again this year!
Sue
Make this delicious apple pie filling. It’s perfect and your kitchen will smell delicious!
Lynn
Deeeelicious! And yes, I used the correct in: apple cider!!!
Melanie F
This recipe is great. So is the recipe author. 🙂
-PLEASE read the instructions for this (and any recipe) very CAREFULLY.
-PLEASE understand that APPLE CIDER (a sweet juice) which is used for this recipe is definitely NOT at all the same thing as apple cider vinegar.
-PLEASE always be KIND when you comment on any recipe.
Barbara Calhoun
Great Recipe! One morning long ago I wanted some apples with my oatmeal and came up with a similar recipe which I've been using for years for everything apple. I tried your recipe this week and now I have a new go-to apple everything recipe. Your recipe is soooo much better than mine. I love the addition of apple cider!
Cindy
Do you ever water bath can this?
Kelli Avila
I have not, and can't offer advice on how to do so, unfortunately.
Marcia
Can’t wait to try this. It will be great for the old varieties I use that ripen at different times.
Nikki
Hi Kelli, I only had 5 apples- 3 pink ladies and 2 big Granny Smiths. I used your recipe to estimate the amounts of other ingredients, and it worked PERFECTLY. It smells so good in here, this is now my go-to for spare apples. Thanks so much!
Pam
Absolutely delicious, so much fun to make, too, this was a huge hit with everyone. The taste is rich and complex in all the best ways. Thank you! I used apple juice soda for the apple cider, didn’t have apple cider on hand, and that worked nicely. I also used lime juice, didn’t have lemon on hand, also worked well. Scrumptious!
Erin
Such a great recipe! The only difficult thing about this was trying to keep my family from eating it before I made the actual pie. Thank you!!
Bobbie Macgee
I made this recipe last night and my husband said it smelled like dirty feet. 🙁 I tasted it and all I could taste was the apple cider vinegar! I checked the recipe again and noticed the note at the very end saying "Do not use apple cider vinegar". Why didn't you just edit the recipe instead of adding a note in the end? I can't even eat it. I have to throw out everything I cooked. 3 pounds of apples and it took me 3 hours. 🙁
I'm very sad. Will you please edit your recipe?
Kelli Avila
I'm very sad too, that you messed up the recipe all by yourself and then left me one star. I have red flags EVERYWHERE about not using apple cider vinegar. I write, SEE NOTE and I even linked a post saying DONT USE APPLE CIDER VINEGAR. My recipe is perfect. You just weren't paying attention. I'm sorry you messed it up, truly. But I've done my part. Recipes are intended to list the ingredients used---not to list the ingredients NOT TO USE. You know what I mean? Like what more can I do. Please when you read a recipe, read it thoroughly. NO WHERE DID I SAY USE APPLE CIDER VINEGAR. They are truly two different products. This was your mistake, not mine. But now your mistake translates to negatively impact my business. You might not know this, but leaving a negative star rating really does affect a website. And clearly, you are angry you messed up a perfectly tested and shared recipe and this is you intention.
Jordan
First time making apple pie filling. I used my sourdough starter for the pie dough. It was a delicious apple pie!! Thank you for the recipe!
Doula Cami
. I was trying to find a recipe that would mimic my favorite apple pie from a restaurant called “The Apple Pan“ in Los Angeles. I left out the butter the vanilla and the nutmeg. I also did not cook the apples first but I did let the macerate. This was the best apple pie I have ever had in my life. I just used a Pillsberry ready-made pie crust and I used a graham cracker homemade no bake crust. It was the freaking bomb. I’m saving this recipe forever and thank you very much!
FYI, the liquid that is left at the bottom of the mixing bowl is amazing if you heat it up in pour over top of the pie when you are ready to eat it.
Susan
Well let me say this first I first tried someone else's recipe BIG mistake glad I hadn't mixed my apples in yet. But then....I found this one. I'm diabetic so I substituted the sugar wirh Truvia blend and also the brown sugar with Truvia brown. I used apple cider from local orchard. This turned out amazing. I made enough for 5 pies. So glad I made this we will be enjoying all winter.
Juli
Made this today for the first time, the apples are cooling and the sauce is delicious.
I made my own pie spice mixture and that's the only thing I did differently.
I usually don't make apple desserts because I hate coring and peeling so I definitely will be buying a gadget.
I intend to use this for crisps and crumbles and cheesecake topping. YUM
Kelli Avila
I too hate peeling and coring. The johnny apple peeler is the best!
Marie
Wow this is so delicious! Thank you for this recipe. I made mini 5” apple pies and knew I was going to need a pie filling that was cooked beforehand. This worked great! I let the filling cool down completely before filling the pies which is a must. I didn’t have lemon juice but I just added another tbs of apple cider and it worked wonderfully.
Evelyn Clark
I made 3 cookings of this apple pie filling last year and canned it and am fixin to make more this year as I speak. It is better than store bought. Everyone brags on my pies. Hope I never lose the receipe. Thanks
Kelli Avila
So glad you enjoy!
M
Incredible!!
Lenka
This filling is the best! 🤤
Brittany
So easy and so delicious. All my questions were answered in the super detailed post, or in another post from Kelli that was linked. My first batch unfortunately didn’t make it to the freezer (it was too delicious and I used it within the week) but I plan to make another batch soon to get a head start on holiday baking.
Jan T.
This is the best pie filling recipe I have ever tasted. The recipe is simple to follow and cooks up fast. Thank you for sharing!
Tracey
Apple Pie Filling is delicious! Thank you for posting this recipe - I need to make it again ASAP because everyone loved it!!
David Frakes
I have made this recipe twice. It's a keeper! I'm now making 2 gallons to freeze for later. I have 2 apple trees in my backyard. I'm using plastic ice cream containers to freeze the filling in. I hope that works. Just read and follow the instructions. I couldn't imagine putting vinegar in pie filling recipe. Good luck to all 🍀🤠
Sheri
How can I make this yummy recipe sugar free?
Kelli Avila
I'm so sorry I don't have an experience with sugar free baking/cooking! Maybe somebody else might chime in here to help out?
Jes
Hi, I didn’t try this yet, but I want to know if you put it in a pie, when you cut the pie, will the filling ooze out or does it al stay together? I’m doing a baking contest and wanted to use this recipe, but I need it to cut neatly. ☺️
Ps: this sounds really good 👍
Kelli Avila
As long as it's cooled--it will sliced neatly! Hot and warm filling will always ooze. Let me know how it goes!
Cassandra G.
Excellent!!! The best recipe for apple filling!! I did not have apple cider so I used Sparkling Apple Cider that I had on hand - which was perfect. When I had run out of that, I used Freixenet Cordon Negro Wine which kicked it up a notch (it was fine since we have no children that would be eating the filling because of alcohol consumption).
Amanda
My husband wanted apple hand pies so after searching through tons of apple pie filling recipes I came across this and so happy I found it.. hands down best apple pie filling I have ever had!! I froze some extra pies dropped one off to my mom she called me the next morning saying she woke up thinking about that pie it was that good followed by saying I should start selling them lol I am now making my 5th batch because the requests keep rolling in from my family members for hand pies…my large Irish Italian family is very hard to please when it comes to food.. so safe to say you have a winner with this recipe!!
Kelli Avila
Amanda, I'm so glad you and your husband and all the rest of the family enjoyed it! Thanks so much for stopping by and sharing! -Kelli
Tayce T.
Great recipe! I used bourbon in place of apple cider (in both the pot and the slurry) and it turned out AMAZING!
Natalie
Another great recipe. Thanks Kelly!
Baker770
I’ve tried this and love it but I was wondering if anyone tried to make it with the peel and if that could maybe work out? I’m making a huge batch and I don’t have an apple peeler ):
Kelli Avila
It's fine to make it with the peel! Added nutrition! -Kelli
Cheedar
SO YUMM!!
Used in hand pies, pie, crumble and ate plain. (Delicious straight from the fridge!) Simple recipe and so good. I use water instead of apple cider and usually end up adding more cornstarch slurry and omit the butter. I also kinda wing the spices and it’s always great. Definitely recommend!!
Eydie
My husband requested apple pie pizza for his birthday and I found your recipe. It went together so quickly and the taste and texture is just perfect. It's going to be a happy birthday indeed---thanks!
Joe Wagner
Hi. Hoping that your road to complete health proceeds apace.
When you freeze a jar of this filling, how much headspace to you leave? I've had, umm, very bad experiences with freezing jars of broth. I don't want the jars to shatter (of course), but I also don't want to leave so much space that I get unnecessary ice crystals on top.
Thanks,
Joe
Kelli Avila
Hi Joe! Thank you for the well wishes. If you are nervous about freezing in mason jars, you can freeze in another freezer safe container! If you do freeze in a mason jar, I'd recommend 1-2 inches of headspace. -Kelli
Andi
I don't normally comment on recipes but I made your recipe for the Apple pie filling and it is by far the best recipe I have come across so no need for me to continue looking for another recipe for this. Haven't looked around yet but hoping you have a blueberry filling recipe as well.
Chel
Making after apple cider season, is there something else I can substitute? Thank you.
Kelli Avila
I am able to find apple cider year-round at all the grocery stores here. It's often in the fresh fruit section of the store. If you can't, you can replace the cider with 100 apple juice (unsweetened) or water. It's really best with the cider though if you can find it!
Ronald Chapman
Hello Kelli
I made this recipe and it was great. Very delicious, the apples were just right. Made with 8 apples, 2 each, granny smith, fugi, honey crisp and gala. I made a double crust pie with them, and it was fantasic. My wife, woh has not liked any of the other pies I made, saide this was very good also. Thank you for tbe recipe. I will be trying your triple coconut cream pie next.
Thank you for your time
Kelli Avila
Ronald, I'm so glad you enjoyed the recipe! And that your wife did too! -Kelli
Terese
This recipe is awesome!! Absolutely delicious! I was making a baked Brie and had forgotten to buy jam. I had lots of apples, so I decided to try this filling on top of the Brie instead of the jam. It was a huge hit! Everyone loved it. I didn’t have Apple cider or juice so I used water and it was still really delicious. I put the filling on top of the Brie, covered it with puff pastry, brushed it with real maple syrup, a dusting of brown sugar and chopped pecans before I baked it. It was decadent! Thank you for getting me out of a jam! Lol No pun intended
Kelli Avila
Terese, that sounds so delicious! Glad you enjoyed the recipe -Kelli
Nancy S
Hi Kelli,
This pie filling looks awesome and I'm looking forward to trying it in a pie! I've tried other precooked fillings (using golden delicious apples) and have had trouble judging when the apples have cooked enough - but not too much - given they are also going to cook in the oven. I assume they continue to soften during baking. How do I know when the apples are the right consistency on the stovetop to yield a pie that is neither too crunchy nor too mushy? I appreciate any additional tips your can offer - thank you!
Kelli Avila
Hi Nancy! If you are planning to use this as a pie filling, you can err on the side of caution and "undercook" them. What that would mean is that they're just barely cooked on the stovetop before adding in the thickener. The recipe calls for about 10 minutes, but you can really cook it as little as 5. That would look like the apples are able to bend slightly (as opposed to when they are raw, they don't bend at all), but still have some bite to them. Hope that helps! -Kelli
Nancy S
Thank you - that is so helpful. I'll give it a try!
Brian J
I made the filling yesterday but got worried that baking the pie would make the apples too soft. I am glad that you updated about baking. I am using a refrigerated pie crust. I love cooking and baking but this is my firest pie ever. I chose this recipe because it had a nice variety of spices and such. I will serve it to family for Christmas dinner. Just in case it is less than appealing I bought vanilla ice cream and redi whip. THis kids will have a field day either way. Thank you.
Moaza Matar
Hands down the best pie filling, thank you for this.
Rocco
Just made this and cooked it for less than 10 min and it turned to applesauce! ????
Kelli Avila
Hi Rocco. Sorry that happened. Would love to help you troubleshoot. What type of apples did you use? And what amount of heat? -Kelli
Rocco
Spartans and red delicious. Cooked it on medium for roughly 8 min seemed to be all intact. After it cooled slightly they turned to mush. I searched other recipes and they call for cooking the apples for 4-5 min.
Kelli Avila
I'm sorry that happened to you. I've made this recipe dozens of times and that's never occurred to me, and you can see many many comments of people successfully making this recipe as well. However, I've never used those apples and they aren't on the list of apples that I recommend using for my recipe. While I regret you'll have to make it again, I hope you can still enjoy the first batch you made as apple sauce! All the best. -Kelli
Rocco
I did some damage control.I threw in some raw apple slices and made a couple of galettes.They liked 'em. So for anyone trying this recipe don't use soft apples such as spartans or crabapples.
Kelli Avila
I'm glad you were able to fix it. But do know I put a lot of care, testing and tips in the recipes I put on this website. I know not everyone has time to read through it all, but I always want my readers to have success with my recipes--which is why I put all the information into writing both in the recipe, and above it! I test my recipes multiple times (often 6 or more) before I pubslih them, making as many mistakes as I can (such as testing out lots of different types of apples) and then sharing what works.
Ingrid
I can’t believe how easy yet amazingly delicious this filling was! I’ve always been hesitant to try online recipes but the steps were detailed and a breeze to follow. My husband and MIL were so impressed! Only downside is I’m obsessed and I can’t stop eating the apple pie!
Betsy Comeau
Made this pie filling today using 6 different types of apples from my brother’s trees. I like the idea of precooking the filling ahead and it was so delicious! I did not have cider, so used Orange Juice instead. Wonderful! Thank you!
Kelli Avila
Wow, that must have been amazing with 6 different types of backyard apples! Glad you enjoyed! -Kelli
Cheyana
This made the most delicious apple pie filling, and was super convenient to make ahead of time for thanksgiving. My family kept stealing apple slices while they were cooking down because they were so good! I used a mixture of granny smith and pink lady apples which held their texture beautifully and provided a nice tart contrast to the sweet apple cider. I will definitely be making this again!
Kelli Avila
Awesome choice for apples! And yes, so hard not to keep nibbling as they're so delicious! Thank you for sharing your experience! Cheers--Kelli
Hailey
This recipe is delicious, but I had to add a little more slurry to get it to thicken up. Over all 5 stars. Great for the caramel apple cheese cake I’m making!
Kelli Avila
Hailey, I'm so glad it worked out for you! Thanks for stopping by and sharing!
Nichole
This is a fantastic recipe! I’m so excited I tried this for our Thanksgiving pies!
Heather
Just curious if you can’t find fresh apple cider , instead of apple juice could you use sparkling apple cider ?
Kelli Avila
Hi Heather. Interesting question! I haven't tried cooking with sparkling anything, so I am not sure what would happen. Do let us know if you try!
Laura
Just made this. So delicious! Instead of slicing the apples I diced them in small pieces (easier to eat in what I'm using this recipe for). My daughter loves homemade apple pie filling on top of her pancakes instead of syrup. I'll be using this in apple fritters also. I've tried a few apple pie filling recipes and this by far has been the best. I had to use apple juice, but I'll be using apple cider next time for when I make apple pies for Thanksgiving.
Kelli Avila
I'm so glad you enjoyed it Laura! And that you modified it based on how you plan to use the recipe. Love that you use it on pancakes! In my house, I use it most frequently on oatmeal! It's so good!
Cherie
Hi Kelli,
I’m looking forward to making this recipe!! Should I use all of the Dane type of apple or mix the two you suggested to use at the beginning of your blog??
Thanks!
Kelli Avila
Hi Cherie! I recommend a mix of apples! Typically one sweet and one a bit more sour!
Kelse
Hello! It seems everyone had good luck with this recipe! It tastes great. I do have one question though regarding cooking the apples. I had the mixture on the stove for almost an hour at medium heat trying to get the apples to cook all the way through. Whereas the instructions mention about 25 mins total. Have any tips or feelings as to what I did wrong?
Kelli Avila
Hi Kelse, I'm a little bit at a loss as to what happened in your kitchen. If apples were cooked for over an hour they'd turn to applesauce! Did you mixture ever come to a boil?
Adriana Perez
i really want to make this recipe for this upcoming friendsgiving but my friends are vegan and I want to make sure they can enjoy it as well! Do you think omitting the butter from the end of this recipe will effect the texture/flavor too much?
Kelli Avila
Absolutely just omit the butter and it'll still be delicious!
Shel Schatz
I'm not going to lie, the first time I made this was with my 3 he old niece and I didn't read it all the way through. I thought it said apple cider vinegar. I thought the amount listed was a little much so I only used 1/4 cup, and it still came out delicious! I have sinced made it the correct way, and it is the best apple pie I have ever made! Thank you for sharing your recipe. It's the bees knees.
Cece
How do you actually cook the pie filling with the crust when ready to make the pie? I have no clue what temp or for how long to bake it. Please help!
Tracey
Sooo easy, and soooo good! I think the vanilla enhances the apples and the slurry made for an amazing filling and the butter at the end makes for a silky finish!
Charity
Update on pie ( i made mini ones) they are amazing, for those who were not able to read my last comment I made a mistake and didnt fully read the post, I ended up using apple cider vinegar against OPs suggestions. So im commenting again with another 5 stars its good but try to follow ops instructions carefully guys.
Kelli Avila
Glad they still turned out ok!
Charity
So I should be flogged lol I knew apple cider vinegar was an odd addition, I was in a rush and did not read the full post, also read the ingredients to quickly. However I havent used it in a pie yet the filling taste fine so far, but we will see after I make the pie. Bless the author, I dont blame her she even writes to not use Apple cider vinegar. I wont be surprised if it doesnt turn out well due to my own error. I will update on how the pie taste.
Kelli Avila
Oh no! Sorry that happened! I hope it still was ok!
Janice
Best recipe for apple pie filling I have tried.
Great job!!😋
Kelli Avila
Thank you! So happy you enjoyed it!
Peter
I want to put the filling in a pie (I never cooked, or made a pie before), how long do I cook it and at what temperature?
Kelli Avila
Make sure the filling is 100% cool. Fill the pie, and bake on the lowest rack in a preheated 425 oven for 40-50 minutes. Cover the edges of the crust if they are browning too quickly. I'm working on a post dedicated to baking fruit pies, and when it's done, I'll link to it!
Andrew
Hi Kelli,
First off, thank you for making this recipe, you know, it's hard to find apple filling recipe with dimensional flavor that I can tell from your recipe. Is there no alternative of Apple Cider or Apple Juice? We don't have apple cider here and I kind of don't get what kind of apple juice to be used, is it the sweetened apple juice from the grocery store or blend the apple to juices by ourselves?
Thank you!
Kelli Avila
Hi Andrew! If you can't find apple cider, apple juice that is just 100% juice will work (as in, no added sugar). If that fails, you can also just use water.
Beth Johnson
My daughter and I made this recipe this morning. Not only was it easy, but it is delicious! We did substitute almond extract for the vanilla. Hoping to make an apple pie with the filling tomorrow. Thank you for sharing this recipe!
Kelli Avila
Hi Beth! So glad you and your daughter enjoyed!
Mel
Soooo good!!! I’ve made apple pie before but this was super simple and I feel like the apples came out much better this way. I hate runny apple pie so the fact that this came out thick made my day 👍🏻 Also you’re able to adjust flavor better which is a plus. I did not have any APPLE CIDER (lol) so I used water in place of the Apple cider and it still came out super yummy and thick!! Next time I’ll be sure to get apple cider. This ones going in my cookbook for sure!!! Thanks for the wonderful recipe Kelli! 🥰🍎
Kelli Avila
Hi Mel! I'm SO glad you enjoyed the recipe!
Deanna
I am planning to make this in mason jars for Thanksgiving. If I want to add the filling to a pie dough lined jar and bake it - can I do this immediately after finishing this recipe? In lieu of canning and freezing?
Thank you! Very excited to try!
Kelli Avila
Hi Deanna--that sounds fun. If you are using the apple pie filling with any type of butter pie crust (whether homemade or store-bought), you'll need to let the apple pie filling cool first. This is because putting the hot filling in a pie crust can melt it. So if you want to use it the same day, I'd suggest pouring it into a shallow container and letting it cool until no longer steaming at room temperature (stirring it helps), and then moving it to the refrigerator to finish cooling. Does that answer your questions?
Abbi
Since this is pre-cooked filling rather than raw apples as called for in a pie recipe, how many minutes would you suggest I shave off the cook time for the whole pie? Trying to win a bake-off this weekend at church. Ha!
Kelli Avila
My apologies for the late reply. It depends on what temperature you bake the pie at, but generally you'll save about 10-15 minutes of baking time. I'd suggest 425 for 40-50 minutes.
Kimberly
This made a very flavorful pie. Everyone loves it.
You shouldn't have to put a note for the apple cider, people need to learn to read for themselves. If they make a mistake, own it and move on.
Kelli Avila
Really happy you enjoyed the recipe, Kimberly!
Martha Covel
Could this recipe be canned as well as frozen??
Sounds delish!
Martha Covel
I should have read the very beginning, not recommended for freezing.
Kelli Avila
Hi Martha! You definitely can freeze this recipe! I do all the time! I don't recommend it to be canned however, as I'm not a canning expert and can't advise if the amount of acid and sugar is sufficient for canning.
Kelli Avila
Yes this can be frozen. No I don't recommend canning!
Rea Jewell
Kelly,
You have made the perfect apple pie filling! I made my first apple pie from scratch and I am very appreciative of you sharing this. Thank you.
Kelly H.
I found this by googling "apple pie filling". I've eaten low carb for eight years now, but when the holiday's come, I look for ways to make slightly healthier versions of things for my family. I made this with a sugar free brown sugar monk fruit sweetener, and then I used Nielsen Massey vanilla bean paste. It's delicious!! I'm thinking I'll make this as holiday gifts for my son's teachers, and our neighbors. In the future I'll try using xanthan gum to thicken instead of cornstarch, to lower the carbs even more. Thanks for a great recipe!
Kelly Young
All I have to say after remaking this after my unfortunate mistake during my previous attempt is that I can’t believe I thought the first try was good. Hands down my favorite apple pie filling. Note to self double recipe so pie doesn’t instantly get devoured 😂
Kelli Avila
Kelly! I couldn't help but chuckle a little--though I am sorry you made the mistake at the outset. Glad you got around to trying it as written!!
Leah C
I made this to top a cheesecake - try it sometime, you won't regret it. Since we already had the cake I scaled down the recipe to 2/3. However, I still used the full amount of cornstarch since I wanted it to get pretty thick. Also I had no apple cider/juice but just used water. Seemed fine.
I was using Macintosh apples, which break down pretty easily. I cooked for 10 minutes once the mixture was boiling, because I was looking for them to get soft, but once the hardest pieces were getting soft, the softest pieces were turning into a mush. But that's okay. It tasted great anyway. I love the flavor of Macintosh apples.
Adam
Thanks for the recipe we had a bumper crop of Apples this year in Colorado and I ended up making a quadruple recipe. I had made incredible amounts of apple sauce earlier this week which I used instead of apple cider and it worked also to thicken the mixture used less corn starch. Thanks again and have a wonderful holiday.
Ann Claire Baber
Love it! It was so easy to make, I even made a slight mistake putting butter in too soon but it still came out amazing. I just want to eat it by the spoonful.
I feel terrible for the commenter who put ACV in their recipe it definitely tastes heavenly when made correctly.
Ann Claire Baber
the only change I made was I used Arrowroot Powder instead of cornstarch. Came out great!!
Stephanie
I love this recipe! I’ve used it 2 years in a row now! I hate making pie crust so I just buy the refrigerated pie crust at the market, make this filling, then bake it. I don’t cook the apples until they’re soft because I put them in the oven with the crust. I cook them until they’re almost soft. I’ve made at least 10 pies with this recipe!
Coreena K
OMG ..... this is the easiest and best tasting apple pie filling EVER.
I am just letting it cool now and I have not been able to stop tasting the filling.
I doubled the recipe for a deep dish apple pie.
Thank you so much for sharing. I know the man I am making it for will flip over it.
Rashida
A keeper. I’ve made it 3 times with Honey Crisp, Golden Delicious and Evercrisp. My 12 yo likes it soft so after 10 min. I simmer on low for 50 min. I use 3 Tb of cornstarch. It’s not too thick. I haven’t used cider, just didn’t have it in the house. I find it makes a lot of juice on its own. And I have forgotten to add the butter each time. Regardless, it’s delicious each time. Some apples are soft and some are firm.
Dee
This is delish! I made half a batch for a few apples we had from an orchard trip and wish we had more! I used it for half a dozen mini pies. Yum! I also made one alteration to the recipe. I did not have apple cider so I made a mixture of caramel and water (50/50). Thai have it the most delish l hint of caramel. ♥️ it.
Katie
Wow, this was spectacular! I will absolutely 1000% make this again.
Kelli Avila
Katie I'm so glad you liked it. Enjoy it tomorrow with your beautiful family!
Alice
Just made this recipe. Did not have apple cider vinegar to hand so used balsamic vinegar instead. Not the 3/4 cup as listed but just 2 tbsps and added more lemon juice. Tastes fantastic. Off to make some apple crumble now.
Kelli Avila
Hi Alice! Glad you enjoyed it. Just to note, the recipe does NOT call for apple cider vinegar. It calls for fresh apple cider!
Jess
Please revise and put the "not apple cider vinegar" note in brackets beside the ingredient list for apple cider. Baking with a toddler and quickly glancing at the recipe you don't see the disclaimer at the very bottom. It ruined my pie.
emily
I haven't made this yet but how would I put this in a pie. Should I cook the crust then put this in or cook them at the same time?
thanks
Kelli Avila
Hi Emily. To use this filling inside of a pie, you'd make sure it is cooled down completely. Then roll out your pie dough, pour the chilled apple pie filling in, add the top crust, brush on egg wash if you want, and bake in a preheated 425 oven on the lowest shelf until the crust is is golden brown all over, at least 40 minutes, but likely around 50 or so.
These two recipes use pre-cooked filling and you can check them out for some guidance if you want:
Mile-High Apple Pie
Cinnamon Roll Apple Pie
Susie
This recipe was outstanding! It has a perfect balance of sweet and spice. It made making an apple pie so easy for another day. I made four batches and froze it in pints. I used the “ALL BUTTER PIE CRUST” on your site. I couldn’t find anywhere how long to bake it, but went by looks. Turned out perfect! I’ve never made such a great pie crust before. Thank you for all the detail. I followed it closely.i can’t wait to make other pie on your site.
Sally Bellanger
I just made 2 pies using this filling recipe, I just doubled it. It tastes so good. Amazing and easy to make. Loved it
Kelli Avila
So happy you enjoyed it!
Jodi Fortner
Hi Kelli --
I'm worried about the cornstarch breaking down after thawing and that the pie filling won't be as thick as it needs to be. I understand the macerating step, and boiling before adding the thickening, but after thawing will it stay as thick as it was when it went INTO the freezer? Most of your commenters seem to have used the feeling right away. I've read in other blogs that some people use ClearGel instead of cornstarch because it holds it's viscosity.
Also, would you happen to know how many cups are needed for a deep dish 2-crust 9-inch pie? I want to freeze some in smaller portions to use for Danish and other recipes which require smaller amounts.
I hope you see this soon, as I have a bushel of Jonathan apples and I'm trying to decide what to do with them! Thanks for your information and your good recipes, I hope you have answers for my questions!
Kelli Avila
Hi Jodi! I sent you an email to ensure you got my reply about this to give you my two cents. In a nut shell, I've never had a problem with a running filling after freezing and thawing. And I've frozen this filling a lot!
Brittany
This recipe is so easy and quick! I did like 2 more apples than called for cause I had some going bad from apple picking a week and a half ago. It made a lot more than I anticipated but it’s enough to make 2 pies and I made one tonight. I used apple juice because I didn’t have cider on hand but it is sooo unbelievably delicious. When I use the rest up, I will absolutely make another batch but use the cider as called for. Thanking for blessing us with this fantastic mouth watering recipe!
Mary
Amazingly delicious! I’ve never made apple pie filling before! Usually only slice the raw apples directly into the pie plate. But I’m looking forward to seeing what these cooked apples taste like in a pie. If they’re half as good as they taste right now I’ll be happy!
Julie
Update answer to my earlier question because I wanted to try asap. I took this filling, put it in the bottom of regular muffin cups, added a crumb topping, then baked at 375 for 20 minutes. Perfection!
Kelli Avila
Julie! So glad you liked it--and thanks so much for sharing what worked for you.
Julie
This was unbelievably delicious. I used Gravenstein and a mystery small crisp tart sweet red apple from a neighbor's orchard and the slices held the texture well. I want to use it for individual apple crisp cups, because my husband won't eat more than one serving. Do you have cooking temperature and time suggestions for refrigerated filling topped with your crumb recipe above?
Leah Kathryn Venable
This recipe is INCREDIBLE. I have made a lot of apple pies but they always turn out too dry, so cooking them in cider worked perfectly. My only regret is using store bought pie crust instead of taking the time to make my own…this filling is just too good for store bought pie crust!! I made 24 mini pies for my daughters class, did a lot of “taste testing” while it was cooling, and still had enough left over to spoon over vanilla ice cream. And even so I wish I had made a double batch to freeze or just eat by the spoonful. Saving this one for all future apple pies!
Kelli Avila
Leah! I'm so glad you enjoyed it. What a huge compliment. Thanks for stopping by and sharing!
Ally
It tastes great but mine refuses to thicken up. Feels to runny to put in a pie.
Kelli Avila
Hi Ally! Does it look much different than the photos do in the post? I've never had it not thicken up, so would love to try to troubleshoot what happened with yours.
Kelly
I’m laughing at myself because I too misread and used apple cider vinegar (I blame exhaustion) BUT thankfully it was still edible and yummy just a smidge sour which I thought was because of the Granny Smith lol my family still loved it, even my small human who is particular. I used 3 pink lady, 3 Granny Smith and 1 gala (my original plan was 3 but peeler gave out) and that was the perfect apple to sauce ratio for us. I also cut the apples into chunks instead of slicing and omitted the vanilla but will probably try it next time. This filling is the perfect consistency and I’m sure it’ll be even better the next time since realizing my mistake.
Kelli Avila
Oh no!!! I'm sorry that happened! Glad it was still edible 🙂
Jen Hewitt
Just made this most amazing recipe - thank you, Kelli! It is absolutely delicious!!!
Kathy McDonald
My husband likes pies made with filling from a can and not fresh apples so this was perfection! He thought filling came from a can but was better!
Kelli Avila
What a win! I am so happy this recipe worked for you!
Mary
Can you recommend an alternative if you don’t have apple cider?
Kelli Avila
I'd say if you really can't get apple cider, I'd use apple juice. And if you can't get apple juice, then water.
Cherie Berthon
Thank you for responding. I am not very experienced at canning, so I won't risk it. I loved the idea of having this in my pantry, but I will just freeze it. I know it will be delicious!!
Emme
I just went to a u-pick farm with my kids and got a bushel of apples because they didn’t want to stop picking. This was the perfect recipe, it came out delicious. Will be using it in my oatmeal tomorrow morning!!
Kelli Avila
Emme thanks for stopping by and sharing! And I can confirm it's awesome with oatmeal--that's been a go-to breakfast for us in the fall, too!
Cherie Berthon
Hello Kelli, I am excited to try this recipe tomorrow with apples from our trees. Do you think I could can the filling rather than freeze it?
Kelli Avila
Hi Cherie! Canning is SO PRECISE and I don't have the tools at my disposable to test whether or not this is safe to can. I suspect it is because of all the sugar and lemon juice, however I myself am not able to verify that it is, so I can't recommend it.
George Milliken
I just stumbled across your website when looking for apple pie filling. This recipe is the bomb and it will be my go top recipe for things apple. Great recipe, well written and easy to follow.
Kelli Avila
Thank you so much for sharing, George!
Rachel
Sounds so delicious. I'm making cheesecake and want to use this as a topping. I do have two questions. One, how do you freeze it? In a zip top bag? A jar? My second is how do I use it in a pie if it's already cooked. Do you have a recipe on your site for this? I've never tried that but this looks soooo delicious I'm thinking I might need to get some in the freezer and use on Turkey Day. Thank you.
Kelli Avila
Hi Rachel! Would be SO GOOD on a cheesecake. I freeze it in mason jars. Just be sure it's fully cooled down before closing the jars and putting in the freezer. But freezing it in a bag would also work! To make a pie out of it, you literally just put it in a pie crust in bake it! As long as you are using good baking apples, it won't be too soft. I don't have an exact recipe on the site using this amount of pie filling, but I have the concept of this with my mile high apple pie or cinnamon roll apple pie. Take a peek at those directions and you'll get it! Let me know if you have any other questions, happy to answer!
LL of,Darkwater
I made this last year at Thanksgiving and now family is begging me to make it again, but this time make more, so they can have seconds this year, and possibly thirds! @everydaypie this is fabulous!
The Apple Cider really jumps up the flavor; this is my go-to recipe for Apple Pie Filling, every time.
Kelli Avila
I'm so happy! Thanks so much for sharing!
Ada
Amazing texture and extraordinary flavors!! Thnk you for this recipe!!
Nina
Dear Kelli
After reading two of the reviews, I just had to give this a try. Thus is the BEST apple pie filling I’ve made/had ever! Thank you so much for being so thorough. I’m not a very good cook and this will make a huge hit thus thanksgiving!
Nina
Melissa
My favorite apple pie recipe. Look no further, use this one! 🙂
Kelli Avila
Yay! So glad you love it! Thanks Melissa!
Jeannette
My new favorite apple pie filling! I recommended putting it in pancakes and baked into hand pies. There are so many possibilities…
Kelli Avila
Yesss! So good for many things other than pie!
Anisha Tuladhar
Thank you for the apple pie filling recipe. Loved it…
Kelli Avila
Awesome! Thanks for sharing!
Kim
So so so good! Highly recommend!!
Kelli Avila
I'm so happy you liked it!
Maria Semmelroth
Excellent recipe!! Thank you for sharing it 🙂
Kelli Avila
Yay so happy you liked it!
Haley Davis
Delicious apple pie filling, turned out great for me, will be making again!
Kelli Avila
So happy!
Sharon D
Kellis recipes never disappoint, rich in flavor and her recipes and directions spot on. Run do not walk to make this.
Kelli Avila
Thank you Sharon 🙂
Katie
Pro tip - make a double batch so you have some for your ice cream or to stir into some overnight oats! These are delicious and you don’t want to miss out!
Kelli Avila
Best pro tip ever 🙂
Megan
Great recipe! Loved it.
Kelli Avila
So happy!
Jess C
Tasted great. Tried it. Worked perfectly fine. Thank youuuu 🤩
Kelli Avila
Awesome! Thanks for sharing!
Chiara
This receipe It’s just perfect, not top sweet but sweet enough, creamy and delicioua. Thanks also for the instructions step by step, very easy to follow. Great job!
Kelli Avila
Chiara, I'm so glad you enjoyed it! Thank you 🙂
Ingy
This recipe is super ..
Kelli Avila
Thanks for sharing Ingy!
Dee
First the Apple filling is amazing! Love to eat it with some fresh homemade scones. Thank you for the very detailed post, it is super helpful and informative.
Kelli Avila
Awww, Dee! Thank you for sharing and for your kind words!!
Jess
Love this recipe!
Kelli Avila
Thanks for stopping by and sharing!
Bri B.
Loved this Apple pie recipe! Super easy to follow and it paired perfectly with our homemade vanilla ice cream. I’ve been following her account on Instagram for a few years now and she is my go to for pie recipes. And even if I am making one from another baker I still use her all butter crust (it’s just so good!).
Kelli Avila
Awww thanks Brianna! I'm so glad you like this recipe! Also, thanks for the shout out on the butter crust---it makes all the difference 🙂
Vanessa H
This recipe is easy to follow and the result is delicious. I would definitely say spending extra $ on fancy apple cider (NOT APPLE CIDER VINEGAR) is not worth it but using good apples is. Love this site and all the recipes I’ve tried so far have been great. Good tip to read the recipe twice before making any moves just in case.
Kelli Avila
Vanessa---you are so right! The apples do make all the difference. So glad you enjoyed the recipe (and you couldn't be more correct---best to read the recipe thoroughly!!). Thanks for stopping by and sharing!
Nicole
Delicious- Best apple pie filling! This will be a go-to fall recipe.
Kelli Avila
YAY! So glad you loved it Nicole!! Thanks for sharing.
Crystal
Amazing recipe, I used it over vanilla ice cream. The apple cider adds so much nuance to the flavor. Definitely will make again when we go apple picking next weekend!!
Kelli Avila
Crystal! Thanks for stopping by and sharing! I too love it with ice cream! And maybe this is weird, but I add it to plain cottage cheese too---so good!
Brittany
Absolutely delicious! Will definitely being using this recipe for all my apple fall baking
Kelli Avila
Ohhh yay! I'm glad you liked it! Thanks for sharing Brittany!
Susy
This recipe is so delicious and easy to make. Definitely need to make it again.
Kelli Avila
Yay! So happy you enjoyed it 🙂 Thanks for sharing Susy!
MommaK
I've made this now dozens of times. It's my go to recipe. I am cutting back the sugar just a tad on this account.. because I'm doing a crumb topping on the pie this time. I have also substituted fresh apple Cider for juice in a pinch and it turned out just as good. The recipe is perfect as is though. Thank you!!
Mary
I love this recipe. It is not too sweet. Now I found my go to apple pie filling recipe. Thank you.
Kelli Avila
Thank you Mary! I'm so glad you enjoyed it!
Danielle
Delicious! Kelli you have done it again!!
Kelli Avila
Thank you!! So glad you enjoyed 🙂
Sarah
I made a double batch- one to test now for thanksgiving and one for thanksgiving. However, I’ll have to make it AGAIN because the filling is so good, I already used it all in 2 pies, gave the other to my best friend for her birthday today.
Kelli Avila
Ok, first off you're SO GOOD for testing for Thanksgiving. That's always the smart way to do things (which I always wish I was organized enough to do myself). And I'm so glad you enjoyed it! Thanks for stopping by and sharing!
Autumn
I am gonna make this apple pie for Thanksgiving thank you
jada
this is a HORRIBLE recipe our apple pie tasted like apple cider vinegar I don't recommend this. so to all the people that said five stars I don't know what's going on with their taste buds. we followed the recipe exactly and it came out very bad DONT TRY THIS RECIPE.
Kelli Avila
There is no apple cider vinegar in the recipe? Please don't tell me you used apple cider vinegar in place of the APPLE CIDER. Those are two different products. And yes---it would absolutely taste awful if you put apple cider vinegar in it. And for anybody else reading this---absolutely do not use apple cider vinegar here---that's not in the recipe.
Brit
I think ur awesome! People can't read and I love that you manage to tell them so! I'm in love with this recipe it's awesome! I feel like these are the kind of people that just can't take responsibility for their mistakes &wanna just blame &belittle because it probably makes them feel better about themselves! Thanks for posting your great recipe! I had to say something it just infuriated me!
Kelli Avila
Hi Brit, I'm so happy you love this recipe!
Ingrid
Very good recipe! I found answers for all my doubts in the explanations.
I prepared only the “filling” to eat with vanilla ice-cream as a desert. I used honeycrisp apples, and didn’t add vanilla. My guests (and we) loved the combination.
Next time, I’ll try a pie.
Thanks for taking your time to put this all together so carefully, Kelli!
Helen
You realize that recipe clearly states DO NOT USE APPLE CIDER VINEGAR.
Jodi
Very easy, not too sweet, and perfect for pies and crumble. I used empire apples we picked ourselves, so the apples were very fresh. Ideal autumn comfort food 🙂
Diane Rudd
I’m so bummed, I read the do not use apple cider vinegar after I was done. I’m really trying to like the taste but of course too much sour going on:). I will most definitely use the real stuff next time but for today no apple pie.
Kelli Avila
Hi Diane. Sorry that happened to you! I hope you get to make it again with the right ingredients! -Kelli
Kim P.
Would one batch of this be enough for one 8" pie? Or should I make two batches?
Kelli Avila
Yes this makes enough for a 9" pie, so you might have a little leftover for an 8"!
Angel
I’m so glad I read comments because I was thinking you asked for Apple cider vinegar and I was skip to another recipe because I thought that would be gross 🤮
Audrey
Don't feel bad Diane I was in a hurry and did the exact same thing 😃
Crystal Hall
Just made this filling with apples from my neighbor. I doubled it and made a couple of pies. They turned out AMAZING. I will be making the filling and freezing it for use during the holidays.
Naomi
Loved this recipe. For someone who’s always loved Apple pie but never made their own, I’d say hands down this will be the recipe I use from now on! I only tweaked a few things, omitted the nutmeg (not a nutmeg person), used flour instead of cornstarch, and used fresh orchard-picked apples (honey crisp, even though these aren’t typical baking apples) and am VERY impressed with the taste and how everything turned out with my pie! Husband loved it, and cannot wait to use this recipe for thanksgiving this year 🥰
And yes, recipe was very easy to read, just gotta follow all of the directions, and doing a pre-read before actually making it helps tremendously 😉
Ginny
Actually I just have a question. Is the amount of apples needed before or after peeling, coring and slicing? Thx!!
Kelli Avila
Good question---the pounds listed is BEFORE peeling / coring / slicing.
Dennis
Bad recipe or at the very least bad instructions its says u need butter but it doesn't mention it after same thing with the vanilla extract. So everyone who gave it 5 stars knows how to make the filling already or their lying
Kelli Avila
Dear Dennis, Thank you for coming to my website just to be mean. Nobody is lying---you just didn't read through the instructions all the way. What to do with the butter and extract is listed in Step 5. Kindly, Kelli
The Grizz
I never made this recipe and found the instructions very easy to follow. I cooked apples longer that 15 minutes but had doubled the recipient. I think the above comment left by a disgruntled "cook" was very inappropriate. Thanks again. The Grizz
Rene
"their" lying?? Don't blame the fact that you are a bad cook/baker on the recipe.
Lydia
*Knows how to make the filing" .. Obviously you don't. Mine came out delicious & was easy to make. Never made apple pie filling in my life... 🙂
Tiffany
It helps if you read the instructions carefully and all the way through. It literally says in step 5. Remove from heat then and add butter and vanilla. Nobody lied you didn’t pay attention.
Daniel
Dennis, use a cup of cider vinegar instead.
bobb
Now that is funny
Jacklyn
Too funny!! lol
Kelly
Perfect apple pie filling! I loved the flavor and it came out the perfect consistency.
Kelli Avila
I'm so glad you enjoyed it! Thanks for stoping by to share!
Laura
I made this filling in advance for some mini pies for thanksgiving and it was delicious! So easy to put together and loved the idea of making the filling to use with other things. I will be trying it on ice cream next time!