
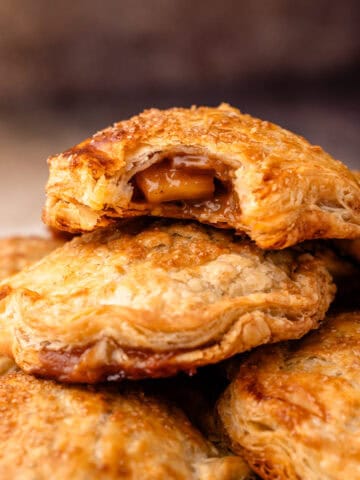
Inspired by the beloved Harry Potter series, these magical Pumpkin Pasties feature buttery cinnamon pastry, a sweet pumpkin filling, and a perfectly drizzled glaze.
Want to save this recipe?
Enter your email & I'll send it to your inbox. Plus, get weekly updates from me!
If you've read the Harry Potter series, you might remember the trolley cart on the train to Hogwarts, filled with candies, sweets, and, of course, pumpkin pasties. Rereading the books with my kids, and seeing the story come alive through their eyes has brought a new sense of magic I didn’t fully experience the first time around.
When we got to the part about the students' first train ride to Hogwarts, I found myself imagining what a pumpkin pasty might look and taste like, since I've never actually had or seen one myself. While the book gives no description as to whether or not it is savory or sweet (and there is much debate to this fact), my own imagination dreamed up a rich and sweet handheld pumpkin pastry, complete with a sweet glaze.
This recipe is what I pictured Harry and all the other Hogwarts students enjoying as they rode along to their first day of school of witchcraft and wizardry. And, the joy on my own children's faces as I let them eat their own pumpkin pasty is one I'll cherish forever. If you have Harry Potter loving kids (or grown ups) in your life, I guarantee making this for them will give you as much joy as they will have when eating it.
What is a Pumpkin Pasty?
A pasty is a traditional handheld British pastry, usually filled with savory meat and veggies. Full disclosure: I’m 100% American, so I’m not claiming to be a pasty master. This recipe is simply my take on what I imagined while reading Harry Potter.
There's been plenty of debate about whether the pumpkin pasty in the books would be savory, as tradition would suggest, or sweet. Since they were sold alongside a whole trolley of sweet treats on the train, I pictured them as sweet.
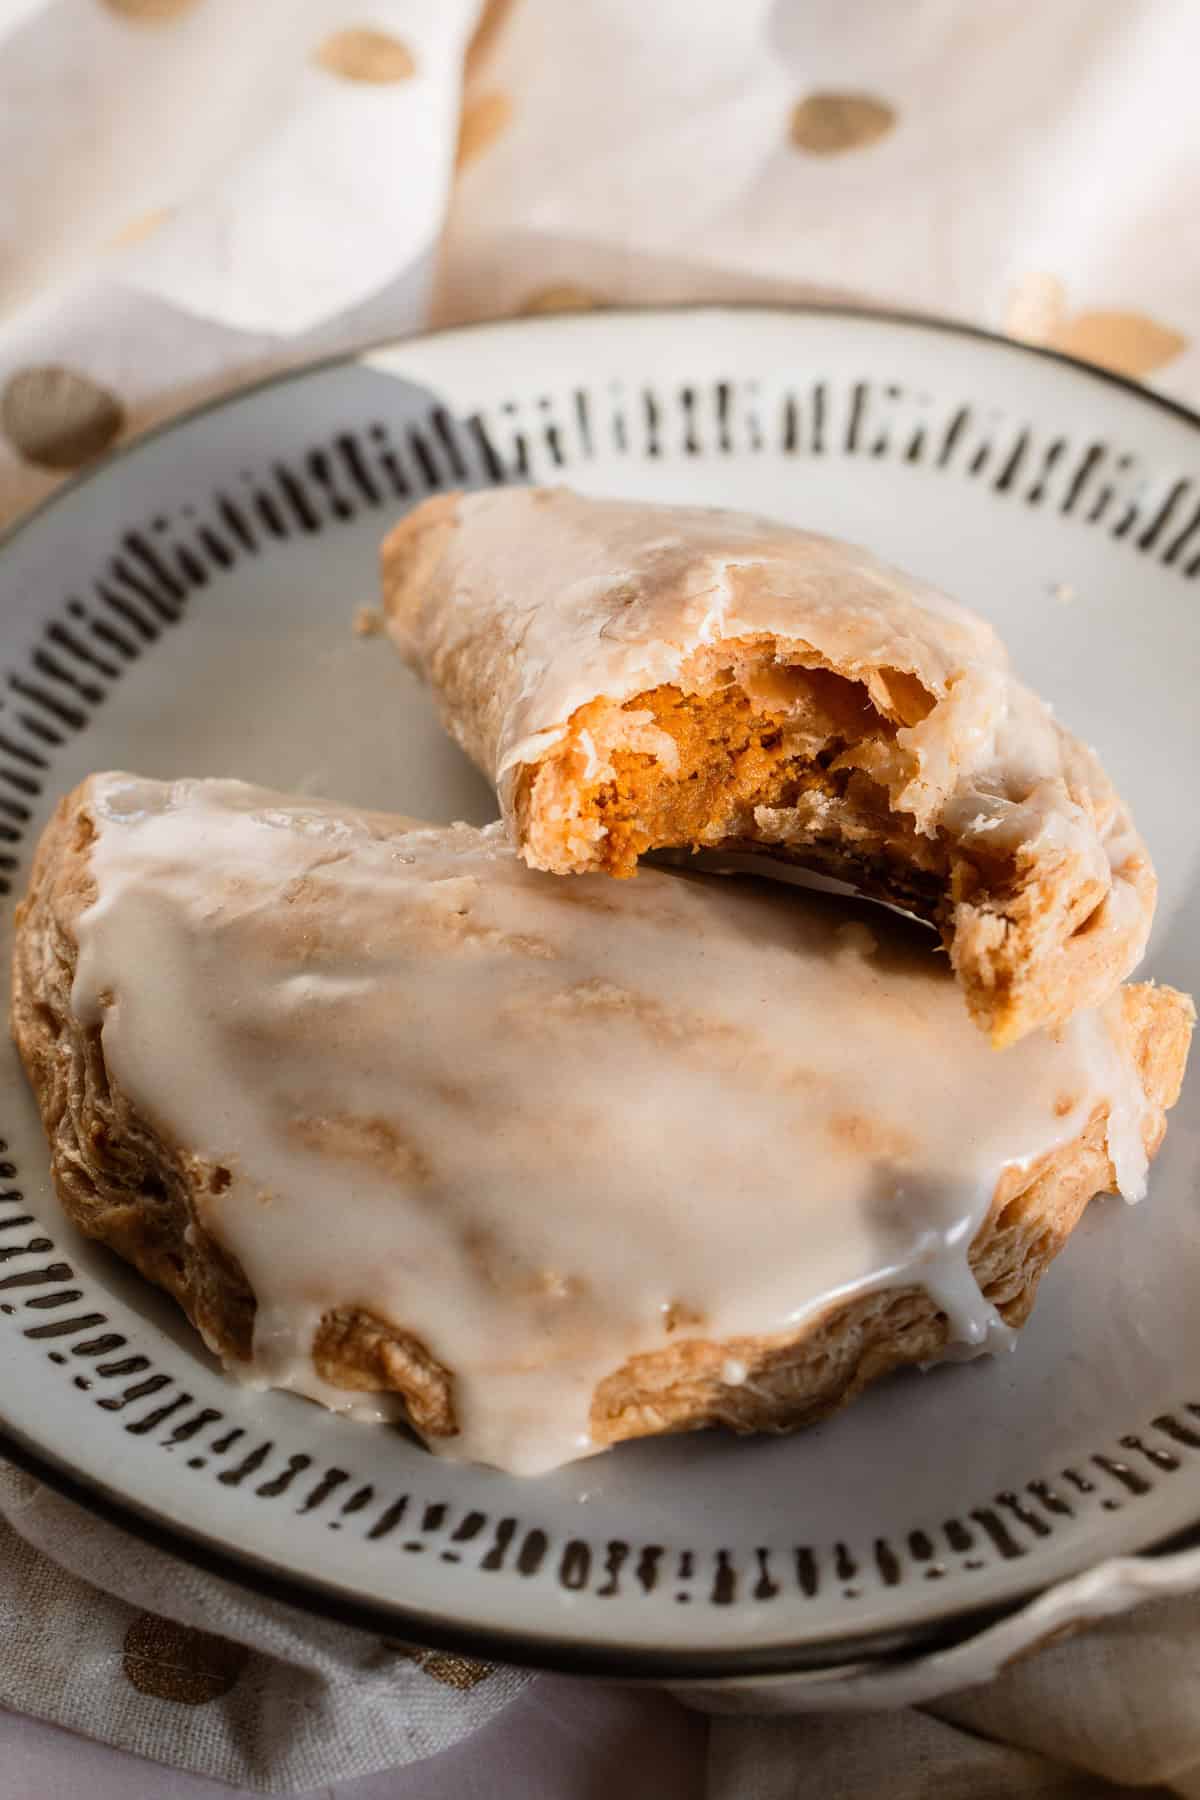
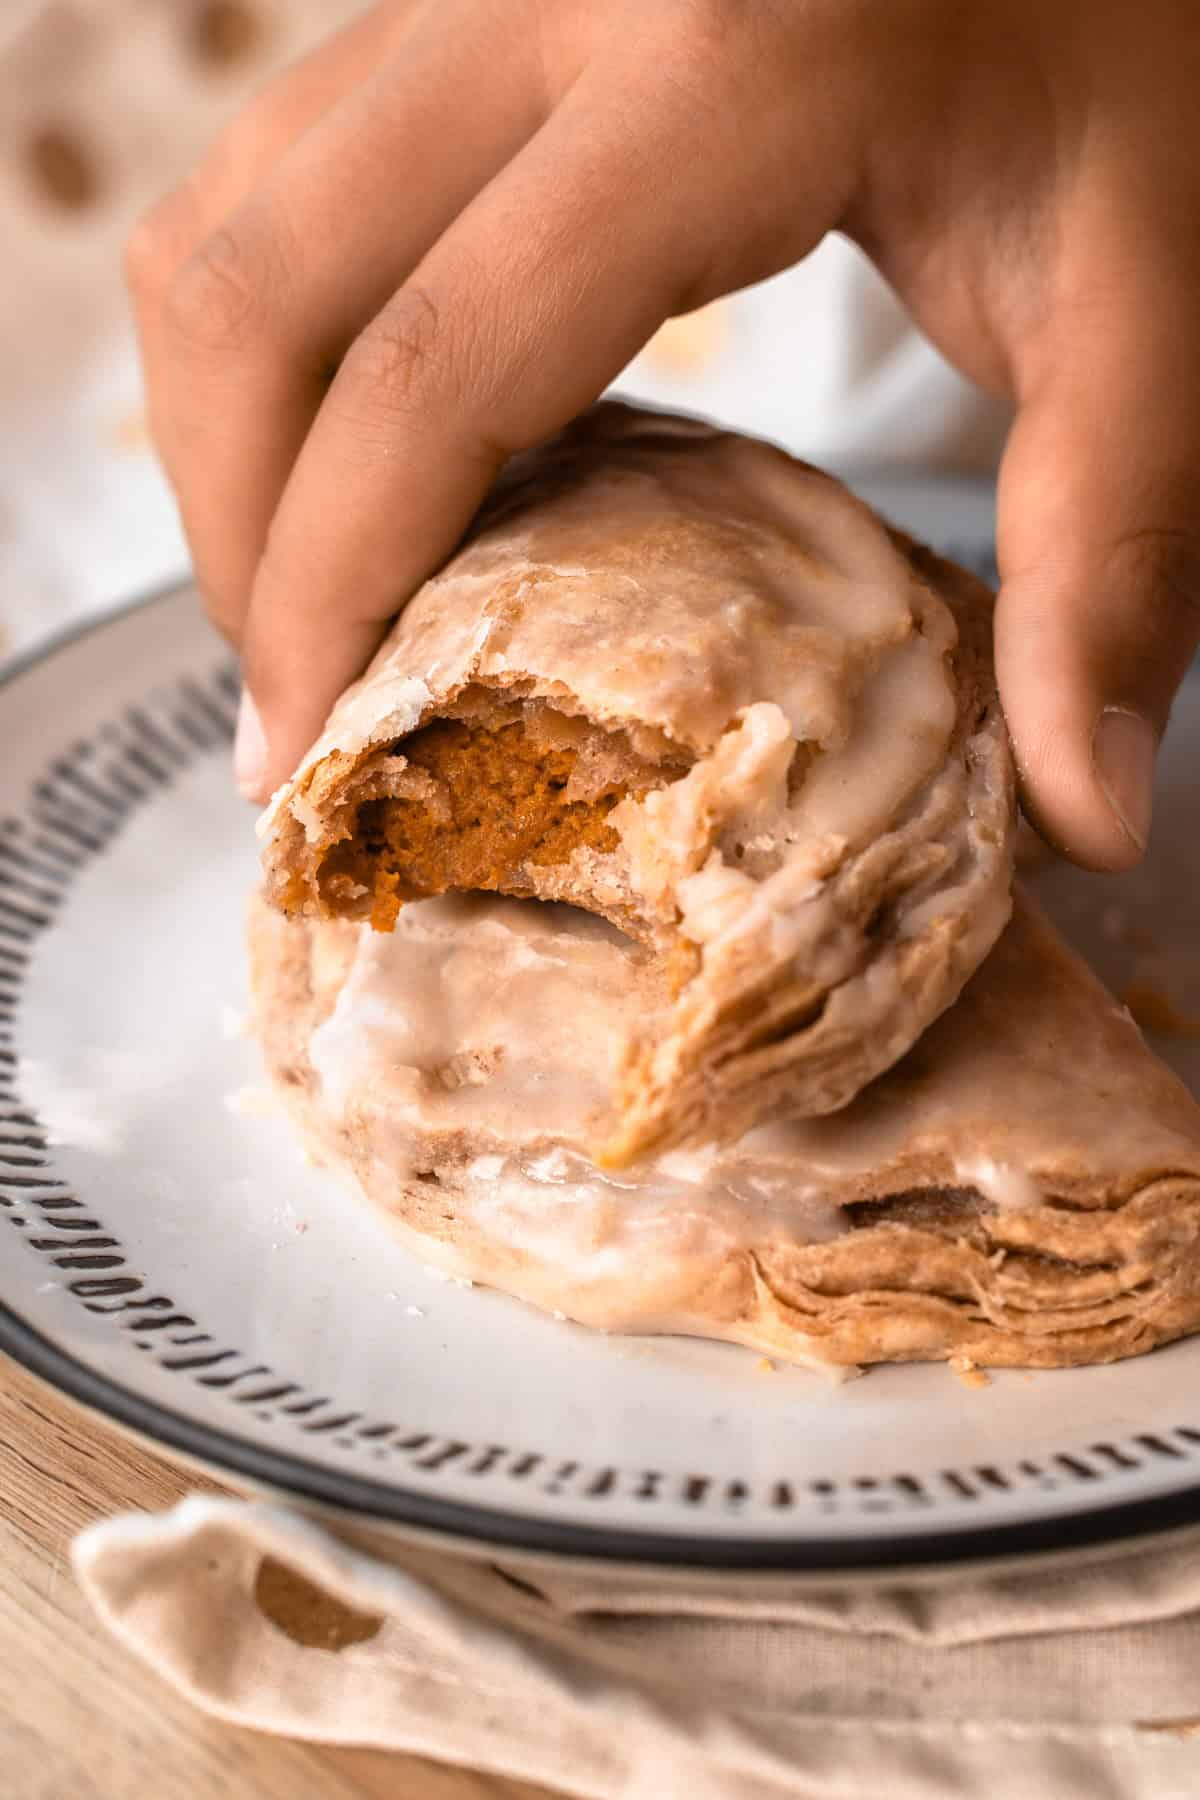
This version brings that idea to life with a sweet, crumbly cinnamon pastry, a rich spiced pumpkin filling, and a simple glaze that hardens to add a nice textural contrast.
How to Make Them
Consider this a “project” recipe, but definitely not a difficult one! Making a pumpkin pasty involves a few steps, so plan to spread the process over two days. Here's what you’ll do:
- Make and chill the dough (ideally for 12 hours, but at least 2).
- Mix up the pumpkin filling.
- Roll out the dough, fill, and bake the pasties.
- Finish by glazing the baked pasties.
Don’t worry—this article and recipe will walk you through everything you need to know to make them successfully. You can jump around using the menu below, or skip to the end of the article for the full recipe.
Jump to:
Making the Pastry
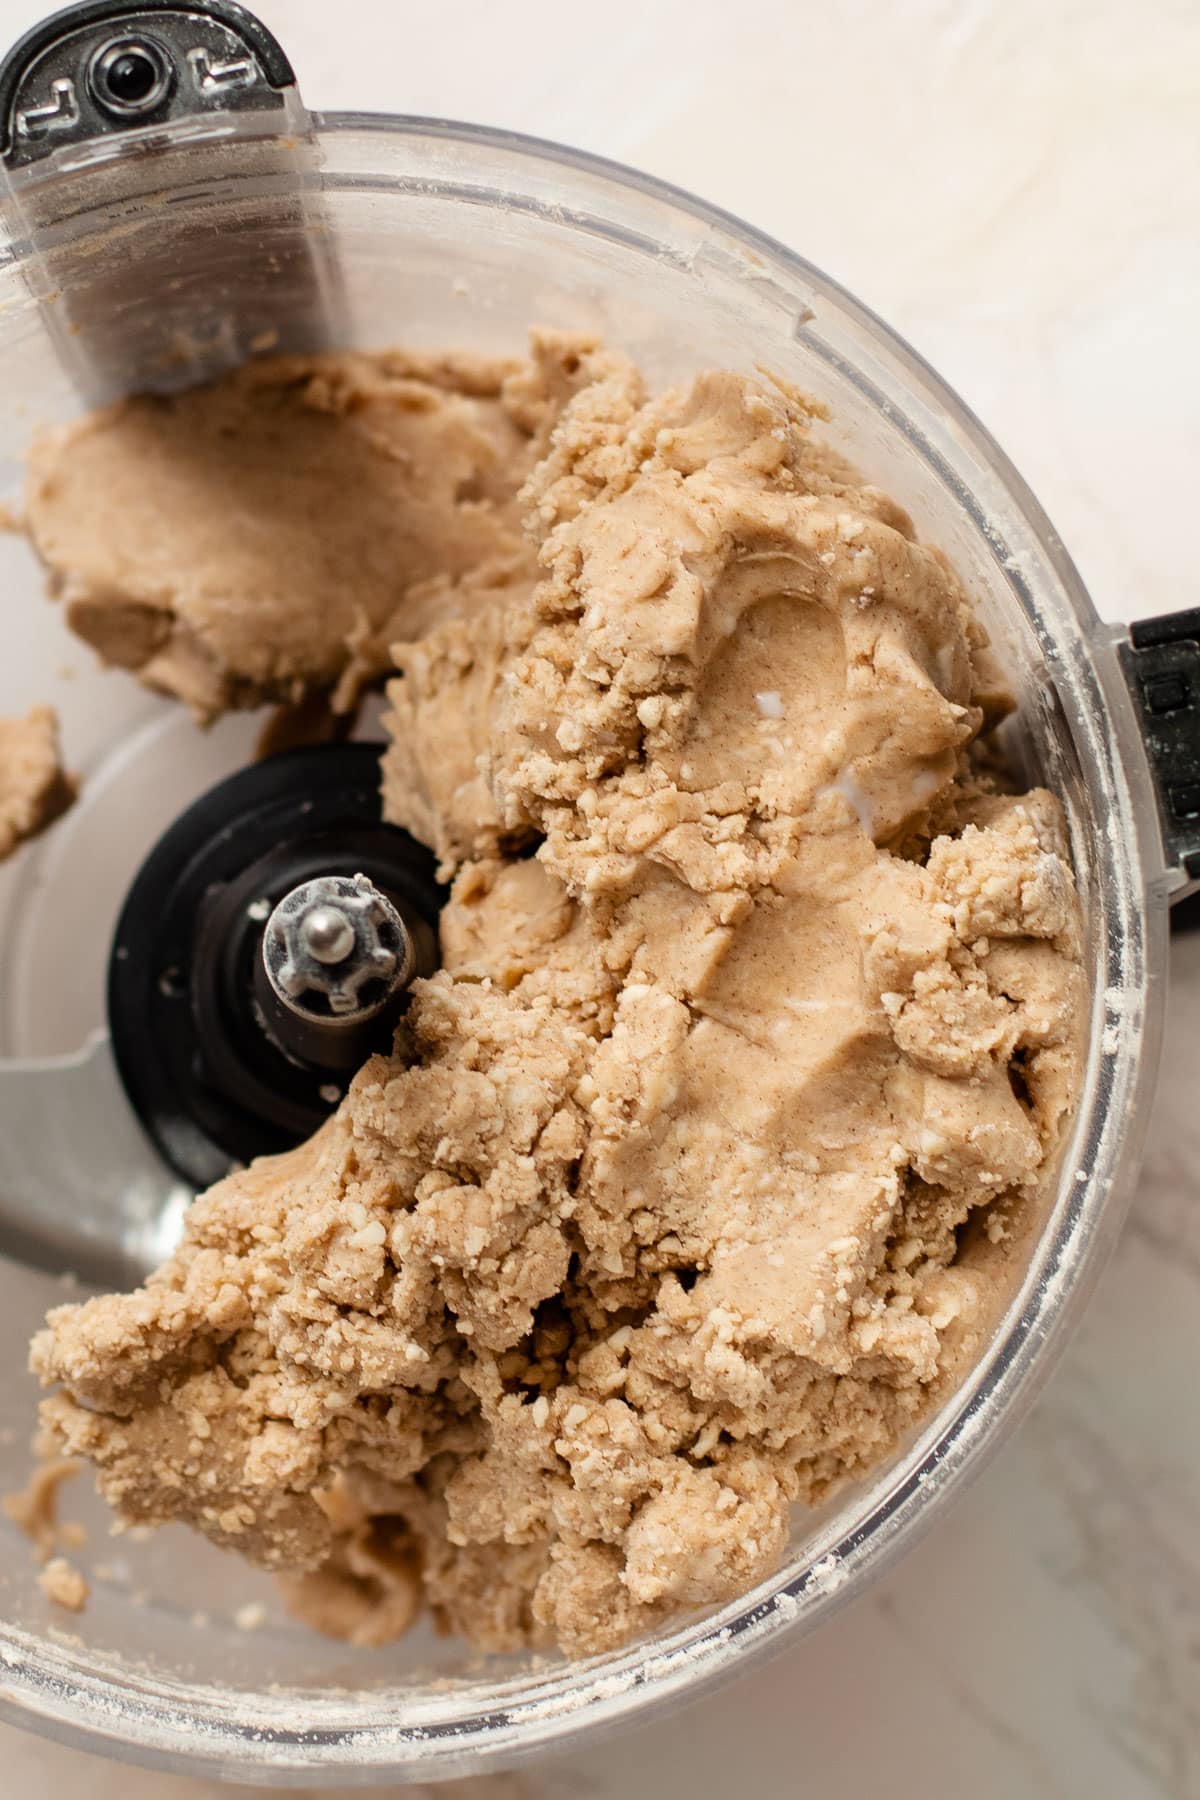
The pastry dough in this recipe is not traditional flaky american pie dough, but instead it's more like a shortcrust. I wanted the pastry to be crumbly, tender and sweet. I also loved the idea of it being a light golden brown color, so I added in cinnamon to the dough.
The dough is made in a food processor. Instead of leaving large chunks of butter in the dough, as you would for regular pie dough, the instructions call for running the processor until the dough clumps together around the blade. This ensures the butter is worked into the dough enough, which will prevent the dough from rising too much in the oven. A touch of sugar is added to the dough, as well as a bit of milk, to make the pastry more flavorful and tender.
Rolling Out the Pastry
The dough needs to be thoroughly chilled before rolling out. Once it’s chilled (I always recommend making dough the day before and letting it rest overnight), remove from the refrigerator and let it soften up for 5-10 minutes. The dough is ready to roll out when it makes an indentation when you gently press your finger into the dough.
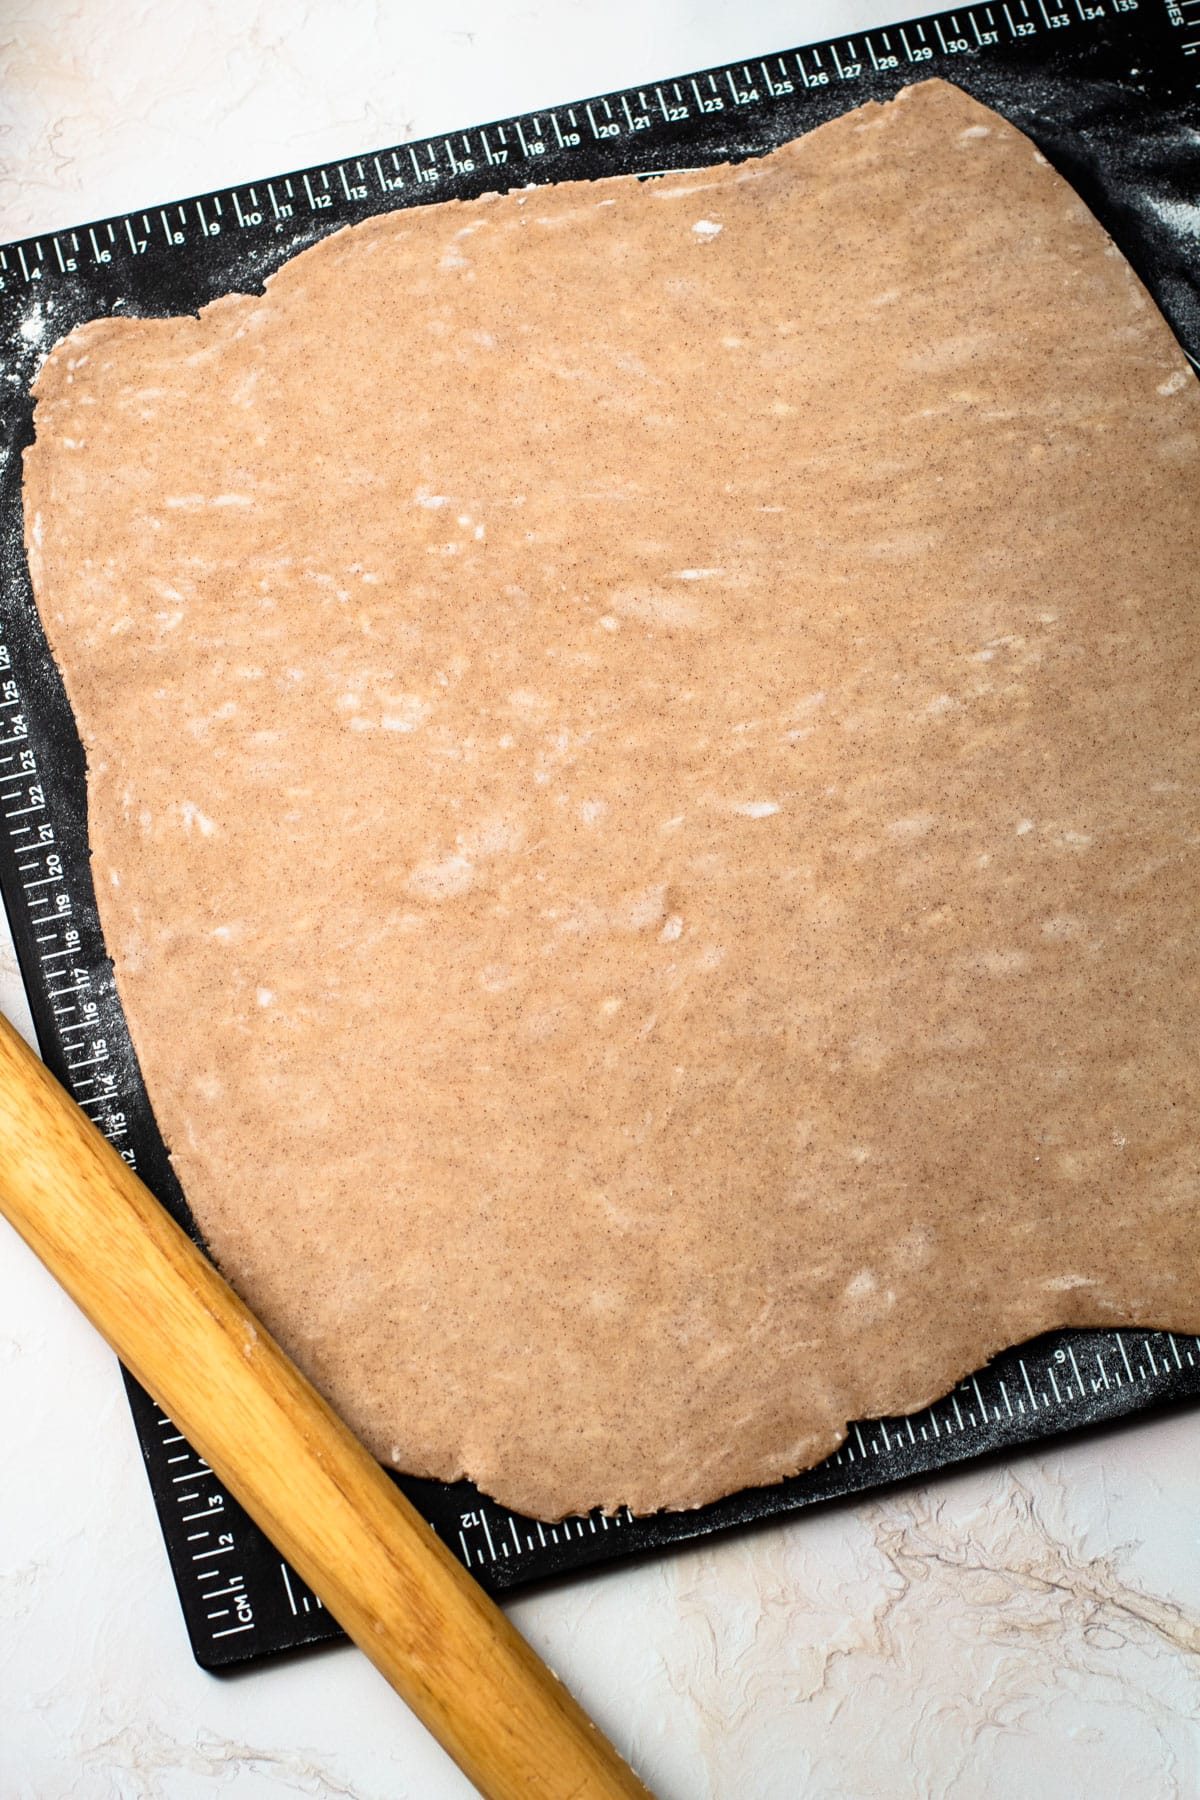
Step 1: Roll the pastry out about a ⅛-inch thick.
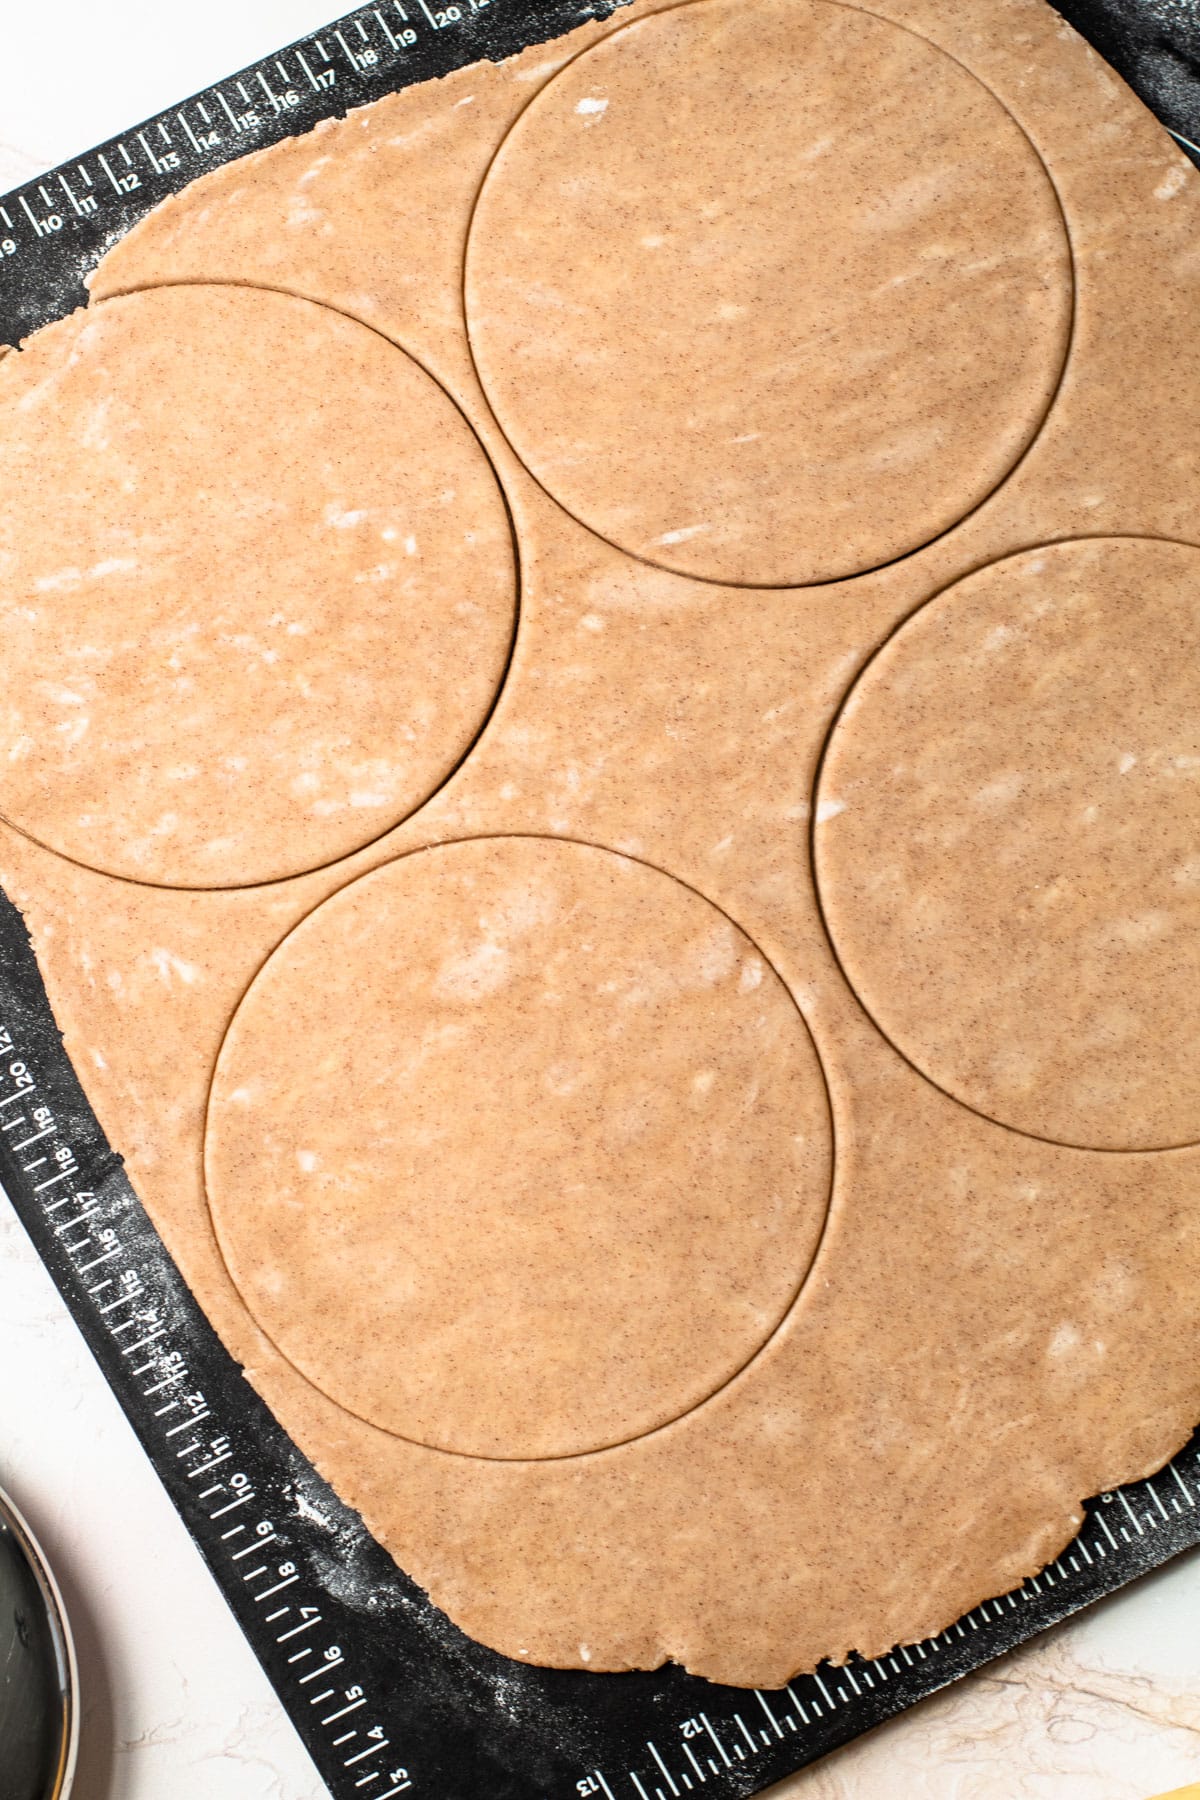
Step 2: Cut or stamp out circles, anywhere between 4-½-inches to 5-½-inches.
Generously flour your work surface, as well as your rolling pin. Divide the dough in half, and set the other half aside. Roll out the dough to a rough 12" by 12" square or about ⅛″ thick, and then set out to make circles.
What Size to Cut Out the Circles
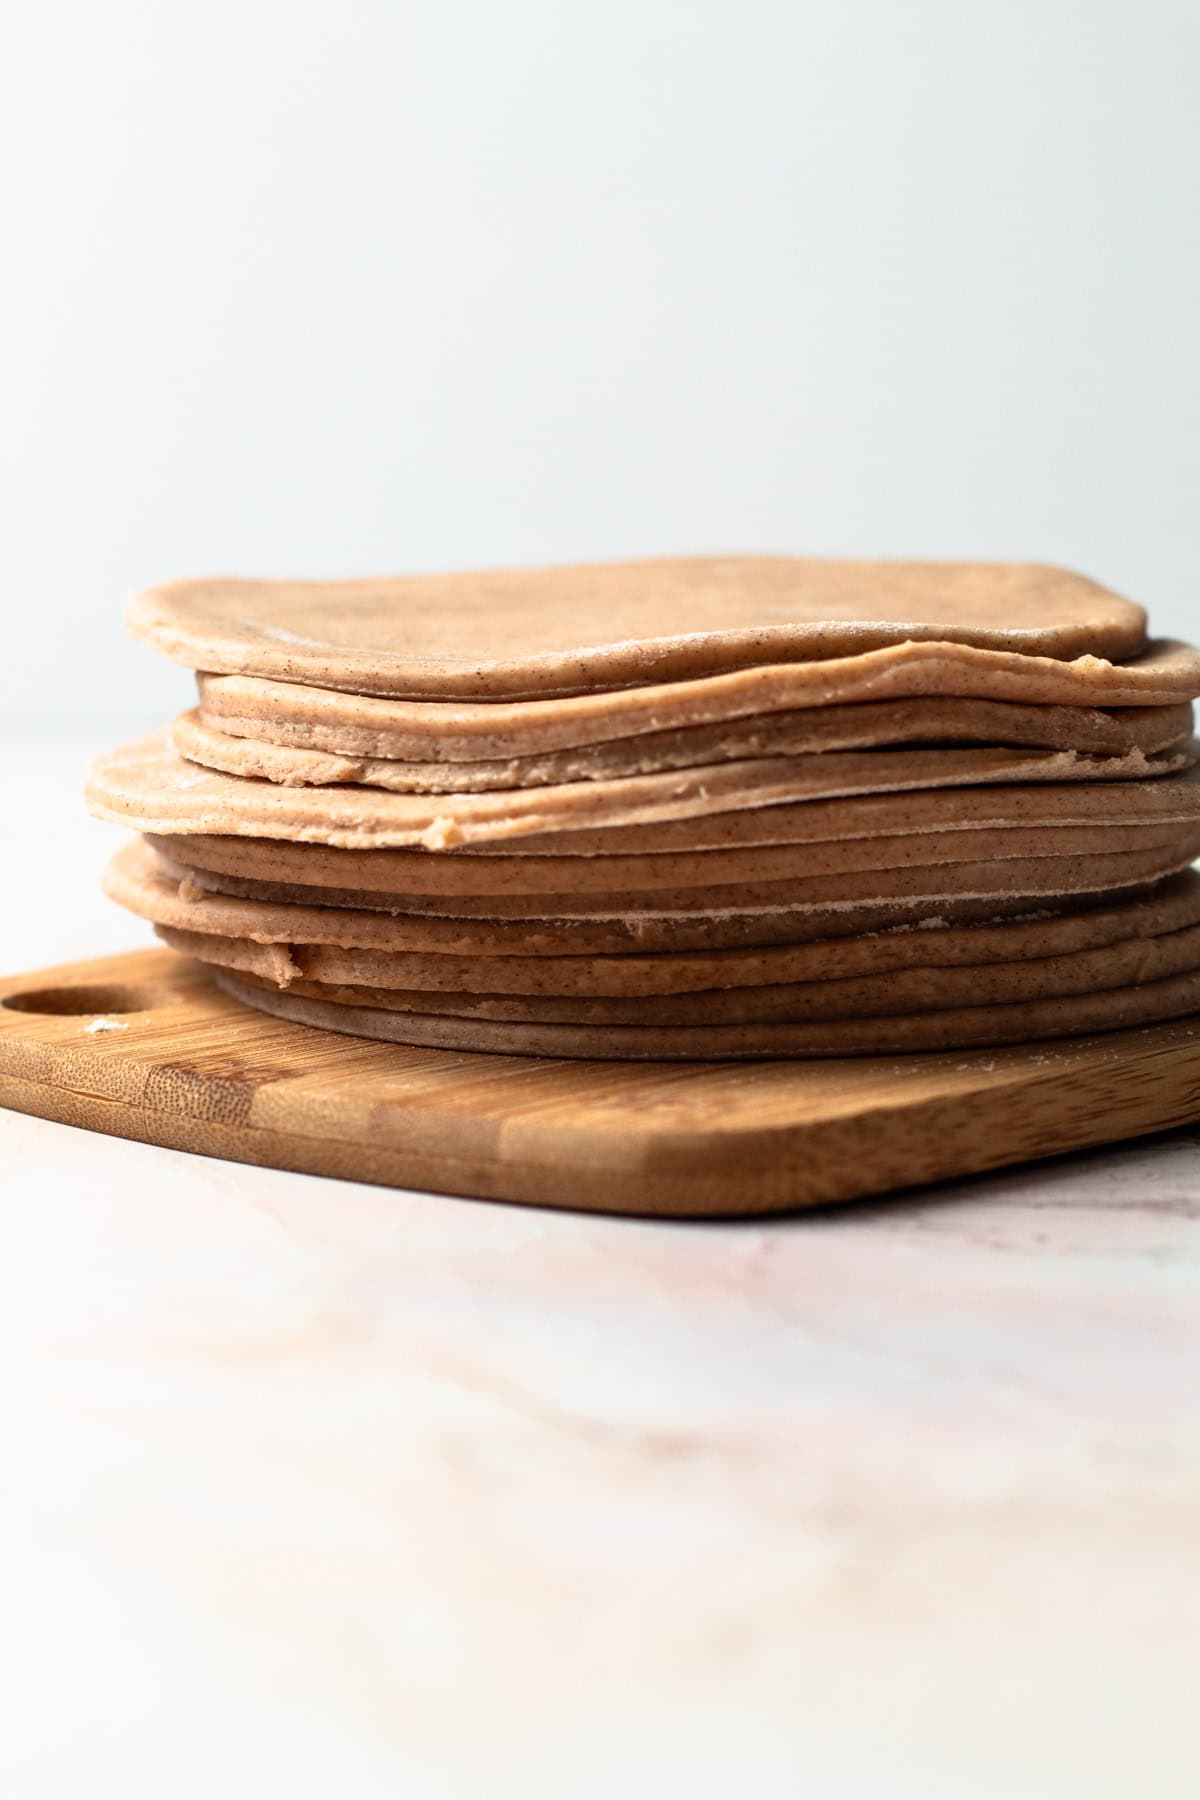
Next, you need to stamp or cut out circles to make the pasties the correct size. I recommend making a 4-½-inch to 5-½-inch circle. I didn't have that size pastry cutter, so I just found a bowl that was that size and made an indentation with the rim of the bowl and then cut it out with a pairing knife. If you have a pastry cutter that size, lucky you, use that! Stamp out as many circles as you can with the rolled out dough, and then set aside the scraps. Repeat the process with the other half of the dough.
Then, re-roll the scraps and roll them out one time. In total, you should be able to get 8-12 circles, depending on what size you make them.
Making the Filling and Assembly
Filling any sort of pastry is always a balance of adding in enough filling, but not too much that it leaks out. Depending on your actual size of the circle that was stamped out of your dough will dictate how much pumpkin filling you need to add.
If the filling is leaking out when you are forming it, use a little bit less for the next one. I found ¼ cup filling to be the perfect amount, but you might need to play around with it.
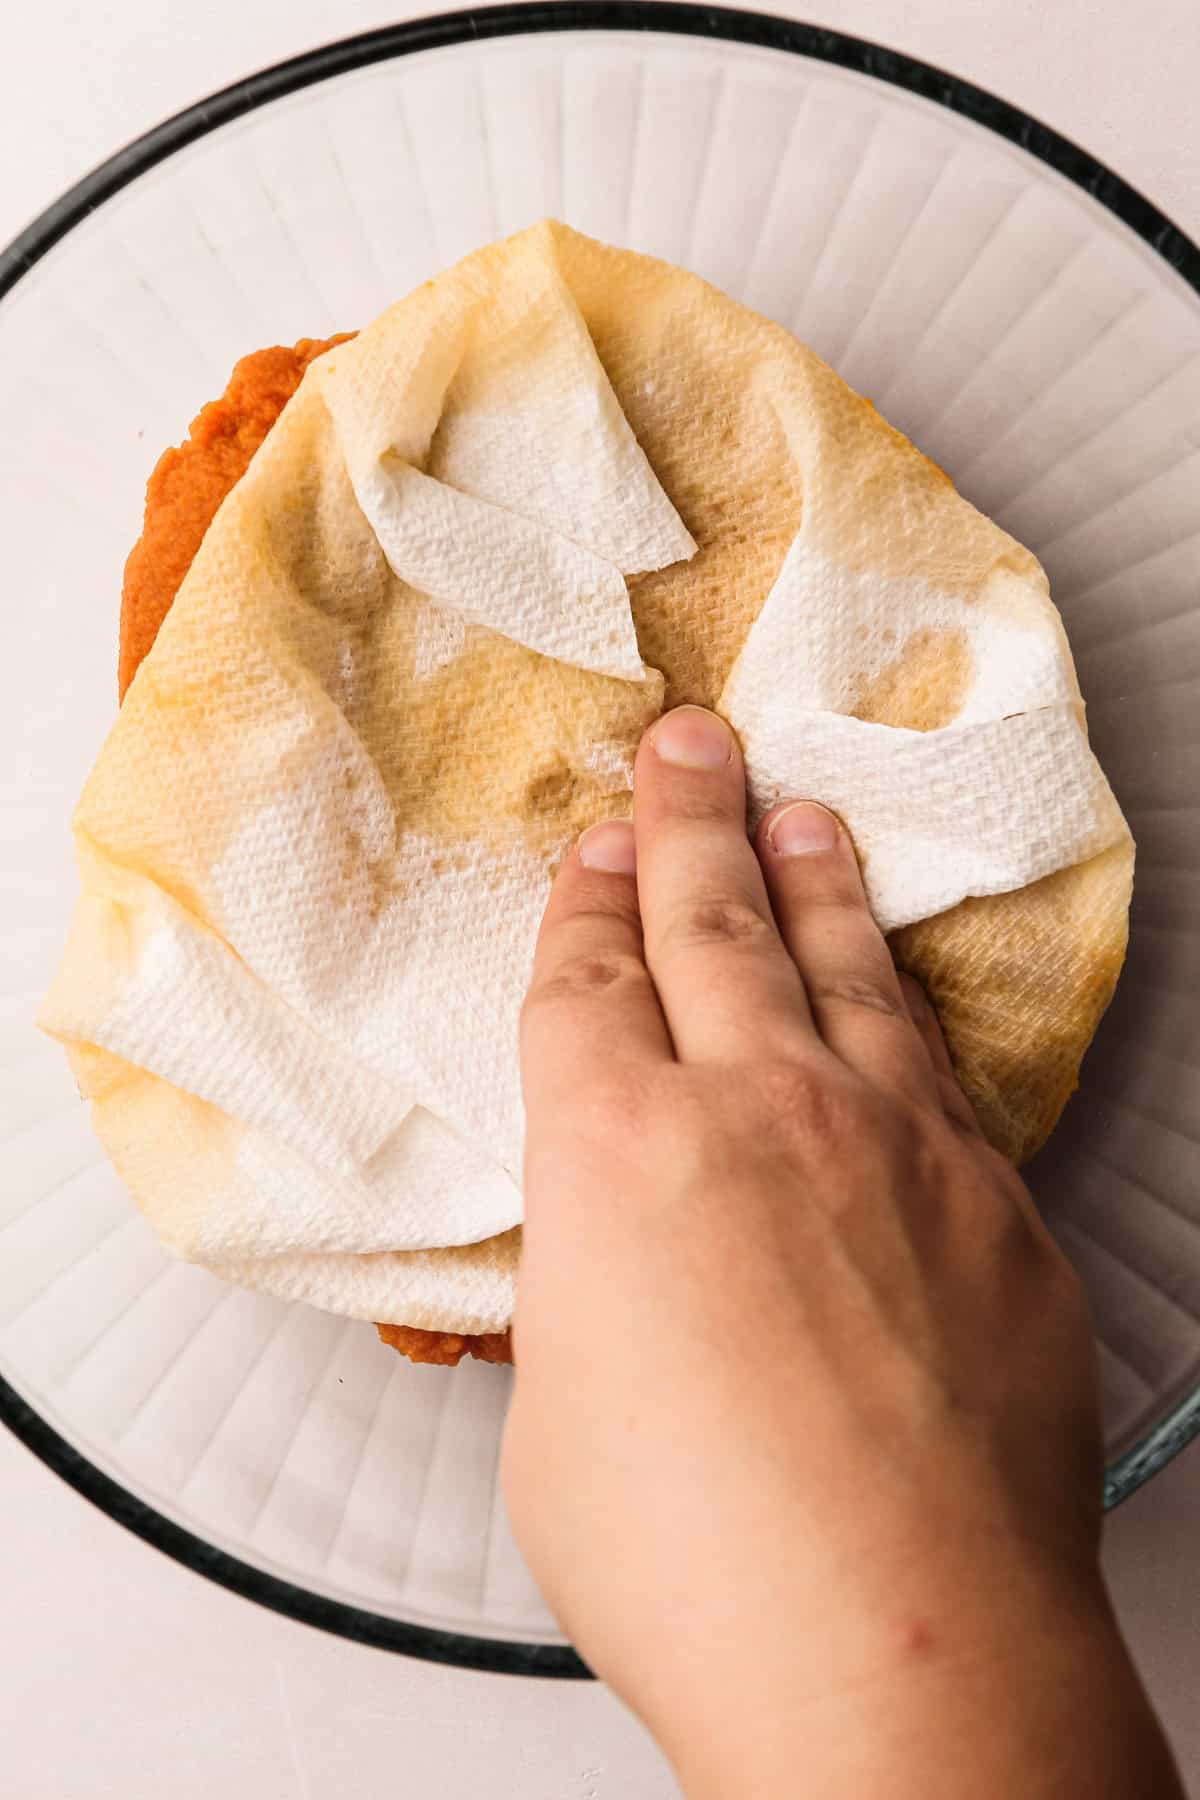
Step 1: Place the pumpkin puree between layers of paper towels in a bowl, pressing gently to absorb excess moisture, then remove the paper towels.
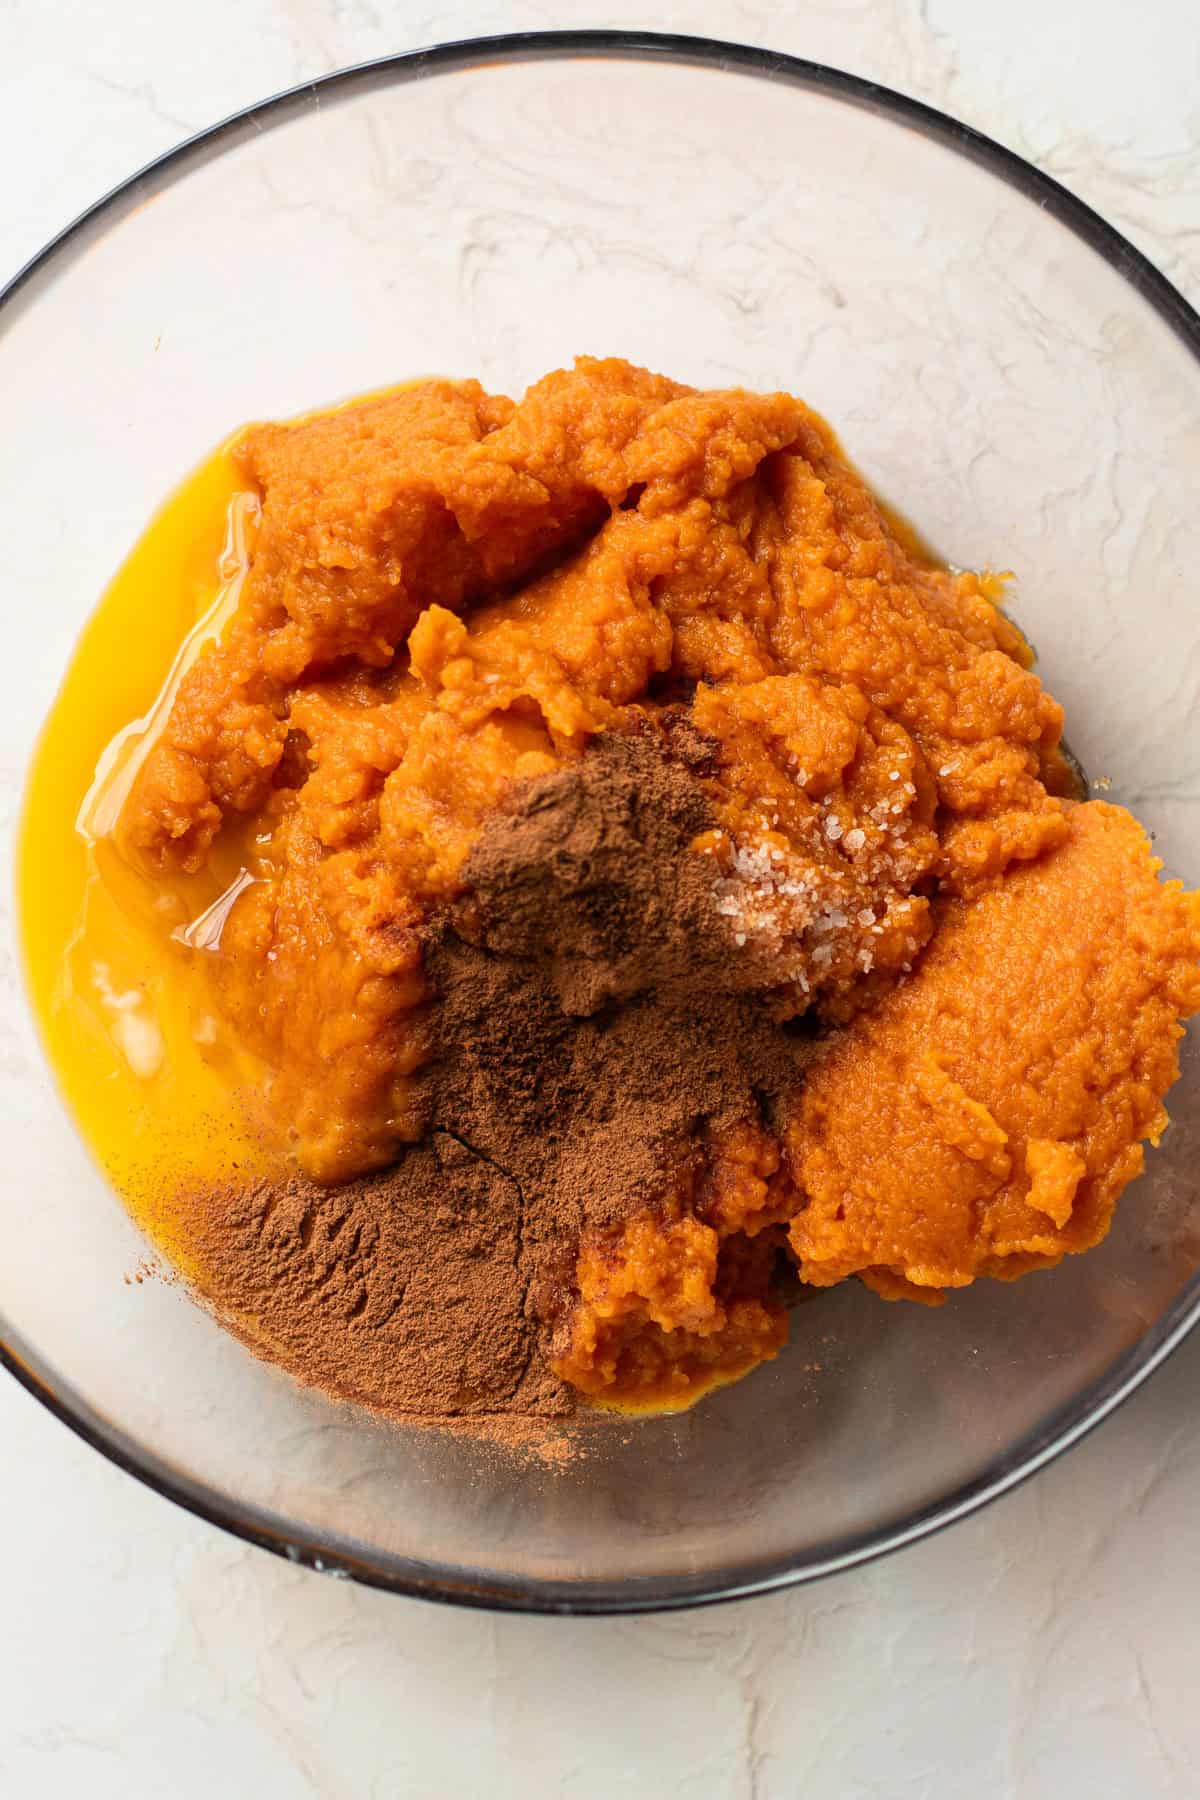
Step 2: Add the remaining filling ingredients with the pumpkin puree.
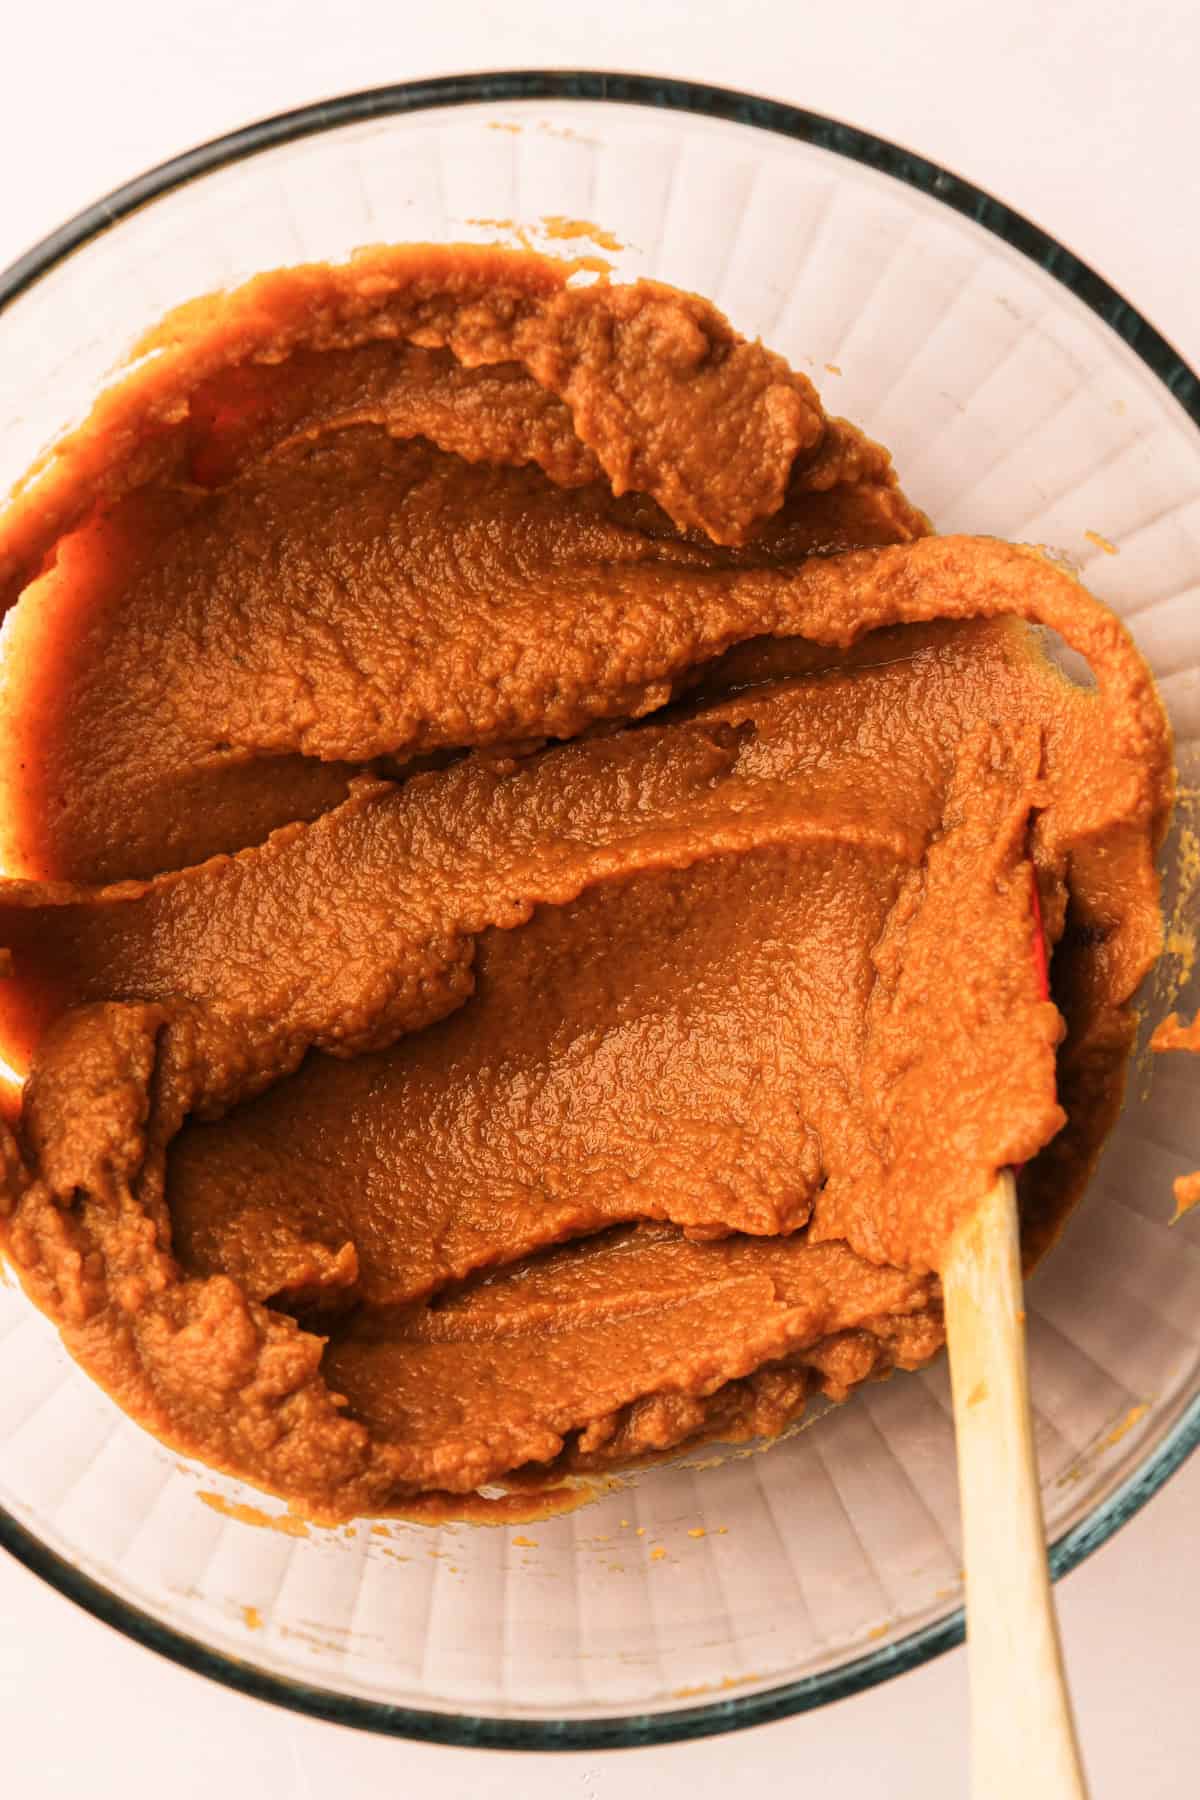
Step 3: Whisk together until smooth.
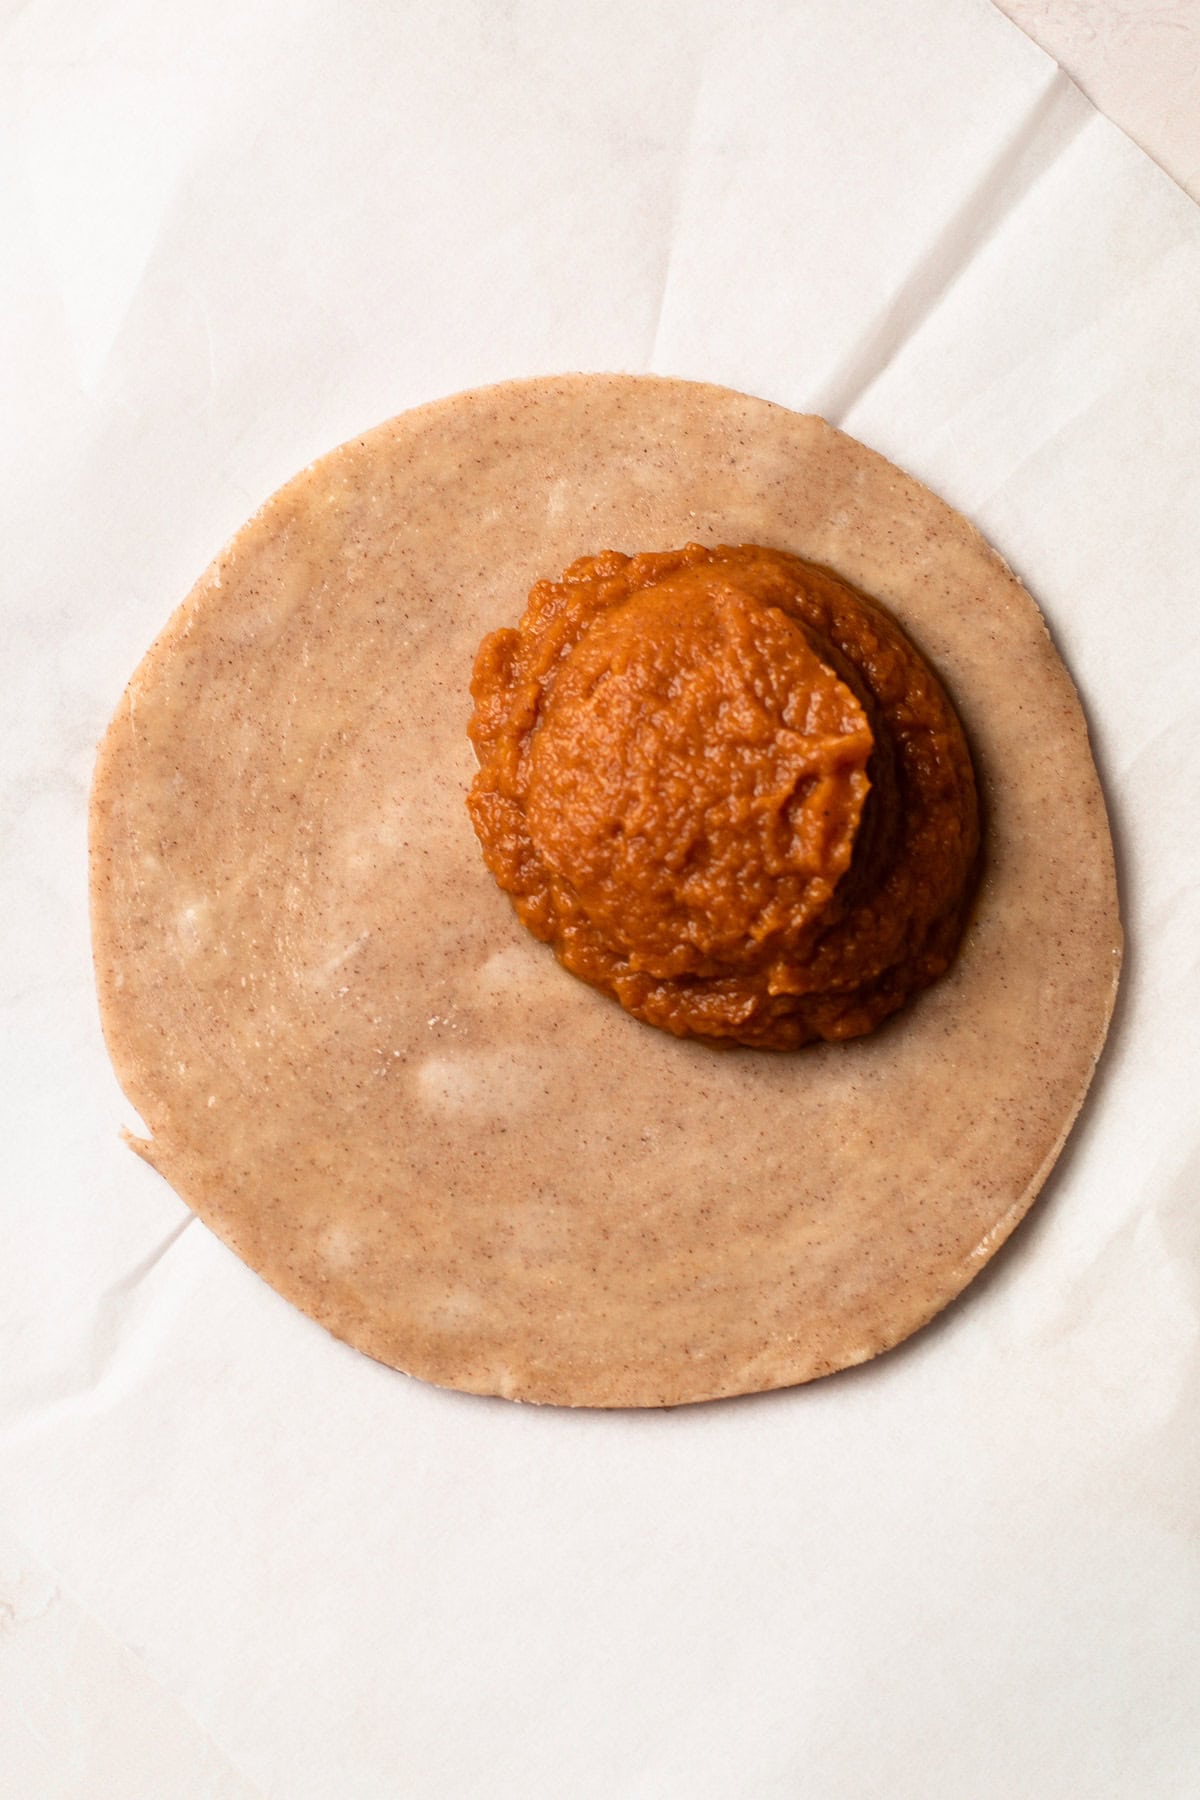
Step 4: Lightly brush water on half the dough edge, then add ¼ to ⅓ cup filling off center.
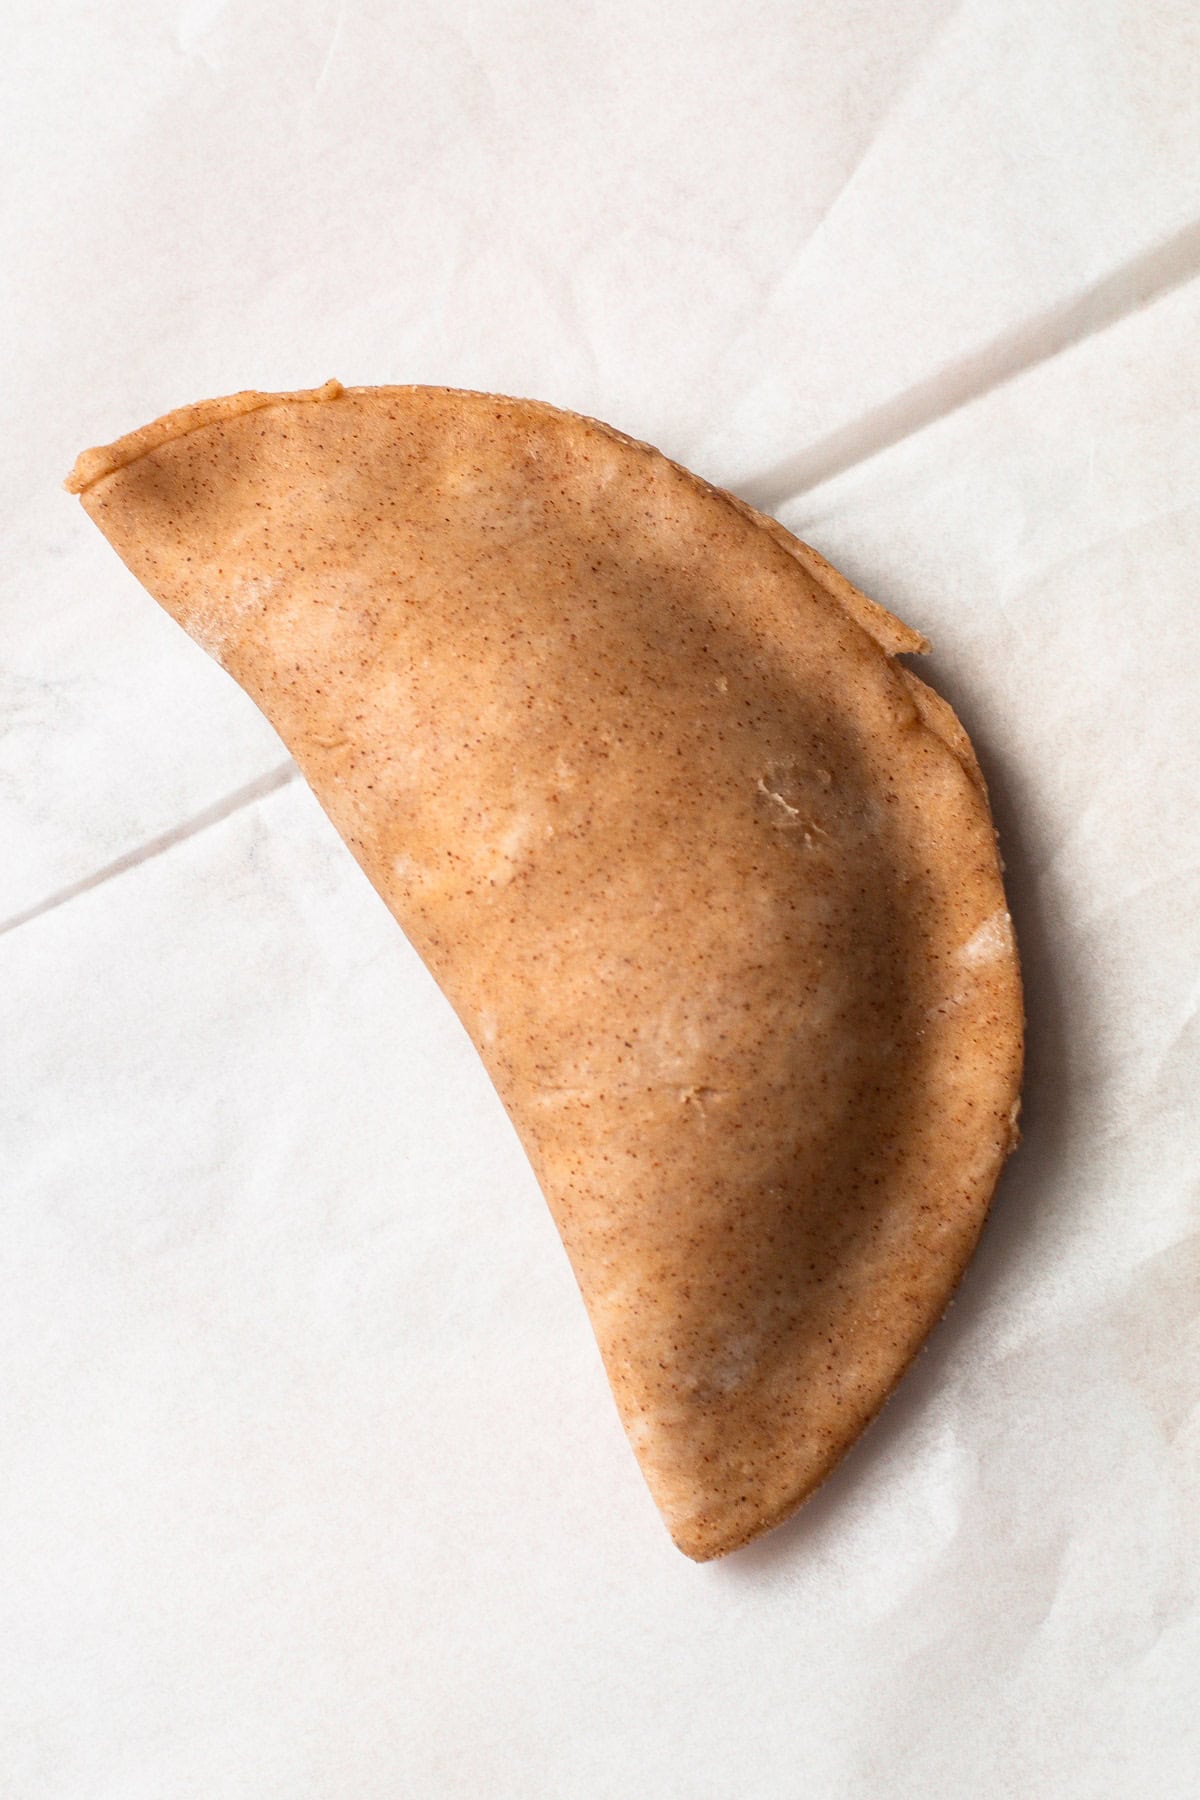
Step 5: Gently fold the circle in half onto itself over the filling.
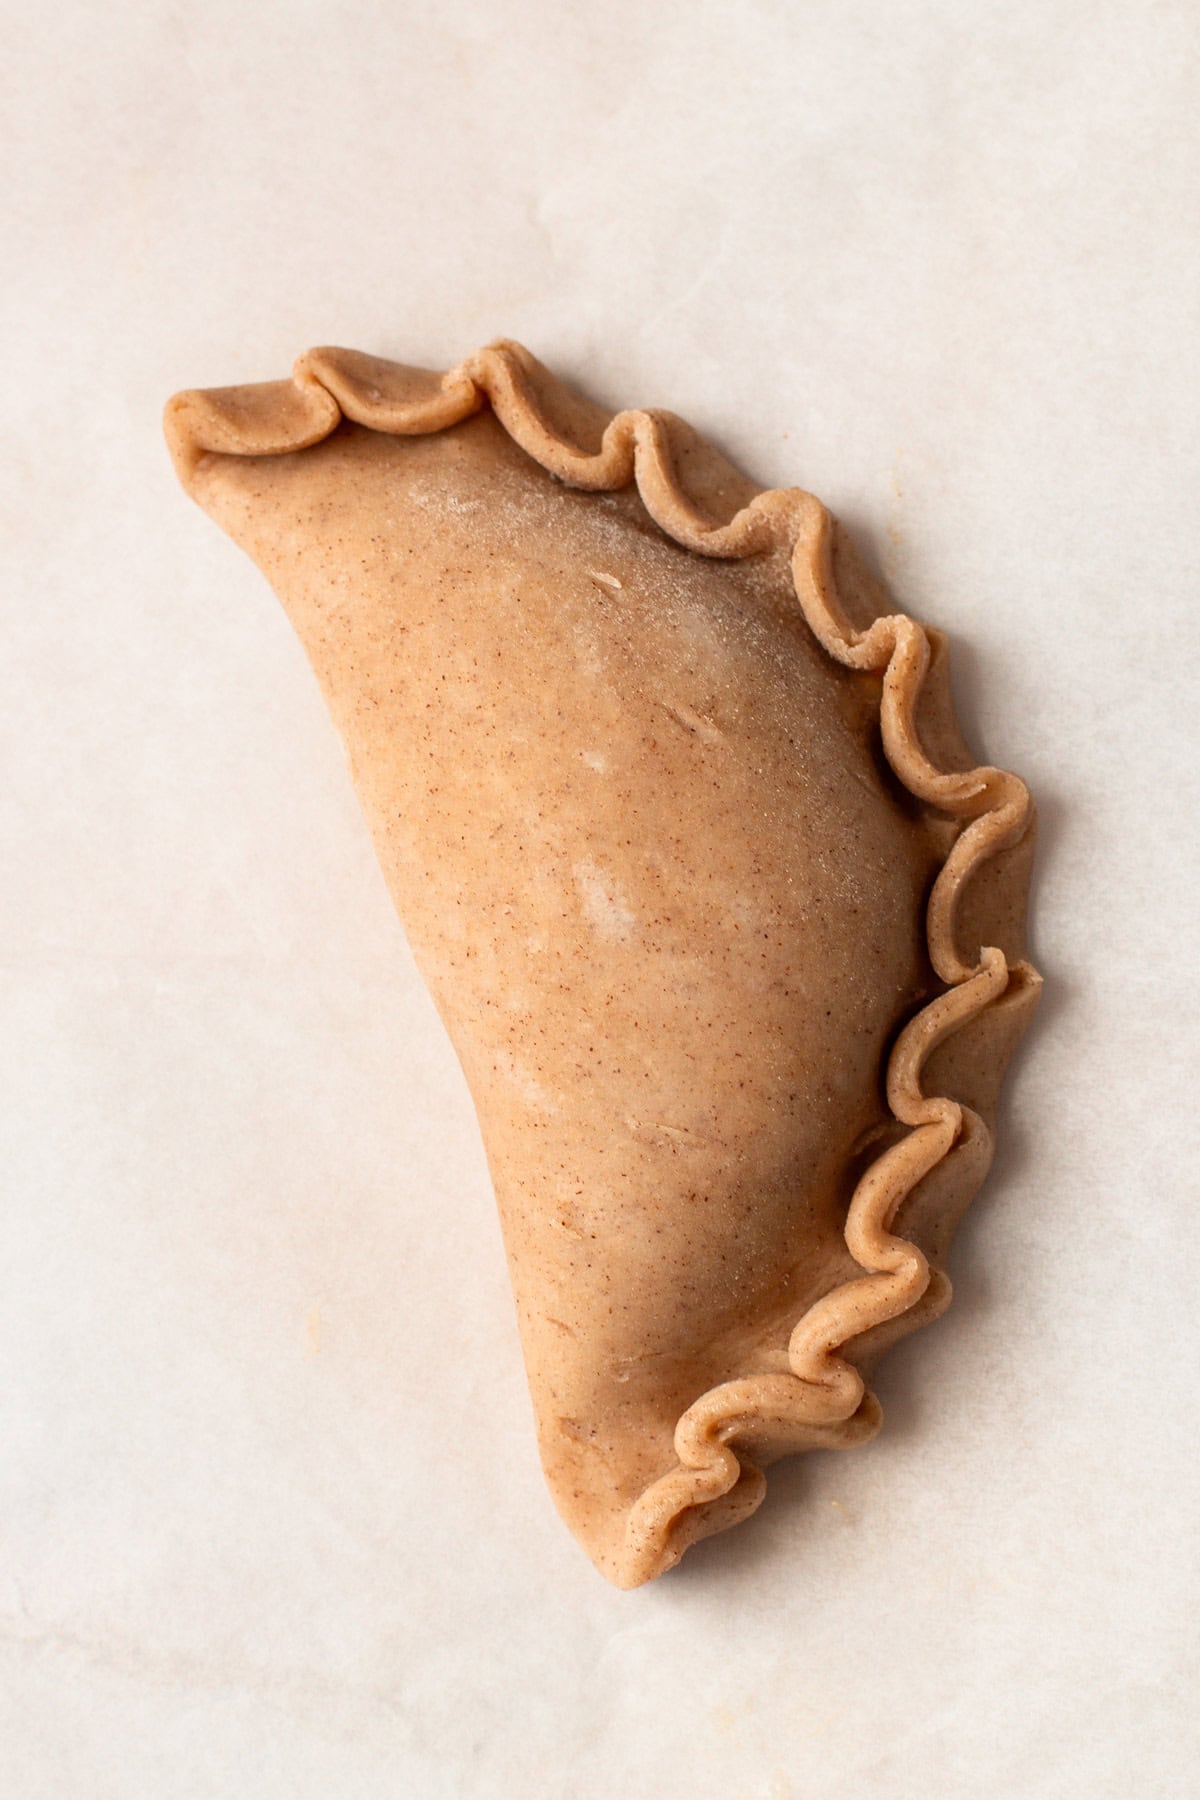
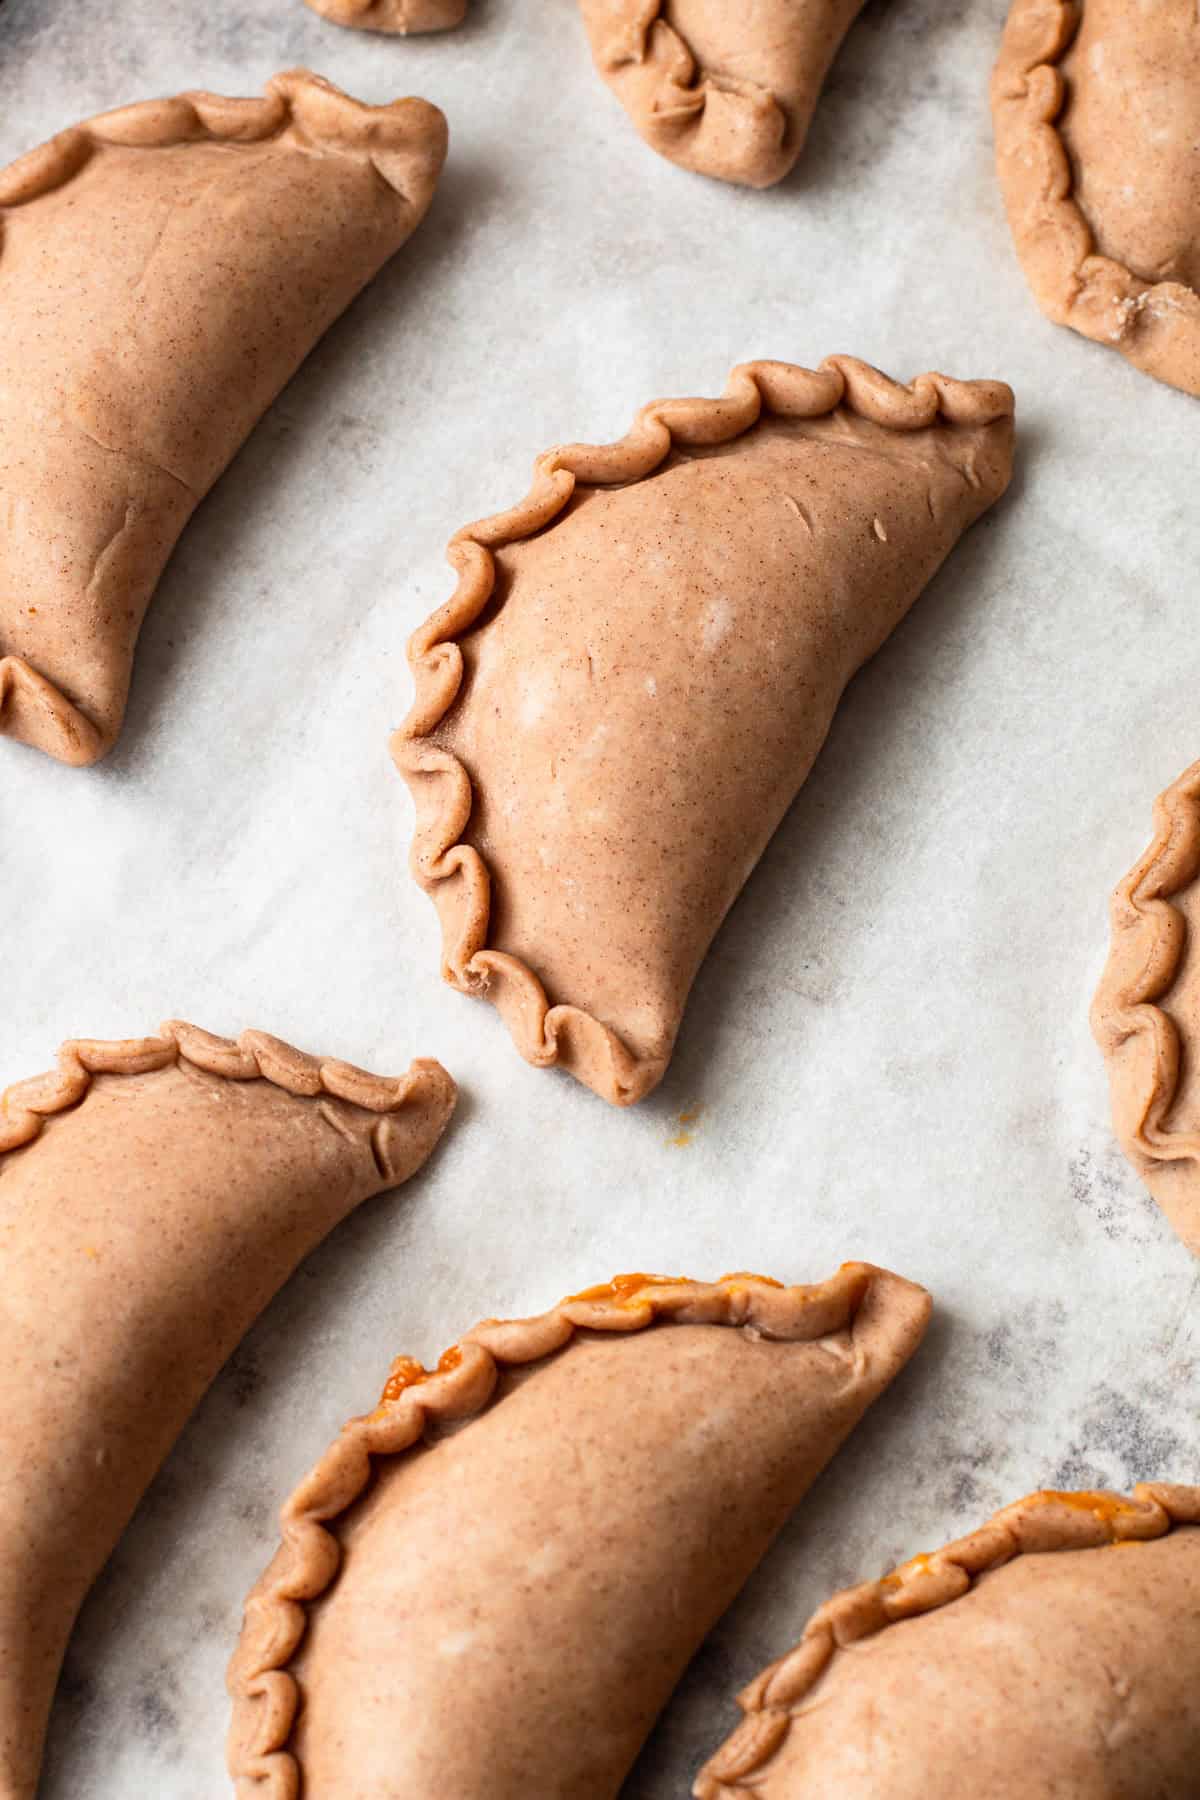
Step 6: Crimp the edges to form the pasty.
How to Crimp
Pasties traditionally have a crimped edge. This serves both a decorative purpose, but it also helps ensure that the pastry doesn't open up and leak out during the baking process.
To fill and crimp the pasties:
- Add the filling a slightly off center of the pastry dough circle.
- Brush a bit of water on the edge of one half of the dough circle.
- Fold over the dough so the two edges meet, doing your best not to trap any air inside of it.
- Press the edges together so they seal.
- Starting on one end, use your finger to bend a small section of dough over itself. Continue this process up the edge of the dough to form the traditional pasty crimp.
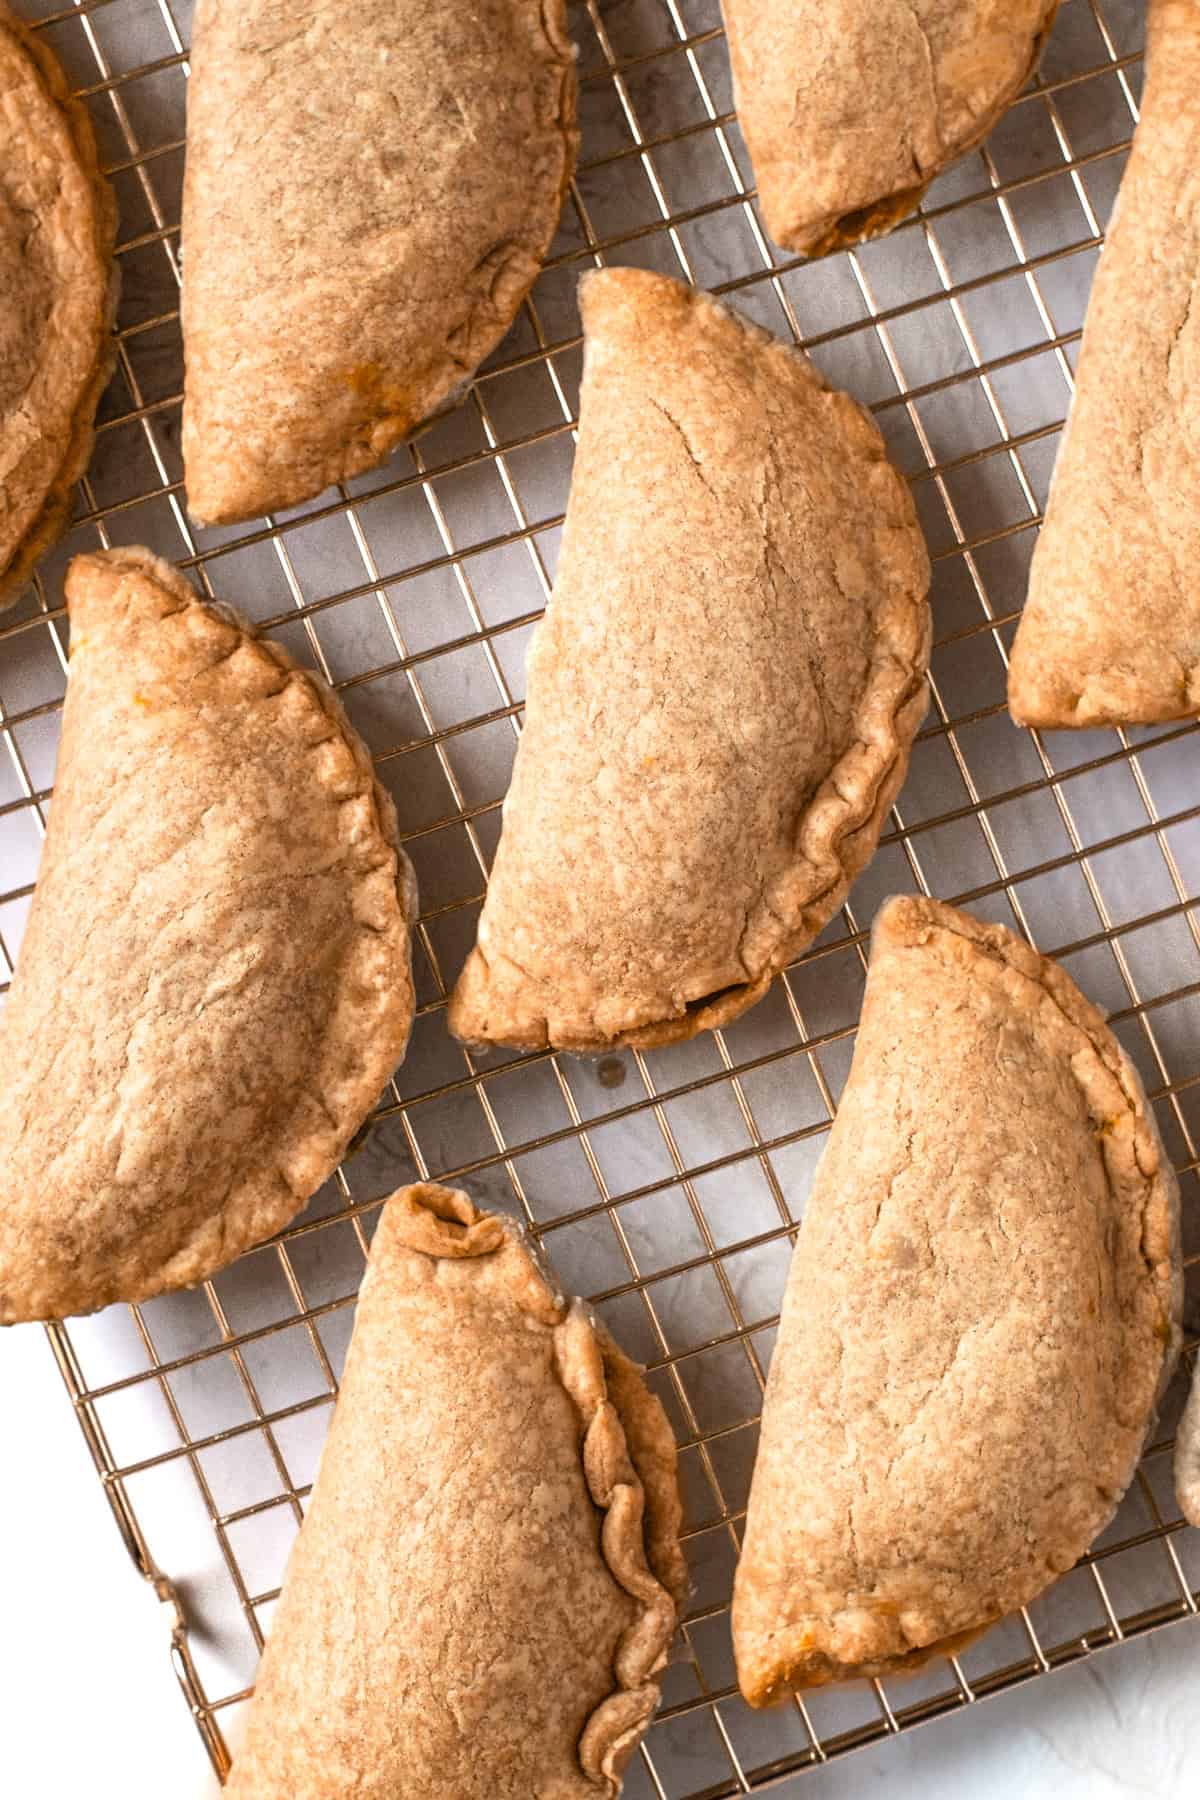
Baking Tips
The most important step in the baking of these pasties is the chilling time beforehand. Chilling the filled pasties ensures that they keep their shape well. Chill the filled dough in the refrigerator for at least 30 minutes, or ideally 1 hour, before baking.
Do note, the pasties made with the re-rolled scraps tend to shrink up when baked (unless you give the re-rolled dough a whole day to rest). As long as they're sealed well, they shouldn't leak out filling though.
These pumpkin pasties taste best when they are just lightly baked. The goal is to not get too much browning on the dough. They should be baked in the middle rack until the bottoms are lightly golden, about 25 minutes. If you prefer a more crisp dough, you can add an extra 5-7 minutes of baking.
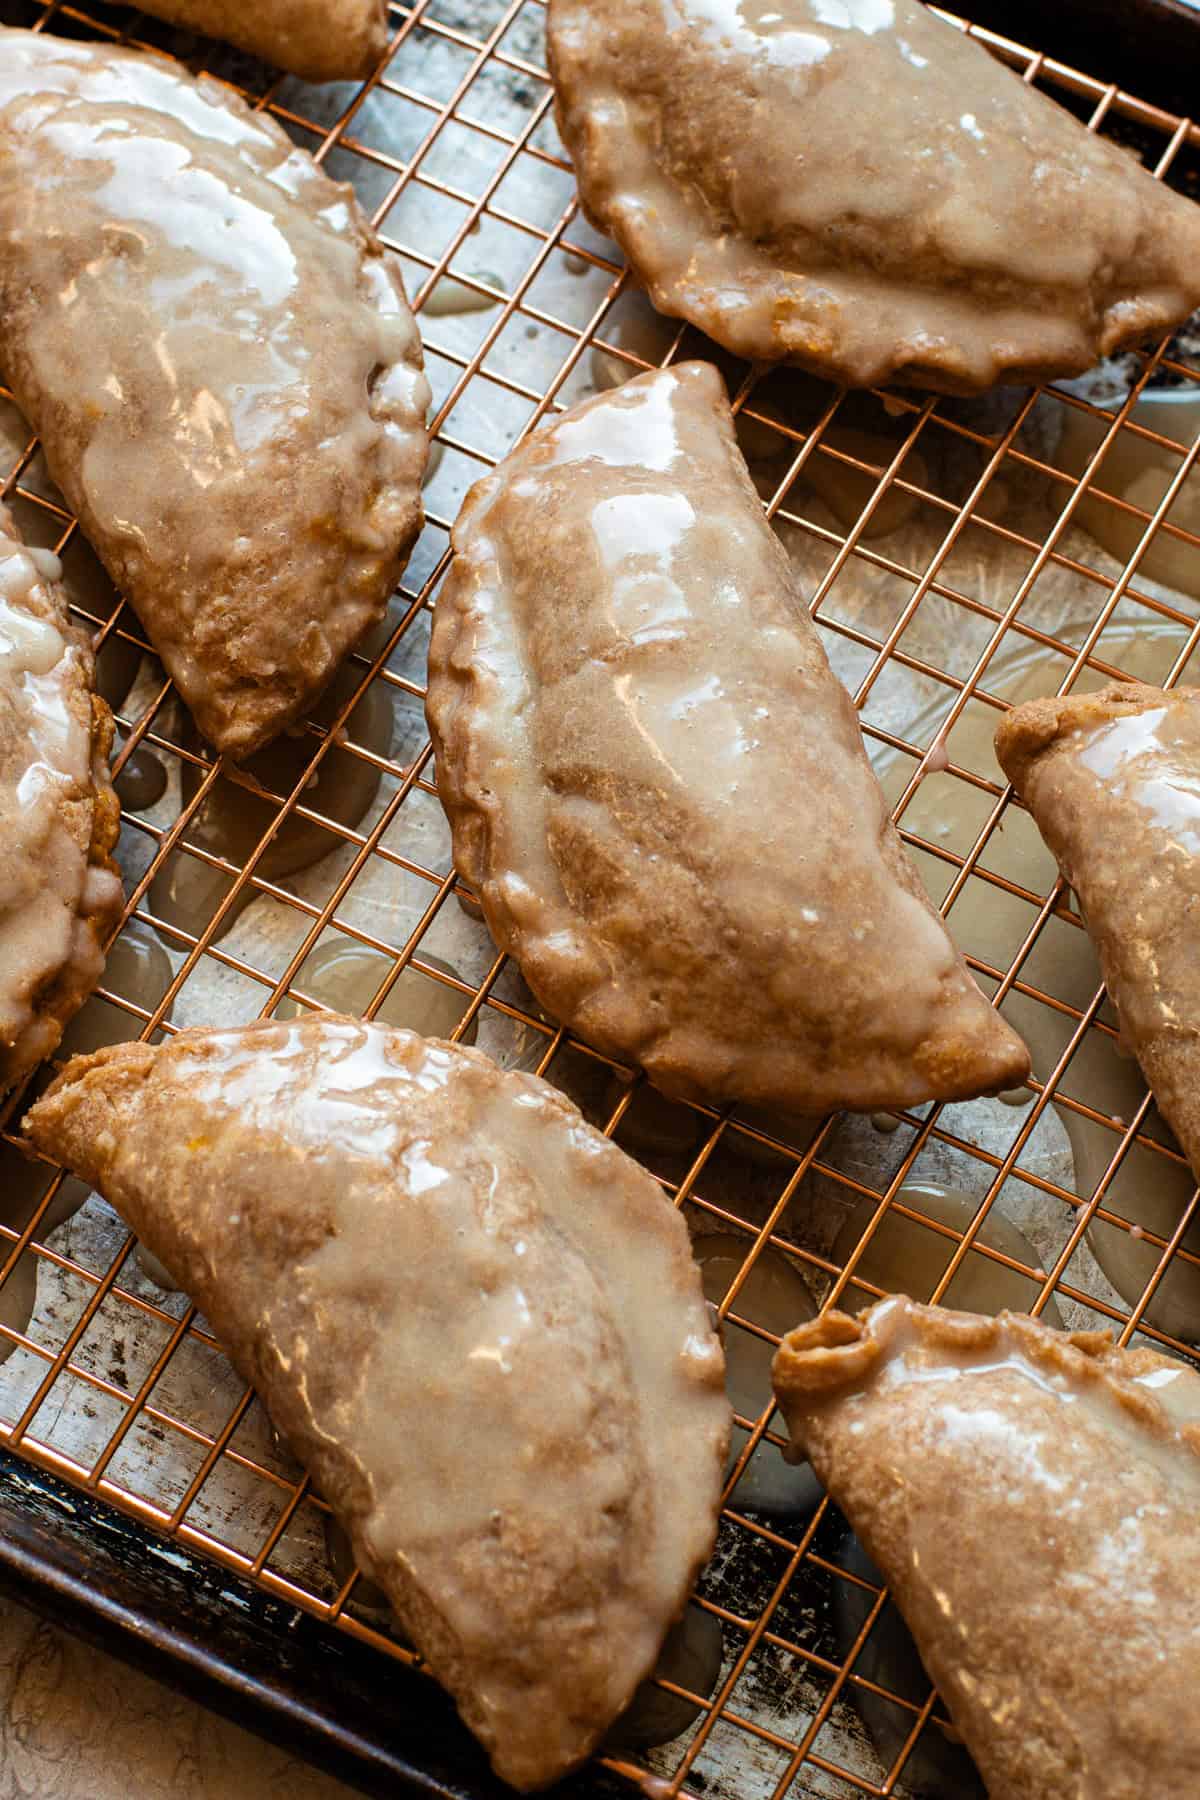
Don't Forget the Glaze
The simple glaze on top is not to be forgotten! It’s very easy to make and consists of powdered sugar, a bit of milk, and a splash of vanilla extract. The goal of the glaze is to add a thin coating to the top of the pasty so it dries and adds a nice sweet textural component to it. The consistency should be similar to heavy cream.
If your glaze is too thin to adhere to the pasty, simply add in a tablespoon more powdered sugar at a time. If it’s too thick, add in more milk to thin it out. Once the pumpkin pasties are cool, spoon on about 2 tablespoons of glaze and gently smooth it down along the top. Alternatively, you can dunk the pasty into the glaze instead.
Storing Pumpkin Pasties
The pasties will keep well for up to 3 days, at room temperature, in a closed container. Just make sure that the glaze is completely set before you place them on top of one another. Un-frosted pasties can even be frozen, baked or unbaked, for up to 1 month in the freezer. Defrost at room temperature.
More Pumpkin Recipes:
More Mini Pastries

I am so honored when you make a recipe from my site! If you make this Pumpkin Pasty recipe, please leave a star ⭐️⭐️⭐️⭐️⭐️ rating with your experience! If you have any questions about this recipe, feel free to comment here, and tag me on Instagram!
Full Recipe
Harry Potter Pumpkin Pasties

Inspired by the beloved Harry Potter book series, these Pumpkin Pasties are made with a buttery cinnamon pastry dough, lovingly stuffed with a sweet pumpkin filling, and then topped with the most perfect glaze.
- Prep Time: 00:30
- Cook Time: 00:25
- Total Time: 55 minutes
- Yield: 10-12
- Category: Hand Pies
- Method: Bake
- Cuisine: English
Ingredients
Pasty Dough:
- 3 cups (360 grams) all-purpose flour
- 2 tablespoons powdered sugar
- 2 teaspoons ground cinnamon
- ½ teaspoon salt
- 20 tablespoons (300 grams) unsalted butter, cold, cubed
- ½ cup (70 grams) milk (or water)
Pumpkin Filling:
- 2 egg yolks
- 1 teaspoon vanilla extract
- ⅓ cup packed (70 grams) light brown sugar
- ½ teaspoon ground cinnamon
- ¼ teaspoon nutmeg, freshly grated
- Pinch cloves
- 1 (15-ounce) can pumpkin puree
Glaze:
- 1-½ cups (175 grams) powdered sugar
- 2-3 tablespoons (30-45 grams) milk
- 1 ½ teaspoons vanilla extract
Instructions
Make the pastry:
- Add the flour, powdered sugar, cinnamon and salt to the bowl of a food processor. Pulse until combined. Add in butter and pulse 7 times. With the motor running, pour in the milk and let process until the dough forms together into a cohesive ball around the blade.
- Scrape the dough from the bowl and place it in a piece of plastic wrap and form into a rectangle, and wrap tightly. Using a rolling pin roll the dough out until it stretches to the corner of the plastic wrap to ensure a tight seal.
- Refrigerate for at least 2 hours, but preferably overnight.
Make the filling:
- Whisk together the egg yolks, vanilla extract, light brown sugar, cinnamon, nutmeg, cloves, and pumpkin puree.
Fill and bake pasties:
- Remove the chilled dough from the refrigerator and let rest at room temperature for 5-10 minutes, or until the dough is slightly softened, so it is easier to roll. Divide the dough in half.
- On a well-floured work surface, roll out one piece of dough to a rough 12” x 12” rectangle, about ⅛” thick. Cut or stamp out 5-¼” circles from the dough (see note).Set the dough scraps aside. Repeat with the other remaining half of dough. Then gather up the scraps and roll out the dough in the same manner, cutting out as many circles as possible. This dough should yield about 10-12 circles. If at this point, your pastry is starting to get really soft, place the dough circles in the refrigerator to chill down, for about 15-20 minutes.
- Line a baking sheet with parchment paper and set aside.
- Fill a small cup with water and use a pastry brush to brush water on the edge of one half of a dough circle. It should just be a very light coating to help the pastry stick.
- Place about ⅓ cup pumpkin pie filling in the middle of the dough circle. Gently fold the circle over onto itself, taking care to seal in the edges without leaving any air inside of the pastry.
- Crimp the edges to form the pasty. This makes the final product look neat and traditionally like a pasty, but it also ensures the edges are well sealed. Place the formed pasty on the sheet tray.
- Repeat with remaining dough circles until all of the pasties are formed.
- Chill the tray of pasties in the refrigerator for at least 30 minutes.
- Preheat the oven to 400 degrees. Bake the pumpkin pasties in the middle rack, until the bottoms are lightly golden, about 25 minutes. Transfer to a rack and let cool.
- Add the powdered sugar, milk, and vanilla to a bowl and whisk together.
- Place 2 tablespoons of glaze in the middle of the pasty and gently smooth it down to the edges.
- Let the glaze set before eating.
Notes
The filling cannot be whisked together ahead of time. It needed to be whisked together and filled immediately. The longer the filling sits, the looser it gets which can make it tricky to fill.
If you have a 5” or 5-½” circle cutter that makes it really easy to stamp out the correct size circles. If you are like me, and don’t have that size, you can use the rim of a bowl to make a stencil, and then cut the circle out. I used a 5-¼” bowl to make the pasties, and I found this to be the perfect size.
The pasties will keep well for up to 3 days, at room temperature, in a closed container. Just make sure that the glaze is completely set before you place them on top of one another.
Un-frosted pasties can even be frozen, baked or unbaked, for up to 1 month in the freezer. Defrost at room temperature.
Some of the links on this page may be affiliate links. Everyday Pie is a participant in the Amazon Associates Program. As an Amazon Associate I earn from qualifying purchases, at no extra cost to you.
Brandy Martin
Can I pre make these and bake them a few days later ??
Kelli Avila
Yes
Jody Larson
Thanks for another great recipe! These are perfect because they freeze so well. Tomorrow I'm going to try peach filling....fingers crossed I can find some good frozen ones.
Kelli Avila
Amazing! So happy you enjoyed!
McKenzie
Any recommendations for those of us without a food processor? Can I soften the butter and cream everything in a stand mixer, or would that totally change the dough?
Looking forward to trying this recipe!
Kelli Avila
Hi McKenzie. The dough can be made by hand, with a little elbow grease. I have a post about making dough by hand, How to Make Pie Crust By Hand, though the ingredients for the pasties are different, the process should still work. You just want to make sure to really rub the butter into the flour, instead of leaving it in bigger chunks like you do for traditional flaky pie dough. Alternatively you could add the ingredients (with cold butter) to a stand mixer, and combine it similarly as you would a food processor, until the dough gathers around the hook. Feel free to reach out with any other questions.