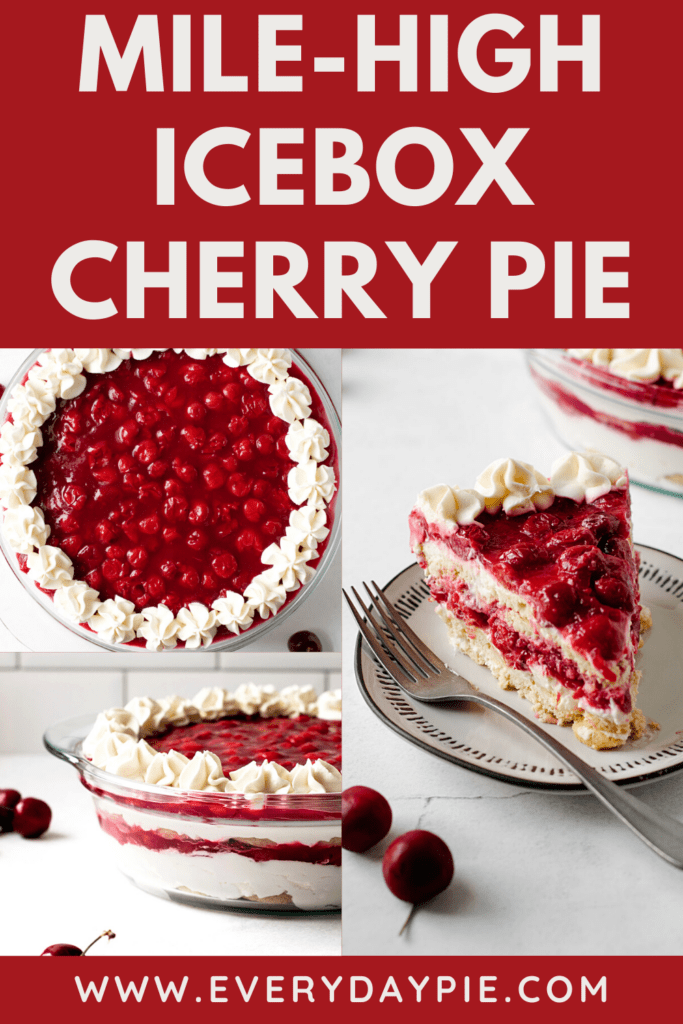
A towering delicious dessert, this Icebox Cherry Pie is a show-stopping no-bake treat everyone will love. With layers of almond cream, vanilla wafers, and cherry pie filling, this is the perfect make-ahead treat to serve to a crowd in need of a sweet cool down.
Want to save this recipe?
Enter your email & I'll send it to your inbox. Plus, get weekly updates from me!
No-Bake Cherry Pie
When the summer heat has melted your culinary motivation, but you still need a dessert to bring to the potluck, this Icebox Cherry Pie is a perfect choice! It's also the thing to make if you want a really delicious and gorgeous dessert. This easy no-bake treat is made up of layers of vanilla wafers, cherry pie filling, and no-bake almond cheesecake. It will feed a crowd fantastically, and also can be made ahead of time and portion out for an after-dinner dessert.
But First, What is an Icebox Dessert?
An icebox pie (or cake) is a no-bake dessert made from a few simple ingredients. Oftentimes, icebox pies have graham crackers or some other cookie element that is then layered with cream and other ingredients. The dessert rests in the refrigerator for a period of time, which allows the cookies to soften as they soak up the sweet cream. It truly makes this dessert taste and feels like a creamy pie, thanks to the texture and feel of the ingredients perfectly coming together.
Ingredients Needed
Here is an overview of the ingredients needed for this recipe. The full recipe is listed below in greater detail.
- vanilla wafers
- heavy cream
- sour cherries + cherry juice
- cream cheese
- almond + vanilla extract
- sugar
- cornstarch
- lemon juice
Can't find sour cherries? I feel you on this! I love sour cherries, but I only find them in certain stores in the frozen section and really struggle to find them fresh. If you can't find them at all, you can use frozen or fresh sweet cherries here. Just reduce the amount of sugar in the cherry filling recipe to ½ cup.
Tools Needed
Here is a list of some of the primary tools I use in this recipe. You won't necessarily choose to use them all, but they are exactly what I used. Any links may contain affiliate links.
- electric mixer
- off-set spatula
- deep dish pie plate (linked here is the exact Pyrex one I used)
- baking basics: small pot, bowls, whisk
How to Make Icebox Cherry Pie
Traditionally, icebox pies and cakes don't involve much more than assembling the ingredients. This icebox cherry pie is a bit different in that you need to make the cherry filling (and preferably chill it overnight), and whip together the cream filling before you are ready to assemble.
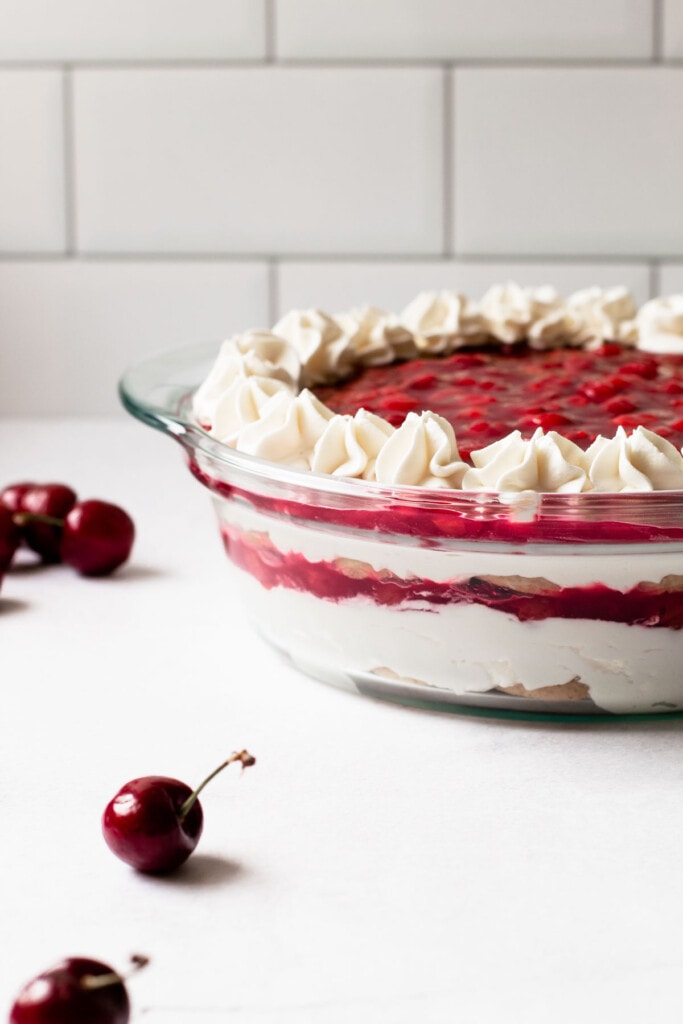
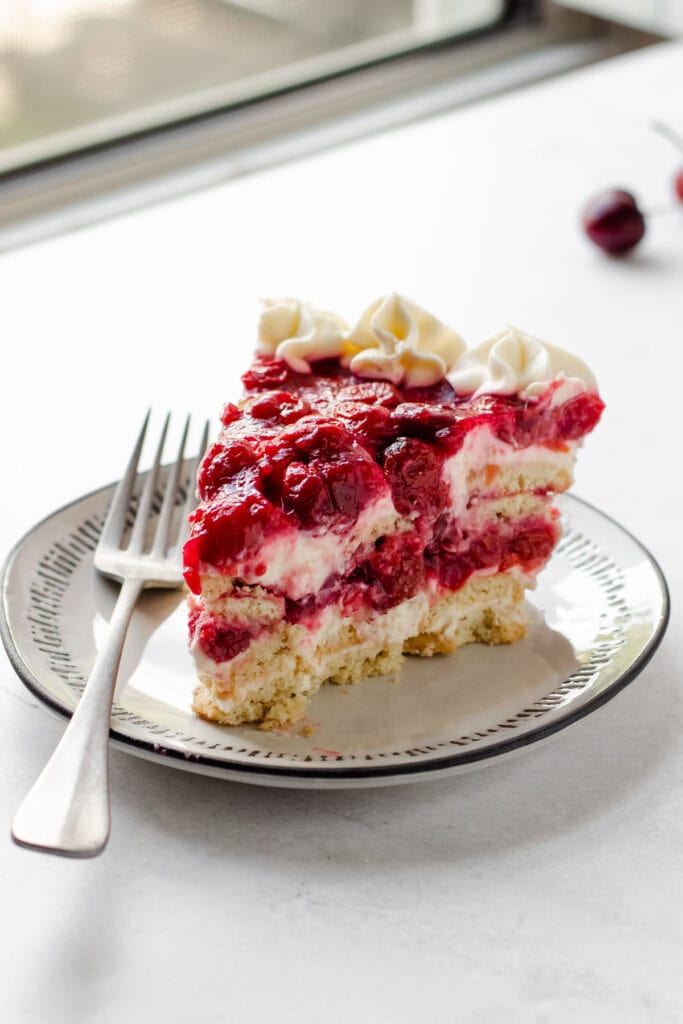
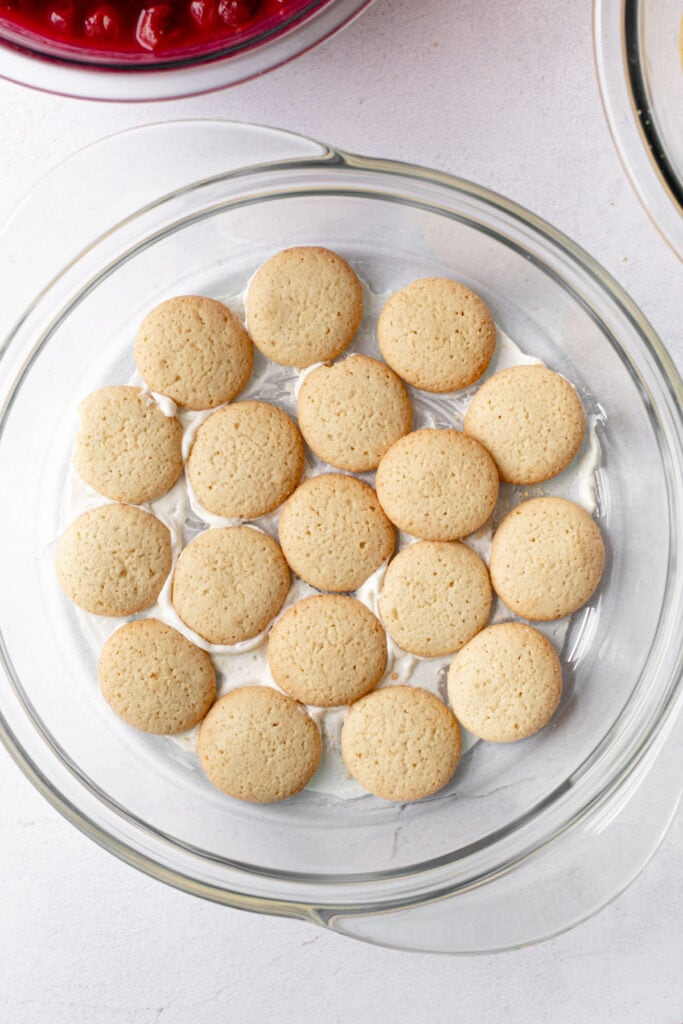
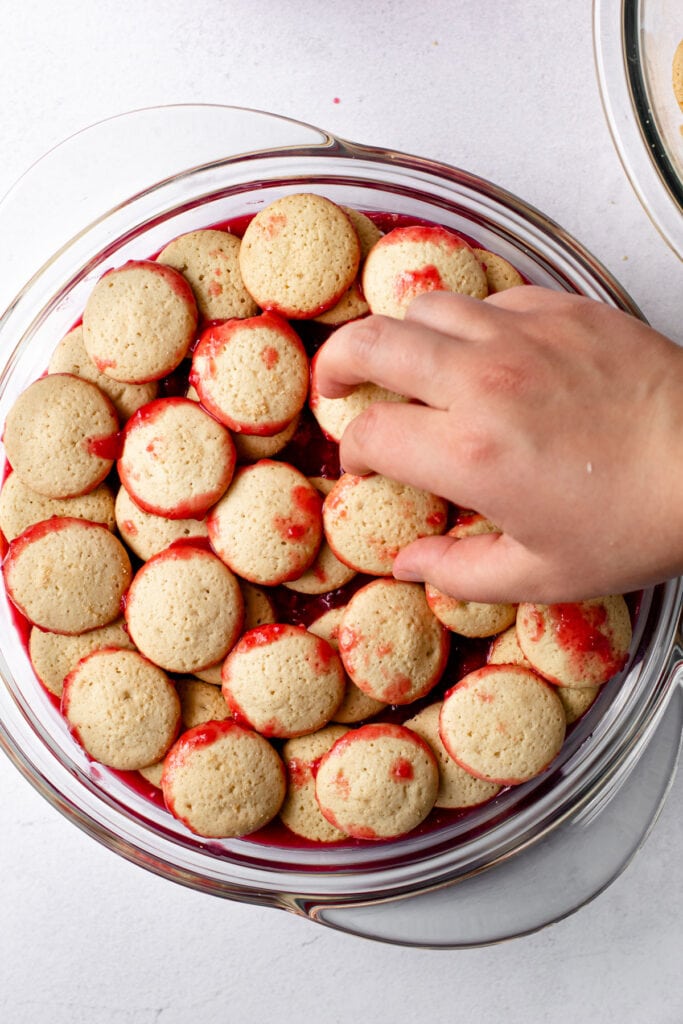
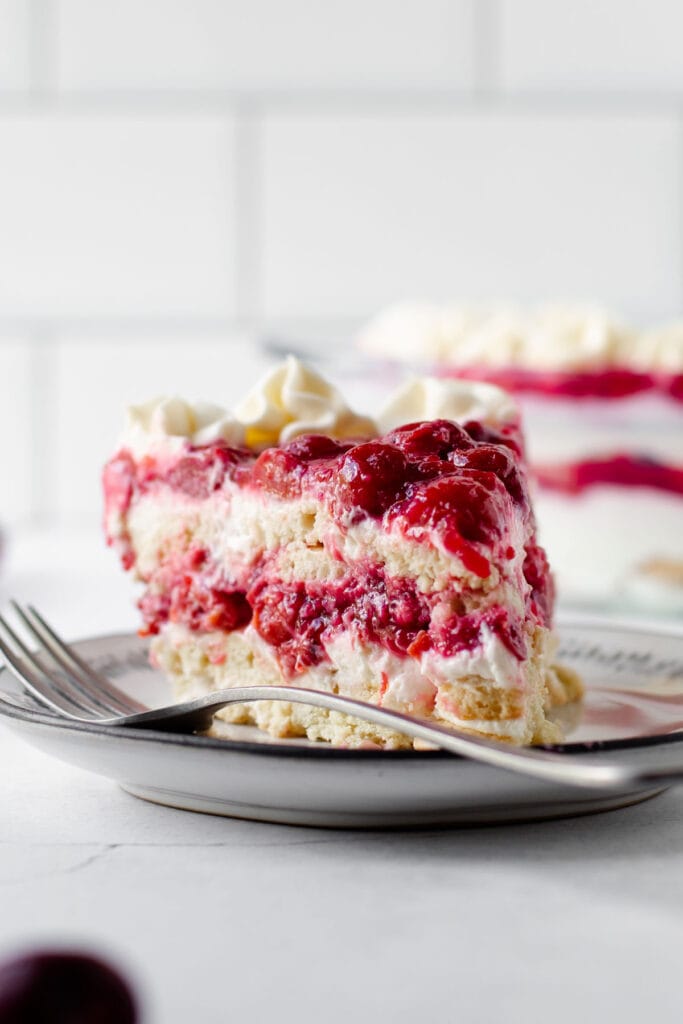
Here are the layers of the pie:
- thin layer of cheesecake mixture (to help the cookies stick)
- 2 layers of vanilla wafers
- cheesecake layer
- cherry filling layer
- 2 layers of vanilla wafers
- cheesecake layer
- cherry filling layer
Tips for Making It
- The cherry filling needs to be completely chilled before you can assemble. For this reason, it's best to make it the day before.
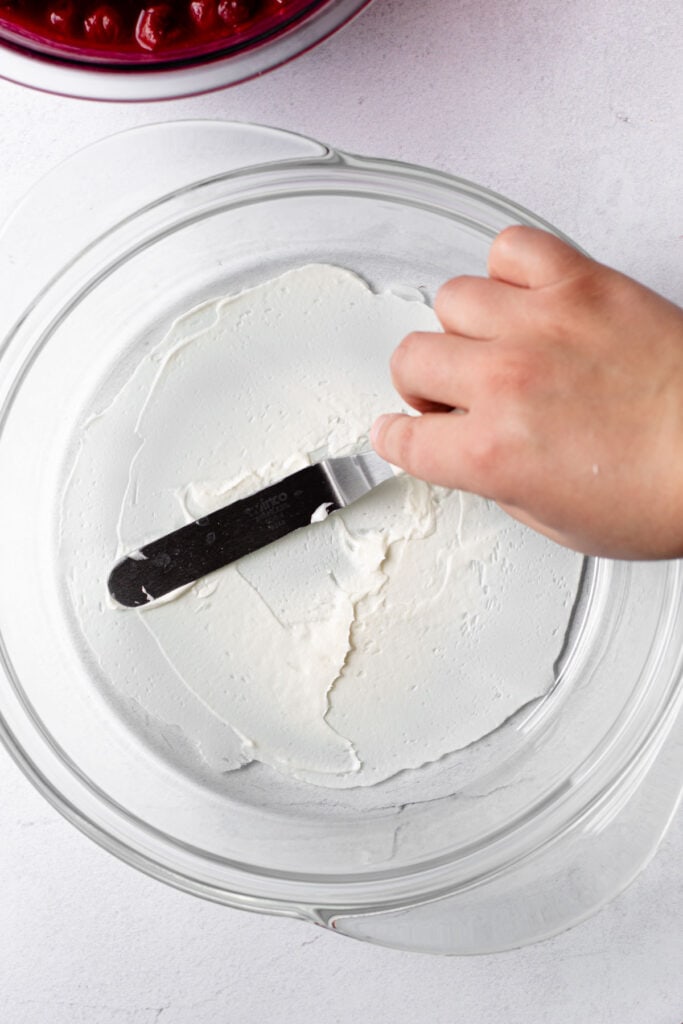
- Don't overwhip or under whip the cream! You want the cream to be just right: stiff enough that it's going to lighten the cream cheese mixture, but not so stiff that it starts to curdle. You'll still be able to taste that slightly curdled cream in the final dish, so pay attention during the whipping of the cream. Want more information on whipping cream? Check out this post all about Whipping Cream.
- The recipe instructs you to assemble double layers of vanilla wafers. This is because when I made the pie with just single layers of cookies, the pie felt like it had too much cream. Two double layers gave it just the right amount of cookies. However, it was necessary to stick some of the cream and cherry mixture in between the double layers in order to ensure they had some moisture available to soften them. It may seem annoying to put a layer of cream or cherry filling on the bottom of the cookie, but it's really essential for getting the right texture. So don't skip that step!
- Don't skip the chilling time. Chilling the pie in the refrigerator overnight is what transforms this dish from a crunchy cookie-layered dessert to an icebox pie!
- I find it helpful to stick the pie in the freezer for about an hour before serving to get super clean slices of the pie. But this step is totally optional.
Refrigerator Vs. Freezer
It's essential to give this icebox pie the proper amount of chilling time (at least 8 hours) in the refrigerator. Wondering why you can't speed up the process of chilling the pie and freeze it instead?
Letting the cake chill in the refrigerator transforms this dessert from a crunchy cookie layered dessert to a cake, as the cookies soak up the cream and cherry filling and soften. If you chilled this in the freezer, instead of soaking up the cream, it freezes it before the cookies can absorb the moisture, and so when you defrost it, it will still be a bit crunchy.
Don't skip the step of the refrigerator chill.
How to Store and Serve It
Once the icebox cake has softened overnight, it is best served within 1-2 days. Simply slice, serve, and enjoy.
However, this cake freezes exceptionally well. Once it has softened, you can freeze this entire cake, or freeze it in slices in an airtight container for up to 1 month. To defrost, simply leave it at room temperature for about 30 minutes, or let it sit overnight in the refrigerator.
More No Bake Recipes:
PrintFull Recipe
Icebox Cherry Pie

A towering delicious dessert, this Icebox Cherry Pie is a show stopping no-bake treat everyone will love. With layers of almond cream, vanilla wafers and cherry pie filling, this is the perfect make-ahead treat to serve to a crowd. This recipe has several steps, and it needs a long chilling time, so be sure to plan ahead.
- Prep Time: 00:20
- Chilling Time: 08:00
- Cook Time: 00:10
- Total Time: 08:30
- Yield: 8-10 servings
- Category: Sweet Pie
- Method: No-Bake
Ingredients
For Cherry Filling:
- 2 pounds (32 ounces or 905 grams) pitted sour cherries (fresh or frozen)
- 1 cup (200 grams) granulated sugar
- ¼ cup (28 grams) cornstarch
- 1 tablespoon lemon juice
- ¼ cup (60 grams) tart cherry juice (see note)
- ½ teaspoon almond extract
For Cream Filling:
- 1-½ cups (340 grams) heavy cream
- 12 ounces (340 grams) cream cheese, softened
- 2 teaspoon vanilla extract
- ½ cup (50 grams) granulated sugar
For Assembling:
- 1 (11 ounce) box vanilla wafers
Instructions
Prepare Cherry Filling:
- Add cherries, sugar, and cornstarch to a large bowl and toss to coat. Mix in lemon juice and cherry juice. Let sit until the sugars have started to dissolve, about 15 minutes.
- Transfer all ingredients to a large pot.
- Turn the heat on to medium and cook, stirring frequently until the filling is bubbling throughout, about 10 minutes. Off of the heat, stir in almond extract.
- Transfer to a shallow container, and let cool completely, preferably overnight in the refrigerator.
Prepare Cream Mixture:
- With an electric mixer using the whisk attachment, whip the heavy cream until medium-stiff peaks form, about 3 minutes. Remove the whipped cream from the bowl and set it aside.
- Place the cream cheese, vanilla, and sugar in the now-empty mixing bowl. Whip on medium speed until completely smooth, about 2 minutes, scraping down the bowl halfway through.
- Add ⅓ of the whipped cream to the cream cheese mixture and fold it in with a rubber spatula by hand until it is completely combined.
- Add the remaining whipped cream to the bowl and gently fold it in, being careful not to deflate it.
Assemble the Pie:
- Using a small offset spatula, spread a thin layer of the cream cheese mixture on the bottom of a deep dish 9” pie plate (see notes for alternatives).
- Line the entire bottom with vanilla wafers.
- Take a vanilla wafer and spread a bit of the cream mixture on the bottom of it, then place it on top of the first layer of wafers. Repeat this process, to create a second layer of wafers with cream on the bottom of each one.
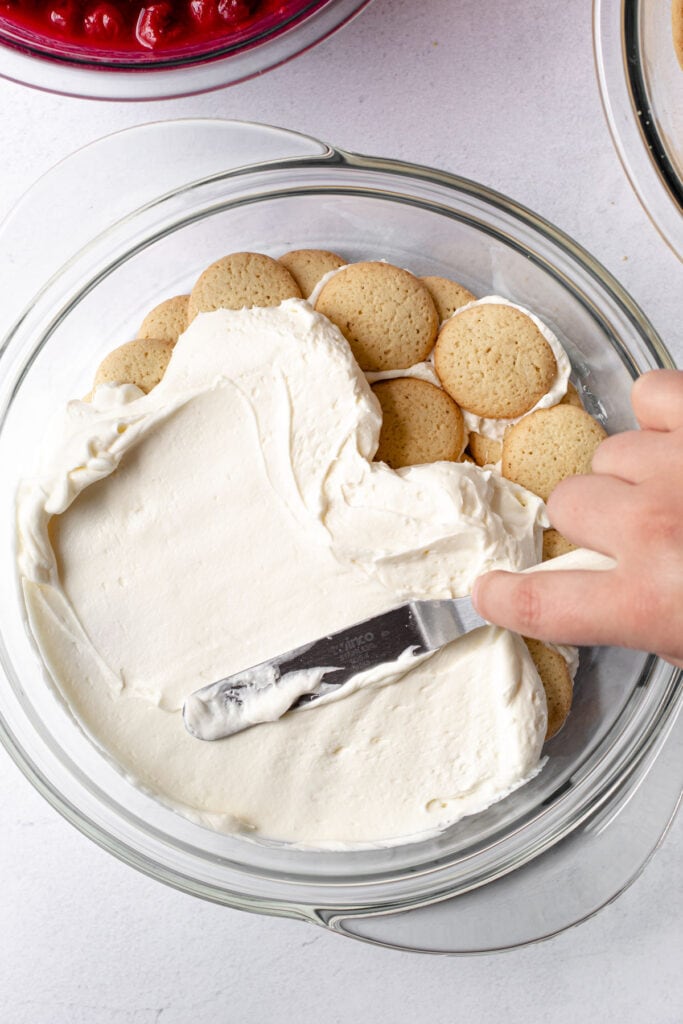
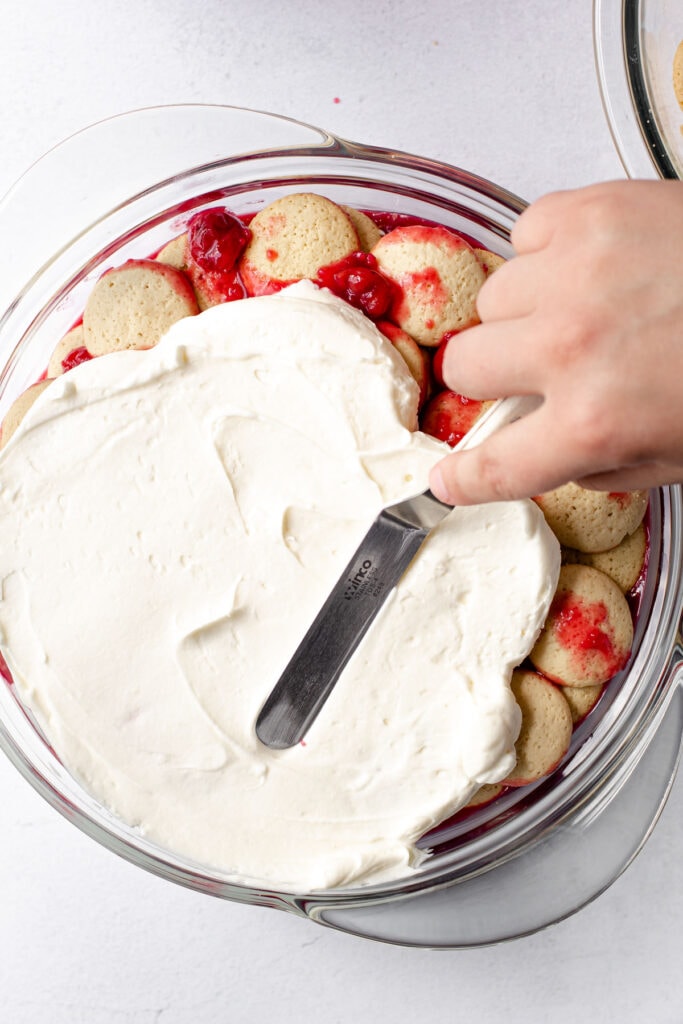
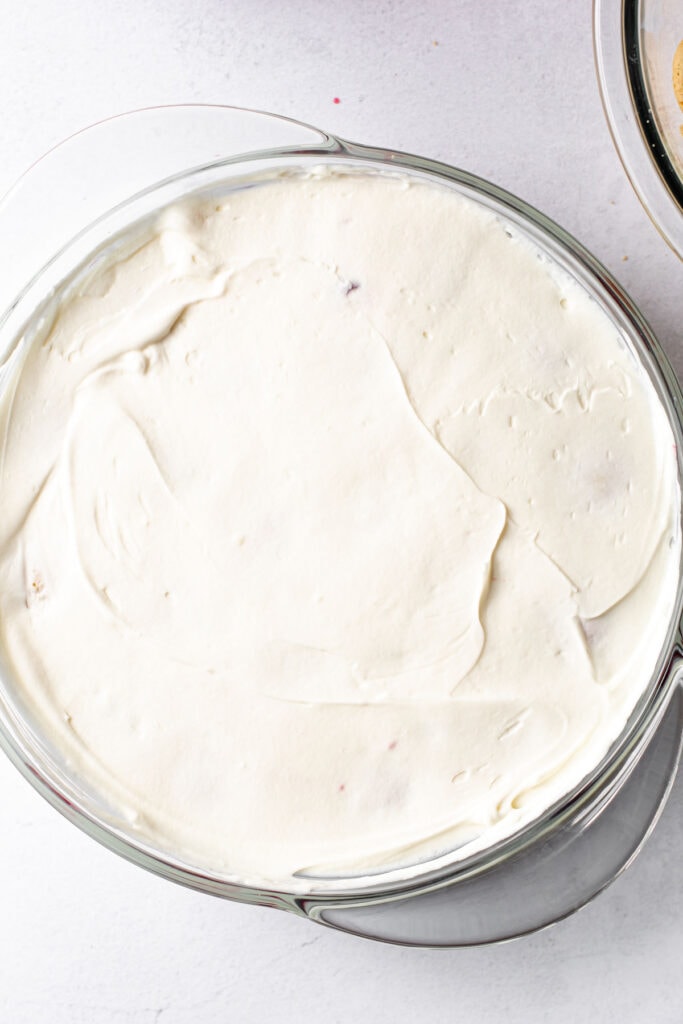
- Once you have two complete layers of wafers, add ⅓ of the cream cheese mixture on top and spread it in an even layer on the wafers.
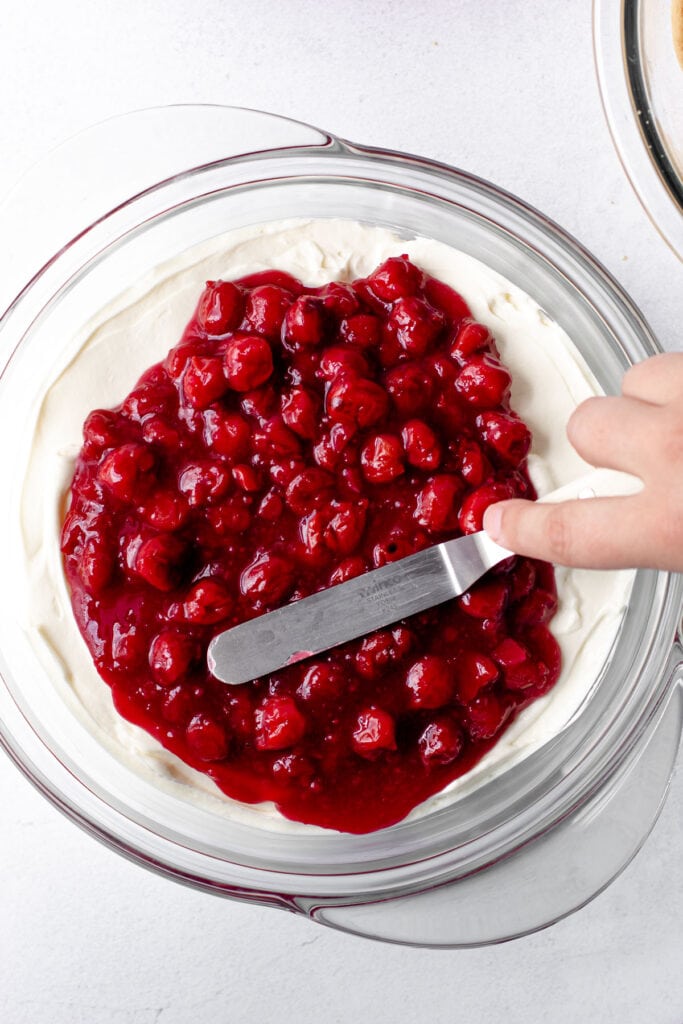
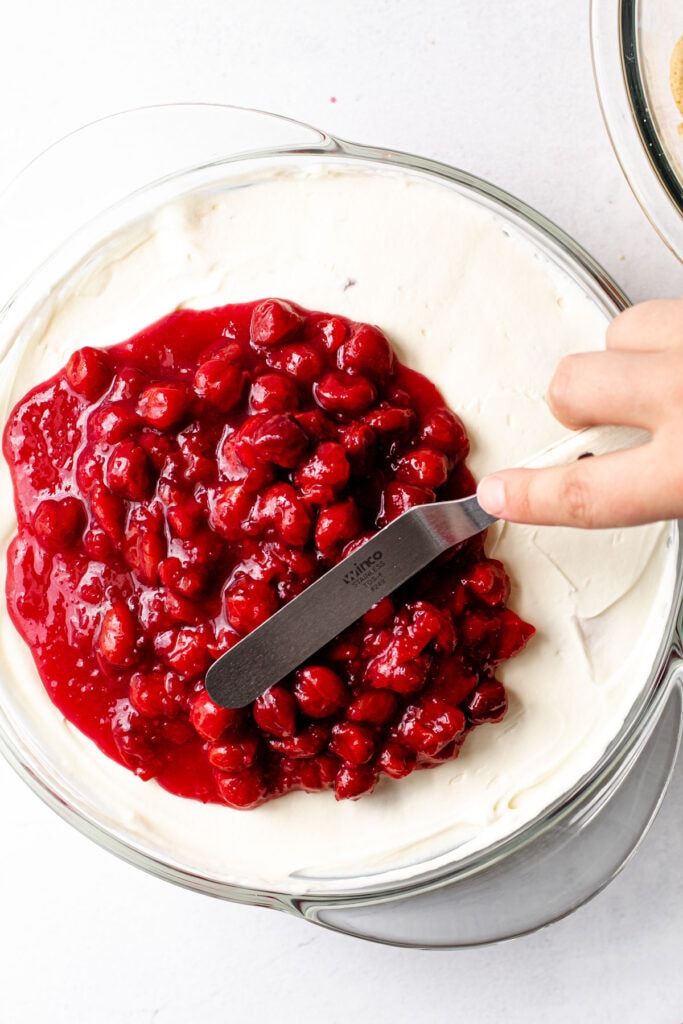
- Spread half of the cooled cherry filling mixture evenly on top of the cream cheese mixture.
- Place another layer of vanilla wafers on top of the cherries.
- Take a vanilla wafer and spread a bit of the juicy cherry mixture on the bottom (alternatively, you can dunk it into the cherry mixture). Place it on top of the first row of wafers and repeat this process, to create a second layer of wafers with a bit of cherry filling on the bottom of each one.
- Add another ⅓ of the cream cheese mixture on top and spread it in an even layer on the wafers.
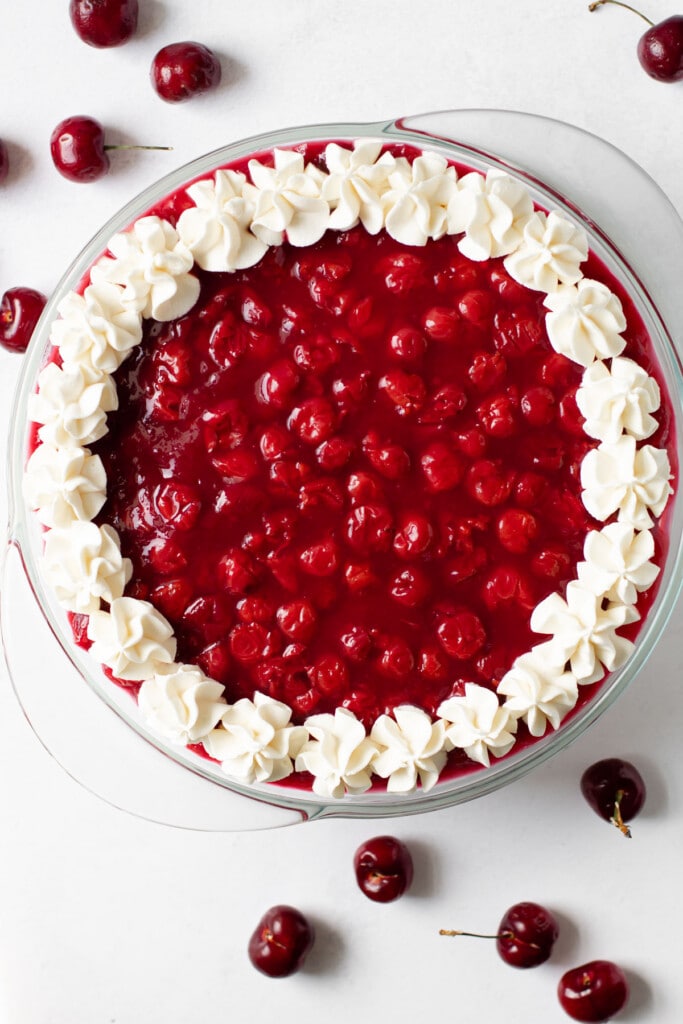
- Add the remaining cherry filling on top of the vanilla wafers and evenly spread it on top.
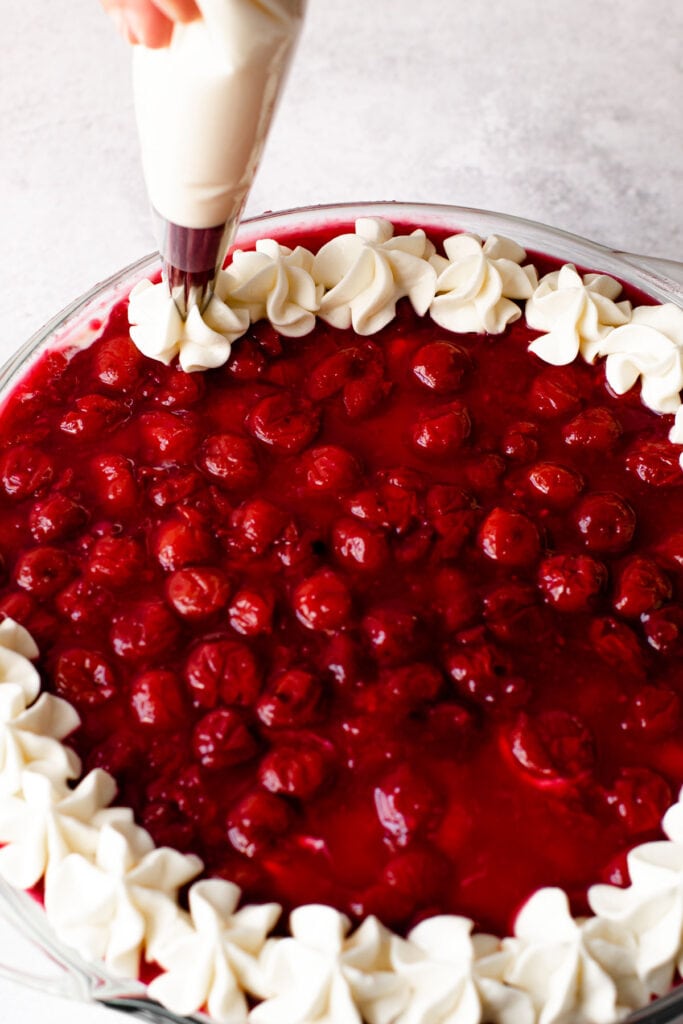
- Put the remaining ⅓ of the cream cheese mixture in an airtight container and place it in the refrigerator until you are ready to serve the pie. You can use this for decorating the top.
- Cover the assembled pie and let it set up in the refrigerator for 8-12 hours.
- An hour before you are ready to serve, transfer the pie to the freezer to let chill. This is optional, but it makes it easier to slice.
- Once ready to serve, remove from the freezer.
- Decorate as desired using the leftover whipped cream cheese mixture. If the cream has become too loose, you can simply whisk it back together until it’s the proper consistency for piping.
- Slice and serve the pie while still chilled.
Notes
Want to make this pie but can't find sour cherries? No problem, you can use sweet cherries, but reduce the amount of sugar to just ½ cup in the filling.
If you don’t have and don't want to purchase tart cherry juice, you can substitute it with water, though it will have a little less cherry flavor and will be lighter in color.
You do not need to use a deep-dish pie dish (affiliate link) to make this. You can truly assemble this dessert in any baking tin you have. A square baking tin can work well too. I just recommend lining it with parchment paper so you can easily life the cherry pie / cake out of the pan for slicing.
Letting the pie chill in the refrigerator transforms this dessert from a crunchy vanilla wafer layered dessert to a soft cake-like filling as the wafers soak up the cream and soften. The reason the recipe then calls for a quick chill in the freezer before serving is that having the pie slightly frozen makes it sturdier to slice. This step is optional, though.
Once the icebox pie has softened overnight, it is best served within 1-2 days. Simply slice and serve! However, this pie freezes exceptionally well. Once it has softened, you can freeze this entire pie, or freeze it in slices in an airtight container for up to 1 month. To defrost, simply leave at room temperature for about 30 minutes, or let it sit overnight in the refrigerator.
Some of the links on this page may be affiliate links. Everyday Pie is a participant in the Amazon Associates Program. As an Amazon Associate I earn from qualifying purchases, at no extra cost to you.
Erica
Made this on Thanksgiving and it was a great contrast to pie or ice cream! So good!!!
Lynda
Where is note on cherry juice
Kelli Avila
Sorry about that---it's in the notes section of the recipe.