
A homemade chocolate pop tart dough is brimming with salted fudge filling and perfectly baked, then topped with the most delicious chocolate glaze. This is the best recipe for chocolate pop tarts!
Want to save this recipe?
Enter your email & I'll send it to your inbox. Plus, get weekly updates from me!
Chocolate Fudge Pop Tarts
Homemade Pop Tarts are far superior to anything you are going to find inside of a silver package on the grocery store shelf. These handheld chocolate pastries are rich and decadent in all the best ways.
The chocolate pastry is tender and sweet, and hidden inside is a salted fudge filling that really makes this pop tart stand out. This is a fun (and delicious!) baking project to do over the weekend. Scroll down and I'll share all the best tips for making chocolate pop tarts!
Steps to Make Chocolate Fudge Pop Tarts
Put this in the “project” category of recipes, but not in the difficult category! To make the pop tarts you will need to:
- make and chill the dough (at least 2 hours of chill time)
- make the salted fudge filling (at least 2 hours of chill time)
- roll the dough/fill/bake the pop tarts
- frost the pop tarts
Tools needed for this recipe:
Here is a list of some of the primary tools I use in this recipe. You won't necessarily choose to use them all, but they are exactly what I used. Any links may contain affiliate links.
- food processor
- rolling pin
- ruler
- pastry wheel cutter
- pastry brush
- pastry bench scraper
- pastry bag or plastic bag with a corner cut out
- Bowls, spatula, whisk, etc
Let's Talk about the Chocolate Pastry
This dough is sweet, tender, and full of chocolate flavor. It has the consistency of shortbread and is very simple to work with.
The dough is made in a food processor. Instead of leaving large chunks of butter in the dough (like you would for pie dough), the instructions call for running the processor until the dough clumps together around the blade. This ensures the butter is worked into the dough appropriately, which will prevent the dough from rising too much in the oven.
If you don't have a food processor, the dough can be made in an electric stand mixer. To make it in a stand mixer:
- Add the dry ingredients and mix with a paddle attachment
- Add in the butter, and mix until the butter is broken down into small pie sized pieces
- Add the eggs and mix until the dough forms together into one cohesive ball. Mix for 30 more seconds while the butter is worked into the dough completely.

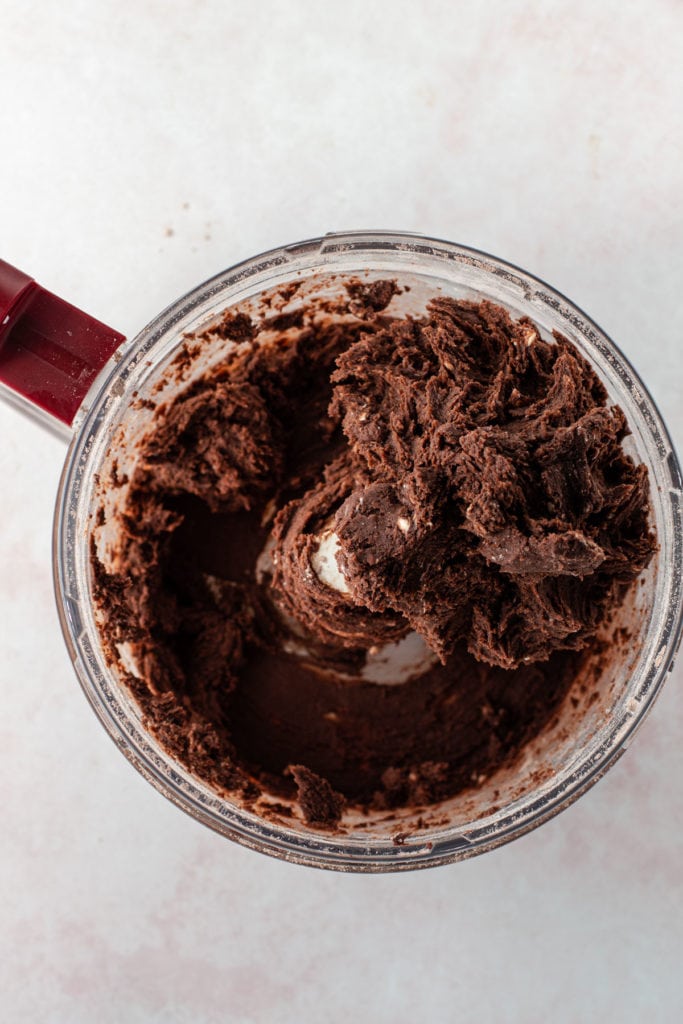
Making the Salted Fudge Filling
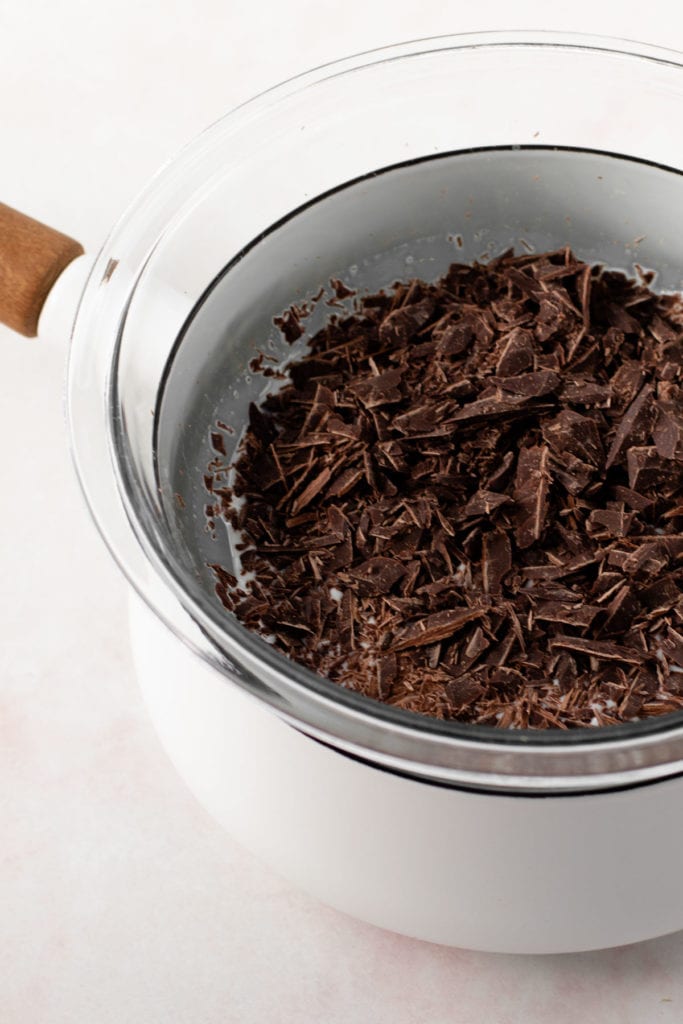
This salted fudge filling is so good, and it is really what sets this pop tart apart from anything in the grocery store. It's sweet, rich, and soft when biting into the pop tart. The filling itself is quite simple to make; just heat the ingredients in a bowl over a pot of simmering water or a double boiler, if you have one on hand.
Once the chocolate is melted, whisk in some butter and transfer the fudge filling to a shallow container and let it cool briefly at room temperature, before chilling fully in the refrigerator.
The reason the fudge filling needs to be chilled is that I wanted it to be a soft consistency when you bite into the pop tart. In order to make sure the filling stays inside of the pop tart while it bakes, it needs to be chilled to start.
I also recommend piping it into the pastry dough so it's an even layer. You don't need to have a piping bag, but it's useful. If you don't have a piping bag, simply use a plastic bag with the corner snipped off, and pipe it in that way.


Rolling out the Pastry
The dough needs to be thoroughly chilled before rolling out. I always recommend making the dough the day before and letting it rest overnight, but two hours is sufficient with this dough if you don't want to wait that long. Once it’s chilled, remove the dough from the refrigerator and let it soften up for 5-10 minutes.
Lightly flour your work surface and your rolling pin. You want to make sure there is enough flour that the dough doesn't stick, but not so much flour that it turns the brown dough white. If there is any excess white flour left on the dough at the end of the rolling, you can simply brush it off with a pastry brush.
Divide the dough in half, and set the other half aside. Roll out the dough to a rough rectangle with a thickness of ⅛″ thick. I recommend having a ruler on hand. Then, using either a knife or a pastry cutter, cut the dough into 4 x 3-inch rectangles. Rolling out each dough piece to a rough 10 x 13-inch rectangle should yield about 8 rectangles. Then, re-roll the scraps and roll them out one time. In total, you should be able to get about 20 rectangles.

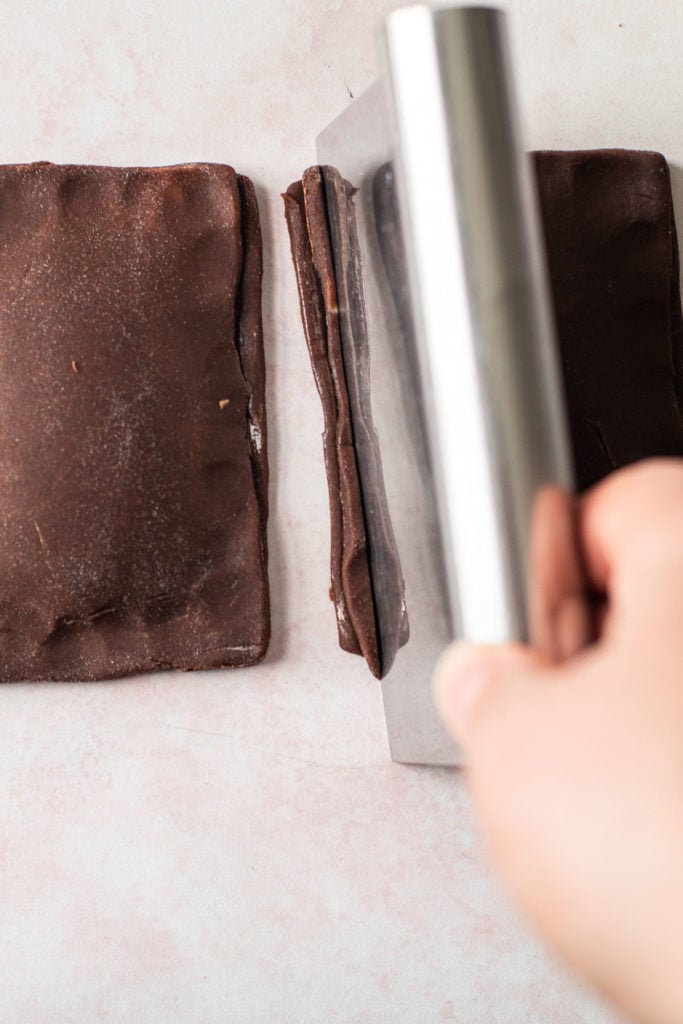
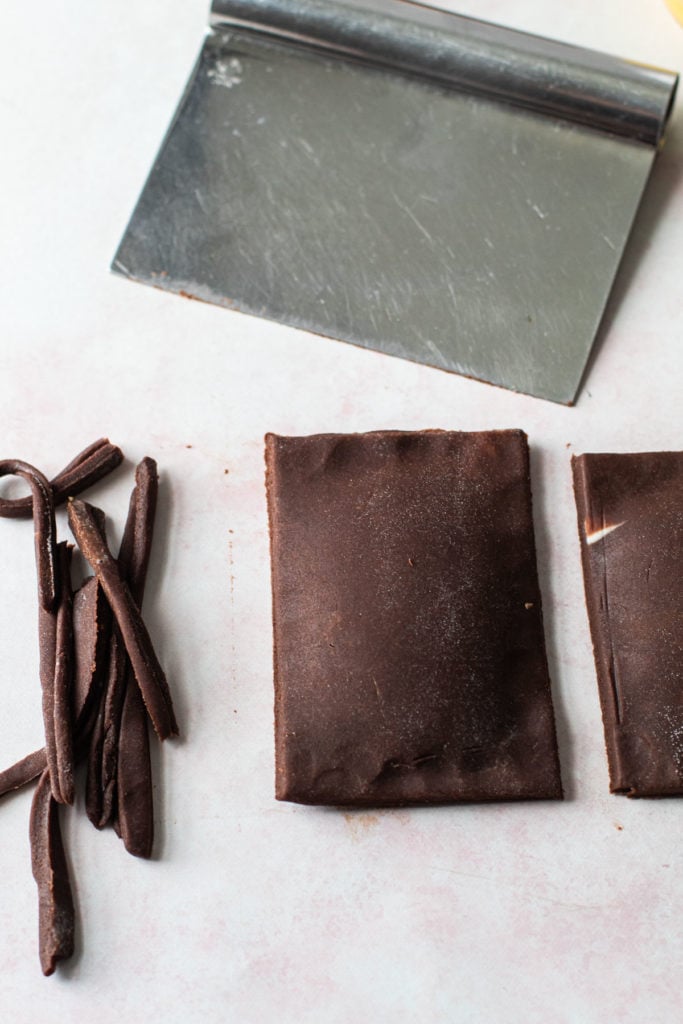
How to Seal the Pop Tarts Well
It’s important to seal the pop tart dough well so that the filling does not leak out. There are quite a few tricks used in this recipe to make sure all that delicious filling stays inside. I recommend you follow them all for the best result!
- Brush the bottom pastry with egg wash. This helps seal the dough together.
- After you place the second piece of dough on top of the filling, make sure to push down on all sides of the pastry one at a time, without trapping any air inside of pop tart dough.
- And finally, the most important step: use a pastry bench scraper to slice of the very tip of the edges. This not only cleans up the edges so the pop tarts look neat, but it also acts to truly seal the two pieces of pastry together. Using a knife doesn’t work the same, because knives are sharp and instead of mashing the two pieces of pastry together it just cuts right through them. If you don’t have a pastry bench scraper, I recommend using another tool that is dull, but not so dull that it can’t cut through the soft pastry. Even a ruler might work well!

Baking the Pop Tarts
The most important step in the baking of these pop tarts is the chilling time beforehand. Chilling the filled pastries ensures that they keep their shape well. Chill the filled pop tarts in the refrigerator for at least 30 minutes, or ideally 1 hour, before baking. If you are truly in a rush, you can freeze them for 15 minutes.
Once they are chilled, take a sharp knife and poke holes through the top of the pastry. This lets steam escape during the bake and helps prevent the dough from rising too much and leaving a gap in between the filling and the top of the pastry.
These pop tarts taste best when they are just lightly baked. The goal is to not dry out the dough too much in the oven.
Bake until the pop tarts are fragrant (yes, when you smell the chocolate, it means they are likely done) and the tops have just started to puff up. Some might even have a few cracks in the middle. Pull them out and as soon as they're safe enough to handle, transfer the pop tarts to a cooling rack so they don't continue to bake.

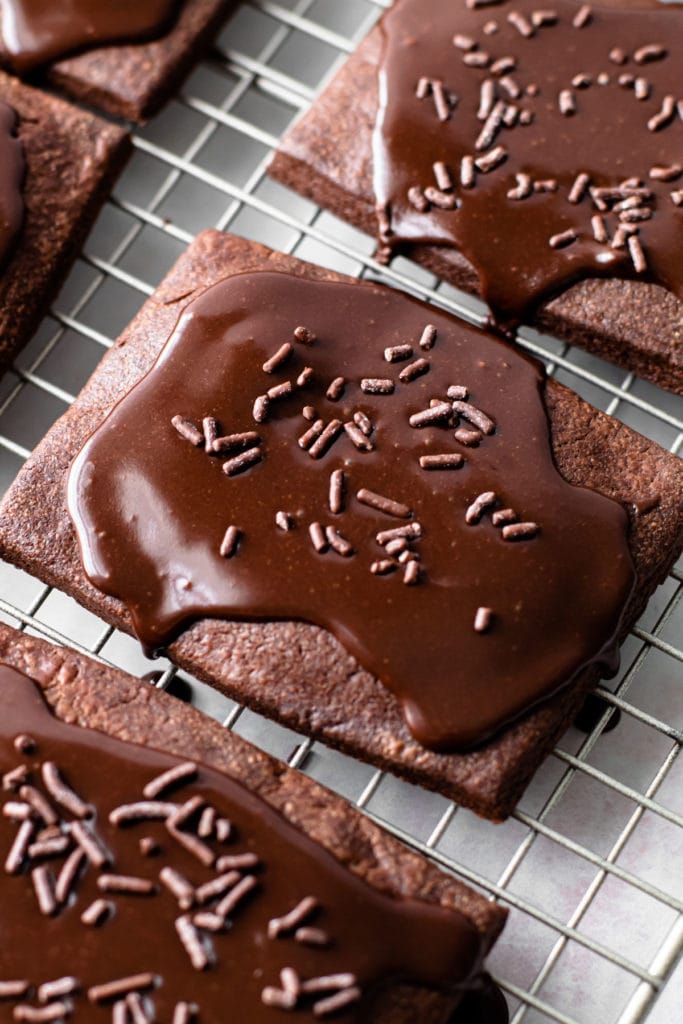
Easy Chocolate Glaze
The frosting on top is not to be forgotten! It’s simple to make and consists of powdered sugar, cocoa, a bit of milk, and a pinch of espresso powder. The espresso powder can be omitted, but it helps boost the chocolate flavor.
The glaze should be thick so it stays on top of the pop tart. You’ll know you have the right consistency if when you drizzle the glaze, it keeps its shape for a few seconds when hitting the bowl.
If your glaze is too thin, simply add in a tablespoon more powdered sugar at a time. If it’s too thick, add in more milk.
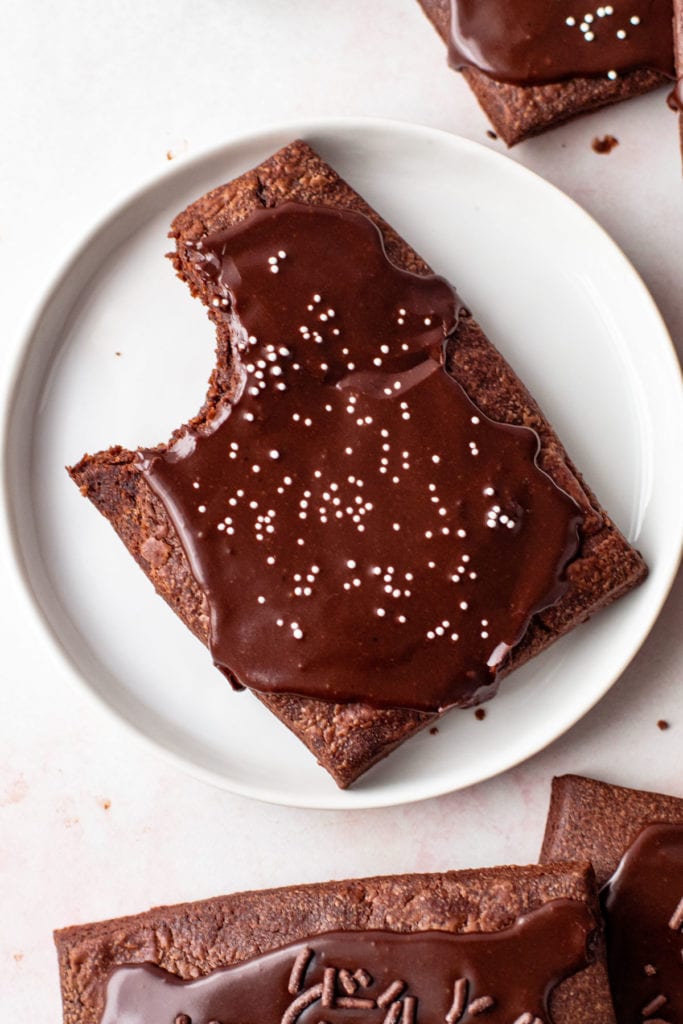
Once the pop tarts are cool, spoon on about 1 tablespoon of glaze and gently smooth it down along the top of the pop tart. Let the glaze set for a minute, and then add any sprinkles if desired.

Storing Chocolate Pop Tarts
Chocolate pop tarts will keep well up to 3 days at room temperature in a closed container. Just make sure that the glaze is completely set before you place them on top of one another.
Un-frosted pop tarts can even be frozen, baked or unbaked, for up to 1 month in the freezer. Defrost at room temperature.
More Pop Tart Recipes:
More Chocolate Recipes:
- Chocolate Cream Pie
- Malted Milk Chocolate Pie
- Chocolate Covered Strawberry Pie
- Chocolate Chip Cookie Pie
I am so honored when you make a recipe from my site! If you make these Chocolate Fudge Pop Tarts, please leave a comment and a star rating with your experience! If you have any questions about this recipe, feel free to comment here, too!
Full Recipe
Chocolate Pop Tarts

- Prep Time: 00:35
- Cook Time: 00:20
- Total Time: 55 minutes
- Yield: 10 Pop Tarts
- Category: Baking
- Method: Bake
Ingredients
Chocolate Pop Tart Dough:
- 2 cups (240 grams) all-purpose flour
- ½ cup (48 grams) natural cocoa powder
- 1 cup (120 grams) powdered sugar
- ¼ teaspoon kosher salt
- 1 cup (226 grams) cold unsalted butter, diced into 1” pieces
- 2 large eggs
Salted Fudge Filling:
- ⅓ cup (75 grams) whole milk
- 1 cup (145 grams) packed semi-sweet chocolate chips
- ¼ teaspoon kosher salt
- 2 tablespoons (25 grams) light brown sugar
- 2 tablespoons (25 grams) cold unsalted butter
- Egg wash (1 large egg whisked together with 1 tablespoon water)
Chocolate Glaze:
- 1 cup (120 grams) powdered sugar
- 2 tablespoons (12 grams) natural cocoa powder
- 2-3 tablespoons (30-45 grams) whole milk
- Pinch of espresso powder
- Sprinkles, to decorate
Instructions
Make the chocolate dough:
- Add the flour, cocoa powder, powdered sugar and salt to the bowl of a food processor. Pulse until combined. Add in butter and pulse until the butter is broken down into rice-sized pieces, about 7-10 times. With the motor running add in the eggs and let the dough process until it forms together into a cohesive ball around the blade.
- Remove the dough from the food processor and form it into a rough rectangle. Wrap the dough tightly in plastic wrap and let it chill in the refrigerator for at least two hours, and up to 3 days.
Make the fudge filling:
- Add milk, chocolate chips, salt, and brown sugar to a medium heatproof bowl. Set the bowl over a small simmering pot of water and stir the mixture until it’s melted.
- Remove the bowl from the heat, and whisk in the butter.
- Transfer the fudge filling to a shallow container, and let cool for 30 minutes at room temperature, before transferring to the refrigerator to chill for 1-½ hours, or until very cold and thick.
- Transfer the fudge filling to a piping bag or a ziploc bag with the corner snipped off.
Prepare the Pop Tarts:
- Remove the chilled dough from the refrigerator and let rest at room temperature for 5-10 minutes, or until the dough is slightly softened, so it is easier to roll.
- Cut the piece in half. On a lightly floured work surface, roll out one piece of dough to a rough 10 x 13 rectangle, about ⅛” thick. Using a pastry wheel or a knife, cut out 3 x 4-inch rectangles. Repeat with remaining dough. Then gather up the scraps and roll out the dough in the same manner, cutting out as many rectangles as possible. This dough should yield about 18-20 rectangles.
- Line a baking sheet with parchment paper and place half the rectangles down on the baking tray.
- Whisk together the egg and the milk to make the egg wash. Very lightly brush the egg wash on the pastry squares.
- Pipe about 1 heaping tablespoons worth of fudge filling in the middle of the pastry squares, taking care to leave a ½” border around the edges of the pastry. Place the remaining pastry rectangles on top and seal the edges. Using a pastry bench scraper, cut off the very ends of the sealed edges. This makes the final product look neat, but it also seals the pop tarts well.
- Chill the tray of pop tarts in the refrigerator for at least 30 minutes, or in the freezer for 15. Once chilled, using a knife, gently pop holes through the top of the dough to let the steam escape during baking.
Bake and Frost the Pop Tarts:
- Preheat the oven to 375 degrees. Bake the pop tarts on the lower rack for 20 minutes. The pop tarts should be fragrant and the pastry will be fully set, and even some of the pastry slightly starting to get cracks as the fudge filling puffs up. As soon as possible, transfer to a wire rack and let cool until no longer hot to the touch, about 1 hour.
- Add the powdered sugar, cocoa, milk, and espresso powder to a bowl and whisk together. The glaze should be thick enough that it will keep its shape for a second when drizzled off of a spoon.
- Place 1 tablespoon of glaze in the middle of the pop tarts and gently smooth it down. Decorate the pop tarts with sprinkles before the glaze sets.
Notes
It’s easiest to pipe the fudge mixture onto the pop tart dough. However, if you don’t have a piping bag or a ziploc bag, you could scoop and spread the mixture onto the dough squares. Just be sure to leave the border edge.
Cutting off the edges of the pop tarts is important because it really helps seal the pastry together. Do not cut it with a knife, because that is too sharp and doesn’t “mash” the two pieces of dough together. Use a bench scraper or other semi blunt object, such as a spatula to cut off the outer edges of the pastry.
Pop tarts will keep, covered, at room temperature, for about 3 days.
Some of the links on this page may be affiliate links. Everyday Pie is a participant in the Amazon Associates Program. As an Amazon Associate I earn from qualifying purchases, at no extra cost to you.
Schön
Good morning,
I just read through your recipe and hope to make them sometime soon. I'm wondering though, do you know if these can be frozen after the last stage?
Thank you,
Schön
Kelli Avila
From the article: "Un-frosted pop tarts can even be frozen, baked or unbaked, for up to 1 month in the freezer. Defrost at room temperature."
Miah
I took my time making this delicious treat. It was worth the wait the whole family enjoyed them.