A croissant is a flaky buttery yeasted breakfast pastry, and to many, the ultimate baking achievement. This extensive tutorial has everything you need for How to Make Croissants at Home with step-by-step photos, video and lots of tips!

Want to save this recipe?
Enter your email & I'll send it to your inbox. Plus, get weekly updates from me!
Homemade Croissant Guide
Bakeries are often judged by the quality of their butter croissants. A good croissant should be light, flaky, and full of flavor. Likewise, for home bakers, making croissant dough is often seen as the ultimate test of their skills. However, many people are hesitant to try. But don't be afraid - it's possible to make delicious croissants at home, and this guide is here to help you.
After reading through this tutorial, you'll be equipped with all the knowledge you need to make croissant dough, laminate it, shape it, proof it and bake it.
Practice makes progress (not perfection) with this recipe. Making croissants requires various skills that you will improve over time with practice. Don't be discouraged if your initial attempt doesn't yield perfect croissants. I've made hundreds of batches while developing this recipe and I'll happily admit I'm still improving too.
Yet, even if they don't turn out flawless the first time, you’ll still be left with some pretty amazing homemade pastry. Unlike croissants made in bakeries using machines, the love and care you put into making them with your own hands is guaranteed to result in the best croissants you've ever had.
So, let's get to making it, shall we? The text below offers tons of tips and helpful notes, or you can scroll to the bottom to grab the recipe and get started!
More of a visual person? Check out the video of me making it below, located right above the recipe!

What Is Croissant Dough?
Croissant pastry is one of the most common sweet yeast-raised pastries, also known as Viennoiserie or Viennese pastry. It consists of a semi-lean yeasted dough wrapped around a block of butter and laminated several times before being shaped, proofed, and baked.
The name "croissant" comes from the French word for "crescent," which describes its traditional shape. However, some modern croissants, including the one in this recipe, have a straight shape instead of the classic crescent.
Croissant dough is like a cross between puff pastry and danish dough.
Croissants and puff pastry share similarities in that they are both made with lean dough that is laminated multiple times to create flaky layers. However, croissants are laminated less than puff pastry and contain added yeast to help the dough rise.
That added yeast is what makes it similar to danish dough, which is also a yeast-raised dough laminated around a butter block. However, danish dough consists of an enriched dough, meaning eggs, butter and sugar are added to it in high quantities.
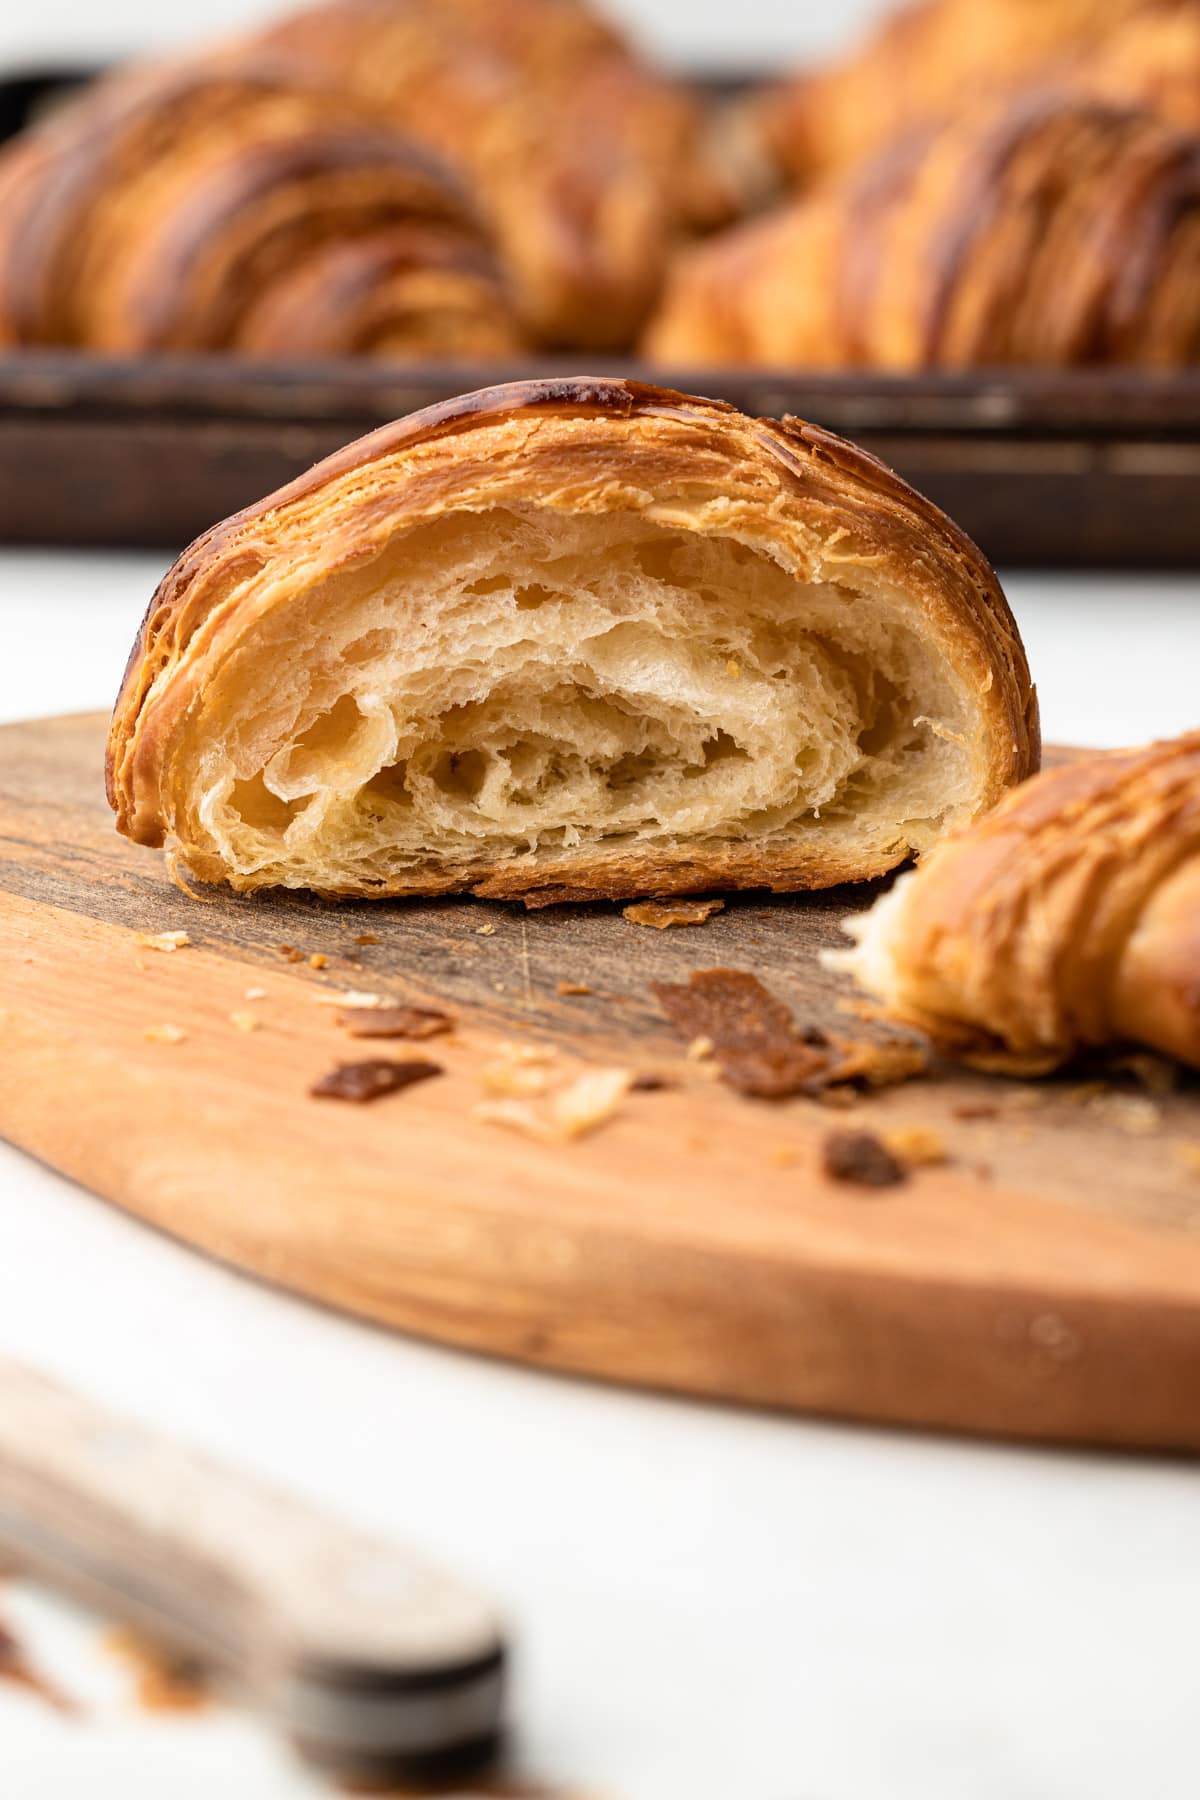
A well-made croissant should have visible layering, it should feel very light for it's size and have an amazing buttery flavor.
Making this dough at home by hand is quite an achievement, but one that I strongly believe anybody, with a little research and practice, can achieve.
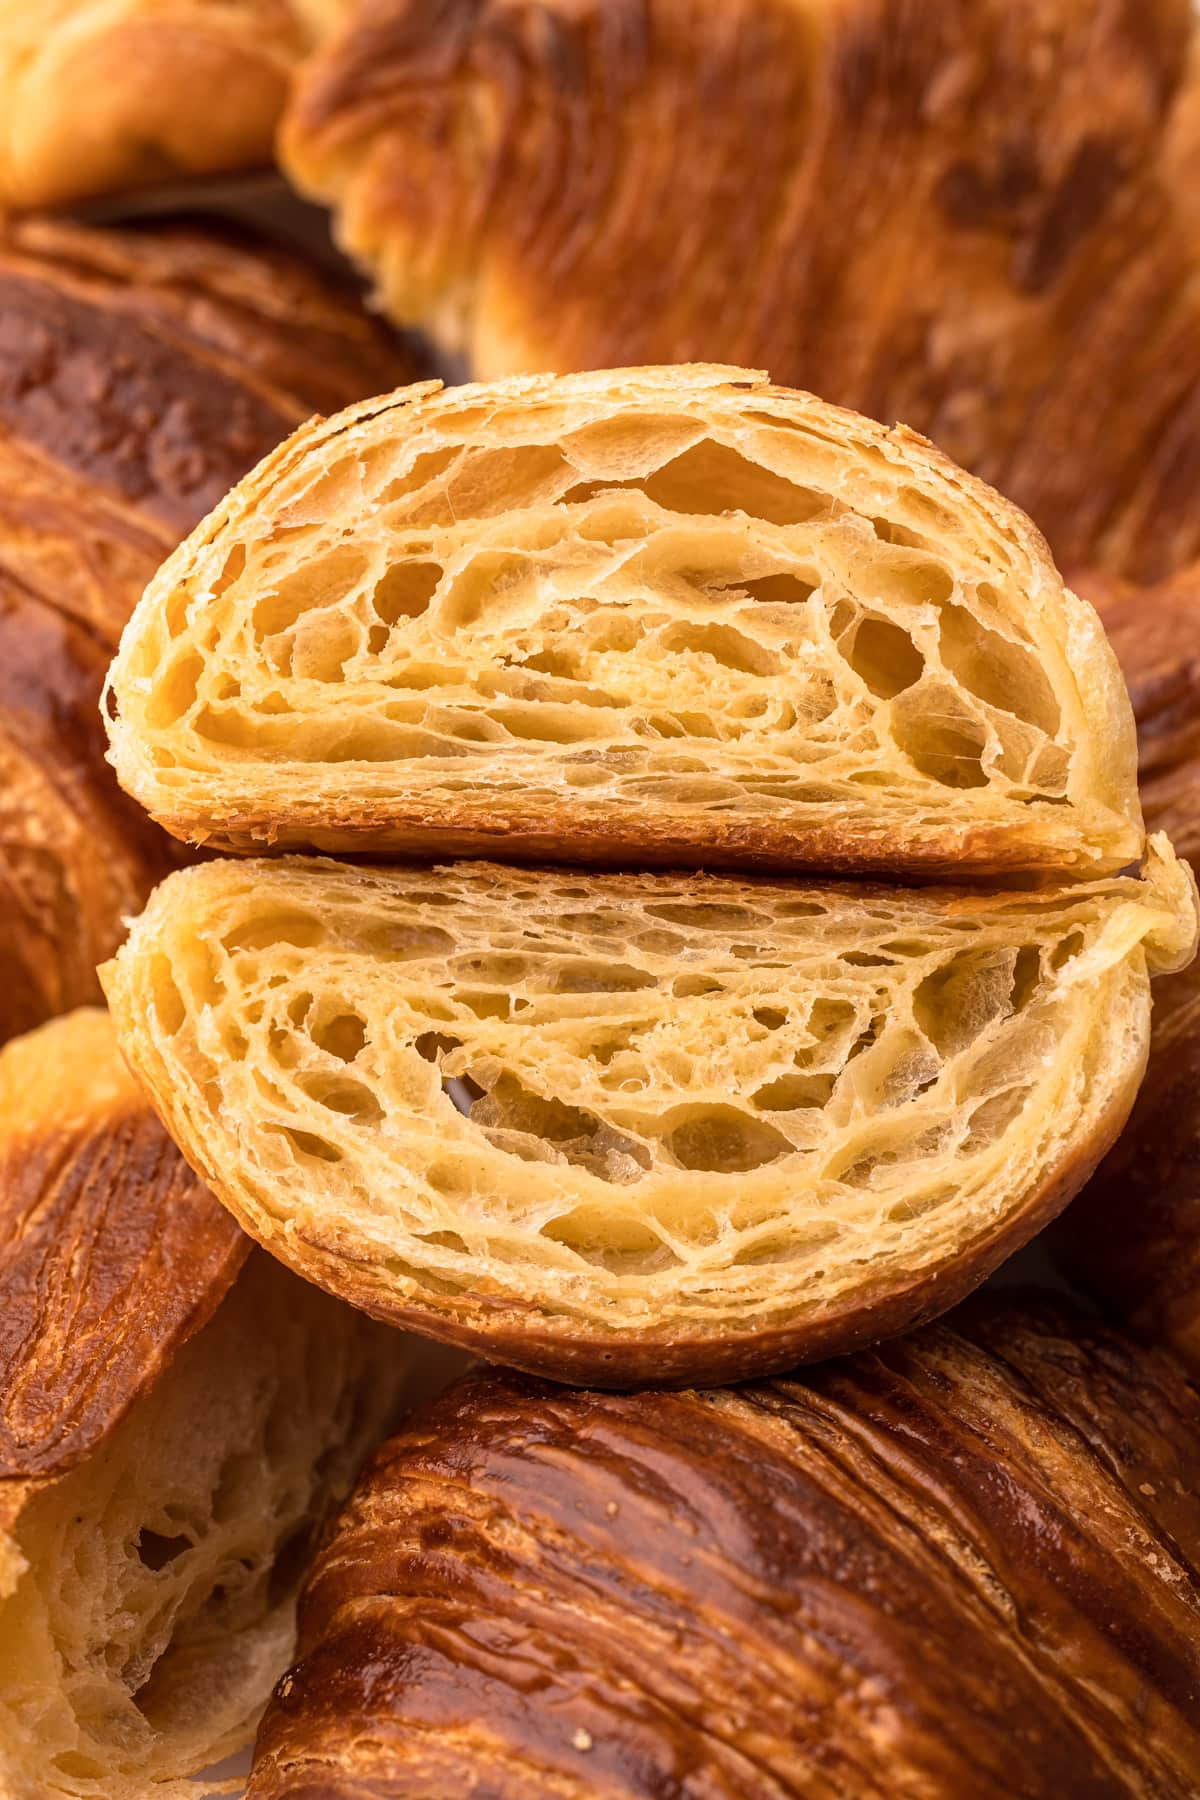
Behind the Scenes of the Development Process
Last year, I discovered my passion for making laminated dough while perfecting my puff pastry recipe. I found that I really really enjoyed the process. And fell in love with making croissants too. It takes all the skill of making puff pastry, with the addition of working with a yeast dough. My experience with puff pastry gave me a strong foundation for researching and developing a recipe for croissants.
To learn how to make croissants at home by hand, I bought countless books and researched various methods of preparation. However, I found that many of the recipes weren't actually geared towards a home baker, with recipe steps that were repetitive or unnecessary. Additionally, the dough was often challenging to roll out.
When I created this recipe, I had three goals in mind. First, I wanted to simplify the steps as much as possible so that it would be easy for home bakers to follow. Second, I aimed to maintain the traditional croissant-making process. And lastly, I wanted to produce a super freaking delicious croissant that any home baker would be proud of.
Although there are quite a few precise instructions in the recipe, I attempted to eliminate as many as possible while maintaining the authenticity of true croissant production. When I say I scrutinized every ingredient and step of preparation, I truly mean it. This recipe has been meticulously crafted with careful consideration of each step and ingredient to ensure its success. Likewise, experienced bakers of laminated pastry may notice some common steps in traditional croissant recipes that I chose to leave out to simplify the process for home bakers without compromising on the final product.
I produced at least a few hundred croissants (or more, I stopped counting) in my home over the last 6 months while developing this recipe, and in that time, I've picked up so much helpful advice to share... and that I will! But when it comes to baking advanced recipes like this one, practice makes progress.
While I always try to be thorough and exhaustive with my advanced recipes, there are many variables when it comes to at-home bakers making them. So if first you don't succeed, come back to the recipe, read through as much as you can, and try to figure out where things went wrong and how they can go differently next time.
Ingredients Needed
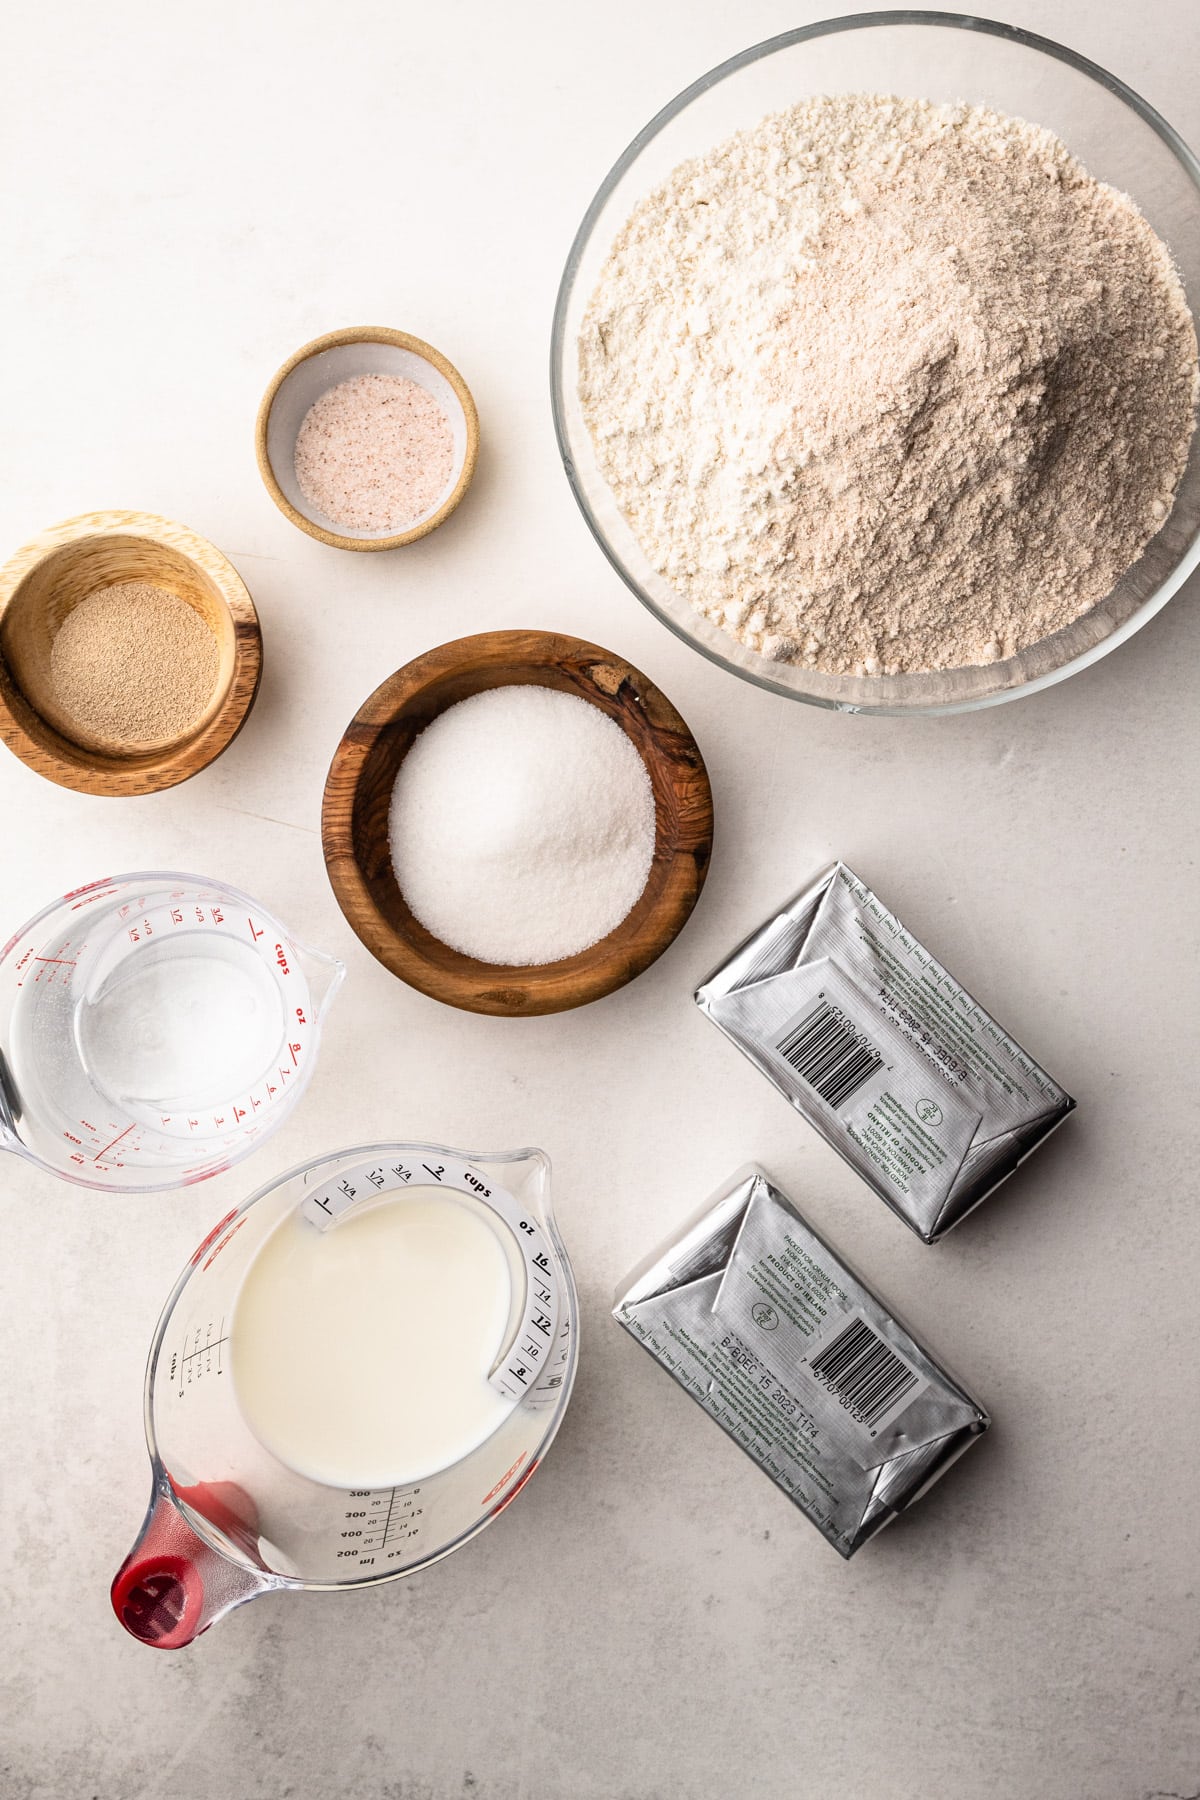
Here is an overview of the ingredients needed for this recipe. The full recipe is listed below in greater detail. I have to pinpoint that this recipe has very specific ingredients involving many variables. I tried my best to give as many substitutions as possible, but sometimes a recipe works the best only with the ingredients called for and this is one of those cases. If you want to try a different ingredient than what is named, you will have to do your own experimentation to see if it affects the final product.
- high-fat (European-style) unsalted butter aka "dry" butter meaning a low water content (brands such as Kerrygold, Plugra, or Cabot Extra Creamy and Vital Farms worked well). Look for butter with a fat content of 82% or above. Do not mix and match butter types; stick with one brand for the entire recipe)
- bread flour (this is essential for the higher protein, and I recommend King Arthur Flour or Bob's Red Mill, which is what I tested this recipe with)
- whole wheat flour (just a little of this is used to enhance the flavor of this recipe in lieu of using a sourdough or pre-fermented...I could go into more details about this but it's unnecessary and you should know the whole wheat is important for the flavor, I used King Arthur Flour Whole Wheat, but this is such a small quantity that any whole wheat flour will work for you here)
- instant yeast (I only tested this recipe with the "red" SAF yeast and cannot advise on alternative yeast options)
- granulated sugar
- fine sea salt (for yeasted breads fine sea salt is good because of its ability to dissolve faster and more evenly, if you don't have it I suggest using the gram amount listed in the recipe to ensure the salinity level is correct)
- whole milk
- egg wash
Tools Needed
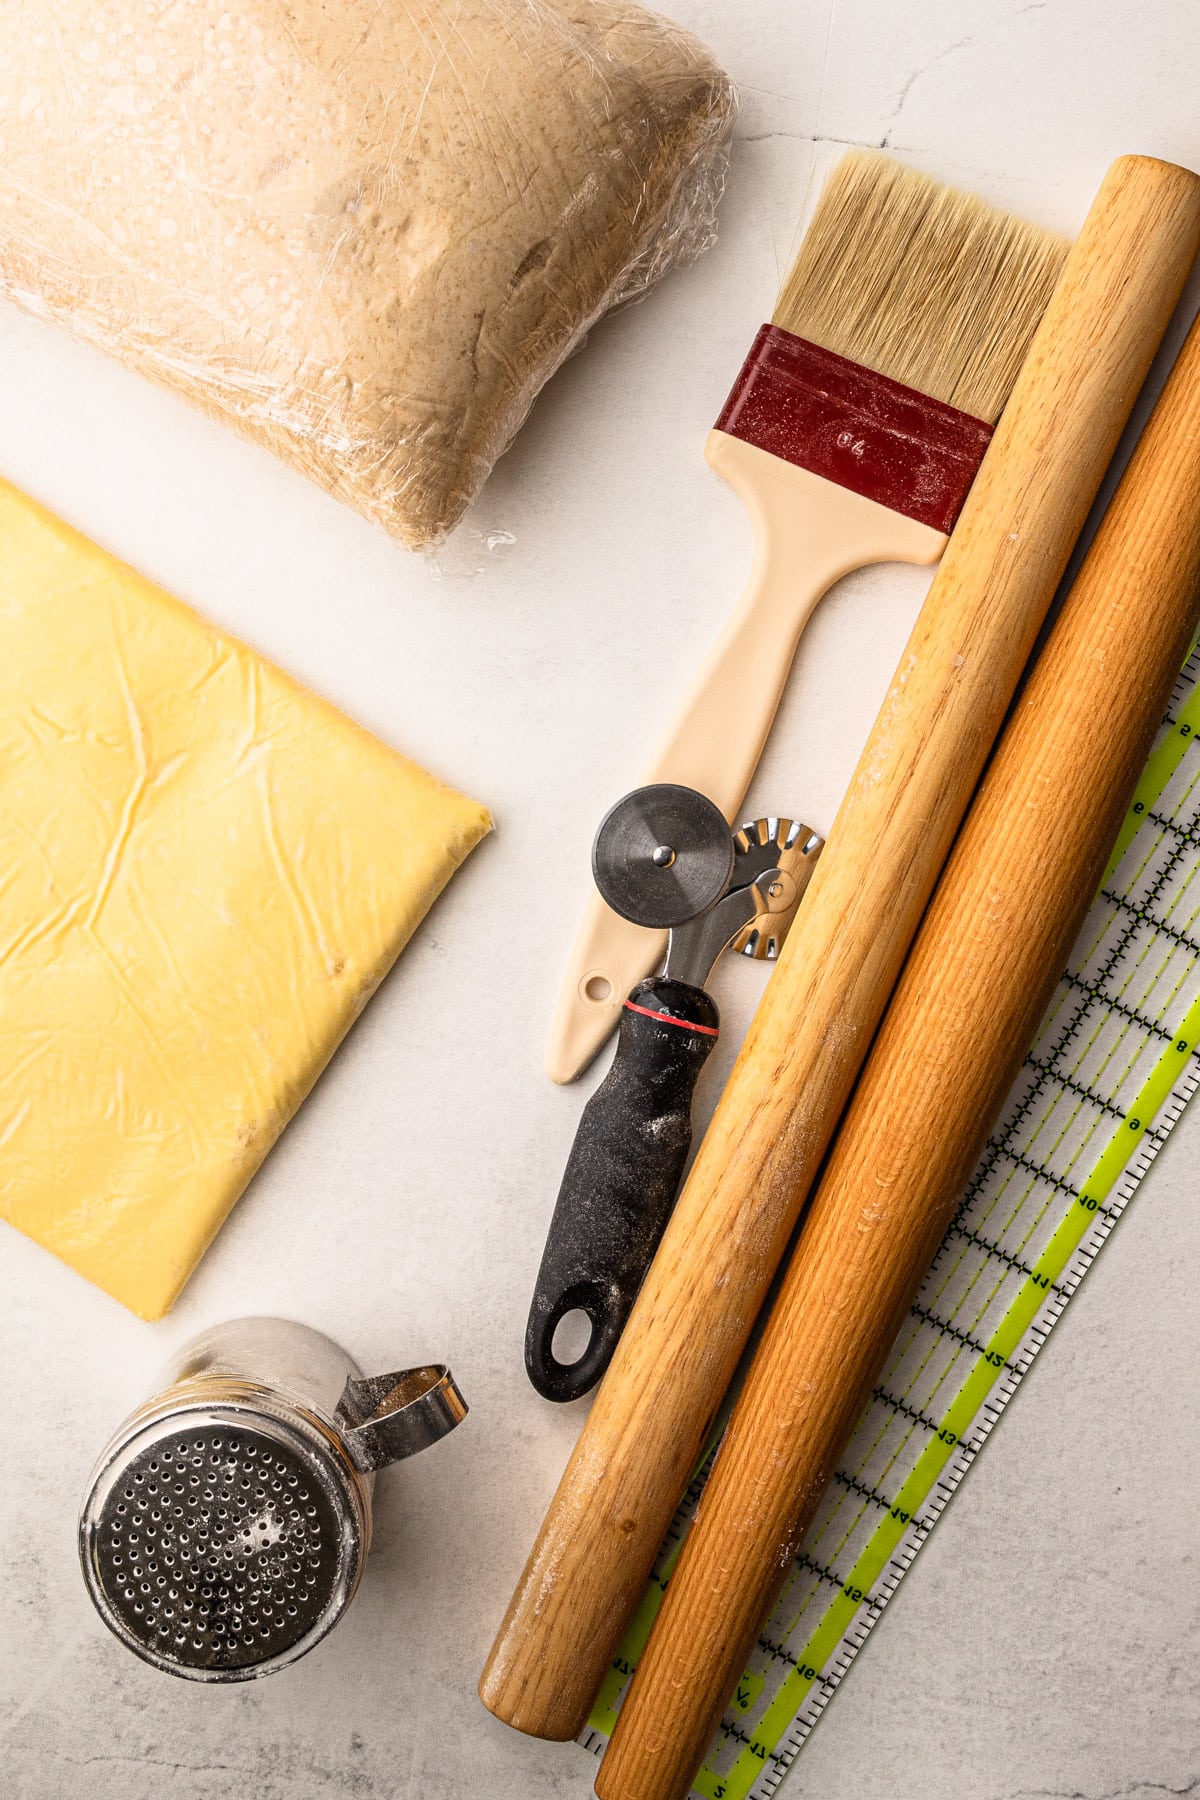
Here is a list of some of the primary tools I use in this recipe. You won't necessarily choose to use them all, but they are exactly what I used. Any links may contain affiliate links.
- Stand Mixer: The instructions call for using a stand mixer to assemble the dough and the butter block.
- Plastic wrap: I know some people are averse to plastic, but I really suggest using it here. It keeps the moisture in the dough during all the resting time in the refrigerator, and it helps the dough keep its shape during the lamination process. It's possible to reuse the same piece of plastic wrap or you could use parchment paper instead, but it can be trickier.
- Rolling pin: There are many different styles out there. Use the one you are most comfortable with. I actually use two rolling pins nearly every time I roll anything out, one tapered french dowel rolling pin and one straight dowel rolling pin.
- Quart-sized plastic bag: This is used to form the butter block! I highly recommend you use this instead of trying to form it on your own.
- Bench scraper: This helps keep your dough in the correct shape, but it’s not absolutely essential.
- Ruler: Useful for ensuring your dough is rolled out to the proper amounts. If possible, one longer at least 18 inches since the dough length will reach 20 inches. It's also useful as a guide of a straight line when cutting the croissants too.
- Clean / Kitchen-safe spray bottle: I use this to add mist to the baking trays for a higher rise in the croissants
- Pastry wheel or sharp knife: This is used for cutting the dough during lamination and for cutting it during shaping.
- Dry pastry brush: To get any excess flour off the dough.
- Wet pastry brush: For brushing on the egg wash.
- A sheet tray: For holding the dough in the refrigerator while it rests and for baking the croissants.
- Room thermometer: This is useful for having a true understanding of the ambient temperature of your home. I have two in my kitchen that I use whenever I'm baking.
Do you really need all those tools? Well, I suppose at the end of the day, all you really need is a rolling pin and a bowl. However, using the above-mentioned tools (which is everything I use) makes making croissants easier.
Something to mention that isn't a tool: you'll need space in both your freezer and refrigerator that can fit a sheet pan when making the dough. As the dough will need to rest multiple times, it's helpful to prepare a designated spot in advance to ensure you have enough room.
The Two Components of Croissant Dough
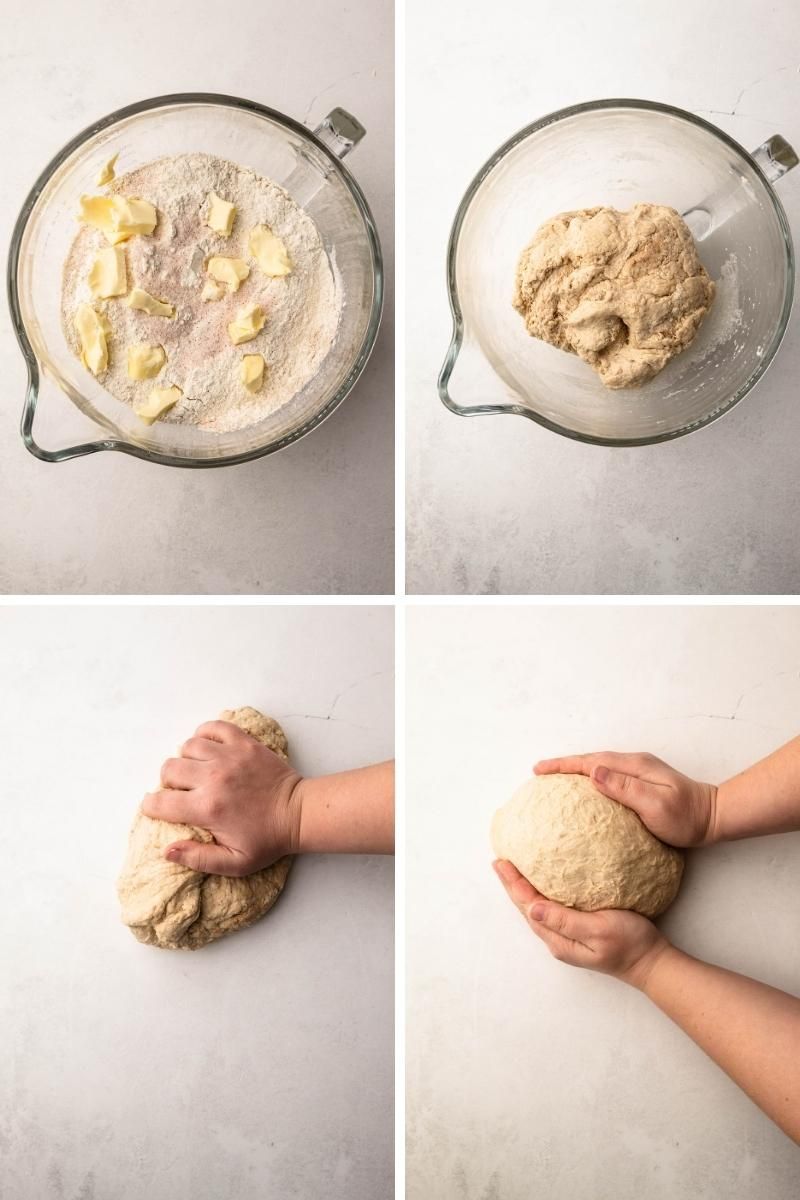
Croissant dough is a laminated yeasted pastry composed of a (semi) lean dough (called the détrempe) with a "dry" block of butter (beurrage) enclosed within it. The dry butter is in reference to the amount of water content within the butter. A dry butter will have less than a 18% water content.
I would like to highlight some unique methods used in making the croissant dough recipe.
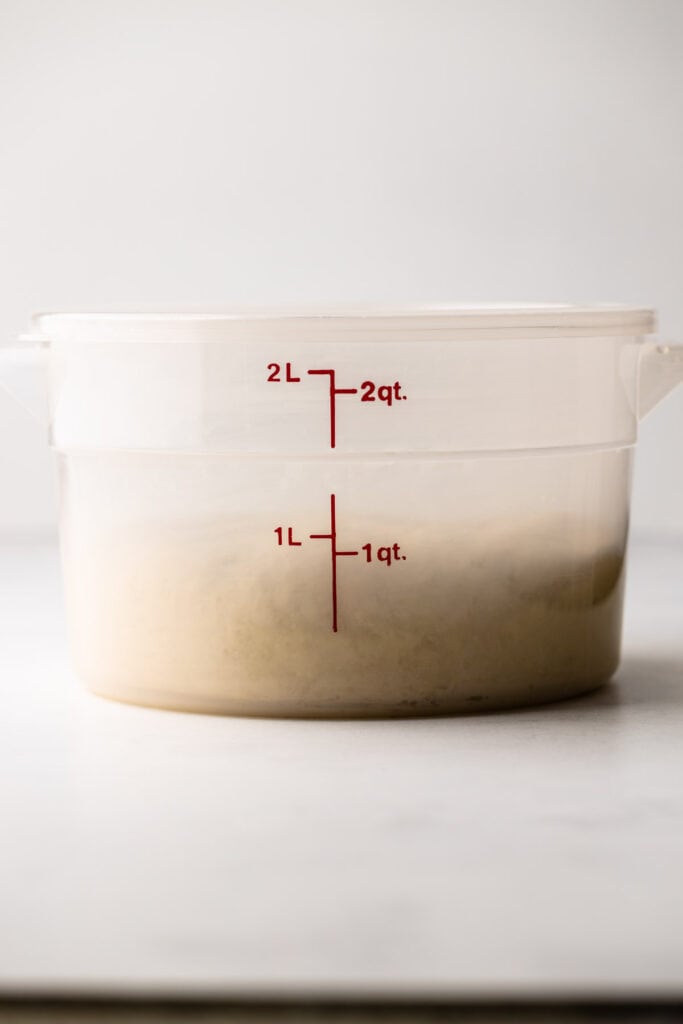
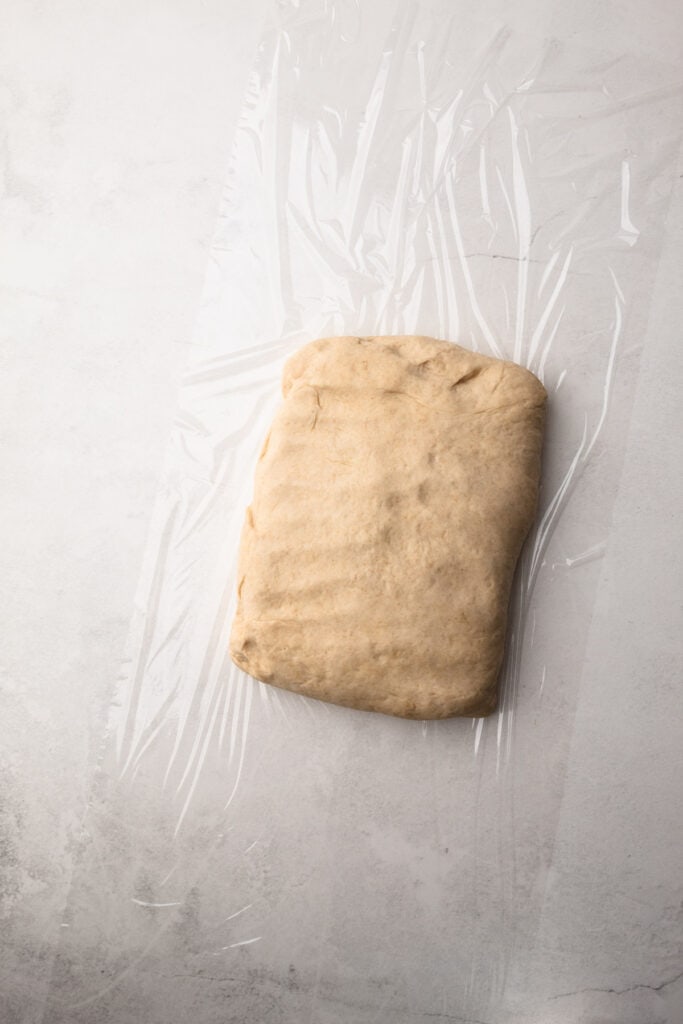
The Dough
When making a yeast dough, kneading is typically required to build up its elasticity and strength, also known as gluten. This is necessary to create a structure for the final rise and bake. However, extensive kneading can make rolling out the dough a difficult task.
And because this is a laminated pastry, this dough also needs to get rolled out quite a bit. And if the dough is already strong from the initial kneading, rolling it out will be an annoyingly difficult task. And one that I find unnecessary.
For this reason, this recipe does not call for an extensive initial kneading. Instead, the dough is mixed in the machine until it comes together and the sides of the bowl are clean. And then, it's given a brief kneading by hand for about one minute. The rest of the gluten strength will come during the lamination process naturally.
This dough is also a bit wetter than typical croissant dough. This makes it easier to roll out by hand for the home-baker.
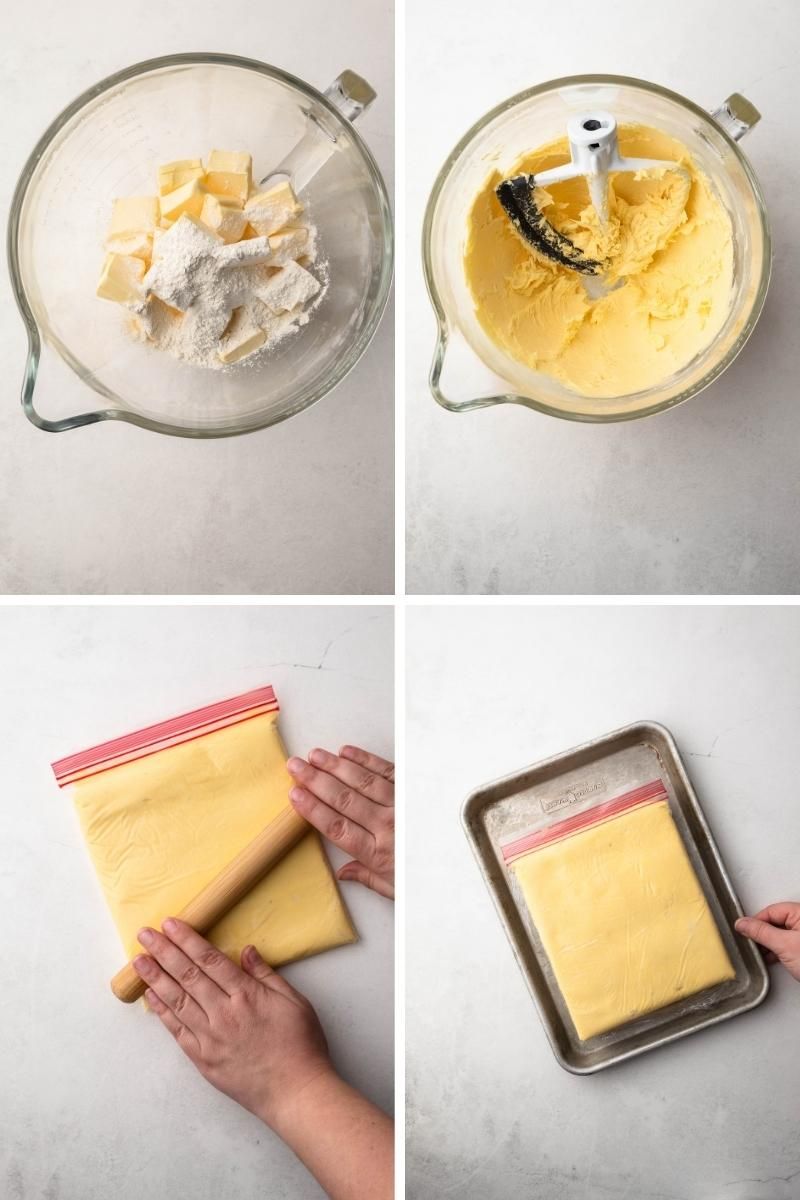
The Butter Block
This recipe has a unique twist when it comes to the butter block. I learned this tip from watching a few European bakers make croissants on YouTube (unfortunately, I don't have the links to share as it was long ago) They used a premixed baker's butter block that was mixed with flour. Basically, it's a dough made almost entirely of butter with a small amount of flour added in (called the beurrage). Adding flour to the butter helps keep it malleable and similar in texture to the dough. Now whenever I laminate anything, I add a bit of flour to the butter when making the butter block.
To create the block, beat cold butter with flour in a stand mixer. The goal here is not to aerate (or cream) the butter, but just combine the flour into the butter so all the butter has been mixed and is malleable.
Once combined, transfer the butter to a quart-sized plastic bag. There are many different methods for creating the butter block, but I find this one the easiest to work with. Simply fill the bag with butter, push out any air, close the bag, and roll it out flat.
Overview of Steps
There are quite a few steps needed to make this recipe. While they are listed in full detail below the article in the recipe, I thought it would be helpful to list the steps needed to complete this croissant recipe in one easy-to-look-at format.
- Make the lean dough, let it rise for 60 minutes, it shouldn't double in size, but just starting puffing up.
- Chill dough in the freezer, for 15-30 minutes.
- Make the butter block.
- Refrigerate the dough and butter 30-60 minutes.
- Enclose the butter block
- Roll out the dough and do a double fold (also known as a book fold)
- Rest/chill the dough in the freezer for 15 minutes and refrigerator for 15-60 minutes.
- Roll out and make a single fold (also known as an envelope fold)
- Rest/chill the dough in the freezer for 15 minutes and refrigerator for 15-60 minutes.
- Preshape the dough by rolling it out until it starts to resist you. It likely will roll out to 8x16 or so. Do not force it beyond that.
- Rest/chill the dough on a parchment lined sheet tray, well wrapped, for at least 4 hours but preferably overnight.
- Finish rolling out the dough (after a brief rest at room temperature to warm up the butter) and shape the croissants!
- Proof for 2-4 hours.
- Egg wash and bake!
To adjust the croissant schedule, refer to the "Flexibility in Croissant Schedule" section. Although it is flexible, it is crucial to read the croissant-making article before making any adjustments. This section is located at the end of the article.
Temperature Matters
The ambient temperature of your home, as well as the temperature of your butter/dough, is incredibly important when it comes to making laminated pastry.
One of the keys to keeping those laminated layers intact is ensuring the butter doesn't melt. If it melts or gets too soft, it will be incorporated into the dough instead of staying as a thin layer alternating with the dough.
If your house is very hot, you may need to chill your dough for longer than called for in between lamination.

How do you know if your croissant dough is too warm?
If you're new to making laminated pastry, it's helpful to use an instant-read thermometer to check the dough's temperature. This will give you an idea of how the dough should feel when it's at the right temperature. Keep in mind that inserting the probe to measure the temperature will create a hole in the laminated layers, so it's not ideal. However, once you know what the dough should feel like at around 40ºF - 50ºF, you won't need the thermometer any longer.
If you don't have an instant-read thermometer, you can tell if the dough is chilled enough by holding it flat on your hand. If it stays stiff, it's ready. If it bends towards your palm, it's too warm.
While it's crucial to keep the dough cold enough, you also need to avoid rolling it out if it has gotten too cold, especially from the freezer, as it could cause the butter layers to crack. Although the butter block contains flour in an effort to prevent this, it may not be enough if the dough is too cold.
If the dough is too cold (below 40º) and stiff, you can let it sit at room temperature for a few minutes to warm up slightly.
Best advice: A helpful tip when laminating dough is to err on the side of being too cold rather than too warm. To achieve this, utilize the freezer space as necessary, especially if your home is warm or if you take longer than 5 minutes to laminate. The instructions call for placing the dough in the freezer for at least 15 minutes in between steps, but you may leave it in for a longer period to ensure the dough stays cold.
All About Lamination
Pastry lamination is a technique that involves layering butter and dough together by rolling the dough--as neatly as possible--and then folding it over itself several times. This is referred to as a turn. Croissant pastry with yeast requires less lamination than non-yeasted laminated doughs (like puff pastry).
There are various ways to achieve lamination, but this recipe uses the single fold technique where the top ⅓ of the dough is pulled down towards the center, followed by the bottom ⅓ towards the middle, creating three layers of dough per turn. It also includes one double fold (or book fold).
Through some experimentation, I discovered the sweet spot for this recipe with two laminations (one single fold and one double fold).
The skill of rolling out pastry improves with practice. Find a rolling pin that feels comfortable to you. I prefer a dowel rolling pin, as opposed to one with handles, but the type of rolling pin really doesn't matter; what matters most is you are able to direct the dough properly with it, since keeping the dough neat is important to keep the integrity of the alternating layers. In other words, you want to ensure you always roll it out to a rectangle that, when folded, each edge is as close to being the same size as possible.
It's less important to roll it out to the size instructed in the recipe than to ensure the rectangle is even.

Tips for Rolling Out Pastry
Ideally, when the dough is rolled out, it is done so with even strokes away from you and the pin, instead of pushing downward and out. This is to maintain even alternating layers of butter and dough. Using too much downward force on the dough will compress the layers of butter. As I said, this takes practice. Be patient with yourself.
- Make sure the dough is at the proper temperature. If it's too soft, it becomes easy to compress and smush the butter while you are rolling it. If it's too hard, it will be difficult to roll, and you could crack the butter or compress the layers together from too much force. It should be around 40ºF - 50ºF.
- Very lightly flour the work surface. If your pastry sticks too much to your work surface, it's going to mess up the lamination. You can always (and should) brush off any excess with a dry pastry brush. But do be judicious when it comes to adding flour. Only add as little as you need to successfully roll out the dough.
- Flip the laminated dough over when rolling throughout the process to ensure it doesn't stick and to help get even layers. Just make sure to use a light / gentle hand when flipping it back and forth.
- If you feel any air bubbles while rolling out the dough, use a cake tester or other small sharp object and pop them, making sure to push out any air. Premature fermentation will result in uneven layering in the final croissants, causing some layers of dough to compress together during the bake.
- Before beginning a turn, use the rolling pin to "get the dough ready to roll" by lightly pressing the rolling pin perpendicular to the dough all along the surface to lengthen and flatten it. This helps keep the rectangle by conditioning the dough to keep its shape.
- If your dough starts to fight you to be rolled out, it means it needs more chilling time to relax the gluten. Never fight the gluten, it will always win.

We All Need Proper Rest, and So Does Pastry
Resting time is crucial for making perfect croissants. The dough needs to rest several times during preparation, including a long rest after lamination. Resting the dough helps keep the butter chilled and allows the gluten to relax, making it easier to roll out.
If the dough is contracting or feels too warm, it's best to let it rest in the freezer or fridge. When in doubt, rest it.
How to Shape the Croissants
For best results, it is recommended to shape the croissants the day after the dough has been assembled and laminated, or at least 4 hours after the "pre-shape".
This fermentation period is done for two reasons. The first is that it allows an extended resting period that reults in a better flavor in the final croissant. Second, it makes the dough easier to work when shaping since the gluten is relaxed.
Remember: an extended rest period means the dough likely needs a few minutes to warm up so the butter doesn't crack when you roll it. Depending on the ambient temperature of the room, about 5 minutes should suffice.

Final Rolling and Cutting Croissant Dough
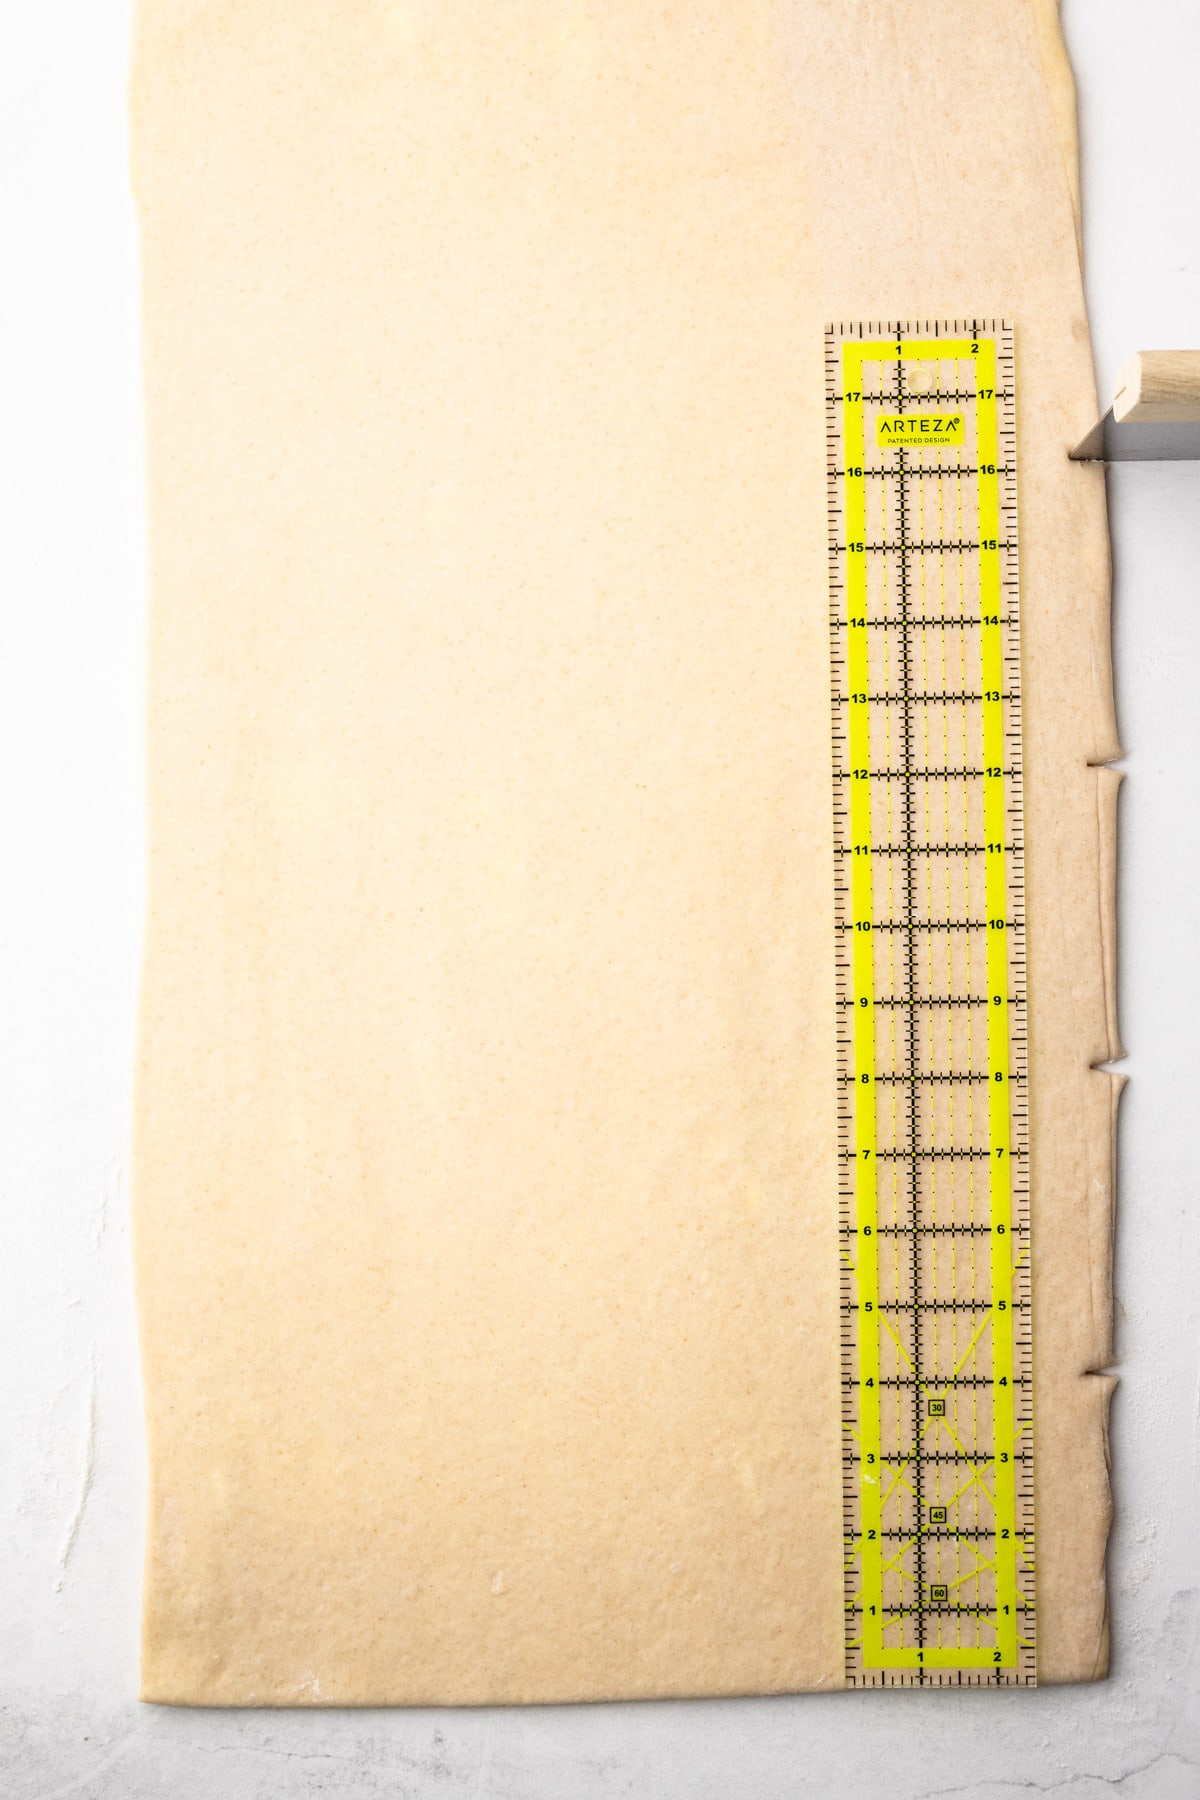
The dough is rolled out to a 10x20" rectangle. For neat croissants, square off the edges to make an exact rectangle. I also find this also helps release any air bubbles caught up in the edges.
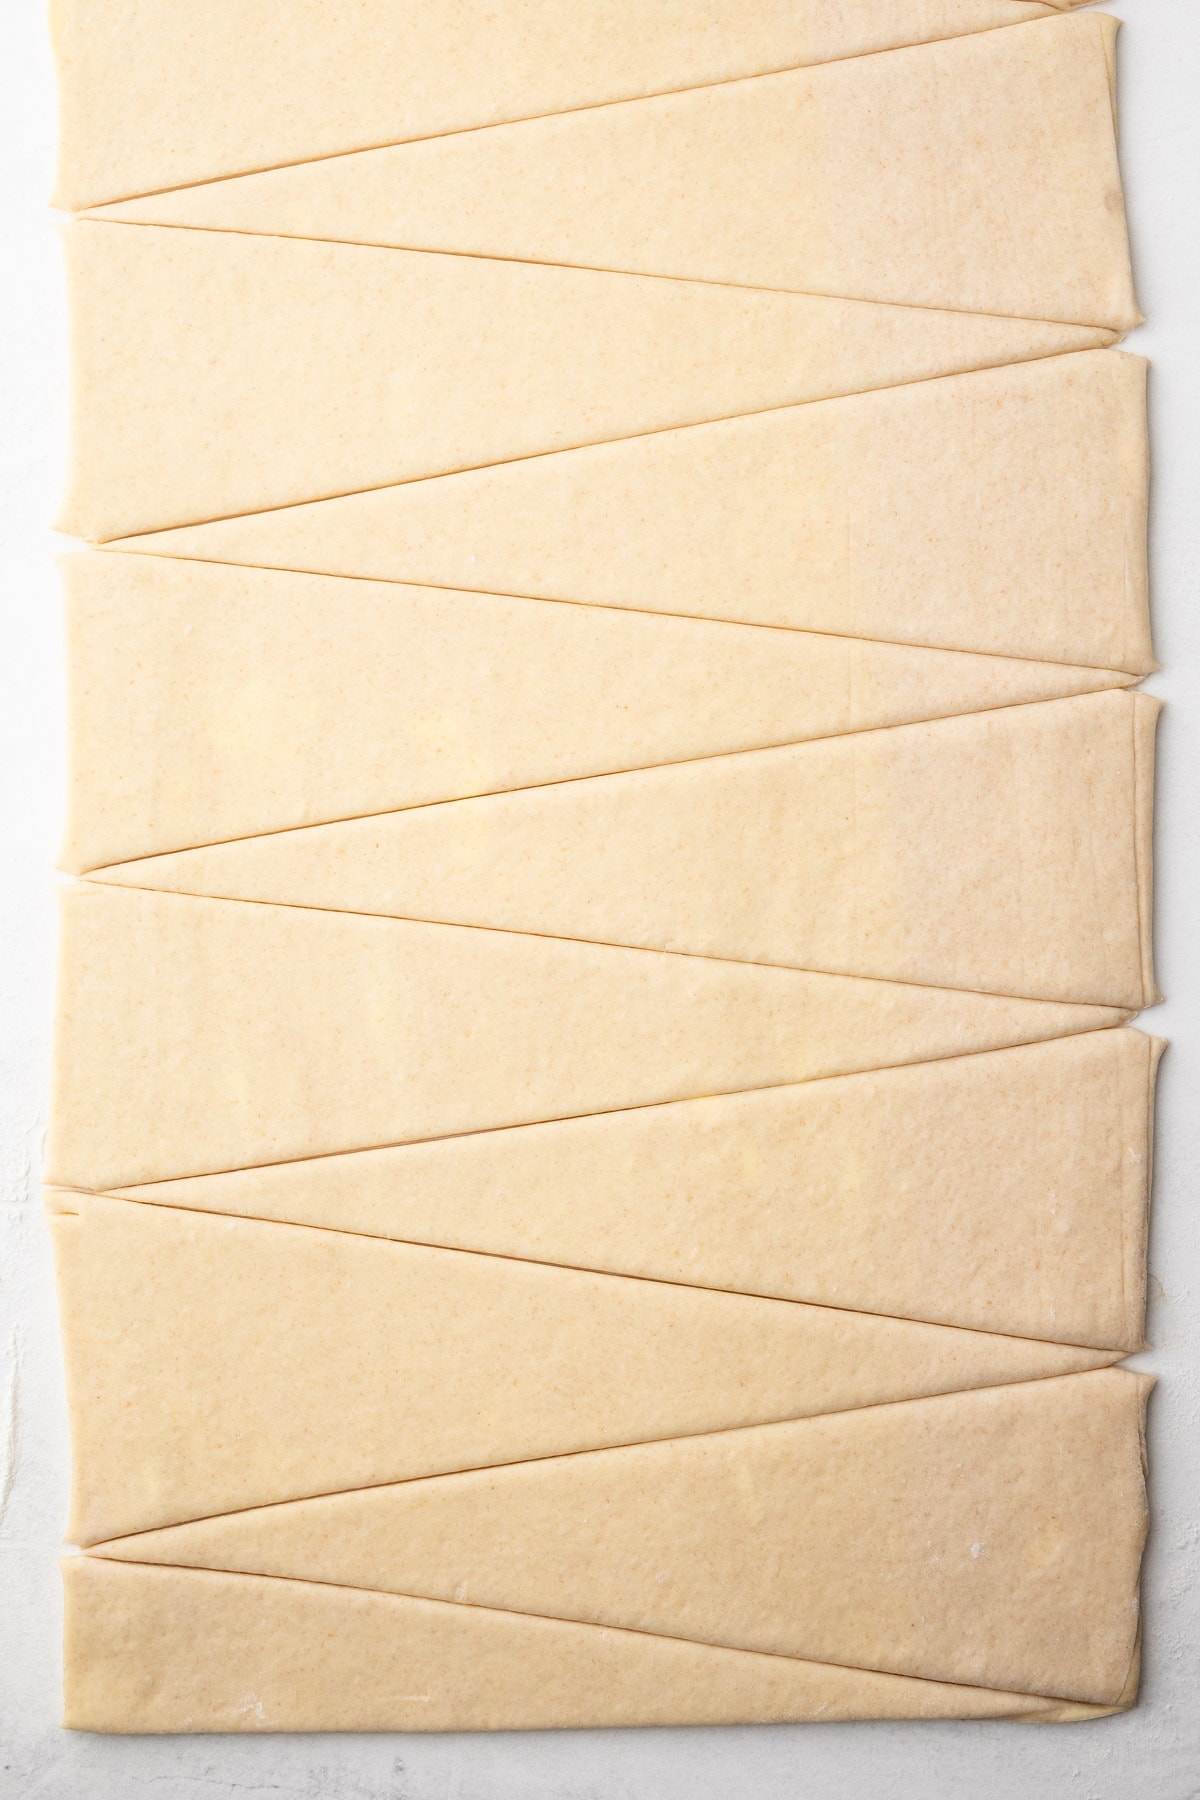
To create the perfect croissant, it's important to cut the dough into precise triangles with a 4" short side. To help you do this, you can refer to the graphic for a visual guide.
First, measure and notch out marks every 4" on both the bottom and top long sides of the dough, for a total of five notches on each side. The notches on the top long side should start 2" inches in from the left side to represent the "middle point" of the eventual triangle. Then, connect the notches with a pastry wheel to cut the dough into precise triangles. You should end up with 9 perfect isosceles triangles to make croissants. The two leftover half triangle scraps can be brought together to create the 10th croissant, known as the "baker's croissant." Although it may not be as perfect as the others, using these two leftover pieces help eliminate excessive waste with the precious dough.

Don't throw away any leftover croissant scraps! Instead, you can save them and create another croissant out of them or bake it up some other way. If you don't plan on making croissants again, pressing the scraps together will suffice. However, if you do plan on making the dough again, it's best to freeze the scraps until you have enough to make morning buns. This way, you can eliminate waste and make delicious treats at the same time.
Shaping the Dough
Once the triangles are cut, it's time for the actual shaping.
This is a good time to ensure the dough is still cold. If it isn't, briefly rest it in the freezer for 10 minutes or refrigerator for 15 or so.
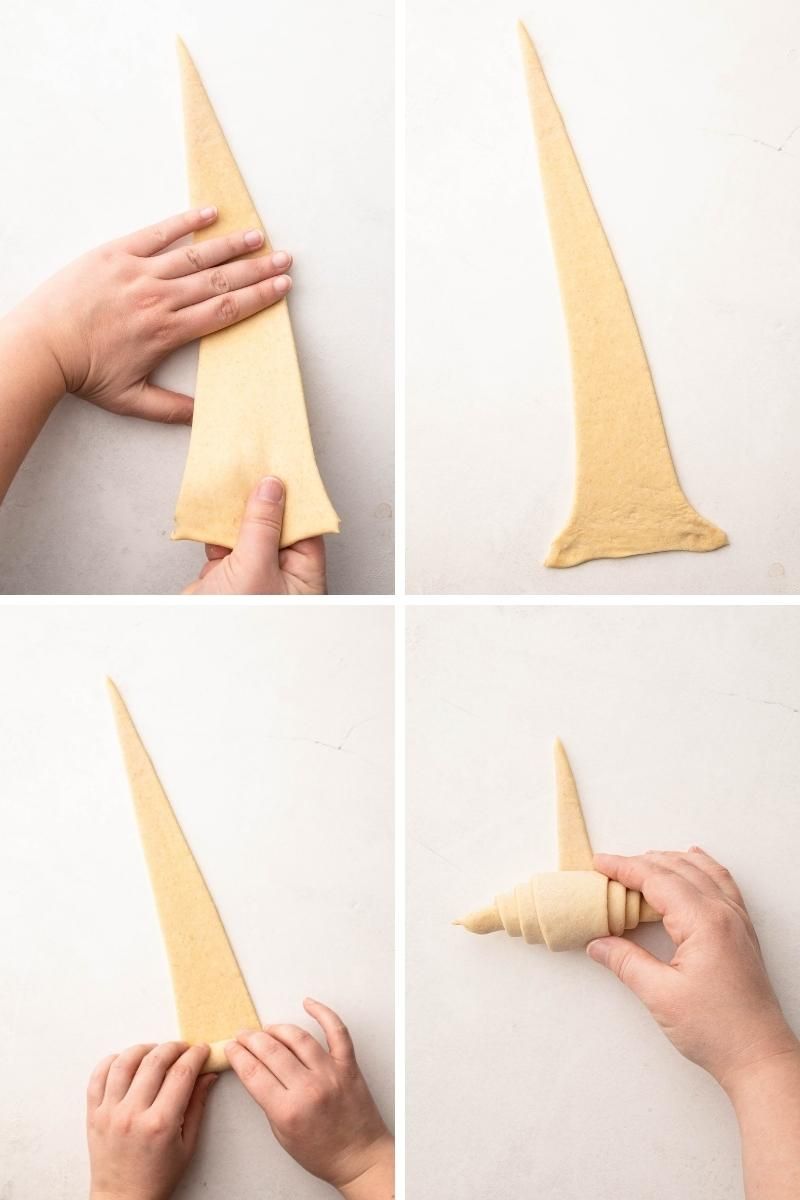
When making croissants, it's important to know how to shape them properly.
This involves three steps:
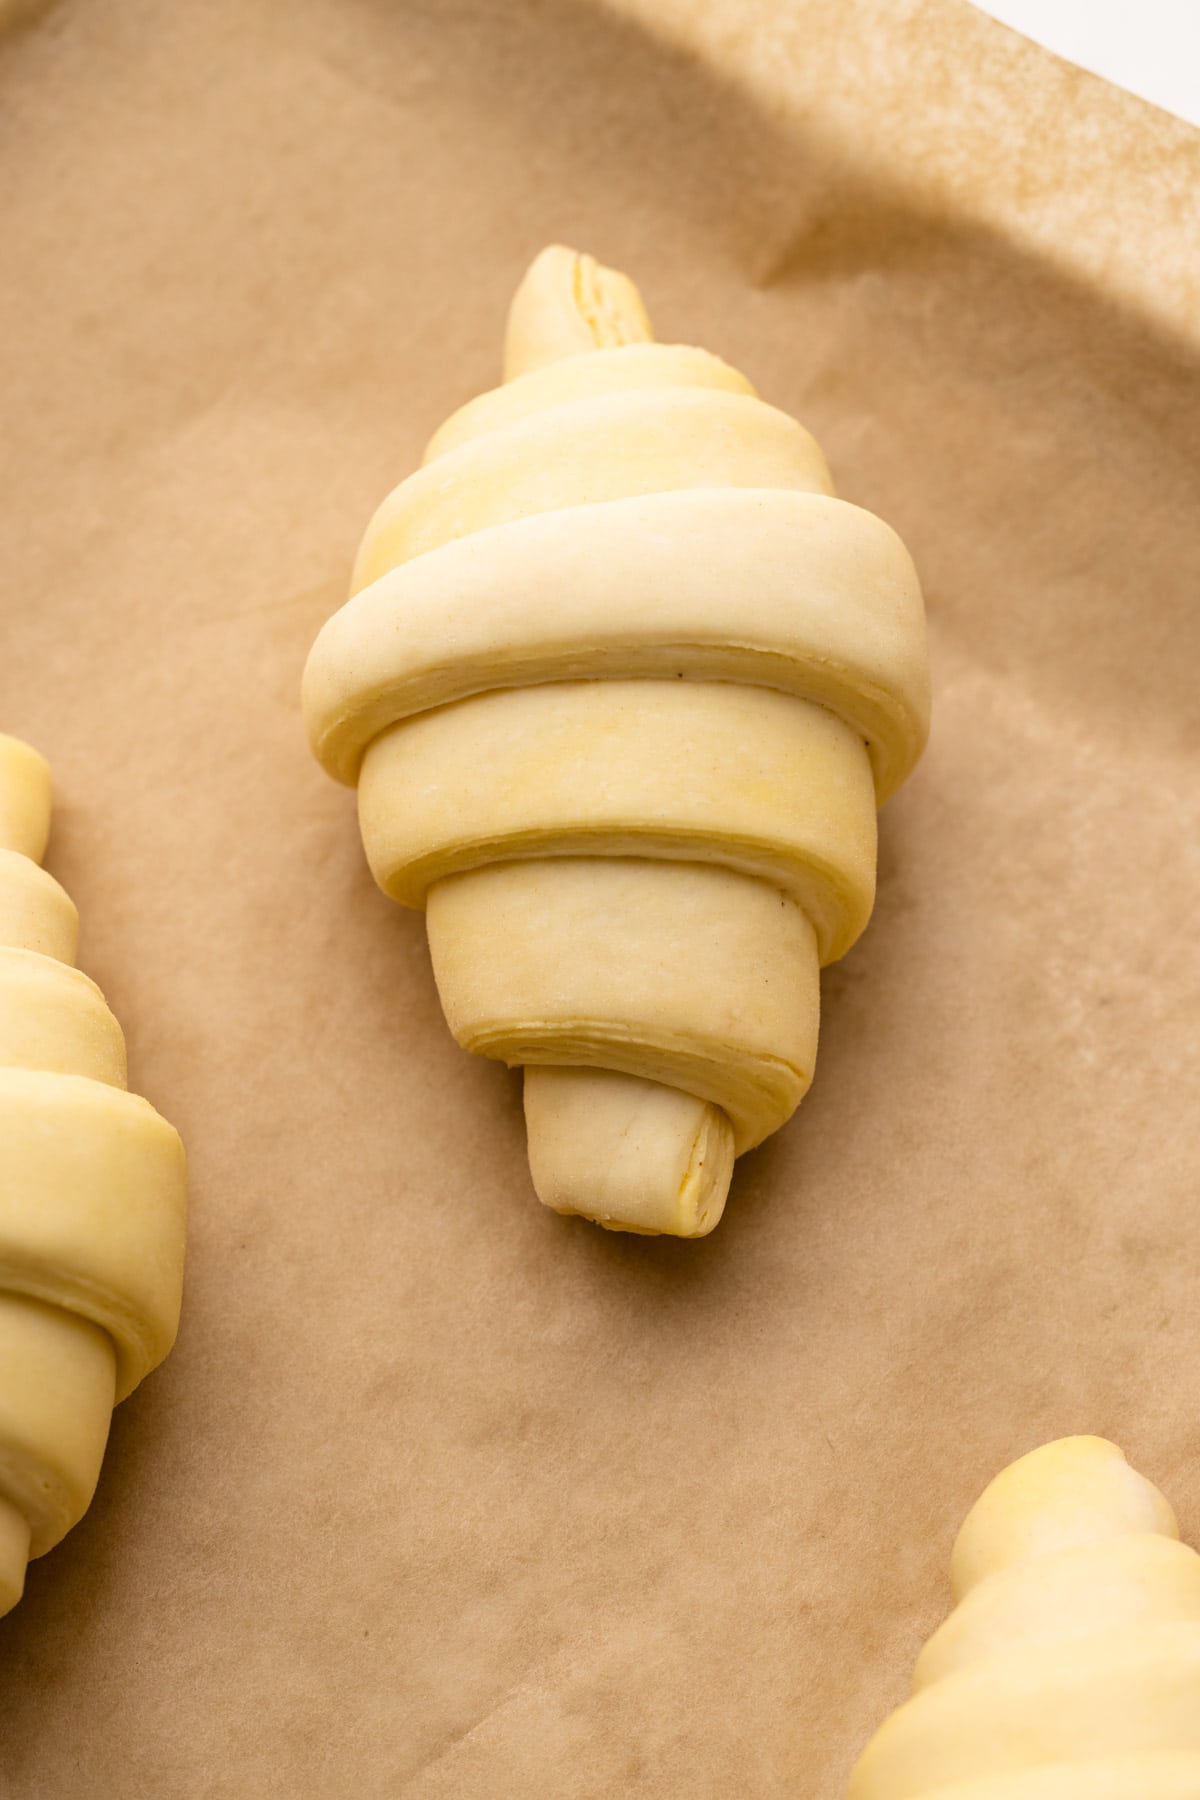
- gently elongating the length of the isosceles triangle
- gently stretching out the two short-sided corners
- rolling up the triangle to form the crescent.
By elongating both the length of the triangle and the corners, you'll be able to make enough rolls in the croissant (there should be a total of 7 "humps" on the final shaped croissant). This can be done by hand or with a rolling pin. It's a skill that will come with practice, so don't worry too much about it when you're just starting out. The most imporant aspect here is to keep the layers of butter intact. For visual learning, you can reference the video and photos.

Proofing (and Yeast)
After shaping the croissants, the next crucial step is proofing (or fermentation). This process is necessary to achieve the final texture of the pastry. The yeast in the dough plays a vital role in leavening the dough, as it consumes the carbohydrates and produces gas, which causes the dough to puff up.
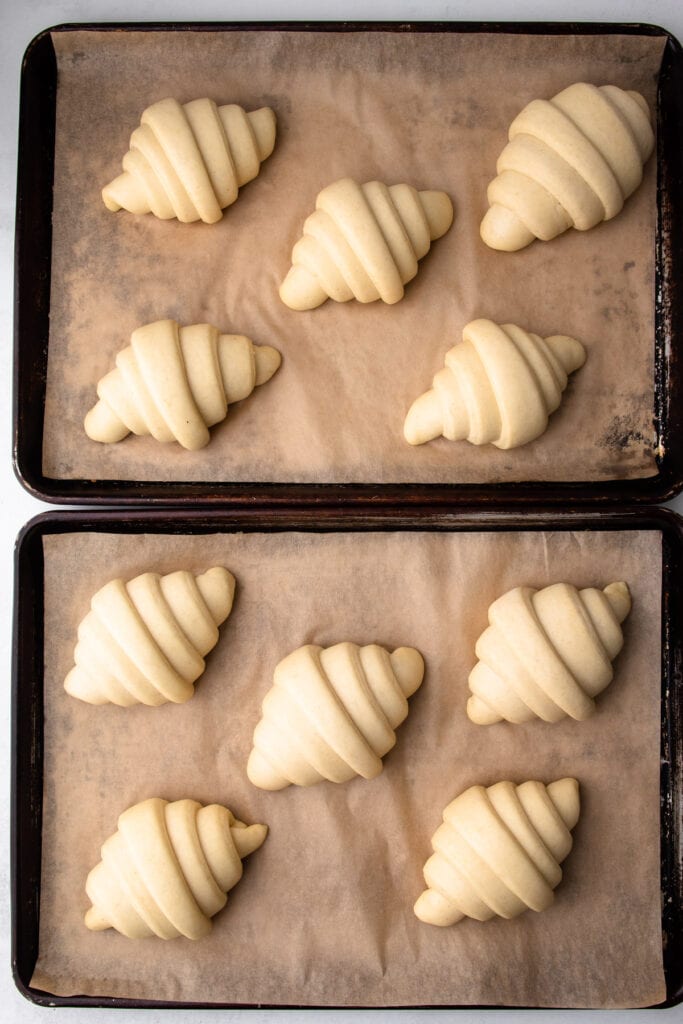
Once the croissants are shaped, they should be placed equally spaced apart on two parchment lined baking sheets. To prevent the dough from drying out very lightly and loosely place plastic wrap over the sheet pan. Do not secure it around the edges of the pan anywhere so that the croissants can properly puff up.
The Proofing Environment
Yeast are living organisms and they are most active in a warm, slightly humid environment. To achieve the perfect proofing for croissants, many bakeries use a professional "proofing box" that maintains ideal temperature and humidity levels. As a home baker, you obviously need to make do without a proof box.
It's important to consider certain factors for proper fermentation. One of these is the ambient temperature in your kitchen, which affects the proofing time. If your kitchen is cold (below 70ºF), the croissants will take longer to proof than in a warm kitchen (above 75ºF). Additionally, you should keep in mind the temperature of the butter during proofing to ensure it stays solid and doesn't get absorbed into the dough.
If your proofing environment is too hot, the butter will melt.
When the proofing environment isn't warm enough, it can take a while for the croissants to reach the proper size.
I have tried various methods to make a proofbox at home, but I have not personally had any success with them. In all my experience developing this recipe, I found it too easy to melt the butter or mess up the proofing when artificially playing with temperature. I had the most success with just allowing the croissants to naturally rise in the ambient temperature of the room. This means it can take anywhere from 2-4 hours to fully proof at room temperature. Or even longer if your kitchen is cold.
By the way, letting the croissants proof for a longer time naturally will result in more delicious croissants due to slower fermentation and yeast activity.
It is ok to place them in an oven that is off with a light on.
If you have success making any artificial proofbox at home, and you don't melt the butter in the proofing croissants, please share in the comments!
How To Tell When The Croissants are Done Proofing
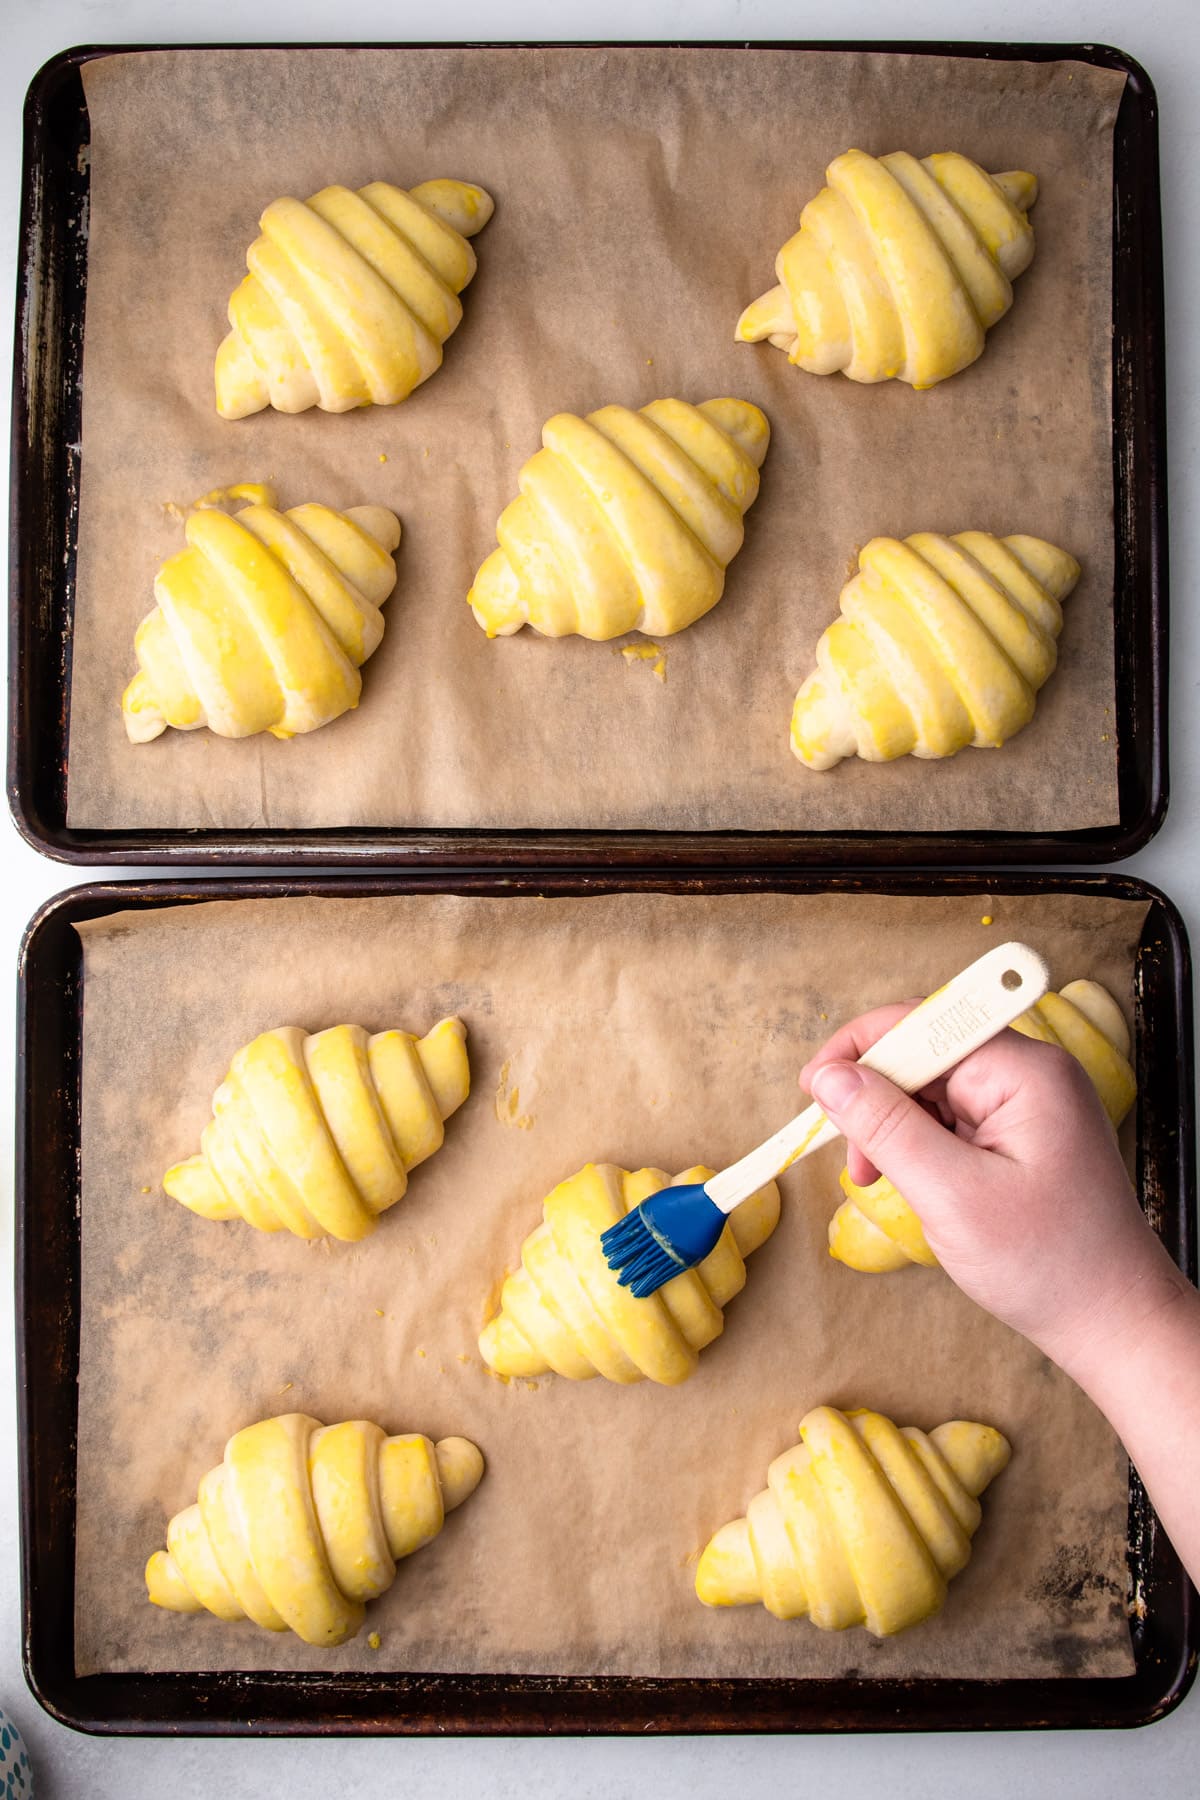
To proof the croissants, let them sit in a draft-free space for 2-4 hours until they have about doubled and size and are very, very jiggly.
It is very easy to underproof the croissants for fear of overproofing them. I can't tell you how long I made this mistake.
If the dough has been laminated and proofed properly the butter/dough striations become very visible on the edges of the exposed dough as it finishes proofing.
At this stage they are incredibly delicate, and it's important to keep the proofing intact. While the oven preheats, gently and carefully remove the plastic wrap from the croissants and discard it.

Baking Good Croissants in a Home Oven
Once the oven is preheated, it's time to eggwash and bake the croissants.
Gently brush the egg wash on the croissants, avoiding the exposed layered areas of the pastry if possible. This could fuse the dough together and prevent lift.
And finally, one last trick to get good at home croissants: a spritz of water on the baking sheets. Adding a bit of "steam" in the hot oven helps the initial rise (also known as oven-spring) of the croissants to bake up higher. I find using a kitchen-designated spray bottle to mist the parchment-lined sheet tray around the croissants to be the easiest method, but if that isn't available, carefully flicking some water onto the tray can also help. Just be sure not to get water on the croissant dough.
Then, finally, after all that hard work: it's time to bake.
I like to preheat the oven much higher than the temperature I plan to bake the croissants to once again, help with that oven spring, so I preheat to 425º and then turn it down to 375ºF when I place the croissants in the oven.
Bake the trays on the middle and lower middle rack for 15 minutes. Then, rotate the trays between the two racks so the croissants bake evenly. Bake for an additional 10-15 minutes, or more, depending on how dark you like your croissants. If "bien cuit" (well-cooked in french!) is what you are after, let them continue to bake a few extra minutes.

My Best Advice for Making Croissants at Home
I made so many failed croissants on my path to at-home-croissant recipe perfection. However, what gave me the most trouble during my tests was maintaining the fermentation of the dough. That refers to both the yeast activity while the dough is being laminated and the yeast activity while the final shaped croissants were proofing.
Maintaining a proper cold dough to inhibit fermentation while laminating is key. There are only two times in the process when you want the yeast to be active, which are in the initial rising period after the dough is made and then at the very end when the shaped croissants are proofing. All that time in between, it's important to limit yeast activity as much as possible to prevent premature fermentation, which causes air bubbles in the laminated dough. The only way to do this is to maintain a cold temperature.
And finally, I struggled and struggled to get a nice, even open crumb in my croissants and that simply came down to underproofing them. I under-proofed my croissants for months before figuring out that my kitchen is chilly in the winter, and it would take closer to 4 hours to proof them properly. I also figured out that it's pretty hard to overproof them (I only did this once because I got stuck in traffic far from home while my croissants were proofing). Really make sure the croissants are doubled in size and very very jiggly.

Serving and Storing
Croissants are best served within a few hours of baking. They'll be crisp on the outside and soft and buttery on the inside.
Croissants can be refreshed anytime by gently reheating in a toaster oven.
Leftover croissants can be stored at covered room temperature for 2 days. They can also be frozen in an air tight container for 1-2 months. Defrost at room temperature and then refresh in a toaster oven.
Flexibility in Croissant Schedule
There is a reason this section of the article is last. And that is because before I recommend you alterting the production schedule to make croissants, it's important to understand all the steps and science that go into making them. Once you understand that, there is ample room to make them on a schedule that works for you.
The schedule for the croissants is important for three main reasons: ensuring the butter stays cold, ensuring the gluten doesn't overdevelop and controlling fermentation of the yeast within the dough.
I was able to successfully play around with the schedule once I was able to understand how to keep all of those needs in balance.
If you want to make the croissants faster, put the emphasis on keeping the butter cold and use the freezer for longer periods of time in between lamination. I'd also suggest kneading the dough slightly less during the initial production of it.
If you want to stretch out the process of making the dough, use the freezer. It's perfectly find to freeze the croissant dough after it has been finished laminating. While I've never frozen it for more than a few days, it will defrost quickly so you can move on to the next step. You can defrost it in the refrigerator for a few hours, and I've even had success doing so at room temperature. Though proceed with caution with that.
The croissant dough can be produced, laminated and shaped all in one day, though it isn't my first preference. I do not recommend baking them the same day you make them. If you are going to attempt to make the dough through the shaping process in one day, I suggest starting early in the morning and shaping them before you go to bed.
The croissants can then be taken out the next morning to proof.
Ideally however, the croissants are made up until the point of preshaping on the first day, and then shaped, proofed and baked the next morning.
Sample Schedules
Here are two sample schedules with a morning and afternoon start time:
Making Croissants from Start to Shaping (Morning)
- 8am: Assemble détrempe and proof
- 9am: Chill détrempe in freezer
- 9:15am: Make butter block and chill in refrigerator. Move détrempe to fridge.
- 10am: Enclose the butter block, complete first turn, place in freezer
- 10:15am: Move dough to refrigerator
- 11am: Complete second turn, place in freezer
- 11:15am: Move dough to refrigerator
- 12pm: Pre-shape dough by rolling it as far as it will go without springing back, transfer dough on sheetpan back to the refrigerator.
- 730pm: Roll out, cut and shape croissants, place on baking sheets and cover with plastic. Place croissants to chill overnight in the refrigerator.
- 7am (the next day): Take croissants out to proof
- 930am: Preheat the oven
- 10am: Bake
Making Croissants from Start to Preshape (Evening)
- 5pm: Assemble détrempe and proof
- 6pm: Chill détrempe in freezer
- 6:15pm: Make butter block and chill in refrigerator. Move détrempe to fridge.
- 7pm: Enclose the butter block, complete first turn, place in freezer
- 7:15pm: Move dough to refrigerator
- 8pm: Complete second turn, place in freezer
- 8:15pm: Move dough to refrigerator
- 9pm: Pre-shape dough by rolling it as far as it will go without springing back, transfer dough on sheetpan back to the refrigerator.
- 7am (the next day): Roll out, cut and shape croissants, place on baking sheets and proof
- 930am: Preheat the oven
- 10am: Bake

More Baking Bucket Lists Recipes
Want to check off some more bakes of your baking bucket list? Check out this list!
- Puff Pastry (Classic or Rough)
- How to Make Choux Pastry
- Classic Cream Puffs
- Classic Fruit Tart
- Easy Pastry Cream
Watch It: Croissant Video
I am so honored when you make a recipe from my site! If you make this Croissant Recipe, please leave a comment and a star rating with your experience! If you have any questions about this recipe, feel free to comment here, too!
Full Recipe
How to Make Croissants
This extensive tutorial has everything you need for How to Make Croissants at Home with step-by-step photos, video and lots of tips! All of that information is located in the article above this recipe. I highly recommend you take the time to read through it if this is your first time making croissants. The video is located above this recipe, and a longer more detailed video can be found on Youtube.
- Prep Time: 01:15
- Chilling + Proofing Time: 04:00
- Cook Time: 00:24
- Total Time: 05:39 + Overnight Rest
- Yield: 10 Croissants
- Category: Pastry
- Method: Hand Lamination
Ingredients
For the Croissant Dough (Détrempe):
- 1 cup (227 grams) room temperature water
- ¾ cup (170 grams) whole milk
- 2-½ teaspoons (9 grams) instant yeast (see notes)
- ¼ cup (50 grams) granulated sugar
- 5 cups (600 grams) bread flour
- ½ cup (60 grams) whole wheat flour
- 1-½ teaspoons (10 grams) fine sea salt
- 4 tablespoons (56 grams or ½ stick) unsalted european-style butter, softened (see notes), cubed
For the Butter Block (Beurrage):
- 1-¾ cups (395 grams or 3-½ sticks) very cold unsalted european-style butter, cut into ½” pieces
- ¼ cup (30 grams) bread flour
Eggwash:
- 1 egg yolk
- 1 tablespoon heavy cream
Instructions
To Make the Croissant Dough and Butter Block:
- In the bowl of a stand mixer fitted with a dough hook, add all of the dough ingredients in this order: water, milk, instant yeast, sugar, bread flour, whole wheat flour, salt and softened butter cubes.
- Turn the mixer on low and mix until the dough comes together and the sides of the bowl are clean, about 2-3 minutes.
- Transfer the dough to a work surface and knead for 2 minutes to ensure the butter is fully mixed in. The dough will not be smooth.
- Place the dough in a bowl or container and let the dough rise for about an hour. It should show signs of proofing but not double in size. If your kitchen is very warm, you may need less time, and if it’s very cold you can let it rise for longer until there is some increase in size of the dough.
- Remove it from the container, flatten it to remove any gas bubbles and press the dough into a rough 7x8” rectangle and wrap in plastic. Transfer to the freezer and let it rest for 15 minutes.
- Meanwhile, make the butter block: Add the cold butter pieces to the same mixing bowl and sprinkle the flour on top. Using the paddle attachment, mix on low until the butter clumps around the paddle, about 1-2 minutes. Scrape the butter off the paddle and mix again for about 1 minute on medium to ensure the butter is smooth with no unmixed butter or flour. Transfer the butter mixture to a quart-sized plastic storage bag (it should be about 7x8”). Fill the bag with the smooth butter mixture, pushing out any excess air. Use a rolling pin to gently push the butter into the corners of the plastic bag to create an even thickness. Pop any air pockets with a cake tester / sharp knife, if necessary.
- Remove the croissant dough from the freezer and transfer it to the refrigerator, along with the butter block, to chill for 1 hour, or until the butter block and dough is less than 50 degrees. If your kitchen is hotter, it may take longer to cool down.
Laminating the Dough and Pre-shape:
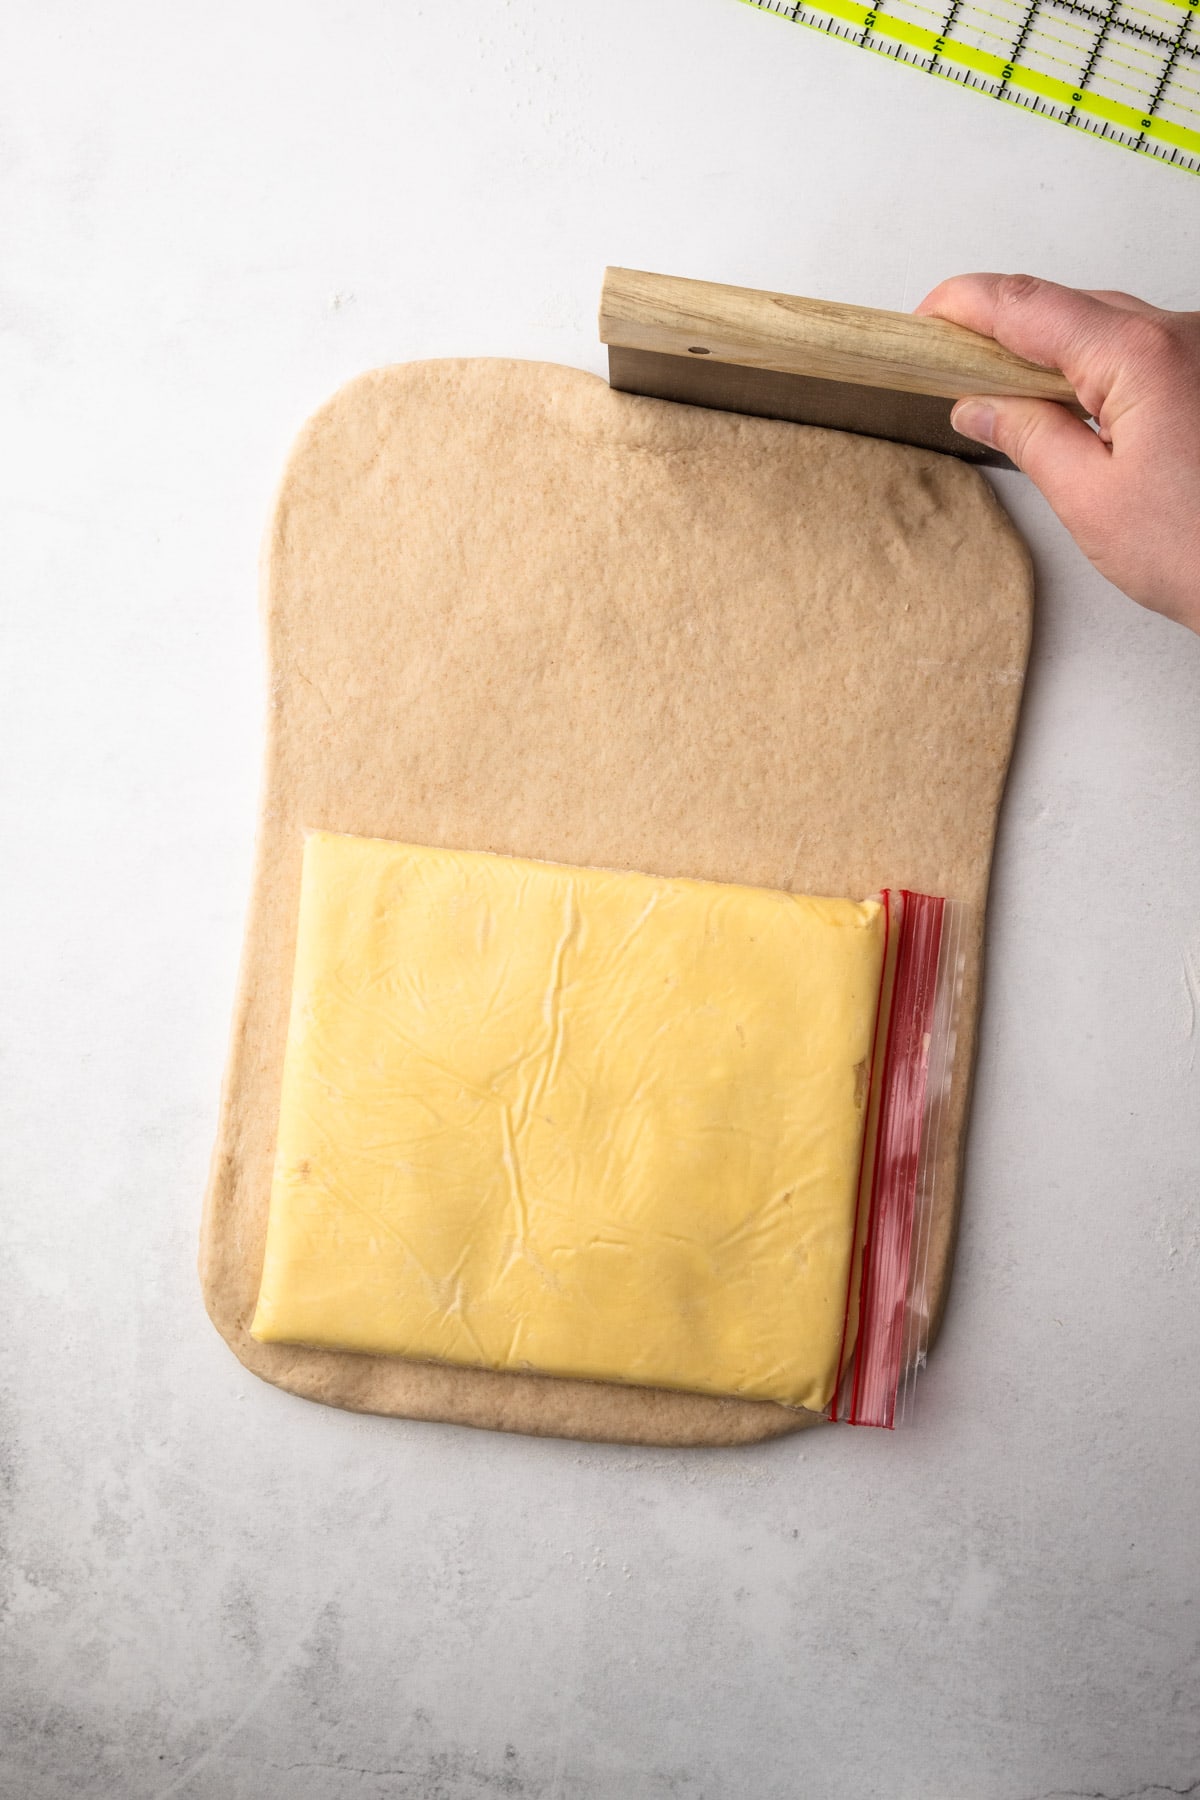
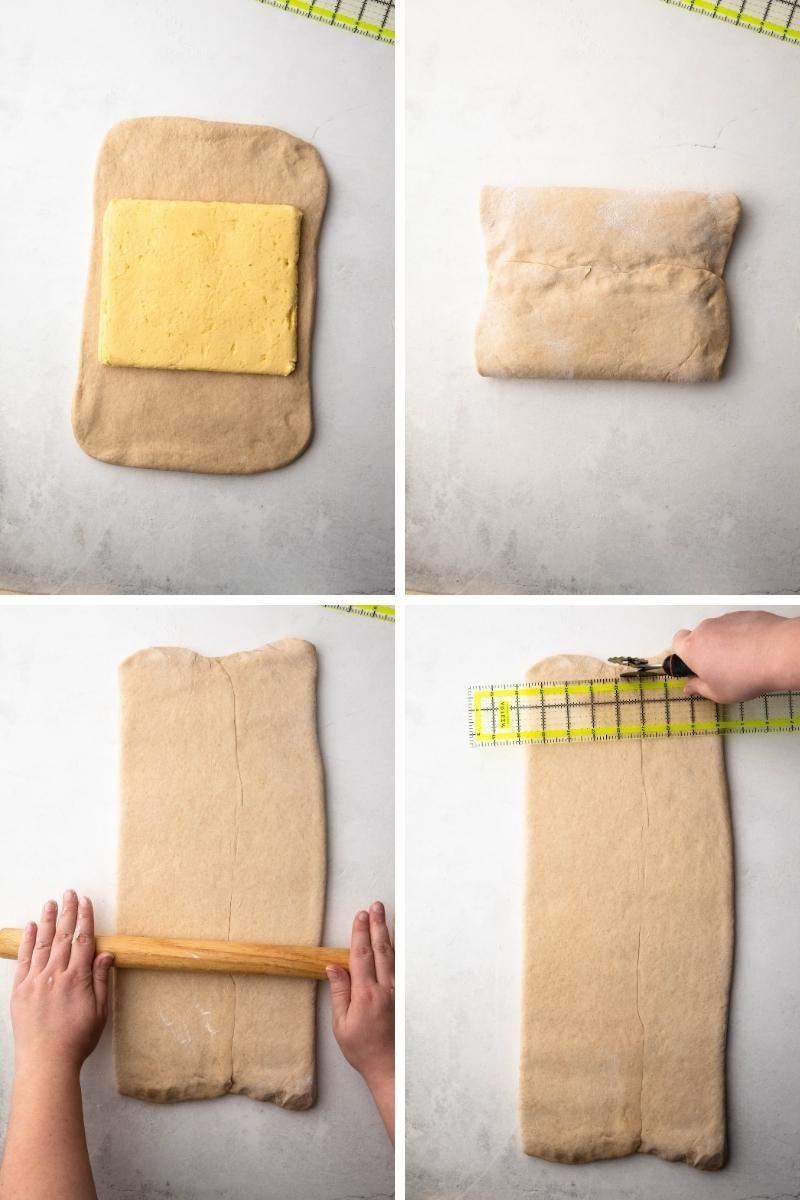
- Once the dough and butter block have firmed up, remove them from the fridge. On a lightly floured work surface, roll the dough lengthwise, dusting with flour as necessary, to an 8” by 15” rectangle. Brush off any excess flour using a dry pastry brush.
- Using kitchen shears or a sharp knife, cut open the plastic bag to remove the butter block, taking care to leave it in its shape. Place the butter block in the middle of the dough.
- Take the top short side of the dough and fold it over the middle of the butter block. Repeat with the bottom short side up over butter. The two dough edges should meet and slightly overlap. Pinch together the seams.
- Rotate the dough clockwise 90 degrees so that the dough seam is now vertical.
- Evenly roll out the dough lengthwise to an 8” by 22” rectangle. Brush off any excess flour. Using a ruler to guide, trim off excess uneven dough on the top and bottom sides of the rectangle to make a straight line. The goal is to start with a neat even rectangle to help keep the shape intact throughout the lamination process.
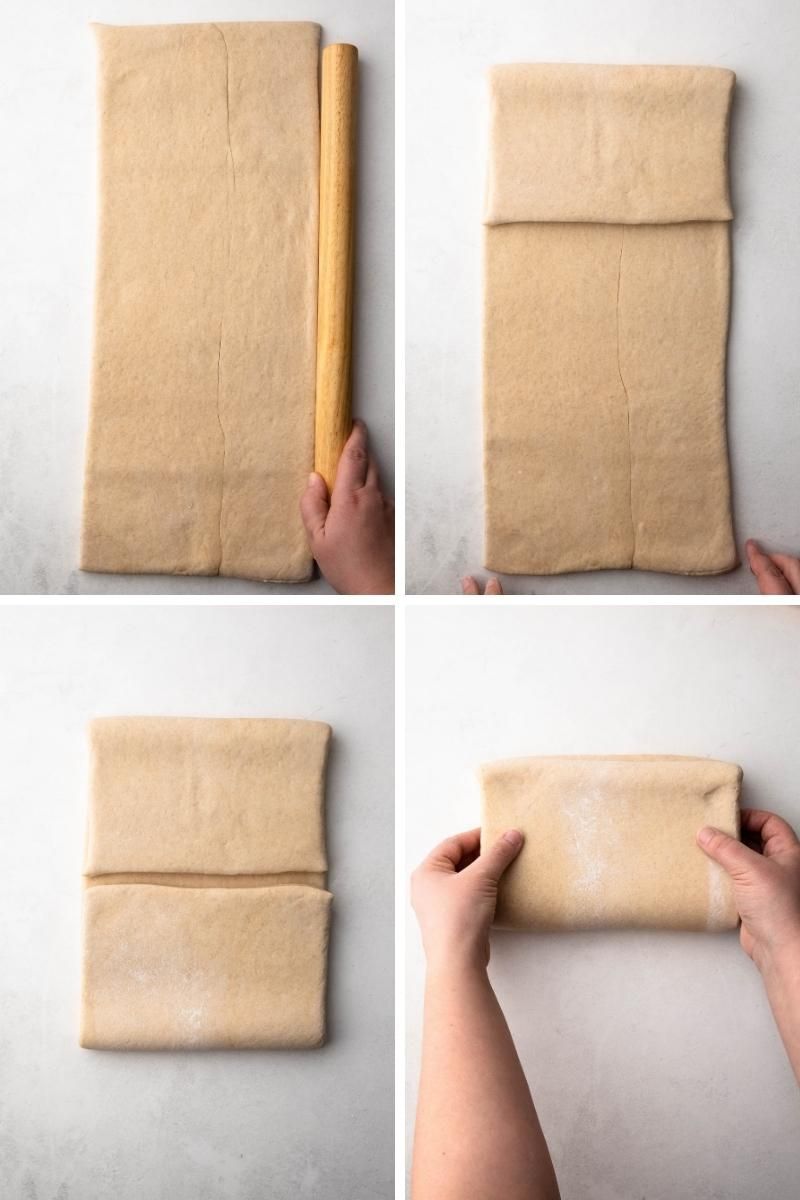
- Take the top short side of the dough and fold it halfway down. Repeat with the bottom short side halfway up. Finish the “double fold” by bringing the bottom half up over the top half. The laminated layers should resemble a closed book. Gently press down on the layers with a rolling pin so the layers stick together. Wrap it tightly in plastic, and freeze for 15 minutes, then refrigerate for 15-60 minutes or until thoroughly chilled.
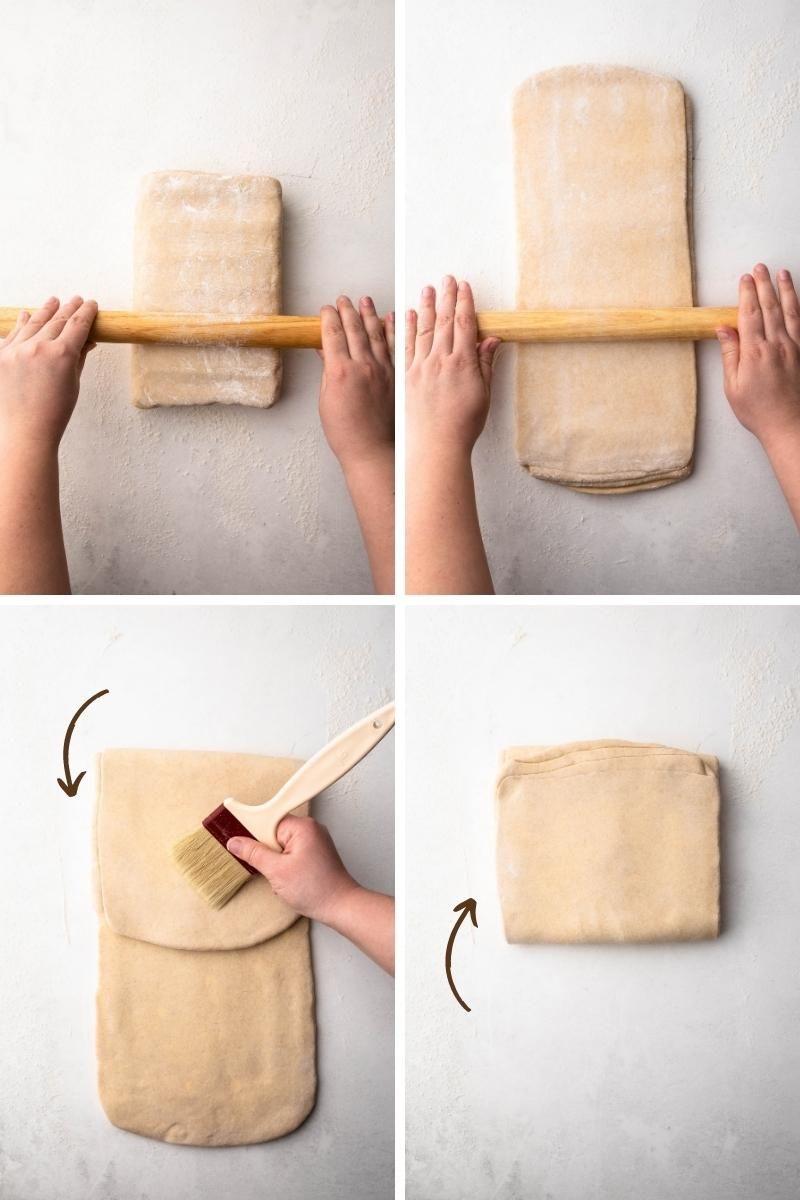
- Remove the chilled dough from the refrigerator and place it on the lightly floured work surface with the open seam of the “book” facing to the right. Evenly roll out the dough lengthwise to an 8” by 22” rectangle. Take the top short side of the dough rectangle and fold it ⅓ of the way down. Repeat with the bottom short side up, like a business letter. This completes the final “single" fold.
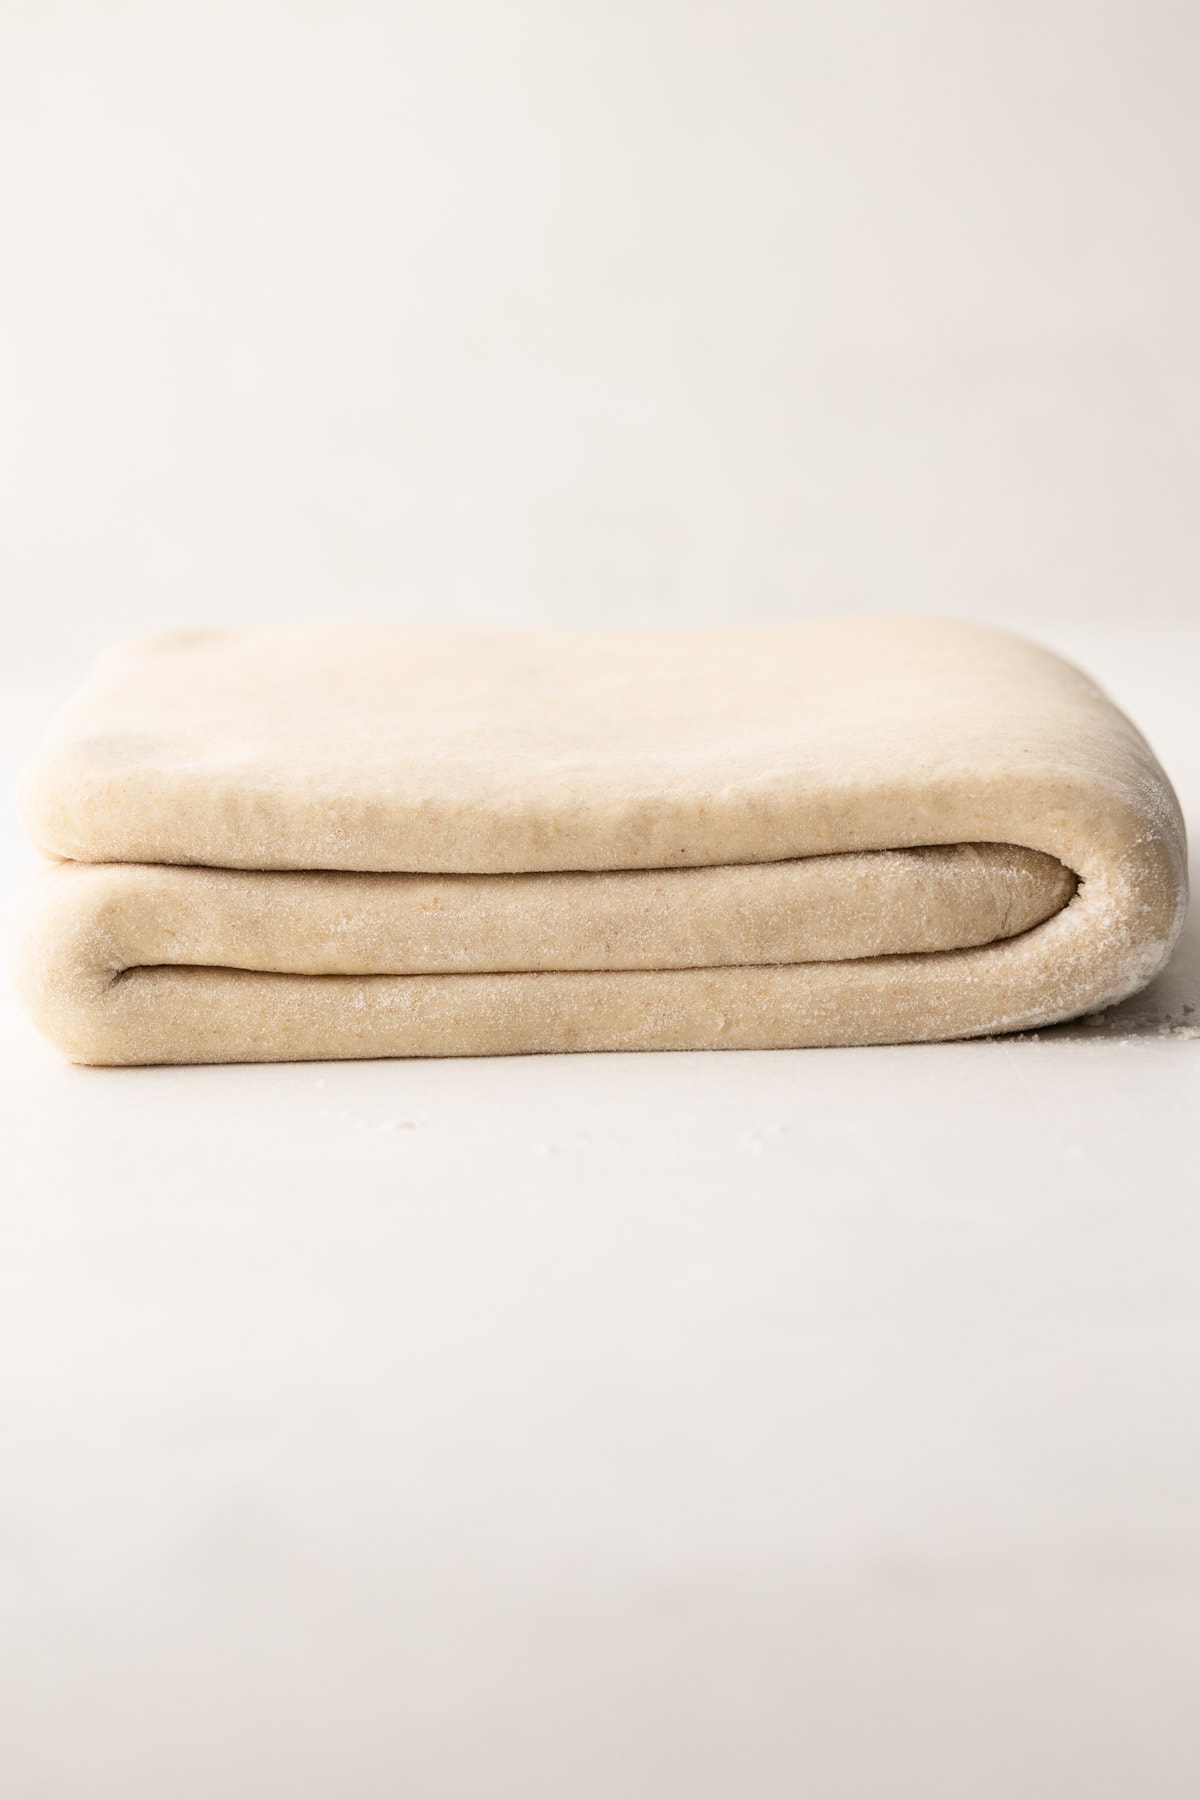
- Wrap it tightly in plastic, and freeze for 15 minutes, then refrigerate for 15-60 minutes, or until thoroughly chilled.
- Pre-shape the dough: Evenly roll out the dough to a 10x15” rectangle or as close as possible to this. Do not fight the dough. If it’s springing back, leave it as is. Wrap it very tightly in plastic, and place on a sheet pan. Chill in the freezer for 15 minutes, and then transfer to the refrigerator for at least 4 hours, or for best results, overnight.
- Using only a very light dusting of flour only if necessary, roll out the chilled croissant dough to the final length of 10” by 20”.
- Using a ruler and a pastry wheel, cut off any uneven edges of the rectangle, especially on the left and bottom sides.
- Using a ruler and pastry wheel, cut 9 isosceles triangles. To neatly do this, premark the dough with 5 very small notches 4” apart on the bottom. Then, starting 2” in on the top, premark 5 notches 4” apart. Connect those notches from bottom to top and then top to bottom, resulting in 9 perfectly cut isosceles triangles. There will be two half triangles remaining; connect those together to complete ten triangles.
Shaping and Baking the Croissants:
- Working one piece at a time, take hold of the base of the triangle and gently elongate it by placing your other hand towards the middle of the triangle and pull the dough and let it glide through your hand as it stretches. It should gently elongate the tip of the triangle, but be careful not to squish the layers. Then grasp the two corners of the base of the triangle, and tug gently outward to extend the points and widen the base.
- Roll up the dough starting at the base, keeping the tip of the triangle centered. Do not roll too tightly. Give a gentle push down on the rolled-up crescent to secure the tip of the dough on the bottom.
- Repeat this process with every triangle of dough.
- Place five croissants each on two parchment lined sheet pans. Very loosely cover the baking sheets with plastic wrap, to prevent the dough from drying out.
- Let proof in a warm place for 2-4 hours (72ºF-76ºF is ideal at home), or until the croissants have nearly doubled in size and are incredibly jiggly.
- Place a rack in the lower middle and the middle part of the oven and preheat the oven to 425ºF.
- When the oven is ready, carefully remove the plastic wrap. Brush the smooth tops of the proofed croissants (not the exposed cut edges) with an egg wash. Using a clean food-safe spray bottle, spritz cold water on the parchment around the croissants to creates steam in the oven (which helps the croissants bake up better).
- Turn the heat down to 375ºF and bake the croissants in the oven for 24-26 minutes, switching the trays half way through, or until the croissants are a beautiful golden brown.
- Remove the croissants from the oven, and let cool briefly before enjoying.
- Croissants are best enjoyed fresh. To store, let sit at room temperature for 24 hours, and beyond that in a covered container. Croissants can be “refreshed” in the toaster oven
Notes
Have a question or looking for tips? The text written above the recipe is always a great first place to start! This Croissant Recipe was developed with love, and the article above the recipe is full of in-depth explanations, tips, step-by-step photos and technical advice shared before the recipe.
Although I offer both weight and volume measurements, weighing your flour is the most accurate way to measure. If you aren't going to weigh it, make sure to spoon it into the cup, and then level it off. If you scoop the flour out with the measuring cup and then level, it could change the outcome of the final product.
This recipe was tested using fine sea salt. If you use Morton's or Diamond Crystal kosher salt you will need to increase by about double for volume, or use the same amount by weight.
I leaned on several sources as I was researching this croissant recipe including: Professional Baking by Wayne Gisslin, On Food and Cooking: The Science and Lore of the Kitchen by Harold Mcgee (although basically this book is always a source for me!), Tartine by Chad Robertson, Patisserie by Christopher Felder and the well-done video by NYTimes and Claire Saffitz.
Some of the links on this page may be affiliate links. Everyday Pie is a participant in the Amazon Associates Program. As an Amazon Associate I earn from qualifying purchases, at no extra cost to you.


Siena
I made these croissants for the first time. They did not turn out perfectly by any means, but they tasted delicious. My dough was sticky, and I think the butter was not solid enough. The butter crumbled as I rolled out the Beurrage. I think this was due to my butter not being cold enough. Overall, the tips in the recipe and the directions were clear and helpful. I think this does require some more trial and error. I do not fault the recipe, rather the maker (me) of my croissants!
Ana
I haven't made croissants in 3 years and found this recipe to be so thorough and helpful! I'll need to practice to get perfectly aesthetic croissants, but they were delicious! 😊
Lala
I only found salted european style butter, can I use that for my butter block?
Kelli Avila
Yes, that's ok. Use a little bit less salt than the recipe calls for.
Mataya
5 stars!
Mataya
This was my first time making croissants. After returning from Europe, I knew I had to figure out how to make them. I was pleased with the results from my first attempt and the step by step recipe and video was super helpful! The outside of the croissants were crisp, golden brown and flaky but the inside was a bit dense and stodgy. Any thoughts as to why? I’m at a higher elevation so perhaps I need to adjust the temp and cooking time? Or could this be from over or under proofing? I was able to get more than 10, large croissants out of the dough so maybe it over proofed during one of the steps? I’m not quite sure. Any tips or suggestions would be greatly appreciated!
Stephanie L
Perfection! Thank you
Lindsey
These were the best things I ever made!! Thanks to your extensive guidance, I was able to make one of the hardest baked goods in my home! And now it smells like a French bakery in here. 😄 My husband had one bite and was like you should start the next batch now🤭 I’m off to go make more!
Ja'Yana
Hi! I was wondering how long it would take to bake these if I filled them with apple filling?
Kelli Avila
Hello! I haven't tried that so I can't advise. It is something you'll have to experiment with.
Becca
This recipe was easy to follow and my croissants turned out amazing! They were delicious and delicious and everyone raved about how flaky and yummy they were. I added a few sticks of dark chocolate when shaping a few and those turned out amazing also. Definitely keeping this recipe. Thanks for the detailed tips and tricks.
Kate Wilkinson
Searching for the most accessible and approachable at-home croissant recipe? Look no further! I have had mixed results with other recipes in the past but these were literally perfect. My wife couldn't believe I made them so perfectly on the first try. I'm not sure if it's still available, but Kelli had a PDF to purchase with so many great tips and photos of the process; if you can get your hands on that, it was like a treasure map to the perfect croissants. If you have a quiet weekend coming up, I recommend trying your hand at this recipe - you won't regret it!
Kelli Avila
Kate! I'm so happy you tried this recipe! Thanks so much for sharing your experience (and promoting me e-book!) Appreciate you! -Kelli
Asmaa
I usually never leave reviews esp for criossant recipes bc I have tried so so many and most of them were fails if you didn't use T45 flour!! BUT, AFTER trying your recipe yesterday I just wanna say thank you thank you for an amazing recipe for the home baker and for using American flour! If you follow the recipe to a T , you will not be disappointed! The only difference is that I used all purpose flour Gold brand instead of bread flour because in past experience I've found bread flour to be hard to work with and I wanted a lighter criossant. You MUST try this recipe!!!
Patty FIGAROLA
I’ve been looking for a new croissant recipe to play around with - thank you for this! I’ll give it a go tomorrow morning. So far my biggest challenge has been proofing. I have a Brod & Taylor proofing box, but learned the hard way that it’s too small - my dough babies grew into each other! I think I’ll pull out my proofing cooler that I rigged during my sourdough days. It’s pretty big and the temp control is consistent. All I did was buy a $20 camping cooler from Wal-Mart and an Inkbird digital temperature controller from Amazon - just set the desired temperature and forget it. I almost forgot to add the seedling heating mat. That goes on the bottom of the cooler with a baking cooling rack over the top. The seedling mat gets plugged into the temperature controller which will turn it on and off to maintain a constant temperature- I’m thinking 75F for croissants??? I’ll post another comment in a few days to let you know how it goes. Thanks again!
Kelli Avila
Patty, good luck! Proofing is the trickiest part. I too have thought of rigging up my own device. It was silly of Brod + Taylor to not make the proofing box capable of holding a half sheet pan! That is why I haven't purchased one. Cant wait to hear how it goes for you!
Samantha
I used a slightly modified version of this recipe to recreate the viral Suprême croissants and they came out perfectly!
Vicki Ramsey
Thank you so much for this post! Recipe worked like a charm and I finally got the lamination I haven’t been able to achieve with other recipes. Delicious!
Crystal
Hi! I made these this weekend and they actually turned out really good. Super flaky on the top and buttery on the inside.
The only issue I had was that the bottom of the dough was partially raw when I took them out, even after baking for about 30 minutes. Do you know about what height your dough is when it’s in the final 10x20 rolled out state? I’m thinking my dough was maybe too thick? I ended up putting them in the oven flipped over for another 5+ minutes to cook the bottoms and they came out wonderfully. Any suggestions?
Kelli Avila
Hi Crystal! Believe it or not, that sounds like a proofing issue, like they were underproofed. I also would be curious where in the oven you baked your croissants?
Rebecca
I have attempted to make croissants with multiple different recipes without success. After ONE attempt with this recipe, I have made the most flaky, fluffy and delicious croissant. Thank you so much for taking the time to describe every step in detail and creating a fabulous croissant recipe!!
Kelli Avila
Rebecca, I'm so happy you had success!!
Julia
Hi! Thank you for your extensive tips!
I have some questions I'm hoping you can aid me with:
1) If I chill my rolling pin (not sure what it's made of but it has handles and is nonstick), do you think that will help with keeping the dough cold while rolling it?
2) Do you use a sifter to flour your surface, so you don't overdo it?
3) Do you cover/wrap the rolled croissants, before putting them into the freezer for 15 mins?
Any tips for baking at high-altitude? 🙂
Kelli Avila
Hi Julia! Some answers:
1) I don't think it's worth it to chill your rolling pin.
2) I do use a flour sifter (aka a powdered sugar shaker) but only because I find it neatly contains the flour. I'd rather you use "too much" flour than not enough when rolling out your dough--just be sure to always brush off the excess flour in between. Of course, try not to use too much...but it's more important the pastry doesn't get stuck and tear.
3) Yes, I do cover the croissant dough always.
4) Unfortunately I have no experience or education on baking in high altitudes. Sorry about that! I'd google for blogs that have experience with it for info.
Hope that helps!
Julia
Hi Kelli!
YES your answers have helped me so much! Thank you for taking the time to do so.
I'll be starting them Friday and baking Saturday - excited to attempt these!
-Julia
Anne
Firstly, massive THANK YOU for putting in so much love, effort, and energy into this post, it is beyond priceless ♡
And secondly, I finally managed to make them right, but following the procedure word-for-word, and not trying to cut corners (which I have done in the past).
They're not perfectly rolled, but the inside was PERFECTION, as well as the flavour.
100/10!!!!
Kelli Avila
Anne! I'm so glad they turned out! CONGRATS on making one of the hardest bakes out there. Glad you kept at it.
Savanah Belanger
Practice does make progress!
last weekend I made croissants for the third time, first with your recipe though. I read through everything at least twice, gathered my courage and gave it a go. My first attempt a few years ago was okay, my next attempt a few months later was worse. and I gave up, frustrated.
I do need to say that I did not have bread flour so I used all purpose king arthur flour. I also forgot to spritz the parchment with water before baking.
Even so! These turned out beautiful! The tops did fall to the side a bit during baking but I bet stronger flour might fix that. Your recipe is incredibly home baker friendly! clear and easy to understand, filled with helpful information about why to do this and be careful about that. I believe the problem I had with previous attempts was at least in part to the dough and butter pack being too different temperatures when tucked in together. 100% giving these another go soon!
Kelli Avila
Thank you for sharing! I'm so glad you haven't given up!
Ytamar Bosque
Buenos días amiga, tengo tanto tiempo tratando de hacer la masa de los Croissant pero nunca e podido , me encanta esta receta voy a tratar de nuevo , te agradezco por compartir tu experiencia y receta , gracias soy de Venezuela 🌹❤️