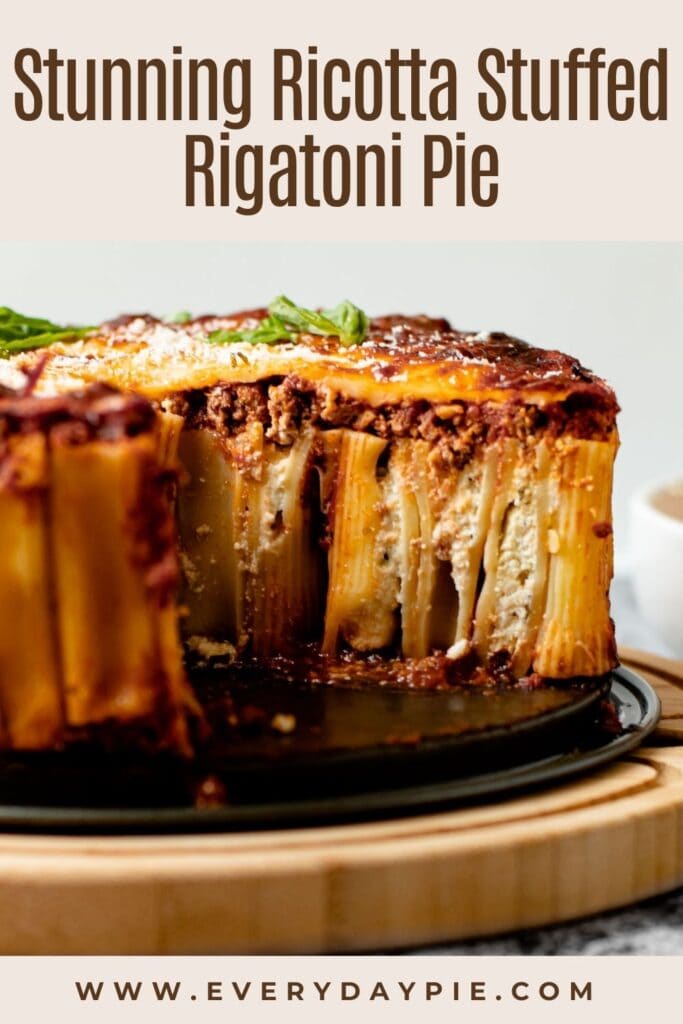
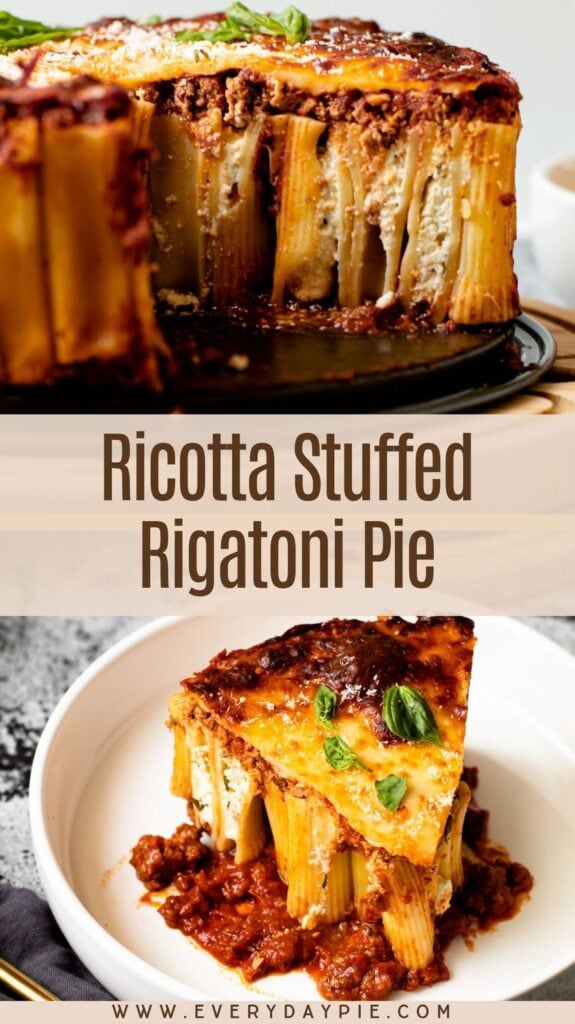
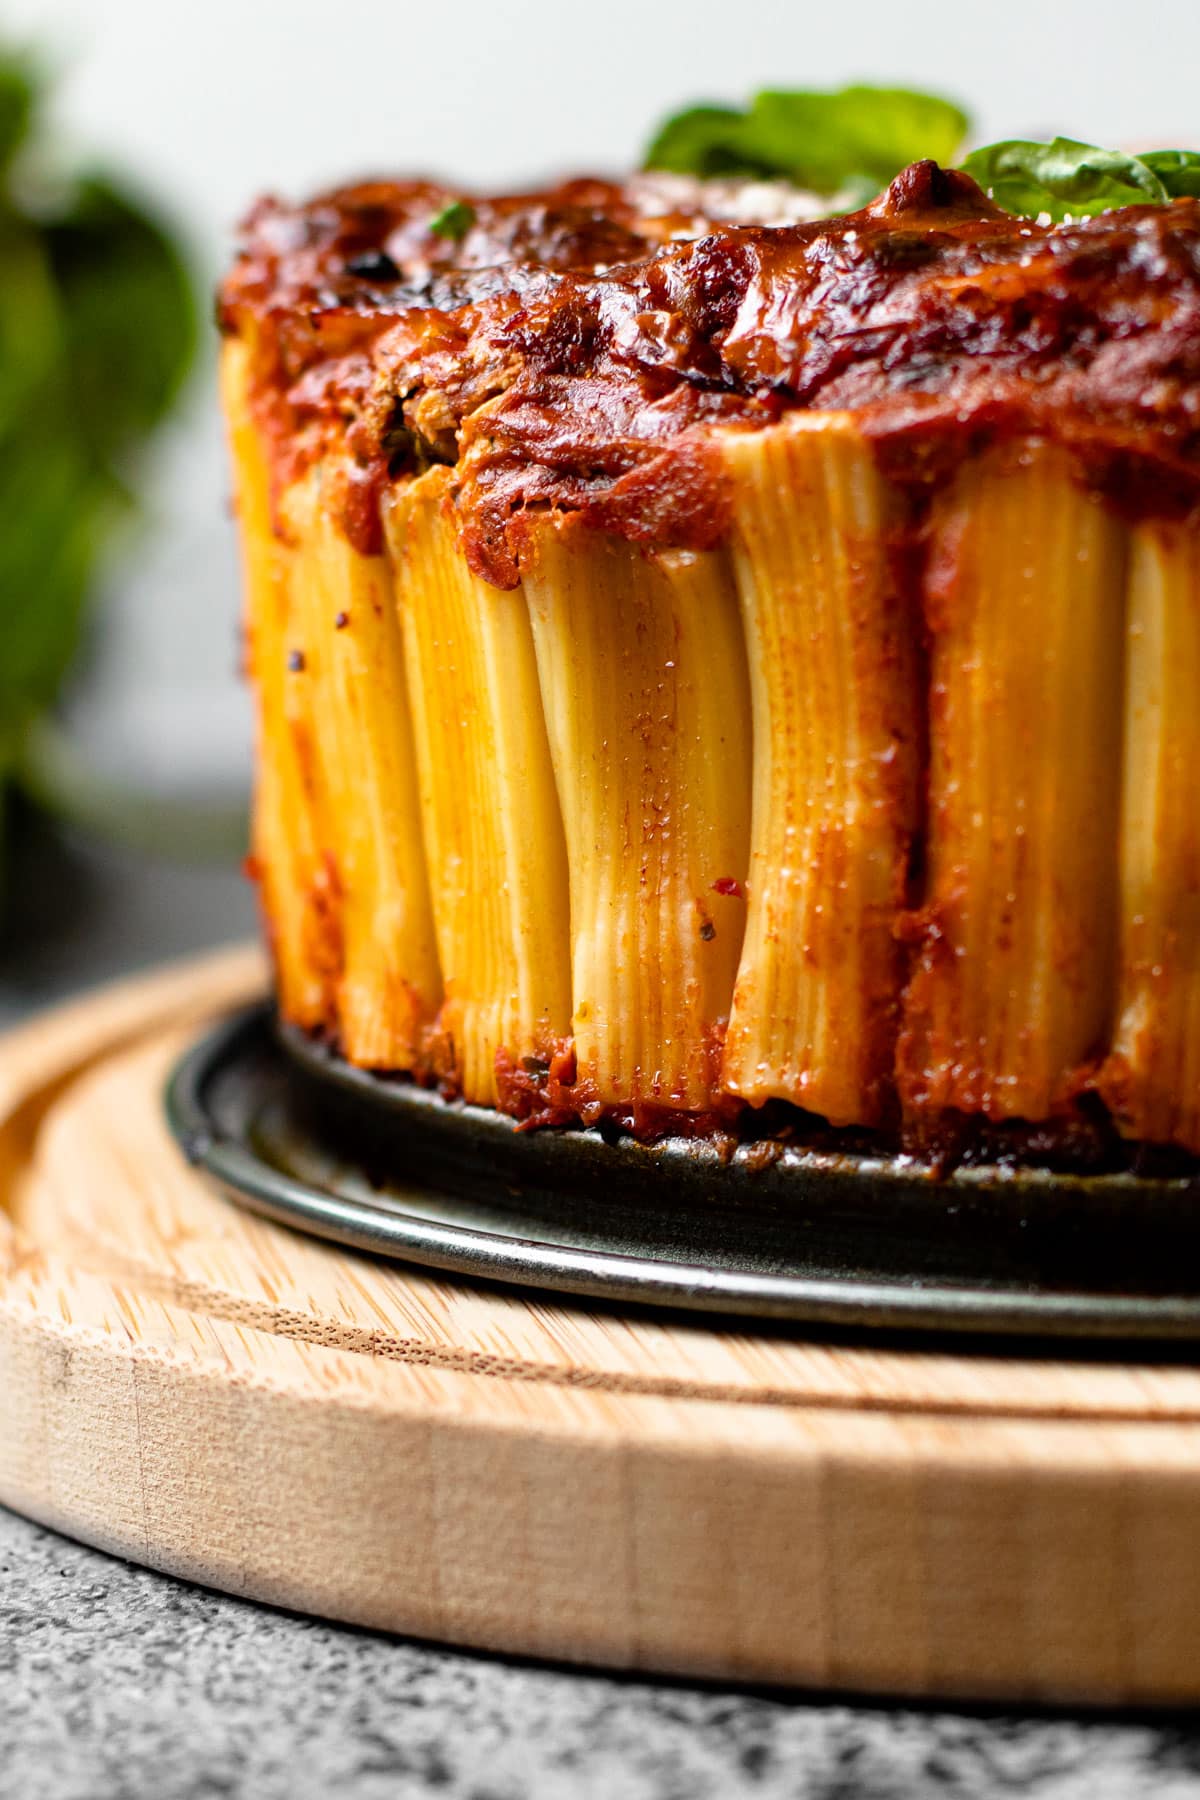
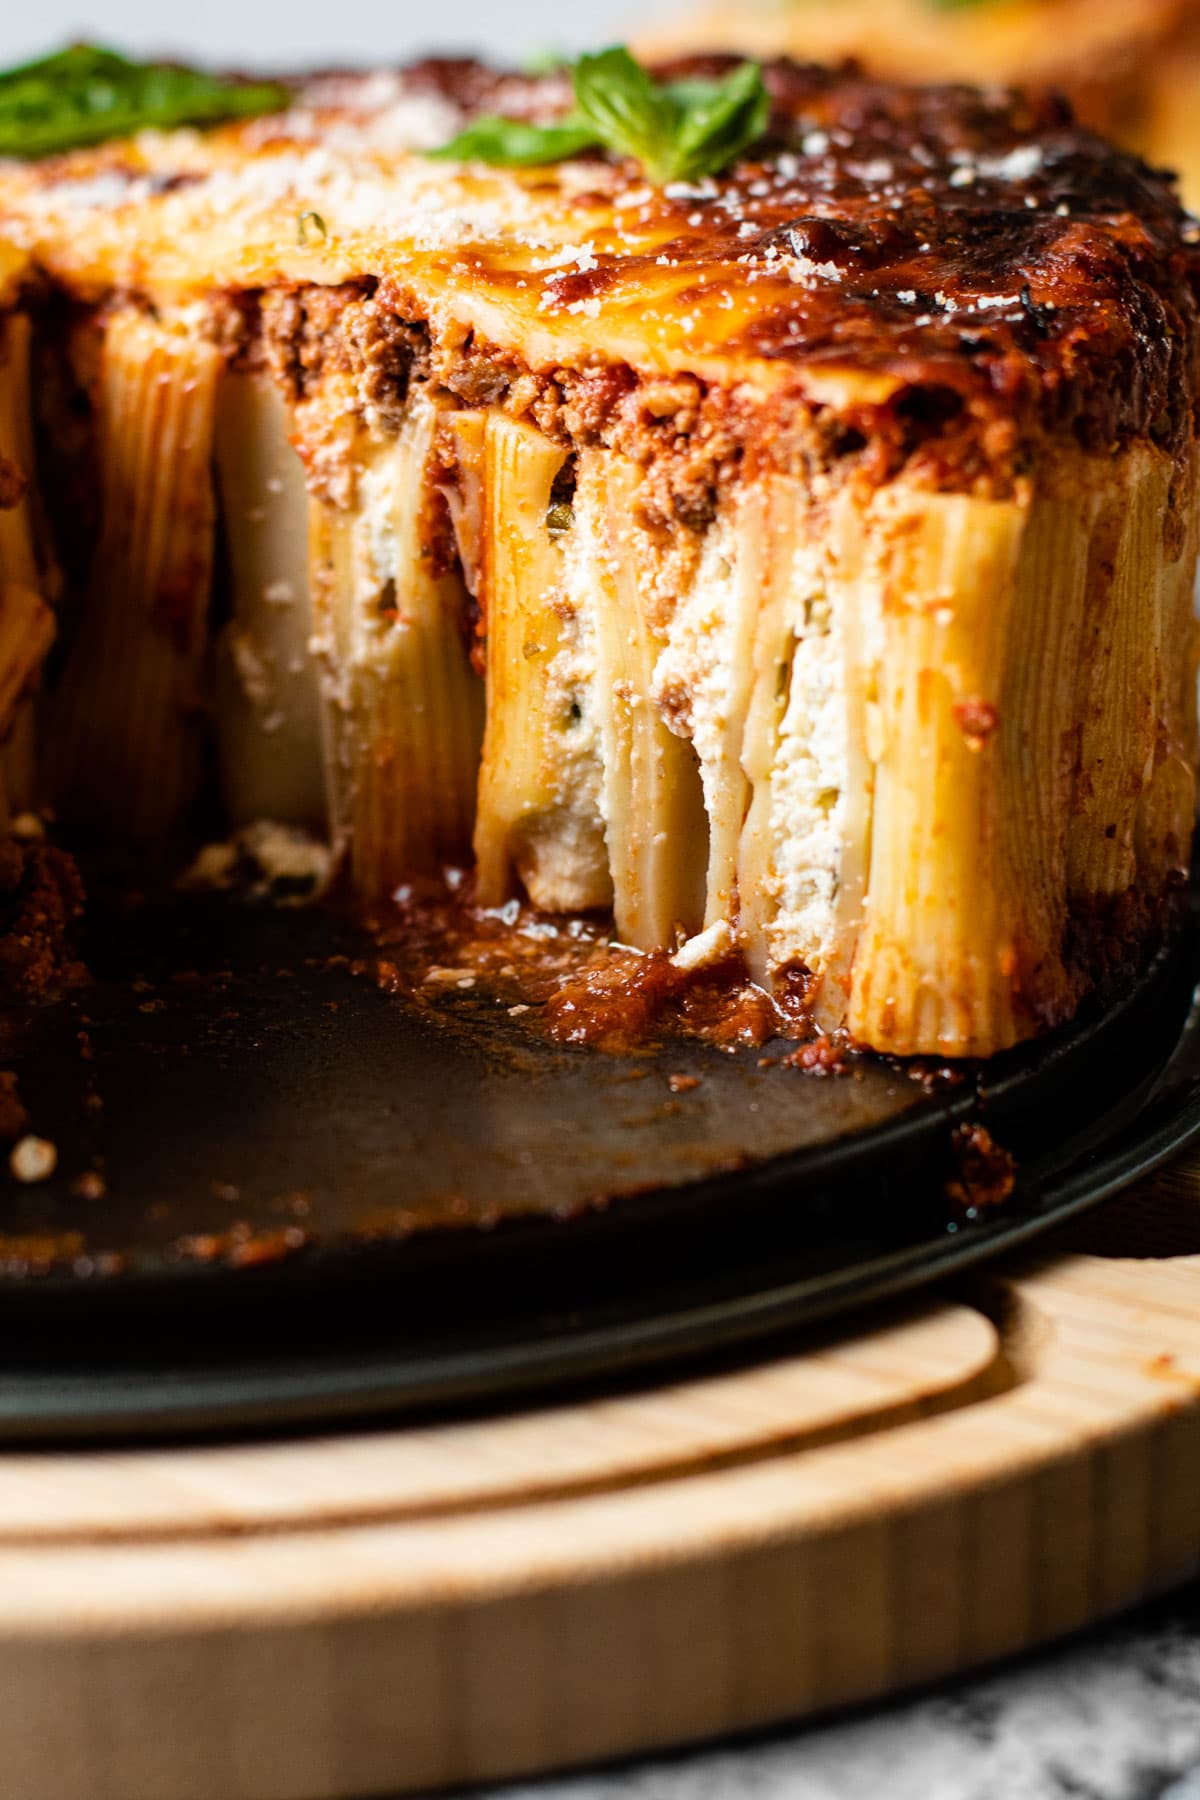
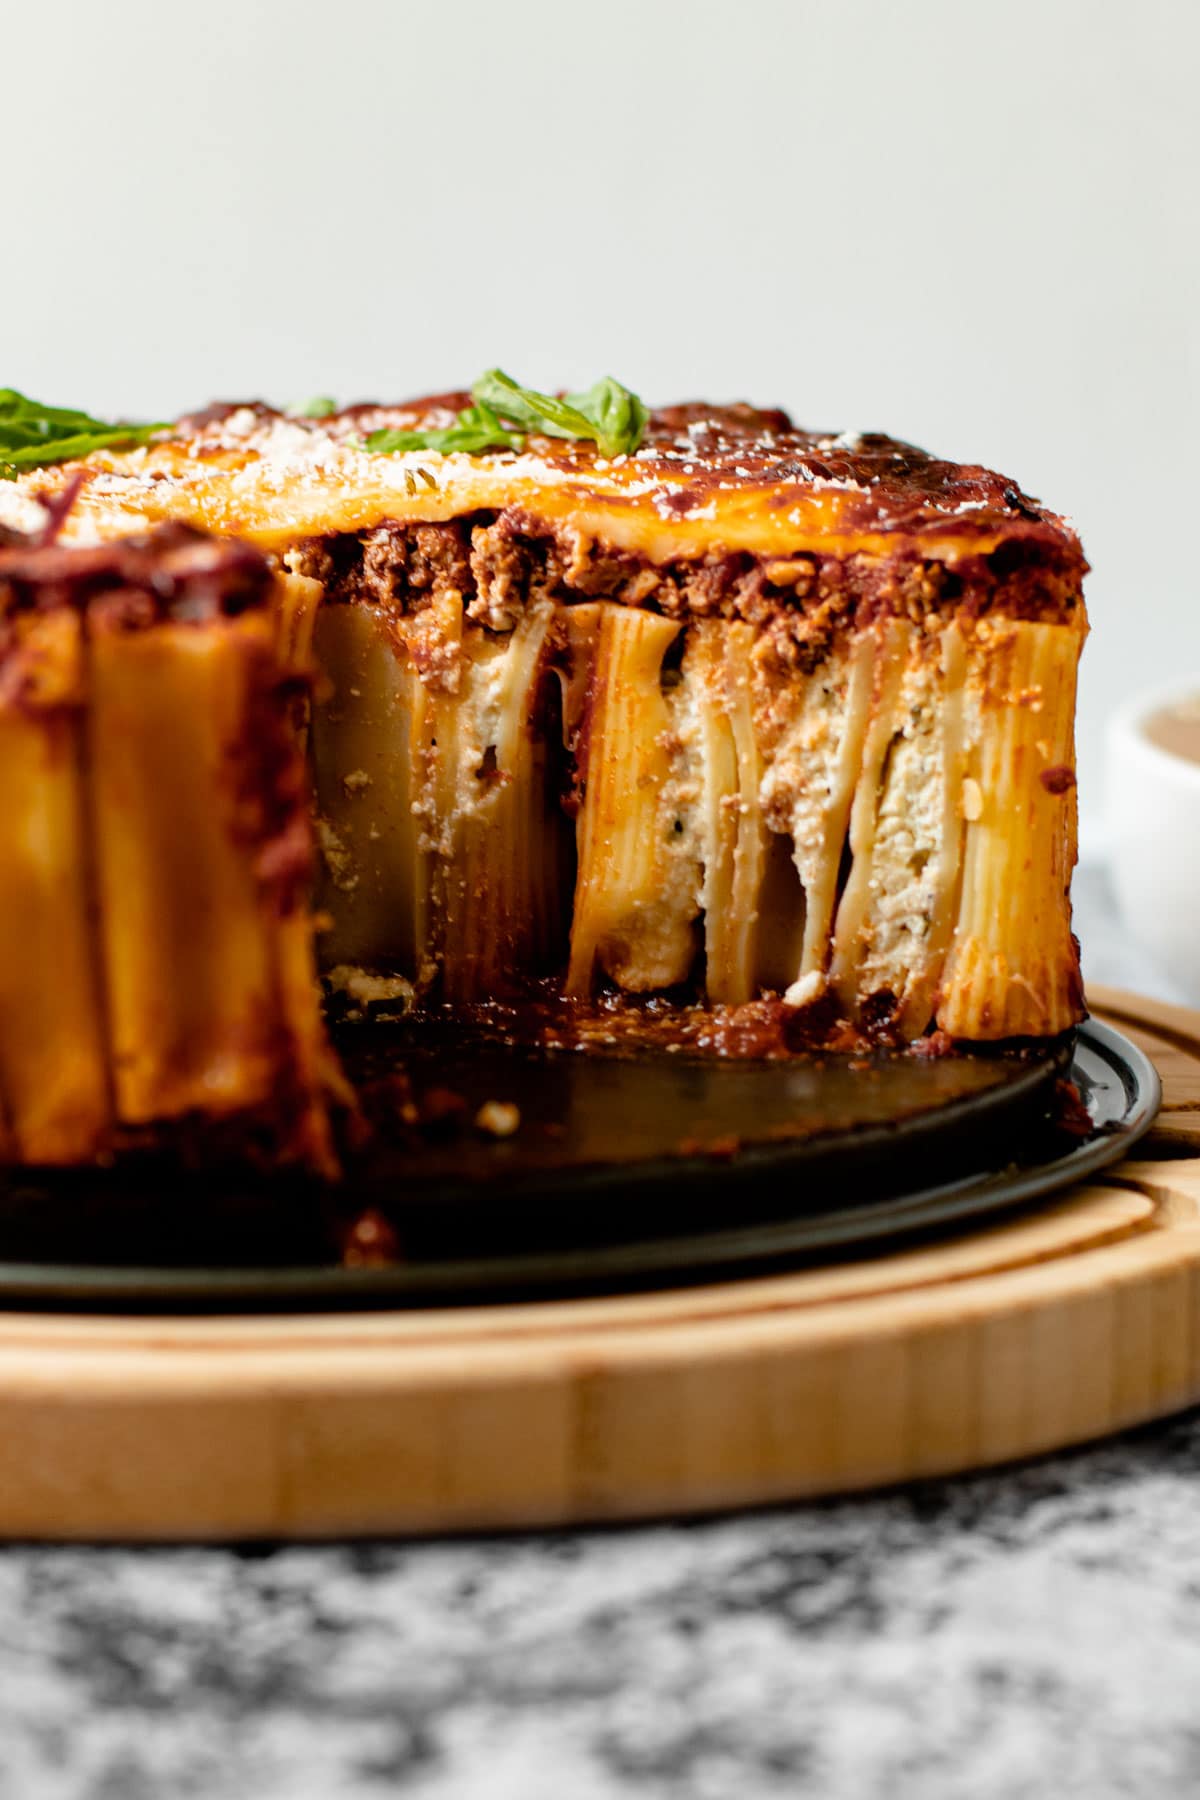
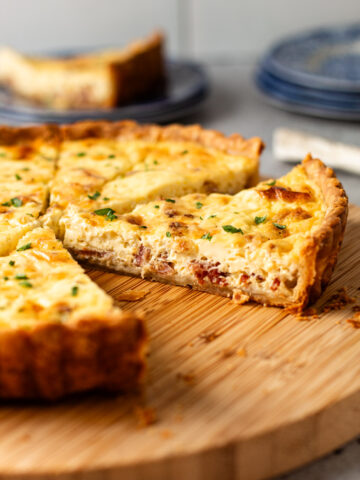
Rigatoni Pie is a visually stunning and super delicious baked pasta dish. Made by placing rigatoni upright in a springform pan, stuffed with flavorful herbed ricotta, topped with meat sauce and mozzarella, then baked to perfection.
Want to save this recipe?
Enter your email & I'll send it to your inbox. Plus, get weekly updates from me!
If you've never heard of a Rigatoni Pie, let me fill you in: This is basically a really pretty version of baked ziti (and an alternative to this Spaghetti Pie). Only, made with rigatoni that is baked vertically. My version is stuffed with ricotta cheese--kind of like a lasagna--and layered with a meat sauce and mozzarella before heading off to the oven to bake into something truly magical.
The first question you might ask yourself when looking at this pretty spectacular looking pie is: is this hard to make? The answer is: not really. It's no more difficult than making lasagna (or any other number of dinners like Shepherd's Pie or a Ham and Cheese Quiche). But, if you are thinking it is tedious to painstakingly place all the rigatoni vertical in a pan, I can say that I timed myself and it took me only 6 minutes. So, not a bad trade-off for a beautiful (and delicious) presentation!
So, let's get to making it, shall we? The article below details all the information you need to know to make these successfully, concluding with the recipe at the end. You can jump around using the menu below, or skip to the end of the article for the full recipe.
Jump to:
Is Rigatoni Pie the same thing as Honeycomb Pasta?
Yes! Admittedly, I'm not a big TikTok user, but apparently, there was a version of Rigatoni Pie that went viral on TikTok and it was called Honeycomb Pasta. I'm guessing it was called this because the rigatoni, when stood up, looks like a honeycomb! In any event, whatever you choose to call this dish, it will be entirely delicious and an absolute crowd-pleaser.
Main Ingredients for Rigatoni Pie
Here is a brief overview of the ingredients needed. The recipe card lists the full recipe with quantities and detailed instructions (located: below this article).
- rigatoni pasta (don't use a mezze rigatoni, as that is too short)
- tomato sauce (just the canned version is good here, so it'll be jazzed up with some meat and spices)
- all the cheese: ricotta cheese + parmesan cheese + mozzarella cheese
- ground beef and Italian sausage (which can just as easily be swapped for whatever meat you have on hand)
- herbs: dried Italian herbs + fresh Italian herbs
- garlic powder + onion powder
- an egg
How to Make It
This recipe takes about as much prep time as it takes to make a lasagna, due to the fact you have to assemble a few ingredients first, and then assemble the actual rigatoni pie. But, don't sweat it! The effort is worth the final results.
Here is a step-by-step overview of how to make this recipe:
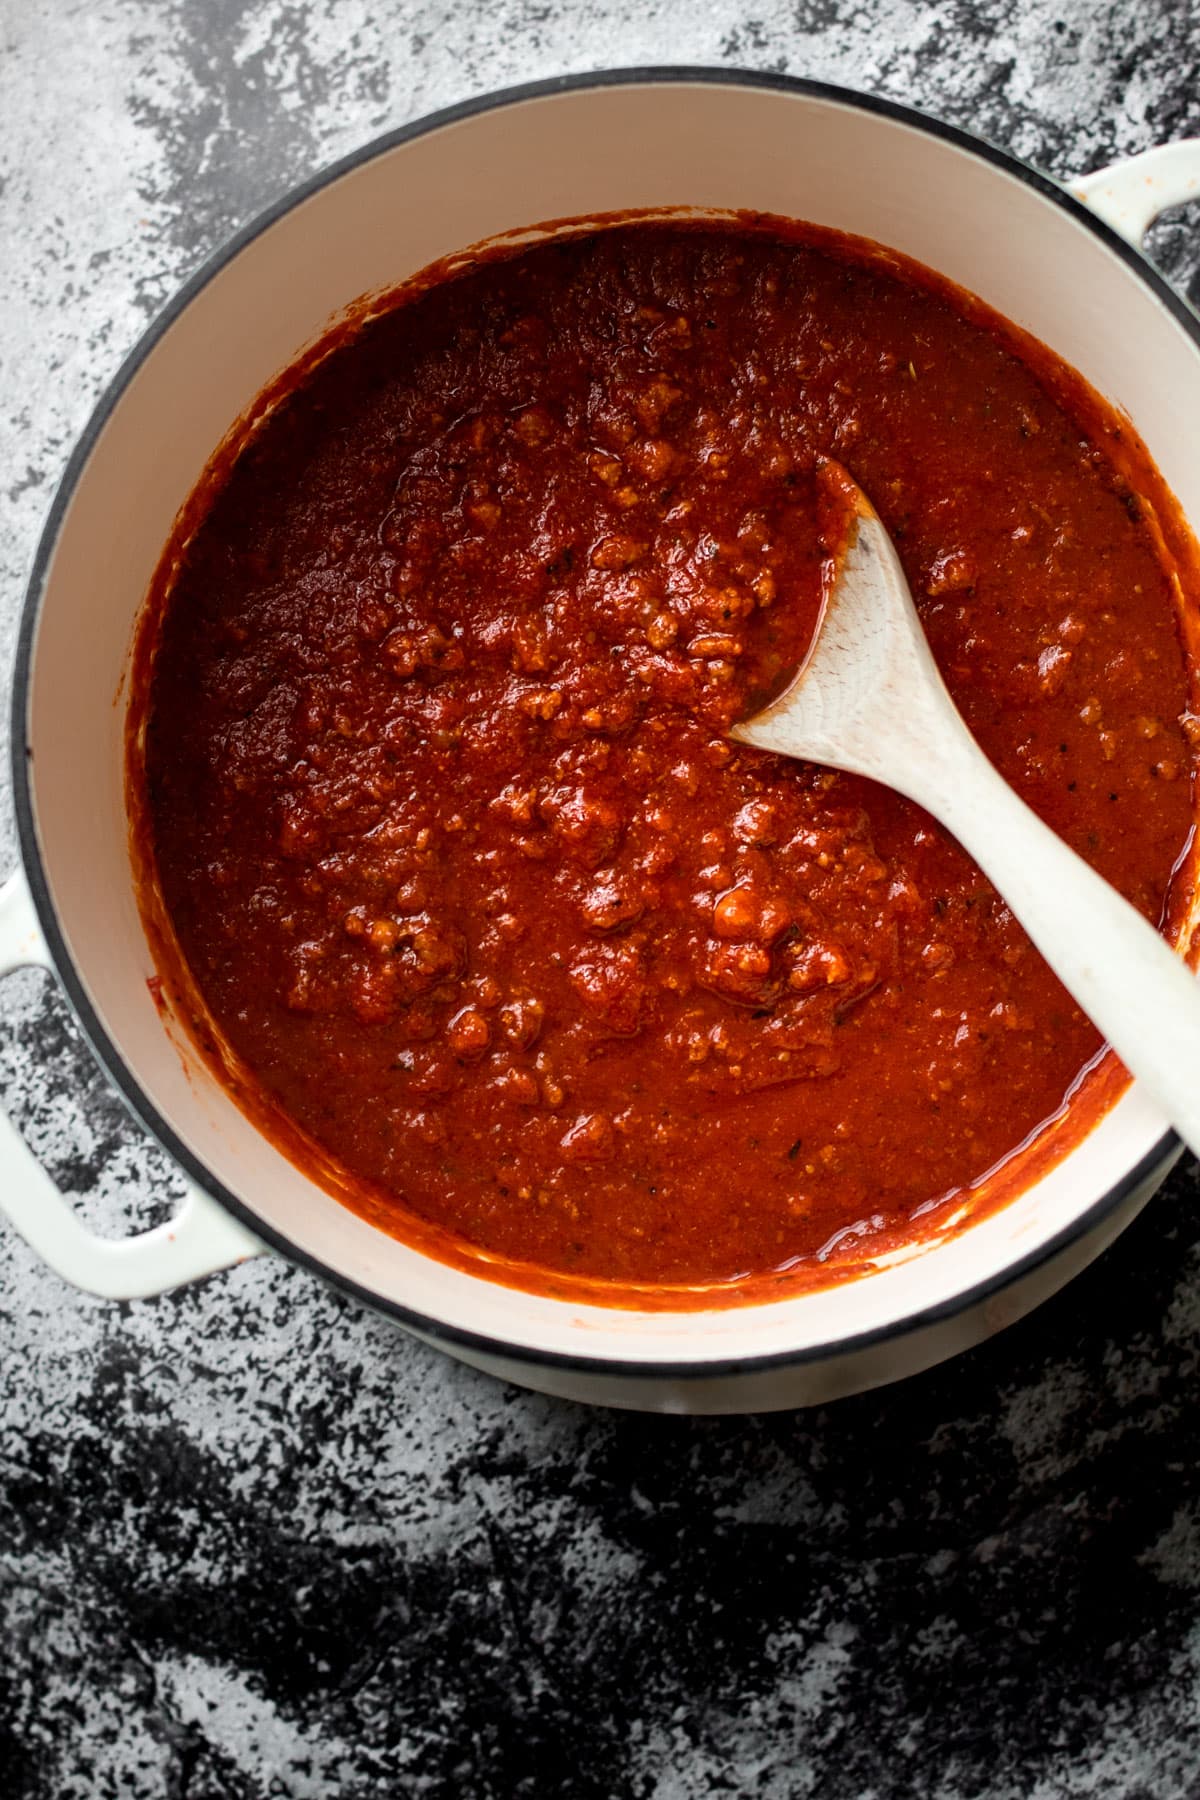
Step 1: Make a quick meat sauce and cook rigatoni.
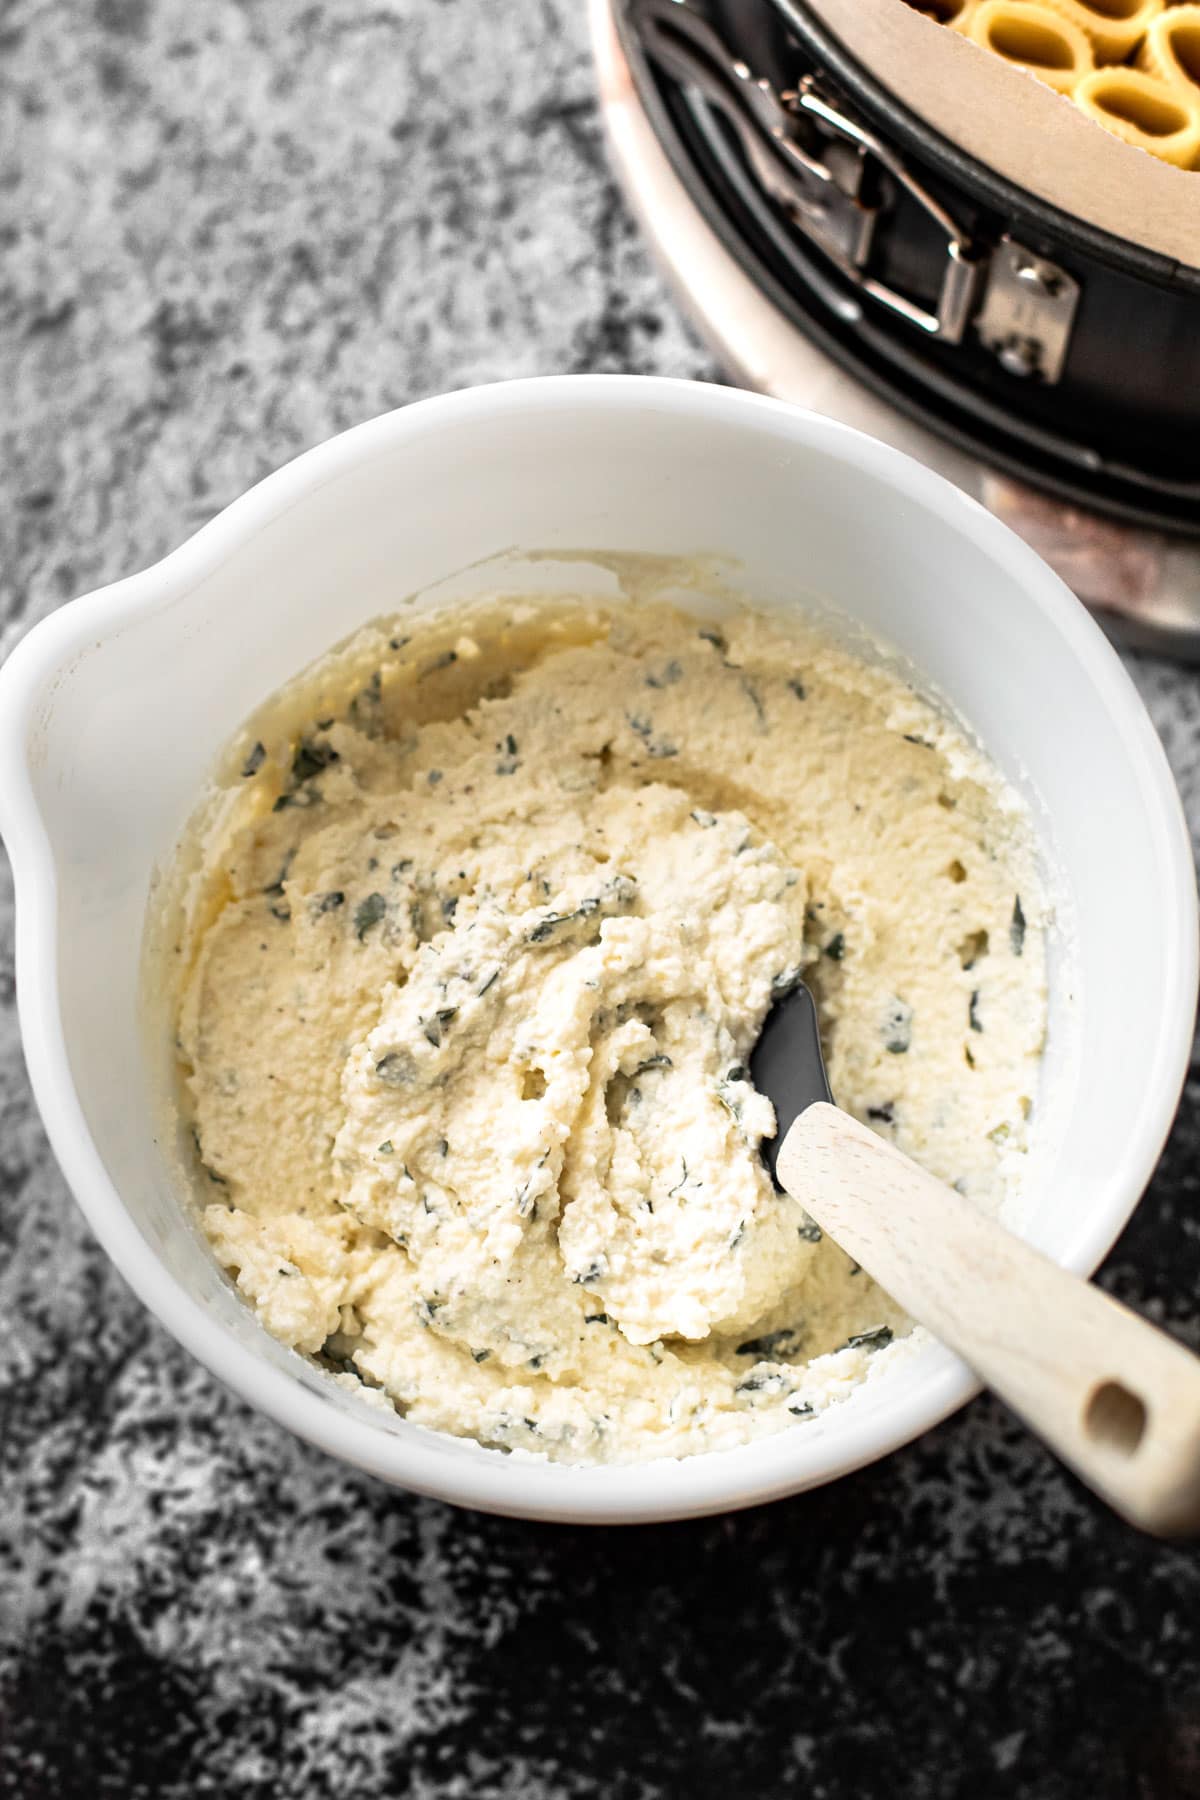
Step 2: Mix together the ricotta filling.
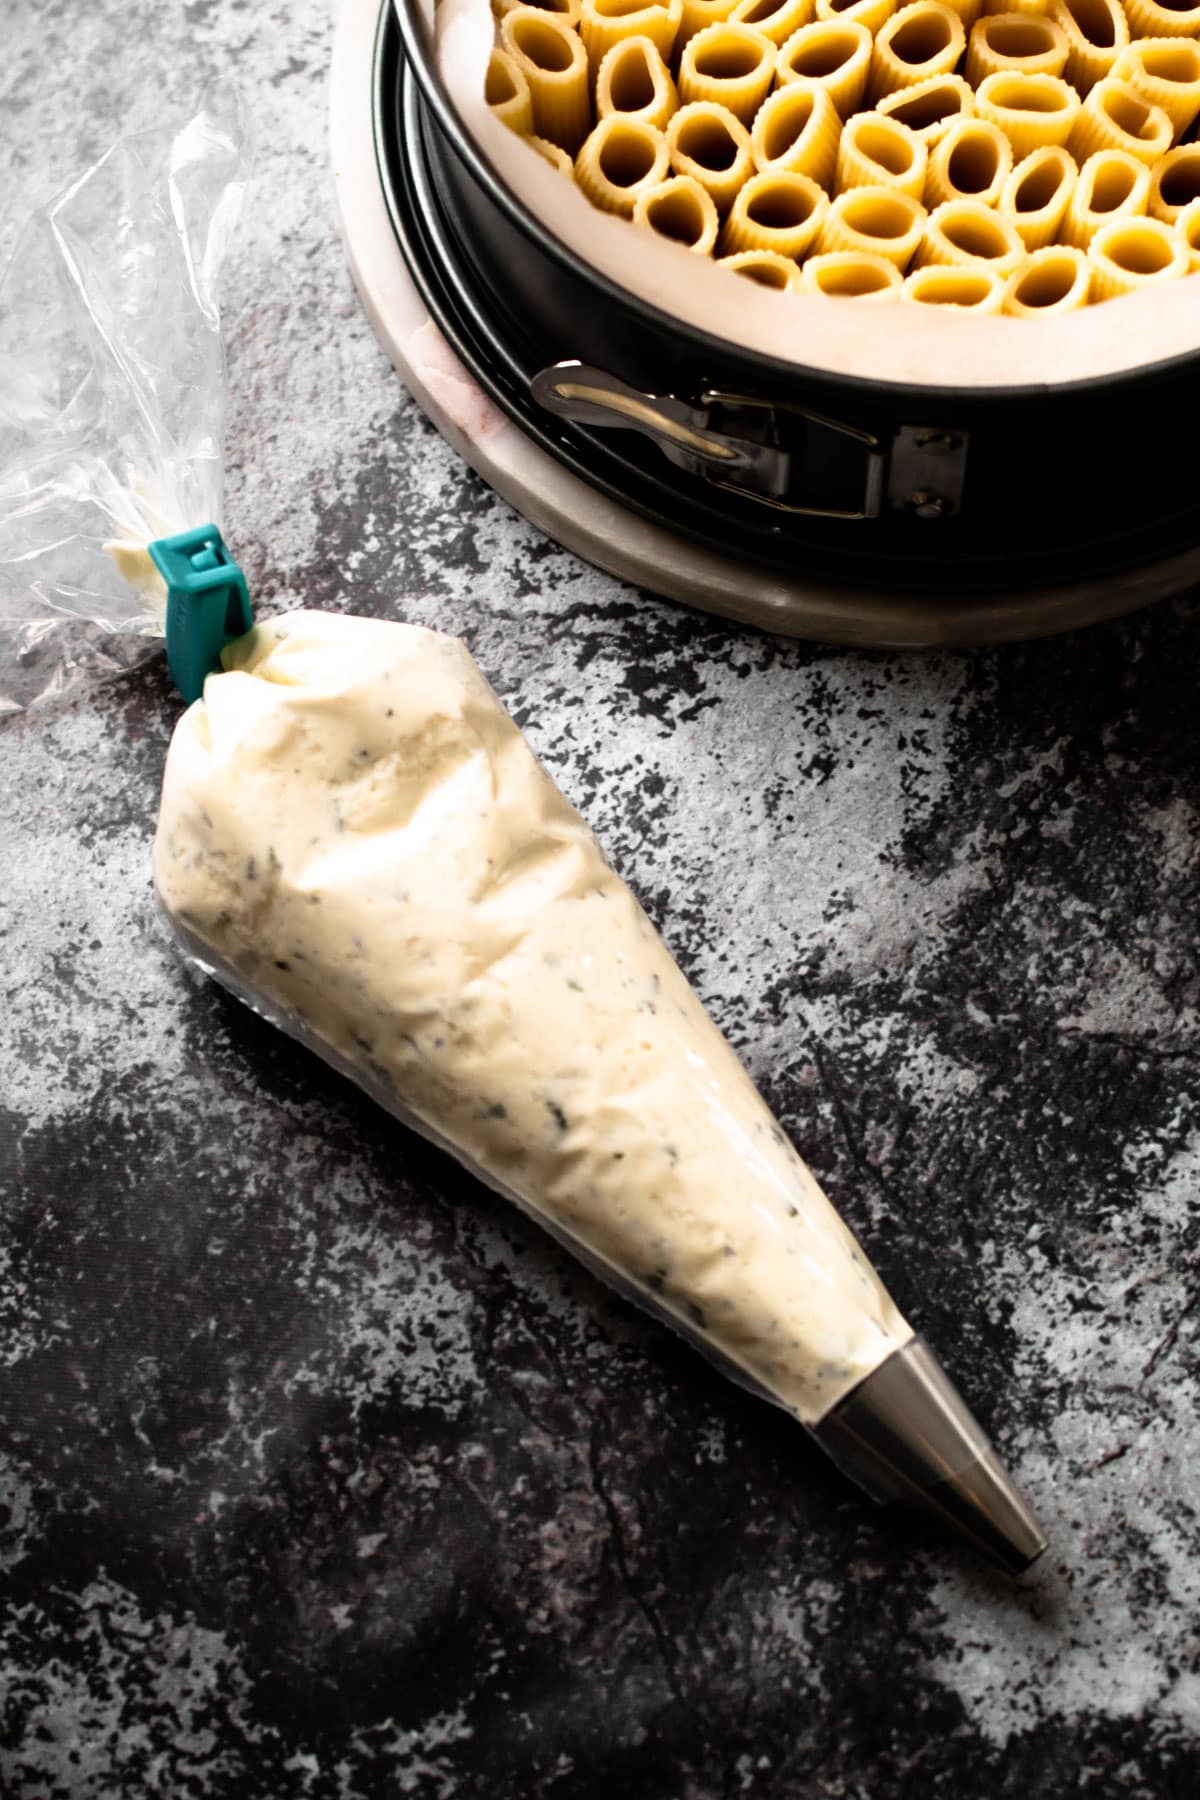
Step 3: Place it in a piping bag, making filling the rigatoni super easy.

Step 4: Place a layer of meat sauce on the parchment-lined springform pan.

Step 5: Stand up the rigatoni.
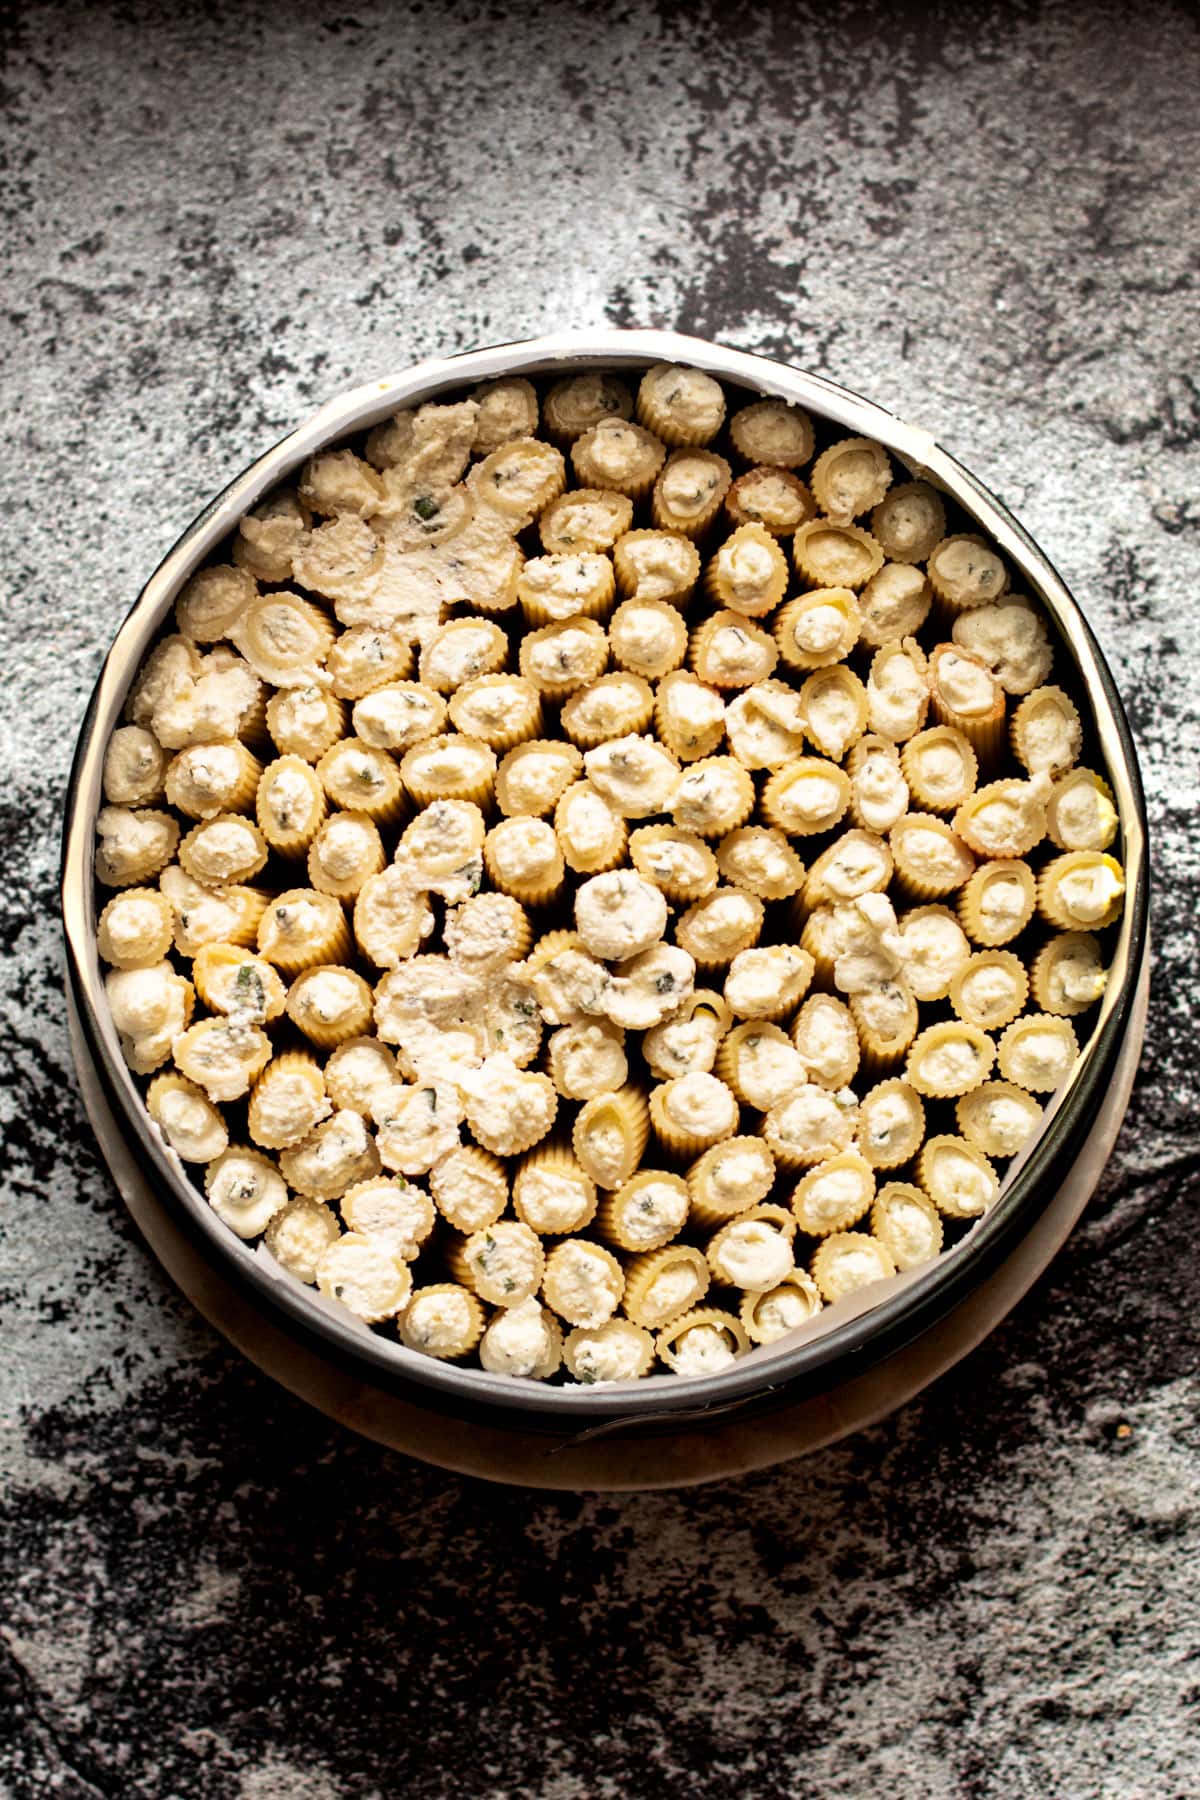
Step 6: Pipe the ricotta filling in the rigatoni.
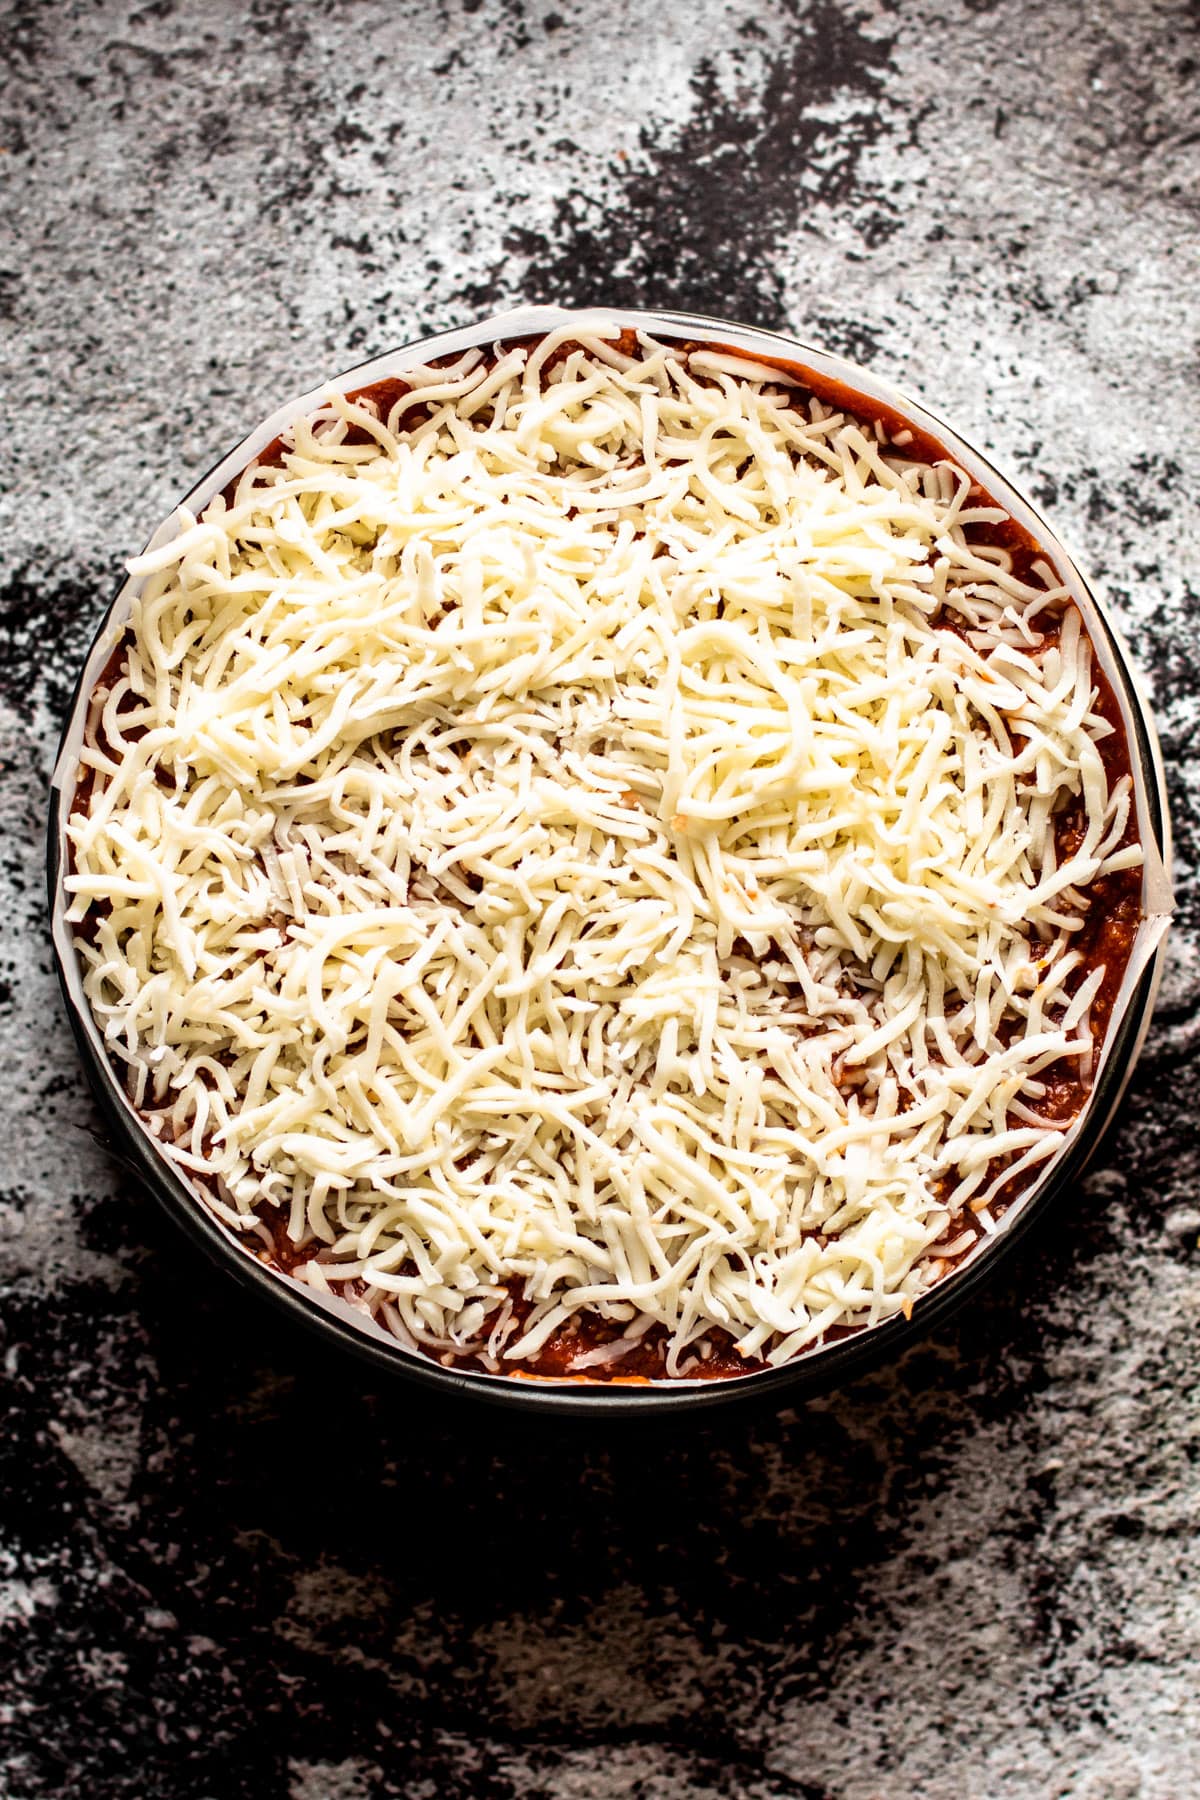
Step 7: Add more meat sauce and mozzarella cheese over the rigatoni.
Step 8: And bake!
Quick Tips
Don't be intimidated by assembling this, as it's very easy to do. Start by being sure all of your pieces for the rigatoni pie are put together and prepared to be utilized. Don't start assembling it until everything is ready. Beyond that, here are some tips for a successful rigatoni pie:
- Using a piping bag is easiest. It's best if you have a plastic one that you can either use a small enough piping tip that will fit inside of the rigatoni. No piping tip? Just snip the bag to a small opening so it can fit inside of the rigatoni.
- If you don't have a plastic or cloth piping bag, you can use a plastic storage bag. However, it can't be one with an "easy-fill" bottom, since you need the edges of the plastic bag to be at a square angle. Fill the plastic storage bag and cut a very small opening on the corner to pipe the ricotta into the rigatoni.
- Don't put oil on your pasta after it's been drained and cooled. Having the pasta be a little bit sticky helps it easily stand up.
- Use a parchment paper collar on your springform pan. This enables an easy release of the rigatoni pie. To line your springform pan with parchment, cut two long strips of parchment with a height slightly higher than the height of the pan. Lightly oil the parchment paper or the spring form pan and place the paper inside.
- Don't pack in the rigatoni too tightly. This allows for some space for the meat sauce to sink down in between, which gives it the right amount of sauce amidst the pasta.
How to Tell When Rigatoni Pie is Done
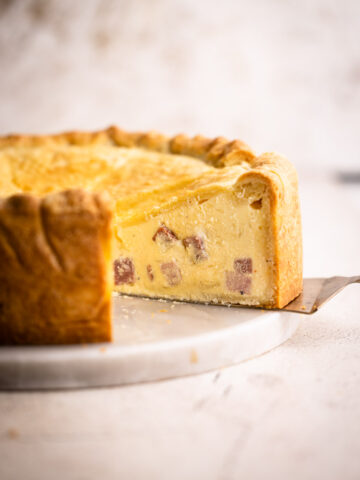
Because there is egg inside the ricotta filling, just like this Savory Ricotta Pie, the rigatoni pie must be thoroughly cooked. The best way to tell if anything in the oven is fully baked is to use an instant-read thermometer to check the temperature. The middle of the rigatoni pie should reach a temperature of above 165ºF to know that the egg ingredient is fully cooked.
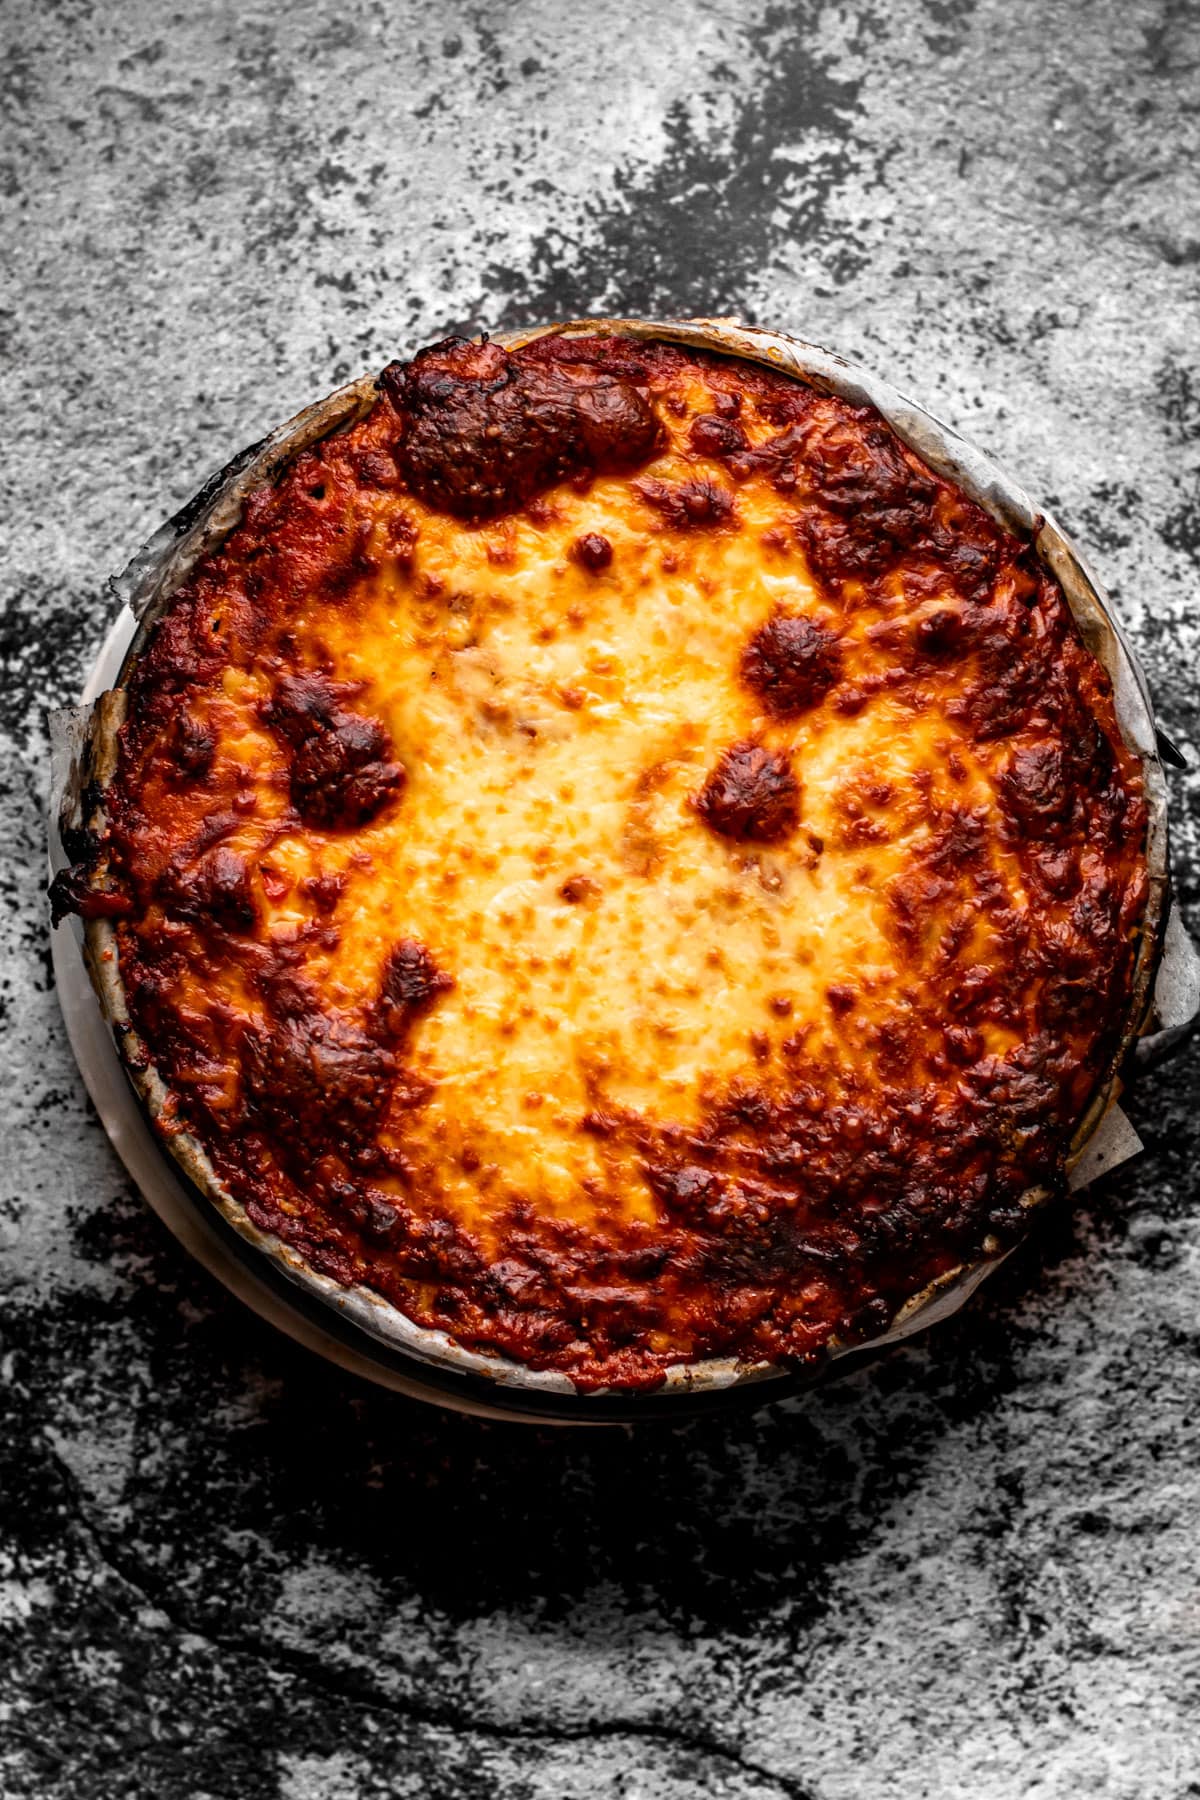
If you don't have a thermometer, a good indication the pie is done is when the outside rim of the cheese has a baked appearance that is bubbling and browning, and the middle of the pie has fully melted and even started to brown lightly.
How to Serve It and Reheat It
Want to keep your rigatoni pasta standing up? Then you'll need to give it time to cool down, which is really no different than any other baked pasta dish. Rigatoni pie needs to cool for a minimum of 20 minutes. In my experience, I found that letting it cool for 30 minutes ensures it will keep its shape nicely when slicing.
This means you won't be serving it when it's steaming, but instead it will be pleasantly warm.
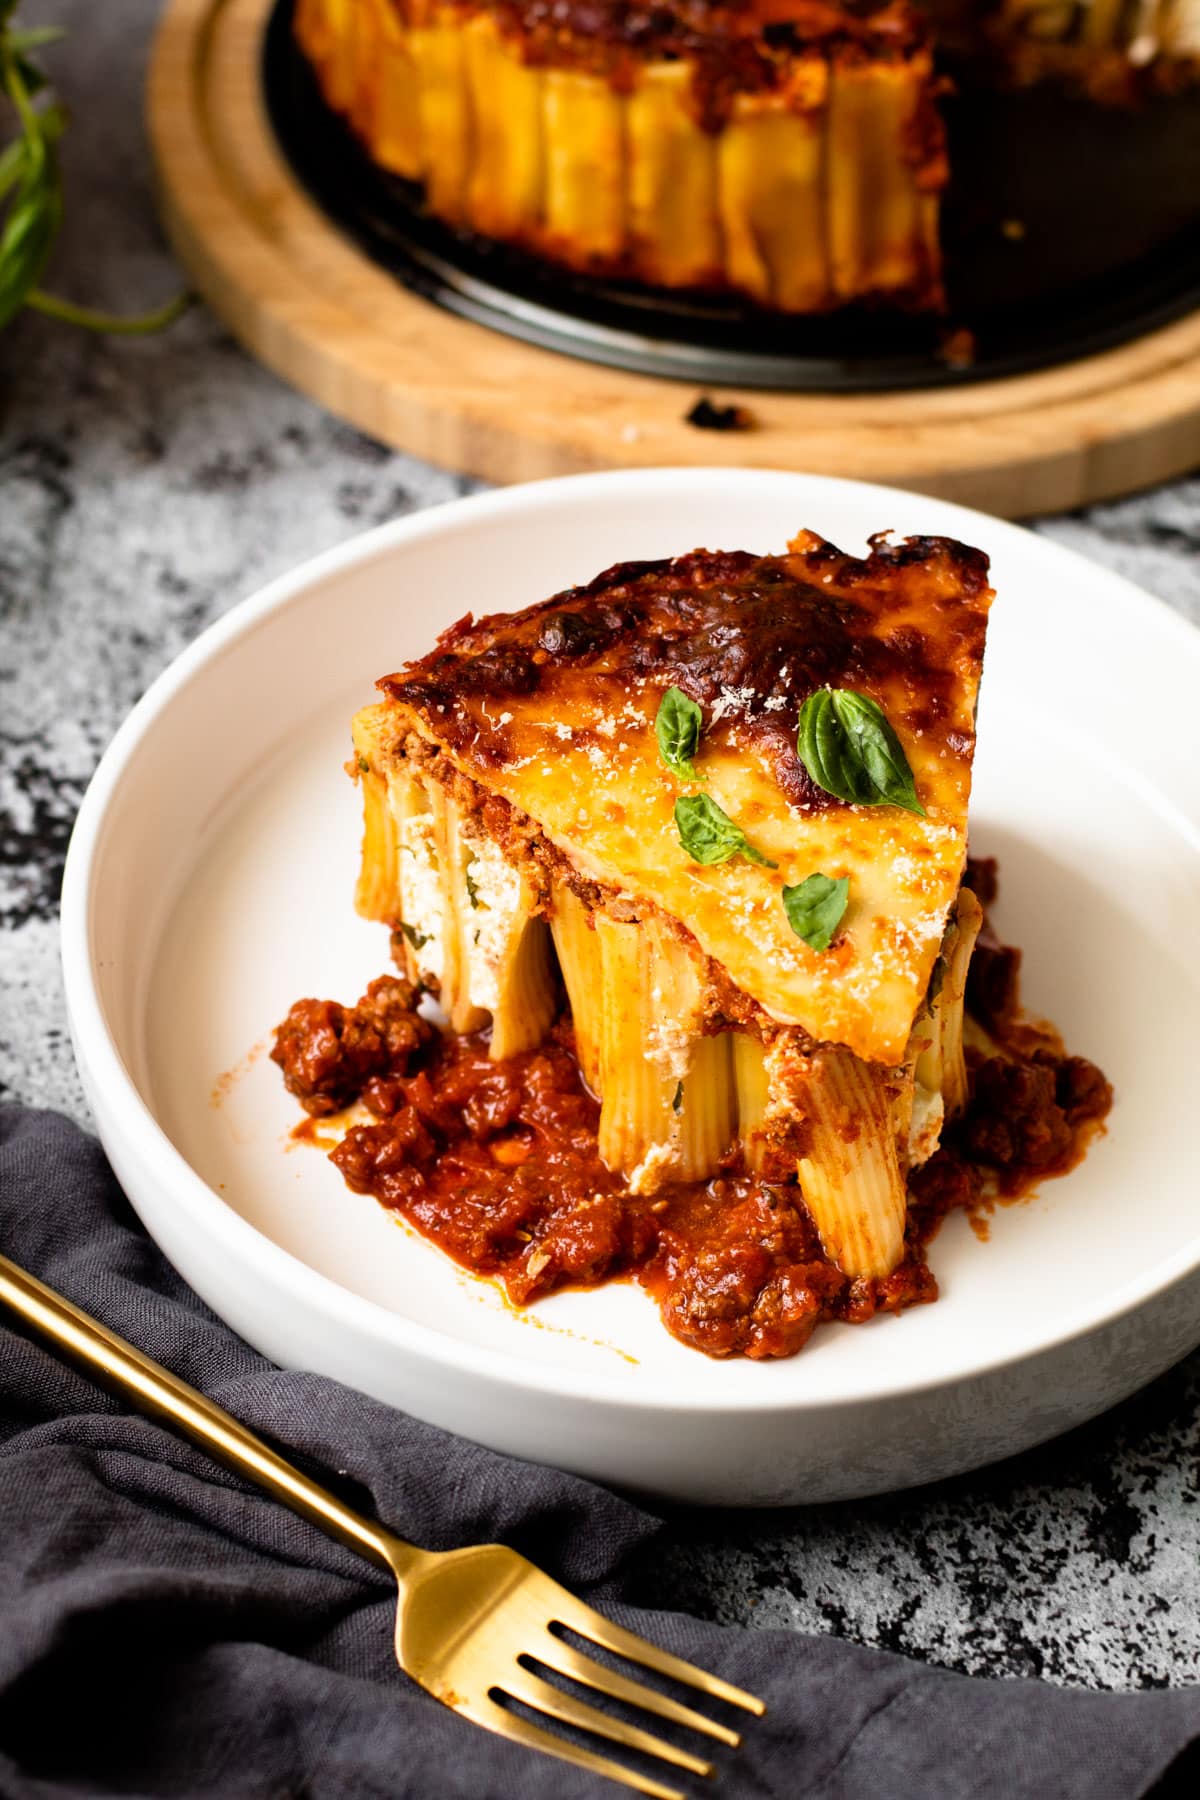
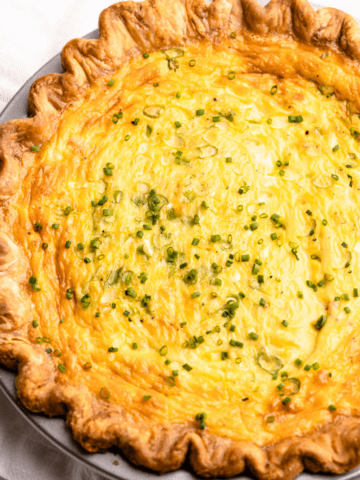
Serve the rigatoni pie with additional warmed meat sauce and a sprinkle of basil or other fresh Italian herbs of parmesan cheese.
Can It Be Made Ahead of Time?
Honestly this pie taste better on day 2 or 3! Baked pasta dishes have a way of doing that. So I'm going to say that this whole dish can be made ahead of time and reheated in the oven. I'd suggest making it up to 2 days ahead of time. Reheat it covered with foil in a 350ºF until it's completely warmed through, which means baked above 135ºF.
Or, it can be assembled up until the point of baking, stored for up to 2 days, and then baked from the refrigerator. The baking will take significantly longer since the assembled pie will have been chilling. It might take up to 30 minutes more to bake.
More Dinner Recipes

I am so honored when you make a recipe from my site! If you make this Rigatoni Pie, please leave a star ⭐️⭐️⭐️⭐️⭐️ rating with your experience! If you have any questions about this recipe, feel free to comment here, and tag me on instagram!
Full Recipe
Ricotta Stuffed Rigatoni Pie
Rigatoni Pie is a baked pasta dish that is not only stunning to look at, but also so delicious. Rigatoni pasta is placed vertically in a springform pan, stuffed with an herby ricotta filling, topped with meat sauce, mozzarella cheese and baked to absolute perfection.
- Prep Time: 00:25
- Cook Time: 01:15
- Total Time: 1 hour 40 minutes
- Yield: Serves 6-8
- Category: Savory Pie
- Method: Bake
- Cuisine: American
Ingredients
For Quick Meat Sauce:
- 1 teaspoon olive oil + more for greasing the pan
- ¼ pound ground sausage
- 1 pound ground beef
- 1 tablespoon Italian seasoning
- 1 teaspoon garlic powder
- 1 teaspoon salt
- ½ teaspoon onion powder
- 3 tablespoons tomato paste
- 1 (28-ounce) can tomato sauce
- 1 cup water
For Ricotta Filling:
- 1 (15 ounce) container ricotta cheese
- 1 egg
- ½ cup grated parmesan cheese
- 2 tablespoons minced basil or other Italian herbs (or 1 tablespoon dry)
- ½ teaspoon salt
- ¼ teaspoon black pepper
For Assembling:
- 16 ounces rigatoni pasta
- 2 cups shredded mozzarella
- Fresh parmesan, for serving
- Basil, for Serving
Instructions
- Pre-heat oven to 400ºF and rub olive oil on the bottoms and the side of a 9” springform pan and place on a rimmed baking sheet. Cut two long strips of parchment paper slightly taller than the height of the springform pan and line the sides of the springform pan. This makes it easier to unmold the pasta dish at the end, and this step is optional.
- Heat oil over medium heat in a large dutch oven. Once hot, add ground sausage and beef and cook until no pink remains, about 7 minutes. Stir in the Italian seasoning, garlic powder, salt, onion powder, and tomato pasta. Cook for 1 minute, until fragrant. Then add the tomato sauce, and water to combine. Bring the sauce to a boil and then reduce the heat to simmer, loosely covered, for 15-20 minutes. The sauce should be thickened.
- Prepare ricotta mixture: In a medium bowl, mix the ricotta, egg, parmesan, herbs, salt and pepper until fully combined. Transfer the filling to a plastic piping bag either with a piping tip smaller than the hole of the rigatoni pasta, or a plastic storage bag with a small hole snipped off of the end.
- Meanwhile, cook the pasta: Bring a large pot of salted water to a boil. Do not add oil. Add rigatoni and cook, uncovered, until the pasta is al dente—about 2 minutes less than the package instructions state. Drain the pasta through a colander and rinse with cool water until it is no longer hot.
- Spoon in an even layer of meat sauce in the bottom of the prepared pan. One by one, stand up the rigatoni pasta in concentric circles in the prepared springform pan. Pack them so that they all stand up vertically on their own but not so tightly that there is no space between them.
- Fill each rigatoni tube with just enough ricotta filling to reach the top. Place 1 cup of meat sauce on top, and smooth it over with a spatula so that the sauce fills the gaps in between the rigatoni. Place another 1 cup of meat sauce and smooth it over. Top with 2 cups of mozzarella cheese.
- Lightly oil a piece of aluminum foil, and loosely cover the top of the springform pan.
- Bake in the center of the oven for 35 minutes. Remove the aluminum foil and continue to bake until the cheese is bubbly and golden on the outer edges and beginning to darken in spots towards the center. The middle of the rigatoni pie should have reached an internal temperature of at least 165ºF.
- Let the pie cool for at least 20-30 minutes before unmolding.
- To unmold, run a knife around the edges of the pie. Unsnap the springform pan and carefully remove the sides of the pan. If the rigatoni pie is still steaming hot, wait a bit longer to cut in to keep the pie structure intact.
- Slice and serve with warmed additional meat sauce, and garnish the pie with additional parmesan cheese and fresh herbs.
Notes
This recipe was tested using Diamond Crystal coarse kosher salt. If you use Morton's kosher salt or fine salt, decrease by about half for volume, or use the same amount by weight.
If you don't have a piping bag, a plastic storage bag works; just avoid the "easy-fill" kind because you need it to have an actual corner. Fill it, then cut a small corner for piping the ricotta into the rigatoni.
This pie actually tastes better on day 2 or 3, so feel free to make it ahead—up to 2 days in advance—and simply reheat covered with foil in a 350ºF oven until thoroughly warmed through, ensuring it reaches above 135ºF.
Rigatoni pie needs to cool for a minimum of 20 minutes, or 30 if you really want it to stay together for a pretty presentation. This means you won't be serving it when it's steaming, but instead it will be pleasantly warm.
Looking for something else? The article above the recipe is always a great first place to start! This Stuffed Rigatoni Pie recipe was developed with love, and I strive to give as many explanations, tips, step-by-step photos and technical advice as necessary for success.
Some of the links on this page may be affiliate links. Everyday Pie is a participant in the Amazon Associates Program. As an Amazon Associate I earn from qualifying purchases, at no extra cost to you.
Sylvia
Making this now. Do you add marina to the bottom of the cheesecake pan like in the photo? It doesnt say this in the recipe card, but does in the step by steps.
Cin
Why on god’s green earth would anyone waste their time standing rigatoni or penne on end to make this casserole? If you want stuffed pasta make cannelloni or shells or manicotti. How foolish.
Kelli Avila
The same reason somebody takes anytime to create anything either beautiful or delicious or in this case both? Nobody is forcing you to make this.
Skip
Oh my, this was awesome! I followed the recipe, but I added a few sausage links to the sauce for extra sauce to go with the rigatoni.
I used another plastic bag with a bit larger hole for sauce in order to get the sauce further down between the rigatoni.
It is a REAL show-stopper. Thank you for sharing this recipe.
Amy Breault
I thought this was delicious (and so did my family). It was a time consuming undertaking but well worth it with the end product.
Thank you for a GREAT recipe!
Kelli Avila
Hi Amy! Agree with your assessment: it's a project, but a worthwhile one! So happy you and your family enjoyed the recipe.
Valerie Mihalik
Totally amazing! I used gluten free rigatoni and omitted the egg from the filling due to family food allergies). It is a crowd pleaser and definitely worth the effort!
Janis
Do you mean “hole” or “whole” of rigatoni pasta?
Kelli Avila
Hi Janis, do you mean in step 3 of the recipe? If yes, thank you for catching that typo---it's been updated to reflect the correct spelling.
Vincent
Made this before finding your recipe. I used ricotta, mozzarella, parmesan, basil and spinach, blended in a processor before bagging. Stuffed each rigatoni then placed into spring pan which had some thin mozzarella on bottom to aid the cut pieces stand.
Andrea S.
This is a great one! I have a bad/good habit of looking at recipes and tweaking for our desired tastes. This one is good,even if all you do on a lazy night is brown 1 # of ground beef and throw in a jar of sauce.
We like to add pesto or basil paste to the sauce, a little rosemary to the ricotta. The process is the most important part. Sorry to the guy that didn't have patience for the noodles. I start either in the center, or tip the pan slightly to start on one side and move across. I also have 2 sous chefs willing and at my beckon call.
We even had a tragedy last time we planned on making it. Dad had snuck in and ate almost half of the ricotta. (Can't blame him, it is sinful) We made due by adding heavy cream and shredded Mozzarella. I might have even liked it better.
Rustic and great for a cold weather, stick to your ribs kind of meal.
Bill
Not worth the effort to get the rigatoni to stand upright! Sorry I'll pass on this one!
Kelli Avila
Did you try it to know it wasn't worth the effort? Also, not sure this is the most productive comment but more of an opinion that wasn't asked for.
Stephanie Campbell
Hi, Kelli. When you have comments, reviews, and feedback options for people who want to try your recipe, you’re asking for an opinion.
I’m making the recipe now, and it’s worth it to me, and it’s also okay if it isn’t for other people.
Jeff the Chef @ Make It Like a Man!
Thanks for this recipe. I made it, and it was fantastic. Thanks especially for all your tips and advice.
Ilene
Loved this recipe! My husband raved over it and asked that I make it again. It is more time consuming than other pasta dishes but filling the rigatoni with the ricotta mixture was actually therapeutic and didn’t take nearly as long as I imagined it would. It is definitely worth the extra effort to get that wonderful filling in each bite. I was out of tomato sauce so I used a jar of my favorite marinara and used fresh onion and garlic because I have an abundance of both but kept everything else the same. I’ll for sure make this again and use the exact recipe next time. Thanks, Kelli, for a delicious recipe!
Lise
Why does it not say time and temp
Kelli Avila
Hi Lise, it states at the beginning of the recipe. But I've actually adjusted it to move down in the recipe so it reads easier!