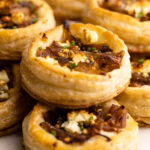
Caramelized Onion Tarts
Salty, sweet, crunchy, and so delicious, these Caramelized Onion Tarts made with puff pastry are the perfect celebratory appetizer or snack.
- Prep Time: 00:20
- Cook Time: 01:00
- Total Time: 1 hour 20 minutes
- Yield: 12 Tarts
- Category: Pastry
- Method: Bake
Ingredients
- ½ batch rough puff pastry or classic puff pastry (or store-bought, see notes)
- 3 large onions, sliced thin
- 2 tablespoons olive oil
- ¼ teaspoon salt
- 1 tablespoon balsamic vinegar
- 3 ounces crumbled feta (about ¾ cup)
- egg wash (1 egg whisked with a teaspoon of water)
- 1 small bunch of chives, sliced fine
Instructions
- Prepare rough puff pastry or defrost frozen puff pastry. If you make it, you will only need half a batch. The remaining half can be frozen. Or you can double the filling for this recipe, and make 24 tarts.
- Make the caramelized onions: Heat oil in a wide, heavy-bottomed pan on medium heat. Add onions and cook for 10 minutes, stirring a few times to make sure all of the onions get contact with the pan and start to soften. Add pinch of salt and stir to combine. Lower the heat to medium low and let onions sit undisturbed for 20 minutes. Continue to cook for 15 more minutes at this point, stirring the pan every 5 minutes for a total of 3 times. Stir in balsamic vinegar and cook for about 5 more minutes. This is the point where the onions have the optimum texture and taste. If you’d like your onions to be completely reduced and jammy, cook for another 10-15 minutes, but this is optional! Let the onions cool to room temperature.
- In a small bowl mix together the onions and feta and set aside.
- Line a 13x18” sheet pan with a piece of parchment and preheat the oven to 400ºF.
- Roll out the puff pastry on a floured surface (remember, you are only using half of the batch if you've made this rough puff recipe) to about ⅛” thickness, or about a 10” by 14” rectangle. Or if you are using store-bought, then simply remove it from the package according to the instructions and lay it out on a lightly floured surface so the puff doesn’t stick to the counter.
- Using a 3-inch circle cutter (or similar), stamp out the pastry. You should be able to stamp out at least 12 circles or more. I don't recommend re-rolling the scraps for this purpose, but you can save them for something else.
- Now dock the pastry: Using a 2” cutter (or similar) make an indentation in the center of the circle of pastry, but make sure not to press all the way through. Repeat with all of the pastry. And finally, take a fork and dock the middle of the pastry to prevent the dough from rising too much during baking.
- Place the pastry on the sheet pan evenly spaced apart. Brush the edges with an egg wash.
- Place a heaping tablespoon of onion and feta mixture in the center circle.
- Bake on the middle rack for 15-18 minutes, or until the pastry is puffed and lightly golden.
- Remove the tarts from the oven, and let them cool slightly before transferring to a cooling rack.
- Sprinkle with sliced chives and serve warm or room temperature.
Notes
As a baking site, I'm always going to say homemade puff pastry is better than store-bought. But it's also ok to use store-bought too! Different brands come in various quantities, so you may have more or fewer tarts depending on your brand and your size cutter. But the spirit of the recipe is the same no matter what.
Leftover caramelized onions will keep for a few days in the refrigerator or a few months in the freezer.
The size of the tarts can vary, depending on the quantities you wish to bake up. If you want more tarts, you can use a smaller cutter. During testing, I made as few as 12, listed here, and as many as 24 in a single recipe by using a smaller cutter. The baking time will vary slightly, though not by a lot.
Have a question or looking for tips? The text written above the recipe is always a great first place to start! These Caramelized Onion Tarts were developed with love, and I always include loads of explanations, tips, step-by-step photos and technical advice shared before the recipe.
These tarts are best eaten on the day they are made. However, they can be stored in an air-tight container in the refrigerator for about two days. They will get stale as time goes on. If desired, they can be re-warmed for a few minutes to get that fresh baked taste. I have frozen them during the development of this recipe, and while they don't taste as best as fresh once defrosted and reheated, they still tasted pretty good! I had success toasting them from frozen, defrosting and then toasting.
The total time to make this recipe depends on whether or not you make your own puff pastry, so keep that in mind.
Find it online: https://everydaypie.com/caramelized-onion-tarts/
