Rough Puff Pastry
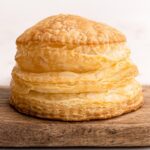
Rough Puff Pastry, also known as Blitz Puff Pastry is a more streamlined and less fussy version of the classic French pastry dough. Used for so many different desserts, this layered flaky and buttery pastry is easier to make than you think! This extensive tutorial walks through all the steps on how to make this shortcut rough puff with step-by-step photos, video and lots of tips! Be sure to read through the entire post if you are new or new-ish at making rough puff.
- Prep Time: 00:30
- Resting / Chilling Time: 04:15
- Total Time: 4 hours 45 minutes
- Yield: (2) 18 ounce puff pastry blocks
- Category: Pastry
- Method: Lamination
- Cuisine: Modern French
Ingredients
- 4 cups (480g) all-purpose flour (see note)
- 1 teaspoon kosher salt
- 1 tablespoon (13 grams) granulated sugar
- 2 cups (450 grams) unsalted European butter
- 1 cup (227 grams) ice water
Instructions
- In the bowl of a stand mixer fitted with a paddle attachment, combine the flour, sugar, and salt on low speed.
- Dice the cold butter into large chunks (one stick should be cut into 8 pieces). Add in the butter, and turn the mixer on low (cover the bowl with a towel if flour starts to spill out). Let the paddle cut the butter into the flour for about 1 minute. There should still be large chunks of butter, with most of them being the size of a walnut, in the flour.
- With the mixer running, slowly stream 3/4 cup cold water into the dough. Mix until most of the dough comes together around the paddle. If there are any dry patches, stream the remaining 1/4 cup water in, a tablespoon at a time, until the dough is fully hydrated with no dry patches. Shut off the mixer. Scrape together the dough and transfer it to a work surface. The dough should hold together easily when it is picked up. Quickly shape the dough in a rough 10x8” rectangle and wrap in plastic.
- Transfer to the refrigerator and let it rest for 1-2 hours, or until the dough is about 50 degrees. If your kitchen is hotter, it may take longer for the dough to cool down.
- On a lightly floured work surface, roll the dough, dusting with flour if necessary, until 14 inches long, and 10 inches wide. The dough will be quite rough at this point, with butter pieces potentially sticking out of the sides. Brush off any flour with a dry pastry brush from the surface of the dough.
- Grab the top short side of the dough rectangle and fold the dough ⅓ of the way down. Repeat with the bottom short side like a business letter. This is a simple turn. Gently press down on the layers with a rolling pin so the layers stick together.
- Rotate the dough rectangle clockwise 90 degrees so the longer edge is now vertical and facing your right (reference the video or step-by-step photos to see this in action). Repeat the process as before to make 1 more simple turn.
- Repeat the folding steps a third time, stopping before folding the dough into thirds. Clean up the edges of the dough using a pastry wheel or a long, sharp knife. The goal after this third fold is to create a straight even rectangle of dough. Finish the turn by folding the dough into a business letter, as done before.
- Wrap tightly in plastic again and freeze for 15 minutes, then refrigerate for 1 hour.
- Repeat this process two more times (removing the dough from the refrigerator, completing two turns, chilling the dough again as instructed, and then repeating with two final turns) for a total of 5 turns.
- Cut the dough in half and wrap each piece of finished puff pastry blocks in plastic wrap and let it rest for a total of 2 hours. After this point it is now ready to use.
- When ready to use, roll out one block of pastry to a thickness of about ¼” to ⅛”, and use as desired or directed in a recipe. See notes in the post for more information about how to store it, freeze it, use it and bake it!
Notes
Have a question or looking for tips? The text written above the recipe is always a great first place to start! There are always loads of explanations, tips and technical advice shared before the recipe.
Weighing your flour is the most accurate way to measure. If you aren't going to weigh it, make sure to spoon it into the cup, and then level it off. If you scoop the flour out with the measuring cup and then level, it could change the outcome of the final product.
I used a thermometer in the beginning when I was learning what was an ok temperature for the dough to be rolled out. If your house is very hot, you may need to chill your dough for longer in between. One trick I noticed was that if you held out the block of dough flat on your hand, if it was soft enough to weep down, then it is too warm. If it held firm and stayed flat, then it is likely cold enough to start rolling out.
Find it online: https://everydaypie.com/rough-puff-pastry/