 Buy Now →
 Very Cherry Ice Cream
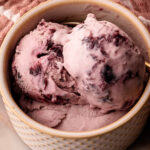
This Cherry Ice Cream recipe is ultra-creamy and has a bold cherry flavor. I love that this process is as streamlined as possible (aka no egg tempering) while still resulting in the most delicious cherry ice cream ever.
- Prep Time: 00:10
- Churning Time: 00:30
- Cook Time: 00:15
- Total Time: 00:55 plus chilling time
- Yield: about 3 pints
- Category: Ice Cream
- Method: Churned
Ingredients
- 16 ounces pitted sweet cherries
- ¾ cup (150 grams) granulated sugar, divided
- 1/4 cup tart cherry juice (or 2 teaspoons fresh lemon juice)
- ¼ teaspoon coarse kosher salt
- 2 tablespoons dry milk powder
- 2 large eggs
- 1-1/2 cups (456 grams) heavy cream
- 1 cup (226 grams) whole milk
Instructions
- In a medium pot, stir together the cherries, 1/4 cup of the sugar, cherry juice, and salt. Cook over medium heat, stirring frequently, until bubbling. Using a fork or a potato masher, mash the cherries to break them up. Reduce the heat to medium-low and simmer for 5 minutes.
- Shut off the heat and set a fine-mesh strainer over a medium bowl. Strain the cherry mixture through the strainer, pressing out as much juice as possible from the cherries. Set the cherry juice aside.
- Transfer the cherry solids to a storage container and let cool. Once cool, cover and transfer to the refrigerator until ready to use.
- Set up an ice bath with two nesting metal bowls.
- In a medium bowl, whisk together the remaining ½ cup of sugar and milk powder. Add in the eggs and whisk vigorously for one minute, until the mixture is lightened.
- Whisk in the cream, milk, and reserved cherry juice.
- Transfer the mixture to a clean heavy-bottomed medium pot.
- Cook over medium heat, stirring constantly with a rubber spatula, especially along the edges and the bottom of the pot, until the mixture reaches 175°F on an instant-read thermometer, about 8 minutes. The mixture will be slightly thickened. To check if the custard is set without an instant-read thermometer, coat a wooden spoon with the custard. Draw a horizontal line on the back of the spoon with your finger. If the line “holds,” then your custard is set. If the line collapses immediately, the custard needs another minute or so. Be careful not to bring the mixture to a boil; this will curdle the custard.
- Immediately shut off and remove the pot from the heat. Continue to stir the custard for 1 minute. This helps bring it all the way up to 180ºF.
- Strain the custard through a clean fine-mesh strainer into the inner bowl of the prepared ice bath.
- Cool the custard in the ice bath to room temperature, stirring occasionally.
- Chill the custard thoroughly in the refrigerator until at least 40ºF, preferably overnight.
- Freeze the custard, following the recommended manufacturer’s instructions of your ice cream maker, until the ice cream has reached a soft-serve consistency. In the last minute of churning, add the reserved cherry solids.
- Transfer the ice cream to one or more airtight containers. Place a piece of parchment on the surface to prevent any freezer burn. Freeze until firm, at least a few hours.


Notes
Don't forget: Freeze the ice cream machine canister 24 hours before you plan to churn the ice cream if you machine requires it!
You can use fresh or frozen cherries here. This recipe has also been tested with sweet dark cherries and tart red cherries. Use whatever cherries you like. The quantity of sugar in this recipe is developed for dark sweet cherries. You could add 1/4 cup more sugar if you are using tart cherries. Just make sure whatever cherries you use are pitted first! Frozen cherries are fine (it's what I almost always use), and they don't need to be defrosted before cooking.
Milk powder can be found in most grocery stores in the baking aisle. It is highly recommended for this recipe, but if you absolutely cannot find it, you can skip it. It will result in less creamy ice cream that may be harder to scoop.
This recipe was tested using Diamond Crystal coarse kosher salt. If you use Morton's kosher salt or fine salt, decrease the volume by half. See this Salt Guide for more information about how salt affects your cooking and baking.
You can use a separate bowl to whisk everything together, as the recipe instructs, or you can mix it right in the pot. If you do mix it in the pot, be sure to scrape up the sides well so no eggs are hiding in the crevices along the edges.
Homemade ice cream is best consumed within a week or two of making it. Different factors can affect this timeline, including how cold your freezer is, what type of ice cream it is, what container it is kept in, and if it has thawed at any point in the freezing process. To help prevent freezer burn, place a piece of parchment paper on the surface of the ice cream in the storage container to minimize air exposure from the ice cream. Freeze promptly and thoroughly. Store the ice cream container in the coldest part of your freezer.
Find it online: https://everydaypie.com/cherry-ice-cream/